APP开发避免不开系统权限的问题,今天做定位时需要在不允许定位的时候做一些操作,所以,今天就大概的了解了一些。
权限分类
升到iOS10之后,需要设置权限的有:
麦克风权限:Privacy - Microphone Usage Description 是否允许此App使用你的麦克风?
相机权限: Privacy - Camera Usage Description 是否允许此App使用你的相机?
相册权限: Privacy - Photo Library Usage Description 是否允许此App访问你的媒体资料库?
通讯录权限: Privacy - Contacts Usage Description 是否允许此App访问你的通讯录?
蓝牙权限:Privacy - Bluetooth Peripheral Usage Description 是否许允此App使用蓝牙?
语音转文字权限:Privacy - Speech Recognition Usage Description 是否允许此App使用语音识别?
日历权限:Privacy - Calendars Usage Description
定位权限:Privacy - Location When In Use Usage Description
定位权限: Privacy - Location Always Usage Description
位置权限:Privacy - Location Usage Description
媒体库权限:Privacy - Media Library Usage Description
健康分享权限:Privacy - Health Share Usage Description
健康更新权限:Privacy - Health Update Usage Description
运动使用权限:Privacy - Motion Usage Description
音乐权限:Privacy - Music Usage Description
提醒使用权限:Privacy - Reminders Usage Description
Siri使用权限:Privacy - Siri Usage Description
电视供应商使用权限:Privacy - TV Provider Usage Description
视频用户账号使用权限:Privacy - Video Subscriber Account Usage Description
【联网权限】
在iOS 10下 ,首次进入应用时,会有询问是否允许网络连接权限的的弹窗,为更好进行用户交互,需要在打开应用时获取应用禁用网络权限状态(状态分为:未知、限制网络、未限制网络),客户端根据不同的权限状态定制相应的人机交互。
针对请求应用网络权限可能存在的几种情形:
关闭 Restricted
无线局域网 NotRestricted
无线局域网&蜂窝 NotRestricted
不进行操作 Unknown
使用 CoreTelephony.framework 框架下的 CTCellularData 类中的方法和属性进行解决
需要先导入#import
应用启动后,检测应用中是否有联网权限
CTCellularData *cellularData = [[CTCellularData alloc]init];
cellularData.cellularDataRestrictionDidUpdateNotifier =  ^(CTCellularDataRestrictedState state){
  //获取联网状态
  switch (state) {
        case kCTCellularDataRestricted:
                  NSLog(@"Restricrted");
                  break;
        case kCTCellularDataNotRestricted:
                  NSLog(@"Not Restricted");
                  break;
        case kCTCellularDataRestrictedStateUnknown:
                  NSLog(@"Unknown");
                  break;
        default:
            break;
  };
};
查询应用是否有联网功能
CTCellularData *cellularData = [[CTCellularData alloc]init];
CTCellularDataRestrictedState state = cellularData.restrictedState;
 switch (state) {
   case kCTCellularDataRestricted:
         NSLog(@"Restricrted");
         break;
   case kCTCellularDataNotRestricted:
         NSLog(@"Not Restricted");
         break;
   case kCTCellularDataRestrictedStateUnknown:
         NSLog(@"Unknown");
         break;
   default:
         break;
}
不幸的是,苹果这个功能可能出得太仓促,并没有给开发者提供相应的 API。所以,我们没办法检测到用户点击“允许”或“不允许”网络请求的回调,也没法检测到当前用户是否授权的状态。
【相册权限】
iOS8以后,第一次访问系统设备的一些属性时,比如相册,照相机,定位等,都会接收系统的权限访问,这个访问并不能使用代码跳过,而在系统的settings里面得隐私设置,可以设置某个程序对系统设备属性的访问权限,而我们能做的就是通过AVCaptureDevice来获取AVAuthorizationStatus属性,判断一下当前的权限,防止在不允许的情况下有Bug!
需要导入#import 这个头文件
这个方法判断是否允许使用相册的回调
 [PHPhotoLibrary requestAuthorization:^(PHAuthorizationStatus status) {
  if (status == PHAuthorizationStatusAuthorized) {
      //允许使用相册
  }else{
  //不允许使用相册
 }
  }];
相册权限
PHAuthorizationStatus photoAuthorStatus = [PHPhotoLibrary authorizationStatus];
switch (photoAuthorStatus) {
  case PHAuthorizationStatusAuthorized:
      NSLog(@"允许授权");
      break;
  case PHAuthorizationStatusDenied:
      NSLog(@"不允许授权");
      break;
  case PHAuthorizationStatusNotDetermined:
      NSLog(@"不确定");
      break;
  case PHAuthorizationStatusRestricted:
      NSLog(@"限制");
      break;
  default:
      break;
}
在使用相册的时候,需要在plist文件中做一些设置
【相机和麦克风权限】
需要导入#import
相机对应AVMediaTypeVideo
麦克风对应AVMediaTypeAudio
权限类型
typedef NS_ENUM(NSInteger, AVAuthorizationStatus) {
  AVAuthorizationStatusNotDetermined = 0,// 未询问用户是否授权
  AVAuthorizationStatusRestricted,// 未授权,例如家长控制
  AVAuthorizationStatusDenied,// 未授权,用户拒绝造成的
  AVAuthorizationStatusAuthorized// 已授权}
权限检测
AVAuthorizationStatus videoAuthStatus = [AVCaptureDevice authorizationStatusForMediaType:AVMediaTypeVideo];
  if (videoAuthStatus == AVAuthorizationStatusNotDetermined) {// 未询问用户是否授权
  }else if(videoAuthStatus == AVAuthorizationStatusRestricted || videoAuthStatus == AVAuthorizationStatusDenied) {// 未授权
  }else{// 已授权
  }
请求授权
[AVCaptureDevice requestAccessForMediaType:AVMediaTypeVideo completionHandler:^(BOOL granted) {

      if (granted){// 用户同意授权

      }else {// 用户拒绝授权

      }

}];
【定位权限】
导入类库
#import
一些枚举值
这里就要查看CLLocationManager的授权状态,此方法会返回当前授权状态:
[CLLocationManager authorizationStatus]

授权状态为枚举值:
kCLAuthorizationStatusNotDetermined                  //用户尚未对该应用程序作出选择
kCLAuthorizationStatusRestricted                     //应用程序的定位权限被限制
kCLAuthorizationStatusAuthorizedAlways               //一直允许获取定位
kCLAuthorizationStatusAuthorizedWhenInUse            //在使用时允许获取定位
kCLAuthorizationStatusAuthorized                     //已废弃,相当于一直允许获取定位
kCLAuthorizationStatusDenied                         //拒绝获取定位
判断用户是否授权应用获取定位权限的完整代码:
if ([CLLocationManager locationServicesEnabled] && ([CLLocationManager authorizationStatus] == kCLAuthorizationStatusAuthorizedWhenInUse || [CLLocationManager authorizationStatus] == kCLAuthorizationStatusNotDetermined || [CLLocationManager authorizationStatus] == kCLAuthorizationStatusAuthorized)) {

//定位功能可用

}else if ([CLLocationManager authorizationStatus] ==kCLAuthorizationStatusDenied) {

//定位不能用

}
跳转到设置->允许定位
 NSURL *url = [NSURL URLWithString:UIApplicationOpenSettingsURLString];
  if ([[UIApplication sharedApplication] canOpenURL:url]) {
                [[UIApplication sharedApplication] openURL:url]
      }
【推送权限】
检查是否有通讯权限
  UIUserNotificationSettings *settings = [[UIApplication sharedApplication] currentUserNotificationSettings];
switch (settings.types) {
  case UIUserNotificationTypeNone:

      break;
  case UIUserNotificationTypeAlert:

      break;
  case UIUserNotificationTypeBadge:

      break;
  case UIUserNotificationTypeSound:

      break;

  default:
      break;
}
获取推送权限
UIUserNotificationSettings *setting = [UIUserNotificationSettings settingsForTypes:UIUserNotificationTypeSound | UIUserNotificationTypeAlert | UIUserNotificationTypeBadge categories:nil];
[[UIApplication sharedApplication] registerUserNotificationSettings:setting];
【通信录权限】
在iOS8中我们访问通讯录用的还是ABAddressBookRef,现在苹果又更新了,推出了ContactsUI,据说比以前更好用,下面简单介绍一下用法
程序启动需要先请求授权
//判断是否已经授权
CNAuthorizationStatus status = [CNContactStore authorizationStatusForEntityType:CNEntityTypeContacts];
if ( status == CNAuthorizationStatusAuthorized) {
//如果已经授权,直接返回
return;
}else{
//iOS8授权方式
//创建通讯录
// ABAddressBookRef book = ABAddressBookCreateWithOptions(NULL, NULL);
//请求授权
// ABAddressBookRequestAccessWithCompletion(book, ^(bool granted, CFErrorRef error) {
// if (granted) {
// NSLog(@"授权成功");
// }else{
// NSLog(@"授权失败");
// }
// });
// [CNContactStore requestAccessForEntityType:completionHandler:]
//iOS9授权
CNContactStore *store = [[CNContactStore alloc] init];
[store requestAccessForEntityType:CNEntityTypeContacts completionHandler:^(BOOL granted, NSError * _Nullable error) {
if (error) {
NSLog(@"error=%@",error);
}
if (granted) {
NSLog(@"授权成功");
}else{
NSLog(@"授权失败");
}

}];
}
获取联系人界面
//获取联系人列表
- (IBAction)btn2Click:(id)sender {
CNContactPickerViewController *contactPickerVC = [[CNContactPickerViewController alloc] init];
contactPickerVC.delegate = self;//控制器实现CNContactPickerDelegate
[self presentViewController:contactPickerVC animated:YES completion:nil];

}
//CNContactPickerDelegate
//取消
- (void)contactPickerDidCancel:(CNContactPickerViewController *)picker{
[picker dismissViewControllerAnimated:YES completion:nil];
}
//不实现此方法,默认进入详细列表界面
/**点击联系人**/
//- (void)contactPicker:(CNContactPickerViewController *)picker didSelectContact:(CNContact *)contact{
// NSLog(@"%@",contact.phoneNumbers[0]);
//
//}
/**点击联系人某个属性**/
- (void)contactPicker:(CNContactPickerViewController *)picker didSelectContactProperty:(CNContactProperty *)contactProperty{

if ([contactProperty.value isKindOfClass:[CNPhoneNumber class]]) {
CNPhoneNumber *phoneNum = contactProperty.value;
NSLog(@"%@",phoneNum.stringValue);
}else{
NSLog(@"选择的不是手机号");
}

}
跳转到系统的设置界面
在项目中,我们经常会碰到使用位置的需求。当用户设置app不允许使用位置的时候,最好的用户体验就是直接调转到系统的位置设置界面,进行设置。
电池电量 Prefs:root=BATTERY_USAGE
通用设置 Prefs:root=General
存储空间 Prefs:root=General&path=STORAGE_ICLOUD_USAGE/DEVICE_STORAGE
蜂窝数据 Prefs:root=MOBILE_DATA_SETTINGS_ID
Wi-Fi 设置 Prefs:root=WIFI
蓝牙设置 Prefs:root=Bluetooth
定位设置 Prefs:root=Privacy&path=LOCATION
辅助功能 Prefs:root=General&path=ACCESSIBILITY
关于手机 Prefs:root=General&path=About
键盘设置 Prefs:root=General&path=Keyboard
显示设置 Prefs:root=DISPLAY
声音设置 Prefs:root=Sounds
App Store 设置 Prefs:root=STORE
墙纸设置 Prefs:root=Wallpaper
打开电话 Mobilephone://
世界时钟 Clock-worldclock://
闹钟 Clock-alarm://
秒表 Clock-stopwatch://
倒计时 Clock-timer://
打开相册 Photos://
NSURL*url=[NSURL URLWithString:@"Prefs:root=Privacy&path=LOCATION"];
Class LSApplicationWorkspace = NSClassFromString(@"LSApplicationWorkspace");
[[LSApplicationWorkspace performSelector:@selector(defaultWorkspace)] performSelector:@selector(openSensitiveURL:withOptions:) withObject:url withObject:nil];
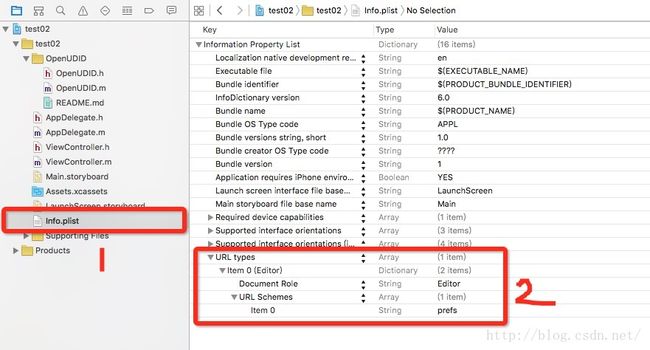
这个需要添加URL Scheme,方法:Target -> Info -> URL Types,点击“+”,将URL Schemes设置为Prefs即可。
上面那一个方法里面有一个performSelector的方法,因为我也不太明白,所以
在此我对performSelector系列方法进行了总结
- (id)performSelector:(SEL)aSelector;

- (id)performSelector:(SEL)aSelector withObject:(id)object;

- (id)performSelector:(SEL)aSelector withObject:(id)object1 withObject:(id)object2;

这三个方法都是同步执行,与线程无关,在需要动态的去调用方法的时候去使用。

例如:

[self performSelector:@selector(configUI)]; 与[self configUI]; 效果完全相同。

withObject:(id)object 这是要传递的参数

2、

- (void)performSelector:(SEL)aSelector withObject:(nullable id)anArgument afterDelay:(NSTimeInterval)delay inModes:(NSArray *)modes;

- (void)performSelector:(SEL)aSelector withObject:(nullable id)anArgument afterDelay:(NSTimeInterval)delay;

  这两个方法为异步执行,只能在主线程中执行。可用于点击UI中一个按钮会触发一个消耗性能的事件,在事件执行期间按钮会一直处于高亮状态,此时可以调用该方法去异步的处理该事件,避免上述问题。

在方法未到执行时间之前,取消方法为:

+ (void)cancelPreviousPerformRequestsWithTarget:(id)aTarget selector:(SEL)aSelector object:(nullable id)anArgument;

+ (void)cancelPreviousPerformRequestsWithTarget:(id)aTarget;

调用该方法之前或在该方法所在的viewController生命周期结束的时候去调用取消函数,以确保不会引起内存泄露。

3、

- (void)performSelectorOnMainThread:(SEL)aSelector withObject:(nullable id)arg waitUntilDone:(BOOL)wait modes:(nullable NSArray *)array;

- (void)performSelectorOnMainThread:(SEL)aSelector withObject:(nullable id)arg waitUntilDone:(BOOL)wait;

这两个方法,在主线程和子线程中均可执行,均会调用主线程的aSelector方法

如果设置wait为YES:等待当前线程执行完以后,主线程才会执行aSelector方法;

设置为NO:不等待当前线程执行完,就在主线程上执行aSelector方法。

如果,当前线程就是主线程,那么aSelector方法会马上执行。

注意:apple不允许程序员在主线程以外的线程中对ui进行操作,此时我们必须调用performSelectorOnMainThread函数在主线程中完成UI的更新

4、

- (void)performSelector:(SEL)aSelector onThread:(NSThread *)thr withObject:(nullable id)arg waitUntilDone:(BOOL)wait modes:(nullable NSArray *)array NS_AVAILABLE(10_5, 2_0);

- (void)performSelector:(SEL)aSelector onThread:(NSThread *)thr withObject:(nullable id)arg waitUntilDone:(BOOL)wait NS_AVAILABLE(10_5, 2_0);

在我们指定的线程中调用方法。

5、

- (void)performSelectorInBackground:(SEL)aSelector withObject:(nullable id)arg NS_AVAILABLE(10_5, 2_0);

后台执行

