代码如下:
# -*-coding:utf-8-*-
#@Author: Songzq
#@Time: 2019年07月18日06时
#说明:
#总结:
import matplotlib.pyplot as plt #导入matplotlib.pyplot库
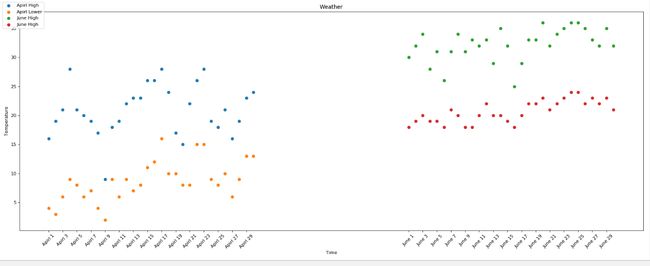
#2019年4月份最高每日最高温度
y_april_high = [16,19,21,28,21,20,19,17,9,18,19,22,23,23,26,26,28,24,17,15,22,26,28,19,18,21,16,19,23,24]
#2019年4月份最高每日最低温度
y_april_lower = [4,3,6,9,8,6,7,4,2,9,6,9,7,8,11,12,16,10,10,8,8,15,15,9,8,10,6,9,13,13]
#2019年6月份最高每日最高温度
y_june_high = [ 30,32,34,28,31,26,31,34,31,33,32,33,29,35,32,25,29,33,33,36,32,34,35,36,36,35,33,32,35,32]
#2019年6月份最高每日最低温度
y_june_lower = [18,19,20,19,19,18,21,20,18,18,20,22,20,20,19,18,20,22,22,23,21,22,23,24,24,22,23,22,23,21]
x_apirl_days = range(1,31)
x_june_days = range(52,82)
#设置图形大小
plt.figure(figsize=(20,8),dpi=80)
#使用scatter方法绘制散点图,plot方法是绘制折线图
plt.scatter(x_apirl_days, y_april_high,label="Apirl High")
plt.scatter(x_apirl_days,y_april_lower,label="Apirl Lower")
plt.scatter(x_june_days, y_june_high,label="June High")
plt.scatter(x_june_days,y_june_lower,label="June High")
#调整x轴的刻度
_x_days = list(x_apirl_days) + list(x_june_days)
_xtick_labels = ["Apirl {}".format(i) for i in x_apirl_days]
_xtick_labels += ["June {}".format(i-51) for i in x_june_days]
plt.xticks(list(_x_days)[::2],list(_xtick_labels)[::2],rotation=45)
#添加图例
plt.figlegend(loc="upper left")
#添加描述信息
plt.xlabel("Time")
plt.ylabel("Temperature")
plt.title("Weather")
#展示
plt.show()
输出图形: