官网给出的Quick Setup看起来很简单,按照那个步骤做了一下,添加mybatis依赖->创建bean->创建bean对应的mapper->调用mapper中的方法获得bean。然而结果并不像官网上说的那样顺利,程序没有运行起来,抛异常了,异常信息如下:
org.springframework.beans.factory.BeanCreationException: Error creating bean with name 'springBootMybatisApplication': Injection of autowired dependencies failed; nested exception is org.springframework.beans.factory.BeanCreationException
异常信息很明白,创建bean失败。按照官网上说的,MyBatis-Spring-Boot-Starter将会自动做很多事:
但仔细一想,数据库的那些连接信息(如数据库连接url,账号,密码等)都没有指定,这有点太智能了吧。我使用的是IntelliJ IDEA,不知道是不是跟这个有关。总之,经过一番探索,终于成功接入spring boot+mybatis。本文将从创建工程开始,到最后运行成功,记录整个过程。
创建工程
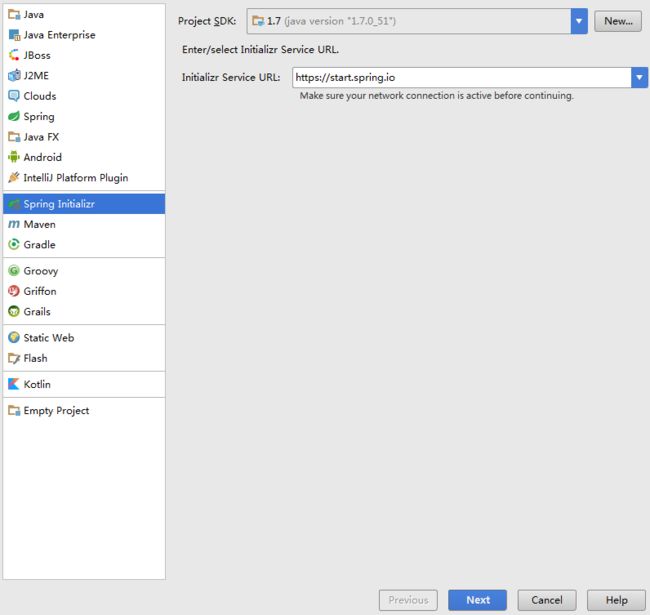
Idea新建工程向导,选择spring initializr模板,下一步
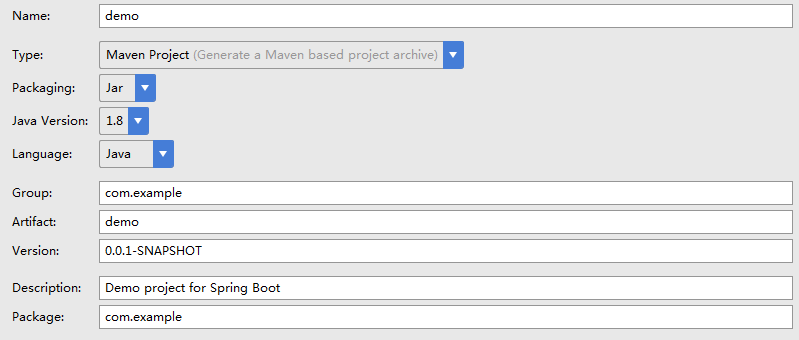
点击下一步之后,idea就会联网获取spring的模板,所以你的计算机要处于联网状态,获取到的模板是这个样子的
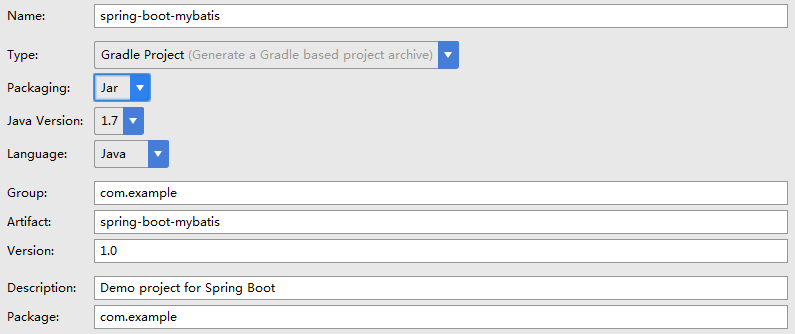
- Name和下面的Version与最后产出.jar或.war的文件名有关,注意,不是最终的工程名哦,但也差不多的意思。这里Name就写spring-boot-mybatis吧;
- Type是选择使用什么管理你的项目,我使用的是gradle,所以选择gradle project;
- Packaging选择打包的类型,这是一个spring boot项目,一般选择jar;
- Java version 选择机器上安装的java版本,我的是1.7;
- Language就选择Java;
- Group和最后一项的Package跟项目的包结构有关,比如我这个com.example,那么以后新建的包都是在这个包之下;
- Artifact跟第一项的Name是关联的,不用管;
- Version是项目的版本号,我想短一点,所以就写1.0吧
- Description是项目的描述信息,随便写,或者就用这个默认的也行
最终填完之后是这个样子的
下一步之后,需要选择一些在项目中会使用到的依赖,这里为了简便,什么都不选,直接下一步。来到项目的配置,这里才是填项目名的地方,Idea帮你填好了,你想改也行,下面是项目的存放路径,默认就行。点击finish。之后弹出一个设置gradle的窗口,选择use auto-import和use default gradle wrapper(recommended)两项,如下所示。gradle的设置之后在file->settings...那里也可以改的。
点击OK之后就开始按照刚才的设置,下载相关的模板。
** 以上是使用Idea新建spring boot项目的步骤,与mybatis没有半毛钱关系o(╯□╰)o **
添加依赖
打开build.gradle文件,在dependencies中可以看到,已经有两个依赖了
dependencies {
  compile('org.springframework.boot:spring-boot-starter')
  testCompile('org.springframework.boot:spring-boot-starter-test')
}
添加MyBatis-Spring-Boot-Starter依赖,使其支持mybatis。
dependencies {
  compile('org.springframework.boot:spring-boot-starter')
  testCompile('org.springframework.boot:spring-boot-starter-test')
  compile("org.mybatis.spring.boot:mybatis-spring-boot-starter:1.1.1")
}
编写代码
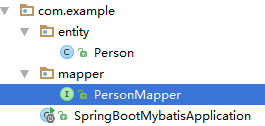
打开src文件夹,在com.example包下新建entity和mapper包,用于存放实体和实体映射。在entity包中新建Person类,在mapper包中创建PersonMapper接口,目录结构如下
Person.java内容如下:
public class Person {
    /** 唯一标识 */
    private int id;

    /** 姓名 */
    private String name;

    /** 年龄 */
    private int age;

    /** 描述 */
    private String description;

    //省略Getter和Setter

    @Override
    public String toString() {
        return "Person{" +
                "id=" + id +
                ", name='" + name + '\'' +
                ", age=" + age +
                ", description='" + description + '\'' +
                '}';
    }
}
在编写PersonMapper的时候,按照官网的例子,使用@Select注解,里面是sql语句,所以要清楚数据库中对应的表字段。数据库中person表各字段如下:
mysql> desc person;
+-------------+-------------+------+-----+---------+----------------+
| Field       | Type        | Null | Key | Default | Extra          |
+-------------+-------------+------+-----+---------+----------------+
| id          | int(32)     | NO   | PRI | NULL    | auto_increment |
| name        | varchar(64) | YES  |     | NULL    |                |
| age         | int(5)      | YES  |     | NULL    |                |
| description | text        | YES  |     | NULL    |                |
+-------------+-------------+------+-----+---------+----------------+
PersonMapper.java内容如下:
import com.example.entity.Person;
import org.apache.ibatis.annotations.Mapper;
import org.apache.ibatis.annotations.Param;
import org.apache.ibatis.annotations.Select;

@Mapper
public interface PersonMapper {
    @Select("SELECT * FROM PERSON WHERE id = #{id}")
    Person getById(@Param("id") int id);
}
在Application中测试
SpringBootMybatisApplication.java内容如下
import com.example.mapper.PersonMapper;
import org.springframework.beans.factory.annotation.Autowired;
import org.springframework.boot.CommandLineRunner;
import org.springframework.boot.SpringApplication;
import org.springframework.boot.autoconfigure.SpringBootApplication;

@SpringBootApplication
public class SpringBootMybatisApplication implements CommandLineRunner{

    @Autowired
    private PersonMapper personMapper;

    public static void main(String[] args) {
        SpringApplication.run(SpringBootMybatisApplication.class, args);
    }

    @Override
    public void run(String... args) throws Exception {
        System.out.println(this.personMapper.getById(2));
    }
}
内容跟官网上提供的例子代码差不多。以上编写代码的步骤跟官网上的都差不多。到这里就差不多写完了,那运行吧,运行的结果就是抛出本文开头说的那个异常,创建bean失败。等等,好像忘了什么事,嗯,连接数据库的那些东西还没设置啊!!!
在哪里设置呢?一般是新建一个mybatis.xml文件,然后通过Resource什么的加载这个文件,创建SqlSessionFactory等等。但完全没有这个必要,可能这就是spring boot强大的地方吧,尽量减少xml等配置文件,而且官网也说了,会自动创建,但至少数据库的连接信息还是要指定的。那不用xml配置,连接数据库的信息写在哪里呢?
一般新建一个spring boot项目,都会有一个application.properties文件,数据库的配置信息就写在那里。这个文件的路径为:
─main
  ├─java
  │  └─com
  │      └─example
  │          │  SpringBootMybatisApplication.java
  │          │
  │          ├─entity
  │          │      Person.java
  │          │
  │          └─mapper
  │                  PersonMapper.java
  │
  └─resources
          application.properties
最下面的那个就是了。在application.properties中添加如下内容
spring.datasource.url=jdbc:mysql://localhost:3306/test
spring.datasource.username=root
spring.datasource.password=root
spring.datasource.driver-class-name=com.mysql.jdbc.Driver
这四项就是再熟悉不过的数据库连接信息了。但最后一项的com.mysql.jdbc.Driver是红色的,原因是没有添加mysql的驱动,在build.gradle中添加依赖:
dependencies {
    compile('org.springframework.boot:spring-boot-starter')
    testCompile('org.springframework.boot:spring-boot-starter-test')
    compile("org.mybatis.spring.boot:mybatis-spring-boot-starter:1.1.1")
    compile('mysql:mysql-connector-java')
}
红色消失了。再次运行,结果如下:
2016-07-26 17:02:00.283  INFO 4460 --- [           main] c.example.SpringBootMybatisApplication   : No active profile set, falling back to default profiles: default
2016-07-26 17:02:00.321  INFO 4460 --- [           main] s.c.a.AnnotationConfigApplicationContext : Refreshing org.springframework.context.annotation.AnnotationConfigApplicationContext@62ccf439: startup date [Tue Jul 26 17:02:00 CST 2016]; root of context hierarchy
2016-07-26 17:02:01.604  INFO 4460 --- [           main] o.s.j.e.a.AnnotationMBeanExporter        : Registering beans for JMX exposure on startup
Person{id=2, name='Alice', age=15, description='Alice is a cute girl'}
2016-07-26 17:02:01.873  INFO 4460 --- [           main] c.example.SpringBootMybatisApplication   : Started SpringBootMybatisApplication in 1.877 seconds (JVM running for 2.114)
2016-07-26 17:02:01.874  INFO 4460 --- [       Thread-1] s.c.a.AnnotationConfigApplicationContext : Closing org.springframework.context.annotation.AnnotationConfigApplicationContext@62ccf439: startup date [Tue Jul 26 17:02:00 CST 2016]; root of context hierarchy
2016-07-26 17:02:01.875  INFO 4460 --- [       Thread-1] o.s.j.e.a.AnnotationMBeanExporter        : Unregistering JMX-exposed beans on shutdown
可以看到中间打印出了Person的信息,与数据库中的数据一致:
mysql> select * from person where id = 2;
+----+-------+------+----------------------+
| id | name  | age  | description          |
+----+-------+------+----------------------+
|  2 | Alice |   15 | Alice is a cute girl |
+----+-------+------+----------------------+
总结
不知道这是mybatis的坑还是跟IDE有关系,至少数据库的连接信息是要指定的,不管是用xml还是像在spring boot中的application.properties文件中那样。


