内容
跟随本教程,您将创建出一个简单的Gradle项目、调用一些基础的Gradle命令,并对Gradle如何进行项目管理有初步的了解。
准备工作
大约12分钟的时间
控制台或IDE应用程序
Java开发套件(JDK),如果要使用Gradle Groovy DSL需要1.7或更高版本,如果要使用Gradle Kotlin
DSL则需要1.8或更高版本(仅在运行Gradle时需要)Gradle的发行版,4.10-rc-2以上版本
shell命令行会以类Unix操作系统的样子展示。每条命令在Windows下都有对应的等效命令。
初始化一个项目
首先,我们为项目创建一个目录。
❯ mkdir basic-demo
❯ cd basic-demo
现在,我们可以使用Gradle的 init 命令简单地创建一个项目。我们会探寻所有生成出来的东西从而使您完全明白都发生了些什么。
❯ gradle init ①
Starting a Gradle Daemon (subsequent builds will be faster)

BUILD SUCCESSFUL in 3s
2 actionable tasks: 2 executed
① 如果您想使用Kotlin DSL,那么请使用
gradle init --dsl kotlin。更多详情参考文档。
命令行会显示“BUILD SUCCESSFUL”并生成下文所示的“空”项目。如果不是这样,那么请确认Gradle是不是
正确安装了,以及 JAVA_HOME 环境变量是否正确地设置了。
Gradle为你生成了这些东西:
Groovy
├── build.gradle  (1)
├── gradle
│   └── wrapper
│       ├── gradle-wrapper.jar  (2)
│       └── gradle-wrapper.properties  (3)
├── gradlew  (4)
├── gradlew.bat  (5)
└── settings.gradle  (6)
Kotlin
├── build.gradle.kts  (1)
├── gradle
│   └── wrapper
│       ├── gradle-wrapper.jar  (2)
│       └── gradle-wrapper.properties  (3)
├── gradlew  (4)
├── gradlew.bat  (5)
└── settings.gradle.kts  (6)
- 配置了当前项目任务的项目配置脚本
- Gradle包装器可执行JAR包
- Gradle包装器配置信息
- Gradle包装器在类Unix操作系统下的脚本
- Gradle包装器在Windows操作系统下的脚本
- 配置构建中参与项目的配置脚本
gradle init可以生成多种不同类型的项目,甚至知道如何将简单的pom.xml文件翻译成Gradle支持的方式。
当当当当!我们的教程到这里就可以结束了。但你肯定要知道如何在项目中 使用 Gradle,所以让我们继续吧。
创建一个任务
Gradle提供了通过基于Groovy或Kotlin的DSL创建和配置任务的API。Project 包含了一系列Task,每个任务都会执行一些基础操作。
Gradle附带一个可以用来配置自有项目的任务库。例如叫做 Copy 的一个核心种类,可以将文件从某个位置复制到另一处。Copy任务是非常有用的(参考相关文档获取更多信息),但是现在,再一次,让我们保持简单。执行如下步骤:
- 创建名为
src的目录。 - 在
src文件夹添加名为myfile.txt的文件。其内容随意(甚至可以为空),但现在为了方便,就添加一行Hello, World!吧。 - 在构建文件中定义一个
Copy类型的copy任务(注意大小写),用于将所有src目录下的文件复制到一个名为dest的新文件夹里。(开发者无需自行创建dest文件夹,任务会自动帮你创建。)
Groovy
task copy(type: Copy, group: "Custom", description: "Copies sources to the dest directory") {
    from "src"
    into "dest"
}
Kotlin
tasks.create("copy") {
    description = "Copies sources to the dest directory"
    group = "Custom"

    from("src")
    into("dest")
}
在这里,group 和 description 可以换成任何你需要的。甚至你也可以省略它们,但这样做会导致它们在稍后我们将要使用的tasks 报告中被省略。
现在让我们来执行这个 copy 任务:
❯ ./gradlew copy
> Task :copy

BUILD SUCCESSFUL in 0s
1 actionable task: 1 executed
检查 dest 目录下有没有 myfile.txt 文件,并验证内容是否一致。
使用插件
Gradle包含一大堆插件,而且还有很多很多插件在Gradle插件门户提供。跟随发行版提供的插件之一是base 插件。结合 Zip核心类型,开发者就可以配置名称、位置来给项目打zip包了。
使用 plugins 语法来给你的构建文件添加 base 插件。确保要在文件头部添加 plugins {} 代码块。
Gradle
plugins {
    id "base"
}

... 构建文件的其他部分 ...
Kotlin
plugins {
    id("base")
}

... 构建文件的其他部分 ...
现在,添加将 src 目录打成zip包的任务:
Gradle
task zip(type: Zip, group: "Archive", description: "Archives sources in a zip file") {
    from "src"
    setArchiveName "basic-demo-1.0.zip"
}
Kotlin
tasks.create("zip") {
    description = "Archives sources in a zip file")
    group = "Archive"

    from("src")
    setArchiveName("basic-demo-1.0.zip")
}
base 插件和设置协同工作,可以在 build/distributions 文件夹下创建打包后的文件basic-demo-1.0.zip。
现在,简单地运行新添加的 zip任务,就能在对应位置看到生成的zip文件了。
❯ ./gradlew zip
> Task :zip

BUILD SUCCESSFUL in 0s
1 actionable task: 1 executed
构建的浏览或调试
让我们来看看Gradle在我们的新项目中还能做些什么。我们也提供了完整的命令行接口参考手册。
发掘可用的任务
tasks 命令会列出所有可用的Gradle任务,包括通过 base 插件引入的任务和我们刚刚添加的那些自定义任务。
❯ ./gradlew tasks

> Task :tasks

------------------------------------------------------------
All tasks runnable from root project
------------------------------------------------------------

Archive tasks
-------------
zip - Archives sources in a zip file

Build tasks
-----------
assemble - Assembles the outputs of this project.
build - Assembles and tests this project.
clean - Deletes the build directory.

Build Setup tasks
-----------------
init - Initializes a new Gradle build.
wrapper - Generates Gradle wrapper files.

Custom tasks
------------
copy - Simply copies sources to a the build directory

Help tasks
----------
buildEnvironment - Displays all buildscript dependencies declared in root project 'basic-demo'.
components - Displays the components produced by root project 'basic-demo'. [incubating]
dependencies - Displays all dependencies declared in root project 'basic-demo'.
dependencyInsight - Displays the insight into a specific dependency in root project 'basic-demo'.
dependentComponents - Displays the dependent components of components in root project 'basic-demo'. [incubating]
help - Displays a help message.
model - Displays the configuration model of root project 'basic-demo'. [incubating]
projects - Displays the sub-projects of root project 'basic-demo'.
properties - Displays the properties of root project 'basic-demo'.
tasks - Displays the tasks runnable from root project 'basic-demo'.

Verification tasks
------------------
check - Runs all checks.

Rules
-----
Pattern: clean: Cleans the output files of a task.
Pattern: build: Assembles the artifacts of a configuration.
Pattern: upload: Assembles and uploads the artifacts belonging to a configuration.

To see all tasks and more detail, run gradlew tasks --all

To see more detail about a task, run gradlew help --task

BUILD SUCCESSFUL in 0s
1 actionable task: 1 executed
构建的分析和调试
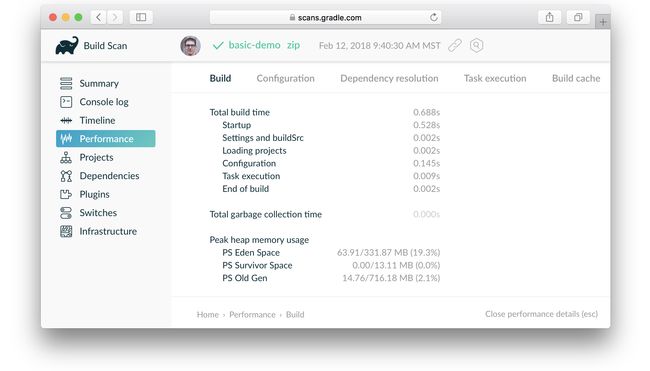
Gradle同时也提供了一个丰富的、基于web的页面用于展示你的构建,其名为构建扫描。
通过使用 --scan参数或明确地在项目中启用构建扫描插件,你可以在scans.gradle.com免费地创建一个构建扫描。将构建扫描发布到scans.gradle.com会将这些数据发送至Gradle服务器。要想使数据停留在您自己的服务器上,请考虑Gradle企业版。
尝试在执行一个任务的时候加入 --scan 选项。
❯ ./gradlew zip --scan

BUILD SUCCESSFUL in 0s
1 actionable task: 1 up-to-date

Publishing a build scan to scans.gradle.com requires accepting the Terms of Service defined at https://scans.gradle.com/terms-of-service. Do you accept these terms? [yes, no]
Gradle Cloud Services license agreement accepted.

Publishing build scan...
https://gradle.com/s/repnge6srr5qs
通过浏览构建扫描结果,你可以轻松地看到那些任务被执行了、每个任务执行的耗时、使用了哪些插件等等。当下次你在StackOverflow上调试什么东西的时候,考虑分享一下构建扫描。
在构建扫描插件用户手册上可以学到更多关于构建扫描插件的配置和使用信息。
列举可用属性
properties 命令会告诉你项目的参数。
❯ ./gradlew properties
输出结果非常长。下面是可用属性的一部分:
> Task :properties

------------------------------------------------------------
Root project
------------------------------------------------------------

buildDir: /Users/.../basic-demo/build
buildFile: /Users/.../basic-demo/build.gradle.kts
description: null
group:
name: basic-demo
projectDir: /Users/.../basic-demo
version: unspecified

BUILD SUCCESSFUL
项目的 name 默认和所在文件夹的名称是一致的。你也可以给 group 和 version 属性指定值,但现在它们和
description 一样是使用的默认值。
buildFile 属性是构建脚本的全名限定路径,默认位于 projectDir 下。
一些属性是可以被修改的。例如在构建脚本文件中尝试加入如下代码行,然后重新执行 gradle properties。
description = "A trivial Gradle build"
version = "1.0"
接下来的步骤
恭喜!你已经学会如何创建一个新的Gradle构建并检验它!
你肯定希望创建针对特定平台的库或应用,所以这里给出一些教程,它们会知道你如何在选定的平台上进行构建:
- 构建Android应用
- 构建C++可执行程序
- 构建Groovy库
- 构建Java库
- 构建Kotlin JVM库
- 构建Scala库
同时你也可以签出一些GitHub上的Gradle构建示例。
帮忙改进本教程
寻求反馈或具有疑问?发现拼写错误?和所有的Gradle教程一样,帮助就是一个GitHub的issue。请在gradle-guides/creating-new-gradle-builds添加issue或拉取请求,我们会给您帮助。
