为什么使用ELK日志分析:
一般我们需要进行日志分析场景:直接在日志文件中 grep、awk 就可以获得自己想要的信息。但在规模较大的场景中,此方法效率低下,面临问题包括日志量太大如何归档、文本搜索太慢怎么办、如何多维度查询。需要集中化的日志管理,所有服务器上的日志收集汇总。常见解决思路是建立集中式日志收集系统,将所有节点上的日志统一收集,管理,访问。
准备两台测试服务器:
Centos7(1),Centos(2)
运行内存:最少2G以上把
一,配置环境
Centos(1):操作 →
添加本地DNS解析:
vim /etc/hosts
192.168.xxx.111 aaa
192.168.xxx.110 bbb
修改文件描述符:
vim /etc/systemd/system.conf
DefaultLimitNOFILE=65535
DefaultLimitNPROC=65535
vim /etc/systemd/user.conf
DefaultLimitNOFILE=65535
DefaultLimitNPROC=65535
配置时间同步:
vim /etc/chrony.conf
#server 0.centos.pool.ntp.org iburst
#server 1.centos.pool.ntp.org iburst
#server 2.centos.pool.ntp.org iburst
#server 3.centos.pool.ntp.org iburst
server 192.168.xxx.111
开启所有同一网段来我这里同步时间:
allow 192.168.xxx.0/24
开启共享
local stratum 10
保存重启服务,开机自启:
systemctl restart chronyd
systemctl enable chronyd
Centos(2):操作 →
修改文件描述符:
vim /etc/systemd/system.conf
DefaultLimitNOFILE=65535
DefaultLimitNPROC=65535
vim /etc/systemd/user.conf
DefaultLimitNOFILE=65535
DefaultLimitNPROC=65535
安装同步时间插件:
yum -y install ntpdate
同步时间(最少两次)
[root@localhost ~]# ntpdate 192.168.xxx.111
23 Apr 09:40:35 ntpdate[3299]: adjust time server 192.168.xxx.111 offset -0.009580 sec
[root@localhost ~]# ntpdate 192.168.xxx.111
23 Apr 09:40:48 ntpdate[3300]: adjust time server 192.168.xxx.111 offset -0.006129 sec
查看同步路径
[root@localhost ~]# which ntpdate
/usr/sbin/ntpdate
编写计划任务,实现自动化同步时间(一分钟执行一次)
crontab -e
-
-
-
-
- /usr/sbin/ntpdate 192.168.xxx.111
-
-
-
查看是否成功
[root@localhost ~]# tail -f /var/log/cron
Apr 23 09:41:01 localhost run-parts(/etc/cron.daily)[3313]: finished logrotate
Apr 23 09:41:01 localhost run-parts(/etc/cron.daily)[3301]: starting man-db.cron
Apr 23 09:41:05 localhost run-parts(/etc/cron.daily)[5888]: finished man-db.cron
Apr 23 09:41:05 localhost anacron[3285]: Job `cron.daily' terminated
Apr 23 09:45:14 localhost crontab[5892]: (root) BEGIN EDIT (root)
Apr 23 09:47:14 localhost crontab[5892]: (root) REPLACE (root)
Apr 23 09:47:14 localhost crontab[5892]: (root) END EDIT (root)
Apr 23 09:48:01 localhost CROND[5906]: (root) CMD (/usr/sbin/ntpdate 192.168.xxx.111)
这样我们的ELK环境搭建完成!(下面就是ELK部署了)
Centos(1):操作 →
安装java环境:
yum -y install java-1.8.0-openjdk
下载elasticsearch安装包并安装
elasticsearch-6.6.0.rpm
rpm -ivh elasticsearch-6.6.0.rpm
修改elasticsearch配置文件
vim /etc/elasticsearch/elasticsearch.yml
cluster.name: ccc
node.name: aaa
network.host: 192.168.xxx.111
http.port: 9200
discovery.zen.ping.unicast.hosts: ["192.168.xxx.111"]
启动elasticsearch服务并设置开机自起:
[root@localhost ~]# systemctl restart elasticsearch
[root@localhost ~]# systemctl enable elasticsearch
Created symlink from /etc/systemd/system/multi-user.target.wants/elasticsearch.service to /usr/lib/systemd/system/elasticsearch.service.
等待 9200,9300端口启动
tcp6 0 0 192.168.xxx.111:9200 ::: LISTEN 6535/java
tcp6 0 0 192.168.xxx.111:9300 ::: LISTEN 6535/java
访问页面是否成功
http://192.168.xxx.111:9200/
Centos(2):操作 →
安装java环境:
yum -y install java-1.8.0-openjdk
下载logstash安装包并安装
rpm -ivh logstash-6.6.0.rpm
配置搜集系统内核日志
vim /etc/logstash/conf.d/syslog.conf
vim /etc/logstash/conf.d/syslog.conf
input {
file {
path => "/var/log/messages"
type => "systemlog"
start_position => "beginning"
stat_interval => "2"
}
}
output {
elasticsearch {
hosts => ["192.168.xxx.111:9200"]
index => "logstash-systemlog-%{+YYYY.MM.dd}"
}
}
启动logstash并设置开机自起
[root@localhost ~]# systemctl restart logstash
[root@localhost ~]# systemctl enable logstash
Created symlink from /etc/systemd/system/multi-user.target.wants/logstash.service to /etc/systemd/system/logstash.service.
等待9600端口启动
[root@localhost ~]# ss -tnl
LISTEN 0 50 ::ffff:127.0.0.1:9600 :::*
测试是否成功
curl -XGET 'localhost:9600/?pretty'
{
"host" : "localhost.localdomain",
"version" : "6.6.0",
"http_address" : "127.0.0.1:9600",
"id" : "8df16d18-b09d-4ccb-a2fc-f470bb48b1e0",
"name" : "localhost.localdomain",
"build_date" : "2019-01-24T12:13:56+00:00",
"build_sha" : "e4390be7e4d511af9d48bc503c9dcc15b03d3bce",
"build_snapshot" : false
}
Centos(1):操作 →
下载kibana安装包并安装
rpm -ivh kibana-6.6.0-x86_64.rpm
修改kibana配置文件
vim /etc/kibana/kibana.yml
server.port: 5601
server.host: "192.168.xxx.111"
elasticsearch.hosts: ["http://192.168.xxx.111:9200"]
启动kibana并设置开机自启
[root@aaa ~]# systemctl restart kibana
[root@aaa ~]# systemctl enable kibana
Created symlink from /etc/systemd/system/multi-user.target.wants/kibana.service to /etc/systemd/system/kibana.service.
等待5601端口启动
[root@aaa ~]# ss -tnl
State Recv-Q Send-Q Local Address:Port Peer Address:Port
LISTEN 0 128 192.168.40.111:5601 :
访问页面是否成功
http://192.168.xxx.111:5601/
发现没有索引
解决:
在Centos(2)添加权限
chmod 644 /var/log/messages
这样我们再次刷新页面
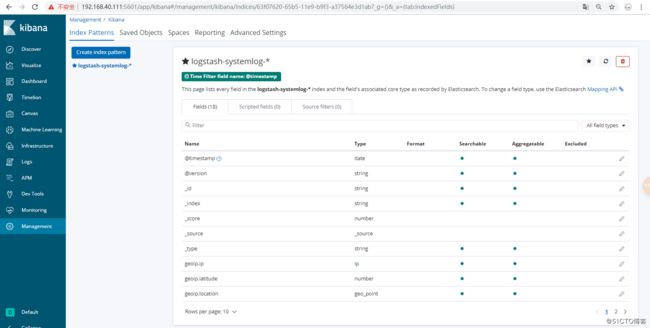
我们可以添加索引
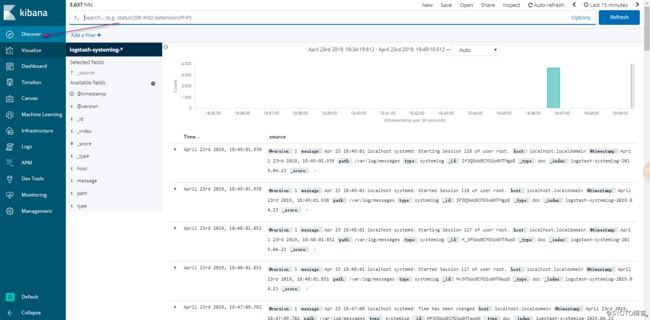
这样呢我们的ELK监控系统日志就完成了!


