硬件环境: lenovo y400
系统版本: ubuntu 14.04LTS
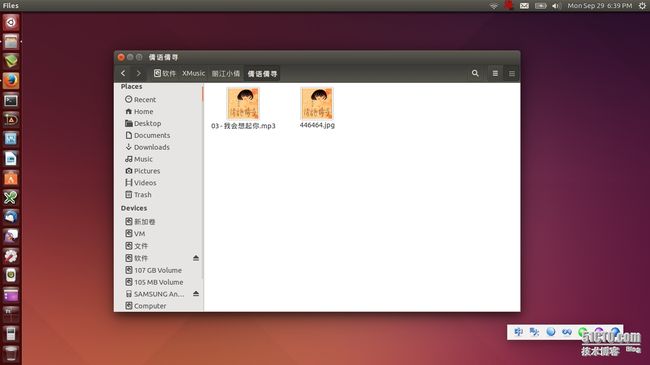
很久以前就希望真正的使用的一款linux系统,转了很大一圈,最后多种原因考虑(主要是自己的技术限制)还是选择了ubuntu. 首先来show下目前在用的桌面。
下面分几点来分别记录下常用的设置项,
1, 输入法
对于一个拥有强烈爱国热情的我来说(英语不好也占了很大的部分,哈哈~),中文输入法自然是迫在眉睫。输入法的框架选择有多种,ibus,scim,fcitx等,更多的等待你的发现与创造。
推荐fcitx,但并不是系统默认,对于系统默认的ibus并不建议删除,有些软件会对ibus产生依赖(System Setings)
##install
sudo apt-get install im-config fcitx fcitx-table-wbpy
##setting
[colynn@lenovo:~]$ im-config
注:默认情况下在右上角会看到ibus的输入法按钮,
“show current input source in the menu bar” 来控制 是否显示ibus输入法的小图标。
2,词典GoldenDict
english is not so good, 词典当然也是必须的,尝试了几款词典,推荐在用的GoldenDict, StarDict(星际译王), 简单做下比较,两者均可以很好的实现的对本地词典的应用查询功能,但发现GoldenDict对在线的网页查询有更好的支持,也有可能是对StarDict的配置没有完全正确。
##install
sudo apt-get install goldendict
##setting
1)下载并加载本地词典
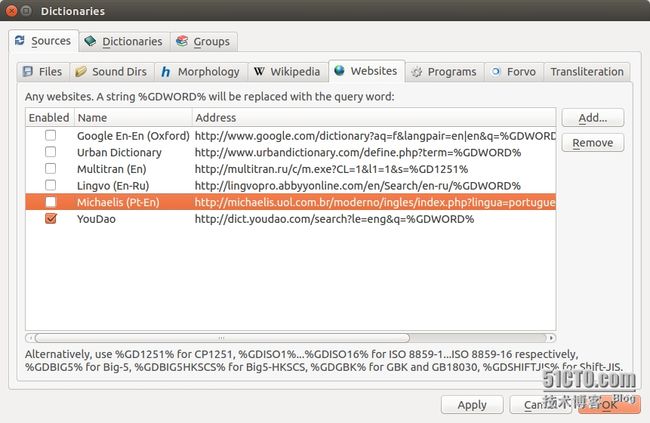
2) 配置网络查询。
如下图,
将自己下载的词典放入相应目录, /usr/share/golendict/dic; 根据规则添加Websites. 本示例只添加了有道站点。
附下载词典的站点: http://abloz.com/huzheng/stardict-dic/zh_CN/
另外,对于发音,需下载 WyabdcRealPeopleTTS OtdRealPeopleTTS
##下载,解压 并在dictionaries(F3 设置快捷键) Sound Dirs指明关联.
wget http://stardict-3.googlecode.com/files/WyabdcRealPeopleTTS.tar.bz2 -O ~/Downloads/WyabdcRealPeopleTTS.tar.bz2
3, Virtual box
## install
sudo apt-get install virtualbox
## setting
图型化的创建安装新的虚拟机 应该是很简单的,就不贴图说明了。主要
简单整理下虚拟机与主机间的网络环境设置。
virtualbox 是个非常优秀的软件,一直用的都是默认的网络设置(NAT),确实很方便。但这次需要主机和虚拟机通信,于是我找到了 host-only 这种网络设置,可以设置独立的 IP,与主机、其他虚拟机和网络通信等优点。非常棒,下面是配置过程:(主机ubuntu,虚拟机为centos)
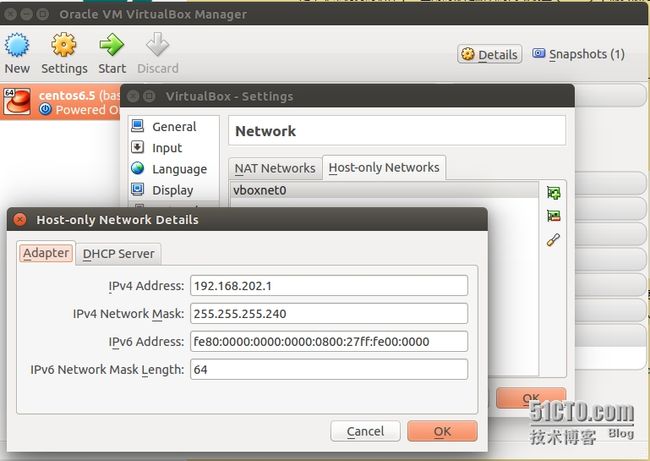
1).virtualbox 全局设置,ctrl + G
在 Network 里添加一个 adapter,vboxnet0,并设置 ipv4:192.168.202.1(自定义),取消 DHCP server(设置静态 IP)。
2).virtualbox 局部设置,ctrl + S
在 Network 中,attached to 选择 Host-only Adapter,Name 选择 vboxnet0.
3).虚拟机网卡设置
[root@master ~]# cat /etc/sysconfig/network-scripts/ifcfg-eth0
……
BOOTPROTO=static
IPADDR=192.168.202.2
NETMASK=255.255.255.240
GATEWAY=192.168.202.1
[root@master ~]# /etc/init.d/network restart
4).ssh设置(方便快速连接)
colynn@lenovo:~$ tail -6 .ssh/config ##这种setting可以有更多的host,可以提高你的效率。
## virbox centos_6.5
Host python
HostName 192.168.202.2
User root
port 22
快速登录:
方式1: ssh 无密码登录,
ssh-copy-id user@host
如果还没有密钥,请使用ssh-keygen命令生成。
方式2: 使用sshpass, save ssh password
sudo apt-get install sshpass
/usr/bin/sshpass -f ssh.passwd.file /usr/bin/ssh python
定义alias
echo "alias ssh1='/usr/bin/sshpass -f ssh.passwd.file /usr/bin/ssh ssh1'" >> ~/.bashrc
echo "alias ssh2='/usr/bin/sshpass -f ssh.passwd.file /usr/bin/ssh ssh2'" >> ~/.bashrc
注意: ssh.passwd.file的权限
附一: 几种网络模式,应该都会有些了解与认识(nat, bridge, internal,host-only)
概述:
nat: 配置上网很方便(建议启用dhcp),但与主机是单方通信,不能很方便的从主机实现对其的管理;
bridge: 与主机在同一网段,依赖主机的网卡接口是否激活,(实现上很方便理解)
internal: 内部模式,(虚拟机 间通信,很少使用)
host-only: 可根据需求,添加多个网卡,很容易实现其与主机通信,并且不依赖主机的网卡接口是否激活,很纯洁的环境,哈哈~
附二: 一个很详细的说明: http://www.360doc.com/content/12/0302/21/22519_191212622.shtml
因实际使用的无线环境较多些,so,只简单说说 host-only模式。(虽没有实现通过host-only模式实现 与主机无线共享上网,有实现的,可交流下 理论层面是通的。)
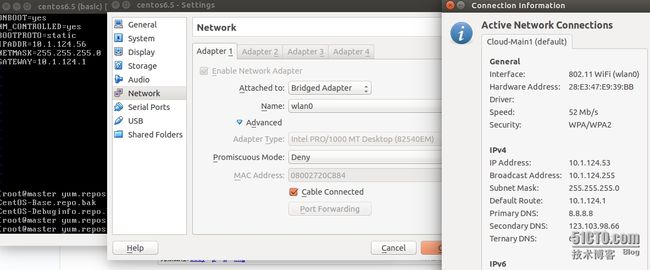
另 bridge模式 桥接到wlan0 也是可以实现上网,并可与主机实现通信。setting 如下:
4, 为知笔记Wiznote
download:
https://launchpad.net/~wiznote-team/+archive/ubuntu/ppa/+packages
5, 管理开机服务
方式一:
查看服务列表代码
service --status-all
启动开机时的服务代码
sudo update-rc.d -f myservice default
停止开机时的服务代码
sudo update-rc.d -f myservice remove
方式二:
安装代码
sudo install sysv-rc-conf
执行代码
sudo sysv-rc-conf
comment: 发现上面的管理方式并不能实现对开机服务的管理, 要对/etc/init/目录下的文件相应程序的配置文件(vsftpd.conf)做修改,注释start on语句。
6, 邮件客户端Evolution mail and Calendar
ubuntu 默认安装的thunderbird邮件客户端,功能单一,而evolution整合了mail and calendar,
在软件中心,搜索(evolution)安装即可。
7, 会话克隆 Session clone
vi ~/.ssh/config (没有就建一个)
Host *
ControlMaster auto
ControlPath /tmp/%r@%h:%p
保存退出/ save and exit
就是记录你登录servers的socket,再次创建新的连接时就不用再输入密码, 当此会话结束时socket会自动清除.
8, 安装sublime-text-3文本代码编辑器
$ sudo add-apt-repository ppa:webupd8team/sublime-text-3
$ sudo apt-get update
$ sudo apt-get install sublime-text-installer
##解决sublime-text 无法使用中文输入法的问题
// 注意依赖环境包安装,fcitx输入法
sudo apt-get install libgtk2.0-dev
sudo apt-get install pkg-config
sudo apt-get install fcitx
a, 下载sublime-imfix.c
假设下载到了 home(~)目录下
b, 安装c\C++编译环境和gtk libgtk2.0-dev
终端下输入以下命令:
sudo apt-get install build-essential libgtk2.0-dev
c, 编译共享库
终端下输入以下命令:
gcc -shared -o libsublime-imfix.so sublime_imfix.c `pkg-config --libs --cflags gtk+-2.0` -fPIC
该命令需要在 home 目录下执行, 即 sublime-imfix.c 所在目录
d, 将编译好的库移到 sublime 的安装目录
终端下输入以下命令:
mv libsublime-imfix.so $SUBLIME_HOME/
该命令需要在 home 目录下执行, 即 libsublime-imfix.so 所在目录
$SUBLIME_HOME,指Sublime的安装(所在)目录
e, 启动 Sublime Text 3 测试效果
终端下输入以下命令:
LD_PRELOAD=./libsublime-imfix.so ./sublime_text
该命令需要在 sublime 的安装目录下执行
否则,需要将命令中的两个文件换成绝对路径
f, 配置forever effective
1, 修改/usr/bin/subl
cat /usr/bin/subl  // 修改为基本如下
#!/bin/sh
export LD_PRELOAD=/opt/sublime_text/libsublime-imfix.so
exec /opt/sublime_text/sublime_text "$@"
2, 修改applications/sublime-text.desktop
即: /opt/sublime_text/sublime_text --> /usr/bin/subl
[colynn@lenovo:~]$ grep "Exec=" /usr/share/applications/sublime-text.desktop
Exec=/usr/bin/subl %F
Exec=/usr/bin/subl -n
Exec=/usr/bin/subl --command new_file
Refer to
https://github.com/YoungZHU/sublime-imfix
9, 修改vim为系统默认文本编辑器
method1, 很暴力,很直接
$ sudo apt-get remove nano
当卸载时,就会看到如下提示,
using /usr/bin/vim.basic to provide /usr/bin/editor (editor) in auto mode
method2, 修改默认软链接
colycolynn@lenovo:~$ ll /usr/bin/editor
lrwxrwxrwx 1 root root 24 Sep 24 18:54 /usr/bin/editor -> /etc/alternatives/editor*
colycolynn@lenovo:~$ ll /etc/alternatives/editor
lrwxrwxrwx 1 root root 18 Dec 15 17:23 /etc/alternatives/editor -> /usr/bin/vim.basic*
根据上面我列出的命令,理解了吧,直接重定义 /etc/alternatives/editor 即可.
10, setup and connect ***-server.
1) connect cisco ***-server.
colycolynn@lenovo:~$ sudo apt-get install ***c
$ sudo ***c #进入交互界面,set IPSec gateway address, IPSec ID, group-id secret, username and password
nter IPSec gateway address: 1.1.1.1
Enter IPSec ID for 1.1.1.1: Cisco
Enter IPSec secret for [email protected]:
Enter username for 1.1.1.1: username
Enter password for [email protected]:
正确设置后,可通过 ifconfig 查看会多由相就的接口, 并查看路由是否处于相应的内网环境中.
2) connect common ***-server (未进行测试)
a, $ sudo apt-get install pptp-linux
b, 用pptpsetup命令建立连接
sudo pptpsetup --create 定义***名称 --server ×××服务器地址 --username 用户名 --password 密码 --encrypt --start
--encrypt加密
--start启动
c, 连接建立好之后就可以用pon和poff这两个命令来启动和断开×××连接了
上线:pon ***名称
sudo pon ***名称 debug dump logfd 2 nodetach
下线:poff ***name (全部下线poff -a)
##***建立好之后是无法链接***
sudo gedit /etc/ppp/peers/***名称
添加一行
refuse-eap
参考:
增加以下两行
defaultroute #添加默认路由
userpeersdns #使用服务器端设置的dns,如果不需要句不添加
d, 设置默认路由 连接完毕要添加路由才能上网
例如: sudo route add default dev ppp0
ifconfig查看一下多了ppp0这个网络
现在还不能通过***来走
因为并不知道数据该怎么走,很明显要配一下路由
#route 查看现在的默认路由,下面两条操作将默认路由改为***的地址,删除原来的默认路由
route add default gw 10.19.1.1
route delete default gw xxx.xxx.xxx.yyy
或者这样更简便
route del default
route add default dev ppp0
#that's all.
#删除保存的会话
sudo pptpsetup --delete ***name
refer to: http://blog.chinaunix.net/uid-26760055-id-3689701.html
11, ubuntu web stress test, siege
Siege is a multi-threaded http load testing and benchmarking utility.
$ sudo apt-get install siege
example:
siege -c5 -d10 -r1 -v http://www.yoursite.com
siege -g http://www.yoursite.com
siege -d10 -c50 -i -f /path_to_file/testfile.txt
refer to: http://manpages.ubuntu.com/manpages/hardy/man1/siege.1.html
12, ubuntu install java plugin for firefox
a, goto http://www.java.com/en/ download the suitable version.
b, install jre
$ sudo tar -zxvf jre-8u25-linux-x64.tar.gz -C /usr/lib/jvm/
##modified system java version
$ sudo unlink /etc/alternatives/java
$ sudo ln -s /usr/lib/jvm/jre1.8.0_25/bin/java /etc/alternatives/java
c, Setting plugin:
$ cd /home/username/.mozilla/plugins
$ ln -s /usr/lib/jvm/jre1.8.0_25/lib/amd64/libnpjp2.so .
d, Verified Java plugin,
if succeed, you will see as follow,
e, Verified Firefox activation
f, run java control command 'jcontrol'
./jcontrol
g, restarted Firefox.
refer to: http://stackoverflow.com/questions/21279085/application-blocked-by-security-settings-prevent-applets-running-using-oracle/27652829
Besides:web browser plugin based on OpenJDK and IcedTea to execute Java applets
$ sudo apt-get install icedtea-plugin
refer to: http://askubuntu.com/questions/354361/how-to-install-java-plugin-in-firefox
13, deepin scrot
0, download link:
http://packages.linuxdeepin.com/deepin/pool/main/d/deepin-scrot/deepin-scrot_2.0-0deepin_all.deb
1, ubuntu software center, open this package file. installed.
14, 自制番茄工作法提醒
refer to: http://www.thinksaas.cn/group/topic/347759/
colynn@lenovo:~$ cat pomodoro.sh
#!/bin/sh
echo "env DISPLAY=:0 /usr/bin/eog /home/colynn/Pictures/1.jpg" |at now+25 minutes
comment: DISPLAY 指定图片显示位置.
15, Firefox vimpreator
Firefox 快捷键,
ctrl + l (小写的字母L) 光标定位在地址栏
16, 终端背景色设置
background #272822
17, 屏幕取色器
$ sudo apt-get install gcolor2 // or gpick
18, 中文乱码
a, 系统添加中文字符编码
$sudo vim /var/lib/locales/supported.d/local
zh_CN.GBK GBK
zh_CN.GB2312 GB2312
zh_CN.GB18030 GB18030
b, 重读使其生效
$sudo dpkg-reconfigure locales
c, vim 正常显示中文
$sudo vim /etc/vim/vimrc.local
set fileencodings=utf-8,gb2312,gbk,gb18030
set termencoding=utf-8
set encoding=prc
d, 重读使其生效
$source /etc/vim/vimrc
e, gedit 正常显示中文
gsettings set org.gnome.gedit.preferences.encodings auto-detected "['GB18030', 'UTF-8', 'CURRENT', 'ISO-8859-15', 'UTF-16']"
19, 安装mpv 播放器
$ sudo apt-get install mplayer2
$ sudo add-apt-repository ppa:mc3man/mpv-tests
$ sudo apt-get update
$ sudo apt-get install mpv
If no voice, tunning as follows:
System Settings>Sound >Output (then select a different output... Like Speakers etc), then play something to test it.
20, tmux 终端复用器( 开启终端新模式)
1), tmux简介
tmux是一个用于终端复用的软件,它允许一个用户在一个终端窗口或远程终端会话中使用多个不同的终端会话。在同一个命令行接口处理多个程序,以及将程序从已经>
开始运行另外的程序的Unix shell中分离出来,是非常有用的。
从本质上来说,tmux允许你创建会话,只要你愿意,你可以随时离开或返回该会话。tmux非常的宝贵,因为你可以根据上下文去安排你的工作。
2), tmux 命令安装
$ sudo apt-get install tmux
3), tmux 命令使用
tmux // 启动会话
tmux new -s panes //启动指定命名的会话
##注意,已经将默认命令前缀调整为 CRTL-a, 默认是CRTL-b. (调整参看 5)推荐配置)
CRTL-a c //新建一个新的会话
CRTL-a w //查看会话列表
CTRL-a n (下一个会话) / CTRL-a p (上一个会话) //按照顺序切换到不同的会话窗口:
CRTL-a d //脱离所有会话,返回原来的终端屏幕 ; $ tmux attach // 恢复脱离的会话
##想要离开一个会话窗口,可以输入 exit 或者:
CTRL-a & //关闭窗口之前,你需要确认一下。
CRTL-a ? //查看所有支持的命令
##
CRTL-a " //水平分割会话输入:
CRTL-a % //竖直分割会话输入:
CTRL-a <光标键> //当前会话窗口分屏间移动:
4), 复制模式copy-mode
a.PREFIX [ 进入复制模式
b.按 space 开始复制,移动光标选择复制区域
c.按 Enter 复制并退出copy-mode。
d.将光标移动到指定位置,按 PREIFX ] 粘贴
如果不在配置文件中进行如下配置,在VIM中复制模式无法完成操作
5), 推荐配置 保存至 ~/.tmux.conf
#设置PREFIX为Ctrl-a
set -g prefix C-a
#解除Ctrl-b与PREFIX的对应关系
unbind C-b
#copy-mode将快捷键设置为vi模式
setw -g mode-keys vi
#将r键设置为加载配置文件,并显示"reloaded!"信息
bind r source-file ~/.tmux.conf \; display "Reloaded!"
#设置终端颜色为256色
set -g default-terminal "screen-256color"
#开启status-bar uft-8支持
set -g status-utf8 on
#设置pan前景色
set -g pane-border-fg green
#设置pane背景色
set -g pane-border-bg black
#设置活跃pane前景色
set -g pane-active-border-fg white
#设置活跃pane背景色
set -g pane-active-border-bg yellow
#设置消息前景色
set -g message-fg white
#设置消息背景色
set -g message-bg black
#设置消息高亮显示
set -g message-attr bright
#设置status-bar颜色
set -g status-fg white
set -g status-bg black
#设置窗口列表颜色
setw -g window-status-fg cyan
setw -g window-status-bg default
setw -g window-status-attr dim
#设置当前窗口在status bar中的颜色
setw -g window-status-current-fg white
setw -g window-status-current-bg red
setw -g window-status-current-attr bright
#设置status bar格式
set -g status-left-length 40
set -g status-left "#[fg=green]Session: #S #[fg=yellow]#I #[fg=cyan]#P"
set -g status-right "#[fg=cyan]%d %b %R"
set -g status-interval 60
set -g status-justify centre
#开启window事件提示
setw -g monitor-activity on
set -g visual-activity on
21, 更改keyword map
$ sudo apt-get install xmodmap
22, 安装percona-mysql
$ gpg --keyserver  hkp://keys.gnupg.net --recv-keys 1C4CBDCDCD2EFD2A
$ gpg -a --export CD2EFD2A | sudo apt-key add -
vim /etc/apt/sources.list # Ubuntu 14.04,其他版本請自行修改下述 "trusty" 的文字
deb http://repo.percona.com/apt trusty main
deb-src http://repo.percona.com/apt trusty main

sudo apt-get update # 建議可以 apt-get dist-upgrade; apt-get autoremove; 清理一下.
sudo apt-get install percona-server-server
FAQS
1,Enter password to unlock your login keyring for ubuntu 14.04
产生问题:
SeaHorse 使用你的登录密码作为管理密码去解锁验证的.当你更改了登录密码, 它并没有更新相应的管理密码(at least, this is what I believe).
A.桌面处理方式:
1): 查找程序 Passwords and Keys;
2): 在 Passwords 选单中, 右键单击 Passwords的子先选单 login. 在显示的菜单中选择 Change Password 选项;
3): 输入你以前的设置的该帐号的登录密码)和当前的生效的登录密码。
You are done. Next time, it won’t ask for any login password for GNOME keyring. If Ubuntu integrate this change while changing the user password, it would be better user experience. (理解不到位,就附原文了.)
refer to: http://karuppuswamy.com/wordpress/2010/06/18/enter-password-to-unlock-your-keyring-prompt-in-ubuntu/
2, Remmina Remote Desktop Client, can't connection
表现: 以前正常连接的winserver, winserver重启后或是其他原因, 莫名就不能连接. 提示"无法连接到RDP服务器”
解决方式:
删除~/.freerdp/known_hosts文件即可。高度怀疑这是证书问题引起的,因为重新连接时需要确认证书可用.
3, Could not apply the stored configuration for monitors
Try removing /home/your_user_name/.config/monitors.xml, that should fix it.
使用心得及faqs持续更新中……


