一、lvs-nat
LVS是Linux Virtual Server的简写,意即Linux虚拟服务器。是由章文嵩博士开发的一个在内核层面的负载均衡调度器。
lvs是在netfilter的INPUT链上根据我们制定的调度规则将特定目标地址和端口的数据包转发到后面的特定主机的,由于是工作于内核空间,所以工作效率高,经过优化最高可达400万的并发量调度。
lvs的实现需要两部分:ipvs, ipvsadm
ipvs是协议规则,ipvsadm是实现ipvs的工具,跟iptables具有极高的相似性。
定义规则时,需要先定义集群服务是什么,然后在定义调度方法。
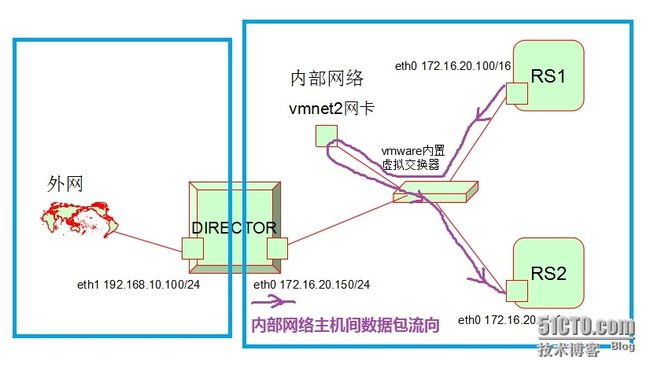
lvs的类型有四种:lvs-nat,lvs-dr,lvs-tun,lvs-fullnat。受限于物理设备状况,本次试验只做lvs-nat的lvs测试。拓扑结构如下:
选择了lvs类型后,还需要选择lvs的scheduler调度法则。调度法则有多种:
RR: round-robin, 轮询;轮叫、轮调、轮流;
WRR:weighted round-robin, 加权轮询;
SH:Source ip Hashing,源地址哈希;把来自同一个地址请求,统统定向至此前选定的RS;
DH:Destination ip Hashing, 目标地址哈希;把访问同一个目标地址的请求,统统定向至此前选定的某RS;
LC: least connection
Overhead=Active*256+Inactive,overhead值越小的越优先被访问
WLC: weighted least connection
Overhead=(Active*256+Inactive)/weight,overhead值越小的越优先被访问
SED:Shorted Expection Delay
Overhead=(Active+1)*256/weight,overhead值越小的越优先被访问
NQ:Never Queue
LBLC:Local-Based Least Connection,动态方式的DH算法;
LBLCR:Replicated LBLC
最常用的也是默认的调度法则是wlc。
二、lvs-nat的实现
(一)、物理基础网络架设:
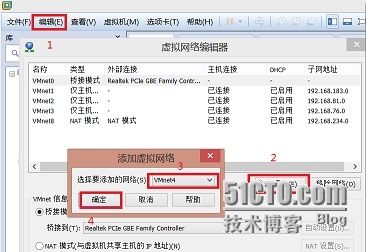
1、添加虚拟网络
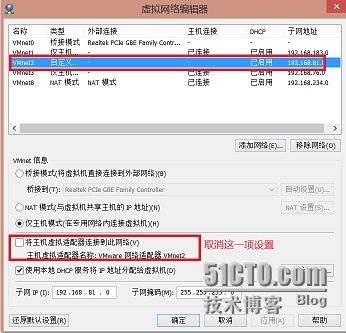
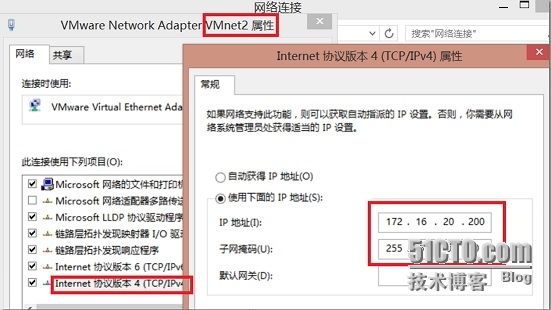
设置vmnet2的网络,只要将IP的前两段设置跟RS主机的一样,掩码也设为255.255.0.0,保证跟两台RS主机及调度器主机的一个内网网卡eth0在同一个网络中就可以,IP的第三段和第四段随便填
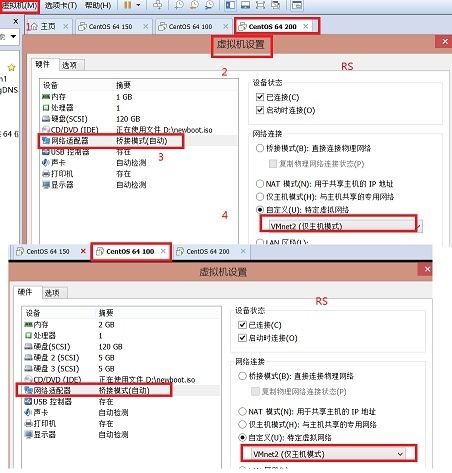
2、内网三台主机(调度器DIRECTOR、RS1、RS2)的网络设置
设置好网络
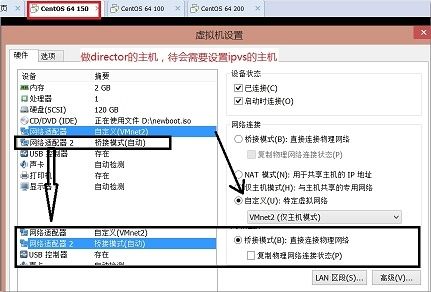
其中作为调度器DIRECTOR的主机需要有两个网卡,一个连接外网,一个连接内网
设置如下:
Director
eth1:192.168.10.100/24 网卡设置为桥接模式
eth0:172.16.20.150/16 网卡设置为vmnet2 仅主机模式
RS1:
eth0:172.16.20.100/16 网卡设置为vmnet2 仅主机模式
RS2:
eth0:172.16.20.1/16 网卡设置为vmnet2 仅主机模式
3、打开调度器的ip转发功能:
[root@kingdom Desktop]# cat /proc/sys/net/ipv4/ip_forward
0
[root@kingdom Desktop]# echo 1 > /proc/sys/net/ipv4/ip_forward
[root@kingdom Desktop]# cat /proc/sys/net/ipv4/ip_forward
1
4、测试网络联通情况
调度器DIRECTOR ping两个RS:
[root@kingdom Desktop]# ping 172.16.20.1
PING 172.16.20.1 (172.16.20.1) 56(84) bytes of data.
64 bytes from 172.16.20.1: icmp_seq=1 ttl=64 time=1.53 ms
……
[root@kingdom Desktop]# ping -c 1 172.16.20.100
PING 172.16.20.100 (172.16.20.100) 56(84) bytes of data.
64 bytes from 172.16.20.100: icmp_seq=1 ttl=64 time=0.347 ms
--- 172.16.20.100 ping statistics ---
1 packets transmitted, 1 received, 0% packet loss, time 0ms
rtt min/avg/max/mdev = 0.347/0.347/0.347/0.000 ms
两个RS ping另一台虚拟主机及调度器的内网网卡,这时是能ping同的,但量台RS虚拟主机没有ping通调度器的外网网卡。
5、查看调度器lvs协议状况
由于centos6已经内嵌了lvs,所以我们现在可以很幸福地不用自己将lvs编译进内核了
# grep -i -A 5 "ipvs" /boot/config-2.6.32-504.el6.x86_64
# IPVS transport protocol load balancing support
#
CONFIG_IP_VS_PROTO_TCP=y
CONFIG_IP_VS_PROTO_UDP=y
CONFIG_IP_VS_PROTO_AH_ESP=y
CONFIG_IP_VS_PROTO_ESP=y
--
# IPVS scheduler
#
CONFIG_IP_VS_RR=m
CONFIG_IP_VS_WRR=m
CONFIG_IP_VS_LC=m
CONFIG_IP_VS_WLC=m
--
# IPVS application helper
#
CONFIG_IP_VS_FTP=m
CONFIG_IP_VS_PE_SIP=m
#
(二)、RS虚拟主机网页服务配置
1、在RS虚拟主机上配置虚拟主机的web服务。
最简单的就是yum安装一个httpd,然后修改配置文件,设置好默认主页:
[root@aunt-s Desktop]# yum install -y httpd
[root@aunt-s Desktop]# which httpd
/usr/sbin/httpd
[root@aunt-s Desktop]# rpm -q httpd
httpd-2.2.15-39.el6.centos.x86_64
[root@aunt-s conf]# vim /etc/httpd/conf/httpd.conf
Listen 80
KeepAlive On
DocumentRoot "/var/www/html"
RS1设置主页:
[root@aunt-s conf]# vim /var/www/html/index.htmlPage Test on RS1
aaaaaaaaaaaaaaaa
RS2设置主页:
# vim /var/www/html/index.htmlPage Test on RS2
2222222222222222
2、启动RS1和RS2的web服务:
# service httpd start
Starting httpd:                                            [  OK  ]
# ss -tunlp | grep httpd
tcp    LISTEN     0      128                   :::80                   :::*      users:(("httpd",14906,4),("httpd",14909,4),("httpd",14910,4),("httpd",14911,4),("httpd",14912,4),("httpd",14913,4),("httpd",14914,4),("httpd",14915,4),("httpd",14916,4))
3、相关设置:
保证iptables对web服务是放行的:
# iptables -L -n
Chain INPUT (policy ACCEPT)
target     prot opt source               destination
Chain FORWARD (policy ACCEPT)
target     prot opt source               destination
Chain OUTPUT (policy ACCEPT)
target     prot opt source               destination
本次实验是直接没有设置iptables规则,如果原来设置了规则,需要调整一下,放行tcp80端口,源ip为调度器的内网网卡。
保证selinux对web服务是放行的:
[root@www Desktop]# getenforce
Permissive
本次实验用的selinux是permissive。
3、测试web服务都能取得相应的网页,服务开通成功。
[root@aunt-s conf]# curl http://172.16.20.100Page Test on RS1
aaaaaaaaaaaaaaaa
[root@aunt-s conf]# curl http://172.16.20.1Page Test on RS2
2222222222222222
(三)、调度器ipvs及相关设置
1、安装ipvsadm
# yum install -y ipvsadm
……
Installed:
  ipvsadm.x86_64 0:1.26-4.el6
Complete!
由于网络设置问题,可能需要事先安装好再做上面的网络配置。自己本次试验由于内网是用的172.16网段,外网用的是192.168.10网段,与教室环境不在同一个网络,所以,是先将外网网卡IP及路由都修改后安装程序包的,安装完后再修改回去:
# route add -host 172.16.0.1  gw 172.16.0.1 dev eth1
# yum install -y ipvsadm
# route del -host 172.16.0.1  gw 172.16.0.1 dev eth1
# ifconfig eth1 192.168.10.100/24
2、设置DIRECTOR的lvs规则:
确定iptables和selinux不会对试验造成障碍:
[root@kingdom Desktop]# iptables -L -n
Chain INPUT (policy ACCEPT)
target     prot opt source               destination
Chain FORWARD (policy ACCEPT)
target     prot opt source               destination
Chain OUTPUT (policy ACCEPT)
target     prot opt source               destination
[root@kingdom Desktop]# getenforce
Disabled
先定义web集群服务,再定义调度规则。
由于本次试验的网络拓扑结构为nat型,所以,lvs类型只能选择-m。但调度策略scheduler是可以任选的。
[root@kingdom Desktop]# ipvsadm -A -t 192.168.10.100:80 -s rr
[root@kingdom Desktop]# ipvsadm -a -t 192.168.10.100:80 -r 172.16.20.100:80 -m -w 3
[root@kingdom Desktop]# ipvsadm -a -t 192.168.10.100:80 -r 172.16.20.1:80 -m -w 1
[root@kingdom Desktop]# ipvsadm -l -n
IP Virtual Server version 1.2.1 (size=4096)
Prot LocalAddress:Port Scheduler Flags
  -> RemoteAddress:Port           Forward Weight ActiveConn InActConn
TCP  192.168.10.100:80 rr
  -> 172.16.20.1:80               Masq    1      0          0
  -> 172.16.20.100:80             Masq    3      0          0
[root@kingdom Desktop]#
(四)、web服务测试
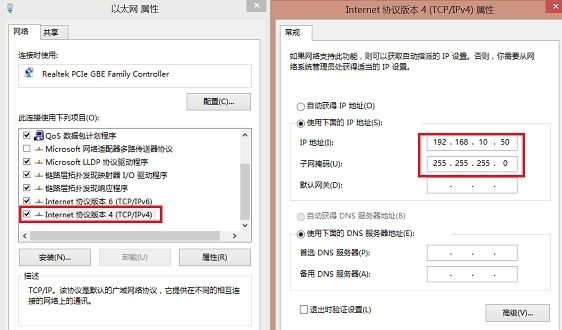
1、设置物理主机的网络,以便能直接通过物理主机上的浏览器打开RS的web主页:
由于我们的虚拟机都是自己私设的ip地址,所以,要使物理主机能直接访问到,就应该让物理主机的IPv4与调度器主机DIRECTOR的外网网卡在同一网段中,也即是192.168.10网段中。
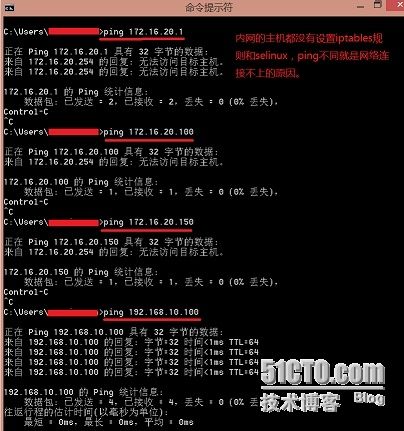
没有修改物理主机网段时,在物理主机上(windows的cmd窗口)是ping不同调度器外网网卡的:
设置好后可以ping调度器了,但是ping不同内网任何一个网卡:
2、测试web服务
在调度器上测试有没有web服务:
[root@kingdom Desktop]# ss -tnlp | grep httpd
[root@kingdom Desktop]#
结果是没有。
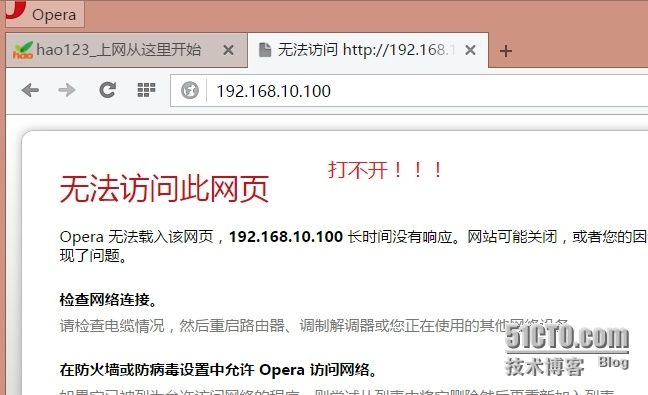
然后通过物理主机(windows)的浏览器打开调度器DIRECTOR的外网网卡:
然后在DIRECTOR上都能打开内网RS的网页:
[root@kingdom Desktop]# curl http://172.16.20.1Page Test on RS2
2222222222222222
[root@kingdom Desktop]# curl http://172.16.20.100Page Test on RS1
aaaaaaaaaaaaaaaa
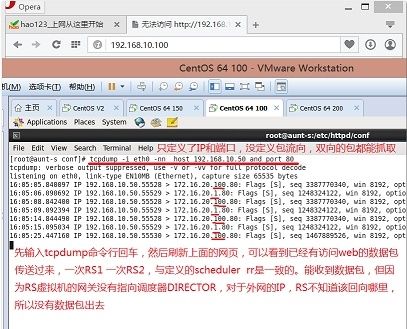
猜测原因:本次构建的网络是lvs-nat,RS没有将网关指向调度器DIRECTOR,在RS上抓包结果如下
给两个RS添加网关,指向DIRECTOR:
# route add default gw 172.16.20.150 dev eth0
3、将lvs scheduler设置为wlc 测试效果
先修改调度器DIRECTOR对web服务的调度规则:
[root@kingdom Desktop]# ipvsadm -E -t 192.168.10.100:80 -s wlc
[root@kingdom Desktop]# ipvsadm -l -n
IP Virtual Server version 1.2.1 (size=4096)
Prot LocalAddress:Port Scheduler Flags
  -> RemoteAddress:Port           Forward Weight ActiveConn InActConn
TCP  192.168.10.100:80 wlc
  -> 172.16.20.1:80               Masq    1      0          3
  -> 172.16.20.100:80             Masq    3      0          3
[root@kingdom Desktop]#
提供第四台虚拟机,其网络设置为:
网络适配器选择为桥接模式;
eth0:192.168.10.1/16
清空ipvs的计数器,以便更准确测试wlc策略的调度比值:
# ipvsadm -Z -t 192.168.10.100:80
# ipvsadm -l -n --stats
IP Virtual Server version 1.2.1 (size=4096)
Prot LocalAddress:Port               Conns   InPkts  OutPkts  InBytes OutBytes
  -> RemoteAddress:Port
TCP  192.168.10.100:80                   0        0        0        0        0
  -> 172.16.20.1:80                      0        0        0        0        0
  -> 172.16.20.100:80                    0        0        0        0        0
在虚拟主机四上对调度器做web压力测试:
# ab -n 5000 -c 100 http://192.168.10.100/index.html
在调度器上查看结果:
[root@kingdom Desktop]# ipvsadm -l -n --stats
IP Virtual Server version 1.2.1 (size=4096)
Prot LocalAddress:Port               Conns   InPkts  OutPkts  InBytes OutBytes
  -> RemoteAddress:Port
TCP  192.168.10.100:80                8334   276749   276376 19924288 32466424
  -> 172.16.20.1:80                   2723   101478   101339  7305856 11905439
  -> 172.16.20.100:80                 5611   175271   175037 12618432 20560985
[root@kingdom Desktop]# ipvsadm -l -n
IP Virtual Server version 1.2.1 (size=4096)
Prot LocalAddress:Port Scheduler Flags
  -> RemoteAddress:Port           Forward Weight ActiveConn InActConn
TCP  192.168.10.100:80 wlc
  -> 172.16.20.1:80               Masq    1      0          10214
  -> 172.16.20.100:80             Masq    3      0          17823
这结果,只能说大致倾向于2:1,这个是动态调度的结果。
4、将scheduler设置为sh,查看调度效果:
[root@kingdom Desktop]# ipvsadm -E -t 192.168.10.100:80 -s sh
[root@kingdom Desktop]# ipvsadm -l -n
IP Virtual Server version 1.2.1 (size=4096)
Prot LocalAddress:Port Scheduler Flags
  -> RemoteAddress:Port           Forward Weight ActiveConn InActConn
TCP  192.168.10.100:80 sh
  -> 172.16.20.1:80               Masq    1      0          0
  -> 172.16.20.100:80             Masq    3      0          0
[root@kingdom Desktop]# ipvsadm -Z -t 192.168.10.100:80
在虚拟主机四上对调度器做web压力测试:
# ab -n 5000 -c 100 http://192.168.10.100/index.html
在调度器上查看结果:
[root@kingdom Desktop]# ipvsadm -l -n --stats
IP Virtual Server version 1.2.1 (size=4096)
Prot LocalAddress:Port               Conns   InPkts  OutPkts  InBytes OutBytes
  -> RemoteAddress:Port
TCP  192.168.10.100:80               15134    75724    75184  5445456  8826054
  -> 172.16.20.1:80                      0        0        0        0        0
  -> 172.16.20.100:80                15134    75724    75184  5445456  8826054
测试结果完全符合sh的调度规则(第一次随机调度到某台RS,随后的同IP访问全部依据第一次的调度进行)。
5、将scheduler修改为wrr,查看调度效果:
[root@kingdom Desktop]# ipvsadm -E -t 192.168.10.100:80 -s wrr
[root@kingdom Desktop]# ipvsadm -l -n
IP Virtual Server version 1.2.1 (size=4096)
Prot LocalAddress:Port Scheduler Flags
  -> RemoteAddress:Port           Forward Weight ActiveConn InActConn
TCP  192.168.10.100:80 wrr
  -> 172.16.20.1:80               Masq    1      0          0
  -> 172.16.20.100:80             Masq    3      0          15002
# ipvsadm -Z -t 192.168.10.100:80
在虚拟主机四上对调度器做web压力测试:
# ab -n 5000 -c 100 http://192.168.10.100/index.html
在调度器上查看结果:
[root@kingdom Desktop]# ipvsadm -l -n --stats
IP Virtual Server version 1.2.1 (size=4096)
Prot LocalAddress:Port               Conns   InPkts  OutPkts  InBytes OutBytes
  -> RemoteAddress:Port
TCP  192.168.10.100:80               28852   331710   330048 23870364 38780354
  -> 172.16.20.1:80                   7213    83052    81941  5967600  9626348
  -> 172.16.20.100:80                21639   248658   248107 17902764 29154006
从结果可以看出,这次的静态调度wrr与动态的调度不同,是遵循权重比值3:1的。
(五)、ssh和telnet远程登录调度测试
lvs调度是在内核的netfilter的INPUT链上调度数据包流向来达到调度目的的,工作位置比较底层,所以只要是需要通过tcp/ip数据包进行通信的服务都可以通过lvs进行调度,如web服务、ssh/telnet远程登录、https安全登录、远程mysql数据库管理。
下面验证ssh和telnet远程登录服务的调度。
基础设置框架跟上面的web一样,此外,需要在原来做RS的虚拟主机上安装telnet服务器程序和sshd服务程序,并开启。
# rpm -q telnet-server
telnet-server-0.17-48.el6.x86_64
# chkconfig telnet on
# service xinetd start
Starting xinetd:
# ss -tunlp | grep :23
tcp    LISTEN     0      64                    :::23                   :::*      users:(("xinetd",1702,5))
23号端口已处于监听状态,telnet服务已开启。
在调度器主机上设置ipvs:
[root@kingdom Desktop]# ipvsadm -A -t 192.168.10.100:23 -s rr
[root@kingdom Desktop]# ipvsadm -a -t 192.168.10.100:23 -r 172.16.20.1:23 -m  -w 1
[root@kingdom Desktop]# ipvsadm -a -t 192.168.10.100:23 -r 172.16.20.100:23 -m  -w 1
[root@kingdom Desktop]# ipvsadm -l -n
IP Virtual Server version 1.2.1 (size=4096)
Prot LocalAddress:Port Scheduler Flags
  -> RemoteAddress:Port           Forward Weight ActiveConn InActConn
TCP  192.168.10.100:23 rr
  -> 172.16.20.1:23               Masq    1      0          0
  -> 172.16.20.100:23             Masq    1      0          0
TCP  192.168.10.100:80 rr
  -> 172.16.20.1:80               Masq    1      0          0
  -> 172.16.20.100:80             Masq    3      0          0
[root@kingdom Desktop]#
保证RS虚拟主机上有非root用户能登录:
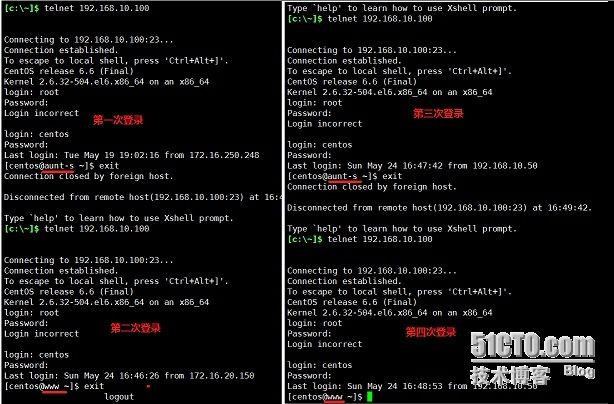
从结果可以看出,ipvs是轮询调度telnet登录的,一次登录在RS1上,下一次登录在RS2上。
其他服务亲们可以自行测试。
mysql远程登录是需要设置3306/tcp,mysql数据库需要先授权访问权限给发起访问的远程主机IP。
ssh远程登录是需要设置24/tcp
