1 准备工作
安装nginx需要的依赖包
- 安装mercurial支持hg命令
sudo add-apt-repository ppa:tortoisehg-ppa/releases
sudo add-apt-repository ppa:mercurial-ppa/releases
sudo apt-get update
sudo apt-get install mercurial python-nautilus tortoisehg

sudo apt install mercurial
- 解决依赖包openssl安装
sudo apt-get install openssl libssl-dev
- 解决依赖包pcre安装
sudo apt-get install libpcre3 libpcre3-dev
- 解决依赖包zlib安装
sudo apt-get install zlib1g-dev
如果不安装相应的依赖包,无法正常编译nginx
2 编译Nginx
2.1 Nginx下载
- 在用户目录创建rtmp
mkdir ~/rtmp
cd ~/rtmp
官网:http://nginx.org/
- 下载nginx (需要先安装mercurial来支持hg命令)
hg clone http://hg.nginx.org/nginx
- 下载nginx-rtmp-module
官网:nginx-rtmp-module
git clone https://github.com/arut/nginx-rtmp-module.git
此时
lqf@ubuntu:~/rtmp$ ls
nginx nginx-rtmp-module
2.2 编译
进入nginx源码根目录:
cd nginx
配置
auto/configure --with-http_ssl_module --with-http_v2_module --with-http_flv_module --with-http_mp4_module --add-module=../nginx-rtmp-module
编译安装
make -j4
sudo make install
默认安装到 /usr/local/nginx
配置文件路径:/usr/local/nginx/conf/nginx.conf
3 配置nginx
3.1 点播配置
在你的配置时,需要把IP换成你的服务器IP或域名。
3.1.1 建立媒体文件夹
/mnt/hgfs/dn_class/vod
3.1.2 准备媒体文件:
把媒体文件 35.mp4复制到/mnt/hgfs/dn_class/vod目录下。
媒体文件自己拷贝,符合AAC+H264的格式即可。
3.1.3 在nginx中配置http
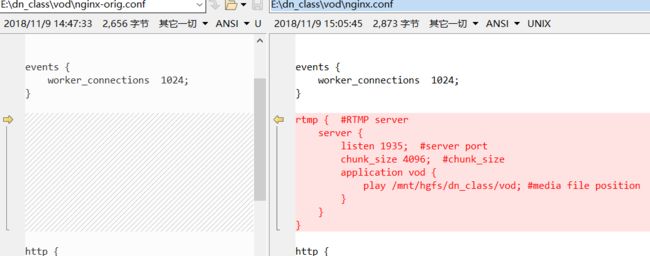
通过上一步nginx服务器已经搭建完成,然后我们就可以开启一个视频点播的服务了。打开配置文件nginx.conf(路径/usr/local/nginx/conf/nginx.conf),添加RTMP的配置。
#user  nobody;
worker_processes  1;

#error_log  logs/error.log;
#error_log  logs/error.log  notice;
#error_log  logs/error.log  info;

#pid        logs/nginx.pid;


events {
    worker_connections  1024;
}

rtmp {  #RTMP server
    server {
        listen 1935;  #server port
        chunk_size 4096;  #chunk_size
        application vod {
            play /mnt/hgfs/dn_class/vod; #media file position
        }
    }
}
........
其他配置不需理会
改动的地方如图所示

文件放好之后,那就让我们重新启动一下nginx
sudo /usr/local/nginx/sbin/nginx -s reload
如果报错
nginx: [error] open() "/usr/local/nginx/logs/nginx.pid" failed (2: No such file or directory)
则说明nginx没有启动,所以需要先启动
sudo /usr/local/nginx/sbin/nginx
3.1.4 在Windows使用ffplay进行播放
注意的是:虚拟机安装的Ubuntu网络连接需要选择"桥接模式",使得windows和Ubuntu是同一网段的IP。
我目前的IP是:192.168.100.33
ffplay rtmp://192.168.100.33/vod/35.mp4
正常配置的情况下是可以播放的。如果不能正常播放则需要检测vod的目录是否正确。
3.2 直播配置
接着我们就在点播服务器配置文件的基础之上添加直播服务器的配置。
3.2.1 配置
RTMP服务添加一个application这个名字可以任意起,也可以起多个名字,由于是直播我就叫做它live,如果打算弄多个序列的直播就可以live_cctv。
#user  nobody;
worker_processes  1;

#error_log  logs/error.log;
#error_log  logs/error.log  notice;
#error_log  logs/error.log  info;

#pid        logs/nginx.pid;


events {
    worker_connections  1024;
}

rtmp {  #RTMP server
    server {
        listen 1935;  #server port
        chunk_size 4096;  #chunk_size
        # vod server
        application vod {
            play /mnt/hgfs/dn_class/vod; #media file position
        }
        # live server 1
    application live{ #Darren live first add
        live on;
    }
        # live server 2
    application live_cctv{ #Darren live  add
        live on;
    }
    }
}
........
其他配置不需理会

3.2.2 推流
在Ubuntu端用ffmpeg产生一个模拟直播源,向rtmp服务器推送
ffmpeg -re -i /mnt/hgfs/dn_class/vod/35.mp4 -c copy -f flv rtmp://192.168.100.33/live/35
或者
ffmpeg -re -i /mnt/hgfs/dn_class/vod/35.mp4 -c copy -f flv rtmp://192.168.100.33/live_cctv/35
注意,源文件必须是H.264+AAC编码的。
3.2.3 拉流
在windows端使用ffplay进行拉流
ffplay rtmp://192.168.100.33/live/35
或者(需要与推流对应)
ffplay rtmp://192.168.100.33/live_cctv/35
更高级的设置参考
http://blog.csdn.net/kingroc/article/details/50839994