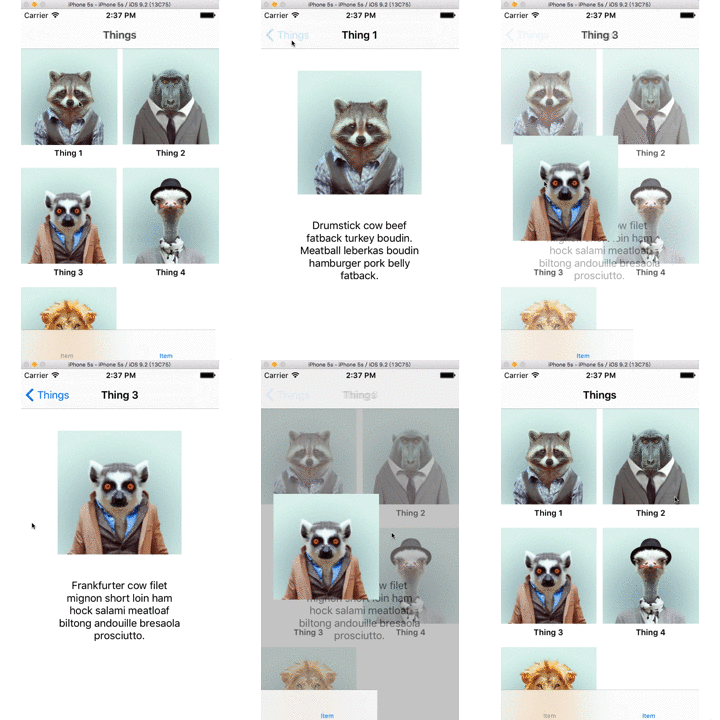
来自于PeteC/InteractiveViewControllerTransitions的定制过渡效果,这是个人非常喜欢的一种动画方式,习惯于成为元素重用,本章将要用Swift重写这个项目,掌握针对于页面的过渡动画,让自己的APP更具个性化。
源码见Github
demo为swift4版本,与文章代码略有不同
页面定制化的过渡方式同样依赖于UIViewControllerAnimatedTransitioning, 如果还不是很了解,可以复习一下自定义navigation controller过渡动画
设计思路
- 整个过渡动画的核心在于图片的移动,看上去是将tableViewCell上的图片移动到下一页控制器的view上,实际上我们会拷贝一份imageView从cell的位置移动到视图中心
- 动画的其他部分无非与设置各个view的透明度
步骤
1.初始化项目
- 两层控制器
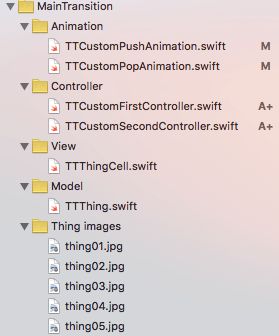
- 相应的视图和模型
- push和pop动画接口
- 资源文件,详见源码
-
控制器的初始化
初始化的过程比较重复,copy相应的代码就好
Swift Tip:
有一段初始化数据的代码比较有意思,可以感受一下
这里用到了lazy关键字进行懒加载,避免了oc里的判断。在赋值的右边,用到了一个匿名函数,并且紧接括号执行返回数组,比较类似于JavaScript的匿名立即执行函数
    lazy var things: [TTThing] = {
        let arr = []  // 通过字面量设置数组
        return arr
    }()
2.设置过渡动画
上一章已经详细说明过渡动画的设置方式,这里就直接进入核心部分----动画效果的处理
1.过场时间设置
依旧以push过场为例,在新建的TTCustomPushAnimation.swift文件内,首先实现
func transitionDuration(transitionContext: UIViewControllerContextTransitioning?) -> NSTimeInterval {
    return 1
}
设置过场时间为1s,1秒的速度方便调试
2.view获取
然后来到动画大剧场
func animateTransition(transitionContext: UIViewControllerContextTransitioning)
在animateTransition内中设置
取得动画所需view
let containerView = transitionContext.containerView()
let fromVc = transitionContext.viewControllerForKey(UITransitionContextFromViewControllerKey) as! TTCustomFromController
let toVc = transitionContext.viewControllerForKey(UITransitionContextToViewControllerKey) as! TTCustomToController
let cell = fromVc.collection.cellForItemAtIndexPath((fromVc.collection.indexPathsForSelectedItems()?.first)!) as! TTThingCell
let snapImageView = cell.imgView.snapshotViewAfterScreenUpdates(false)
除了过场必要的containerView、fromVc、toVc之外,我们还要通过collection取得点击的cell,并将这个cell上的ImageView拷贝成snapImageView备用
Swift Tip:
这里在取得fromVc、toVc、cell时都用到了as!进行强制类型转换,加上感叹号避免在之后调用中的可选解析
,但是在逻辑上就需要保证相应类型的正确,后面的代码会做相应类型保护
3.过场参数设置
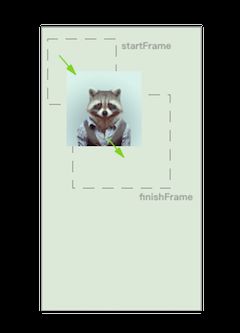
除了必要的动画时间,还需要获得snapImageView在动画中的起始frame和终止frame(frame同时影响位置和大小)
let duration = self.transitionDuration(transitionContext)
let startFrame = cell.imgView.superview!.convertRect(cell.imgView.frame, toView: containerView)
let finalFrame = toVc.view.convertRect(toVc.imgView.frame, toView: containerView)
记得动画舞台containerView么,snapImageView会在整个过场中置于其中进行动画操作,所以我们使用convertRect将Cell上imageView的frame转换到containerView作为起始frame,将toVc上imageView转换到containerView作为终止frame
4.动画初始化
获得所有动画所需的属性后,接下来就是动画的准备活动了
1.将toVc的视图和snapImageView添加到containerView上
2.将snapImageView的frame设置到起始frame,以覆盖Cell上的imageView,并将Cell的imageView隐藏
3.将toVc的视图透明度设置为0,并隐藏toVc上的imageView
containerView?.addSubview(toVc.view)
containerView?.addSubview(snapImageView)

snapImageView.frame = startFrame
cell.imgView.hidden = true
toVc.view.alpha = 0
toVc.imgView.hidden = true
5.动画设置
在整个动画中只有2个流程
1.让toVc的视图逐渐显示出来
2.将snapImageView移动到终止frame
UIView.animateWithDuration(duration, animations: { () -> Void in
    toVc.view.alpha = 1
    snapImageView.frame = finalFrame
    }) { (finished) -> Void in
        toVc.imgView.hidden = false
        cell.imgView.hidden = false
        snapImageView.removeFromSuperview()
        transitionContext.completeTransition(!transitionContext.transitionWasCancelled())
}
动画结束之后,记得收场哦
1.移除snapImageView,并将toVc上的imageView显示出来
2.将cell上的imageView恢复显示
3.清除过场
3.设置push控制器
老规矩,上述操作写好了剧本,得让演员上台表演了。由于这里是定制的过场动画,并不能重写导航去影响所有的过场,所以需要指定的演员TTCustomFirstController
在TTCustomFirstController中,添加UINavigationControllerDelegate,显示控制器时添加代码,不显示时移除
override func viewWillAppear(animated: Bool) {
    super.viewWillAppear(animated)
    self.navigationController?.delegate = self
}

override func viewWillDisappear(animated: Bool) {
    super.viewWillDisappear(animated)
    if let _ = self.navigationController?.delegate {
        self.navigationController?.delegate = nil
    }
}
然后声明此控制器的过场方式
func navigationController(navigationController: UINavigationController, animationControllerForOperation operation: UINavigationControllerOperation, fromViewController fromVC: UIViewController, toViewController toVC: UIViewController) -> UIViewControllerAnimatedTransitioning? {
    if fromVC == self && toVC is TTCustomSecondController {
        return TTCustomPushAnimation()
    }
    return nil
}
在导航的代理方法中,我们返回了自定义的过场动画接口,并对fromVc和toVc都做了类型判断,还记得我们在上面用到的as!强制类型转换么,这里的判断能保证类型的正确使用
重启程序,push的过场已经和预期的是一样的了 ☺️
4.设置pop动画
push动画已经设置完毕,pop动画依旧是push的逆向过程
1.初始化pop过场动画
新建TTCustomPopAnimation,实现UIViewControllerAnimatedTransitioning的两个方法,这里直接贴出pop动画的设置代码
依旧需要注意的是fromVc和toVc对应的控制器
func animateTransition(transitionContext: UIViewControllerContextTransitioning) {
    let containerView = transitionContext.containerView()
    let fromVc = transitionContext.viewControllerForKey(UITransitionContextFromViewControllerKey) as! TTCustomSecondController
    let toVc = transitionContext.viewControllerForKey(UITransitionContextToViewControllerKey) as! TTCustomFirstController
    let selectedCell = toVc.collection.cellForItemAtIndexPath(toVc.selectedIndex!) as! TTThingCell
    let snapImgView = fromVc.imgView.snapshotViewAfterScreenUpdates(false)

    let duration = self.transitionDuration(transitionContext)
    let startFrame = fromVc.view.convertRect(fromVc.imgView.frame, toView: containerView)
    let finalFrame = selectedCell.imgView.convertRect(selectedCell.imgView.frame, toView: containerView)

    snapImgView.frame = startFrame
    fromVc.imgView.hidden = true
    toVc.view.alpha = 0

    containerView?.insertSubview(toVc.view, belowSubview: fromVc.view)
    containerView?.addSubview(snapImgView)

    UIView.animateWithDuration(duration, animations: { () -> Void in
        toVc.view.alpha = 1
        fromVc.view.alpha = 0
        snapImgView.frame = finalFrame
        }) { (finished) -> Void in
            fromVc.imgView.hidden = false
            selectedCell.imgView.hidden = false
            snapImgView.removeFromSuperview()
            transitionContext.completeTransition(!transitionContext.transitionWasCancelled())
    }
}
pop动画的设置还是有几个小坑的:
1.需要取得控制器跳转前点击的那个cell,这里采用了简化的方法,在cell点击时,将index记录在selectedIndex,方便pop的时候直接取用
2.注意各个视图透明度和hidden的控制
2.设置pop控制器
重复设置push控制器的流程,在TTCustomSecondController中,添加UINavigationControllerDelegate并实现导航代理方法
func navigationController(navigationController: UINavigationController, animationControllerForOperation operation: UINavigationControllerOperation, fromViewController fromVC: UIViewController, toViewController toVC: UIViewController) -> UIViewControllerAnimatedTransitioning? {
    if fromVC.isEqual(self) && toVC is TTCustomFirstController {
        return TTCustomPopAnimation()
    }
    return nil
}
再次启动项目,pop的动画也能够正常工作了
5.手势返回
跟之前一样,自定义过场之后,右划手势返回会失效,需要重新设置,这里就不重复这部分内容了,但是新的手势需要加到TTCustomSecondController控制器内,自定义手势
如果你也喜爱游戏,欢迎支持我的APP Up 游戏专辑


