简单使用单元测试
对方法引用AFN框架的单元测试
不写单元测试的程序员是不合格的,为了让自己成为一名合格的程序员,学习如何写单元测试是很有必要的,这里以Xcode集成的测试框架XCTest为例。
XCTest基础用法
默认的测试类继承自XCTestCase,当然也可以自定义测试类,添加一些公共的辅助方法,所有的测试方法都必须以test开头,且不能有参数,不然不会识别为测试方法。
@interface__Tests:XCTestCase@end@implementation__Tests// 在每一个测试用例开始前调用,用来初始化相关数据- (void)setUp { [supersetUp];// Put setup code here. This method is called before the invocation of each test method in the class.}// 在测试用例完成后调用,可以用来释放变量等结尾操作- (void)tearDown {// Put teardown code here. This method is called after the invocation of each test method in the class.[supertearDown];}// 测试方法- (void)testExample {// This is an example of a functional test case.// Use XCTAssert and related functions to verify your tests produce the correct results.}// 性能测试方法,通过测试block中方法执行的时间,比对设定的标准值和偏差觉得是否可以通过测试- (void)testPerformanceExample {// This is an example of a performance test case.[selfmeasureBlock:^{// Put the code you want to measure the time of here.}];}/// 我自定义的 针对 Person 类的测试方法- (void)testPerson{}@end
断言
XCTest的断言具体可查阅XCTestAssertions.h文件,这里还是做个简单的总结
//通用断言XCTAssert(expression,format...)//常用断言:XCTAssertTrue(expression,format...)XCTAssertFalse(expression,format...)XCTAssertEqual(expression1, expression2,format...)XCTAssertNotEqual(expression1, expression2,format...)XCTAssertEqualWithAccuracy(expression1, expression2, accuracy,format...)XCTAssertNotEqualWithAccuracy(expression1, expression2, accuracy,format...)XCTAssertNil(expression,format...)XCTAssertNotNil(expression,format...)
举个例子
- (void)testExample {//设置变量和设置预期值NSUIntegera =10;NSUIntegerb =15;NSUIntegerexpected =24;//执行方法得到实际值NSUIntegeractual = [selfadd:a b:b];//断言判定实际值和预期是否符合XCTAssertEqual(expected, actual,@"add方法错误!");}-(NSUInteger)add:(NSUInteger)a b:(NSUInteger)b{returna+b;}
从这也能看出一个测试用例比较规范的写法,1:定义变量和预期,2:执行方法得到实际值,3:断言
当然在有些特殊情况下直接使用这些断言,会让代码看起来很臃肿,使用时可以对其进行一定的封装一下:
#define ml_ssertTrue(expr)XCTAssertTrue((expr), @"设置指定的字符串,同下")#define ml_assertFalse(expr)XCTAssertFalse((expr), @"")#define ml_assertNil(a1)XCTAssertNil((a1), @"")#define ml_assertNotNil(a1)XCTAssertNotNil((a1), @"")#define ml_assertEqual(a1, a2)XCTAssertEqual((a1),(a2), @"")#define ml_assertEqualObjects(a1, a2)XCTAssertEqualObjects((a1),(a2), @"")#define ml_assertNotEqual(a1, a2)XCTAssertNotEqual((a1),(a2), @"")#define ml_assertNotEqualObjects(a1, a2)XCTAssertNotEqualObjects((a1),(a2), @"")#define ml_assertAccuracy(a1, a2, acc)XCTAssertEqualWithAccuracy((a1),(a2),(acc))
简单实用准备工作
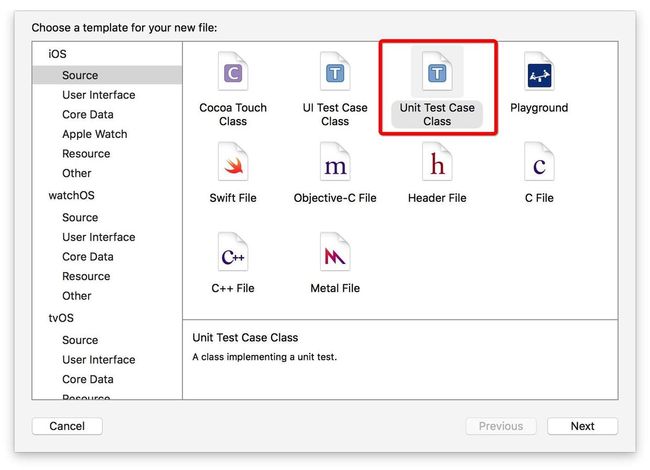
795875-a207ce29f12fa7f2.png.jpeg
如果是之前创建的项目,里面没有勾选,可以自己创建:
795875-9e3ebd787a699757.png.jpeg
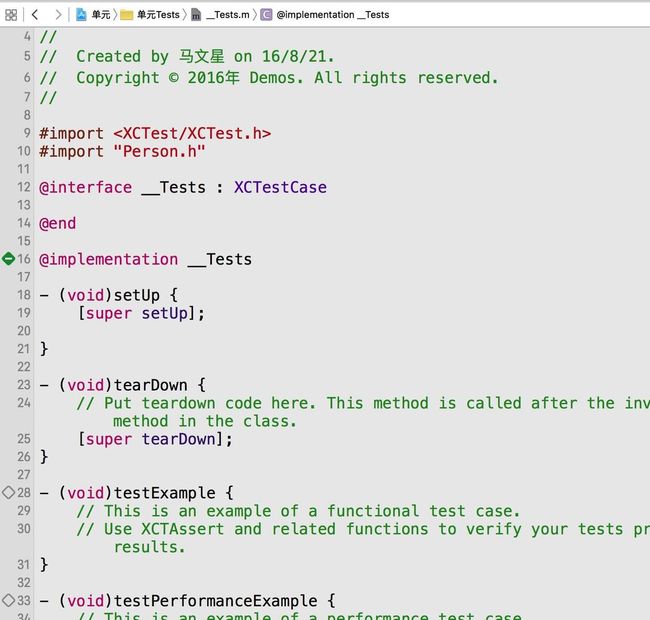
进入到这个类,
setUp是每个测试方法调用前执行,
tearDown是每个测试方法调用后执行。
testExample是测试方法,和我们新建的没有差别。
不过测试方法必须testXXX的格式,且不能有参数,不然不会识别为测试方法。测试方法的执行顺序是字典序排序。
按快捷键Command + U进行单元测试,这个快捷键是全部测试。
795875-362afa43ea505bb6.png.jpeg
一、简单使用单元测试
1、创建一个Person类,里面有一个test1类方法
2、顺便勾选右边的测试单元按钮,为了对这个.m文件的数据测试
795875-192f3a273594f9e7.png.jpeg
3、如果项目比较小,就可以直接在项目刚创建的tests方法里测试,如果项目比较大的话,就创建一个单独的tests,例如:PersonTets:
795875-89721ddcf3d48789.png.jpeg
4、创建一个测试方法:testPerson:
795875-cbeeb6ba7a19c6ef.png.jpeg
上面也说了:测试方法必须testXXX的格式,且不能有参数,不然不会识别为测试方法
如果前面不出现小菱形,可以Build一下
5、点击小菱形图标,出现绿色说明成功:
795875-fdefc42918aaccb4.png.jpeg
6、有时候需要验证值的话,就使用 XCTAssert(<#expression, ...#>),或者其他的断言方法测试结果;
二、对方法引用AFN框架的单元测试
1、测试带有网络请求的方法,例如:
795875-12be468144d6e31a.png.jpeg
2、 按照之前的那样 [Person test2]的话,点击小菱角会出现找到AFN框架:
795875-d4d646284ee3dd06.png.jpeg
3、需要做一些配置
3.1、复制Target(App) - Build Setting - Header Search Paths 的路径。
795875-27159a355bc9a14f.png.jpeg
3.2、粘贴到Target(UnitTests) - Build Setting - Header - Search Paths里。
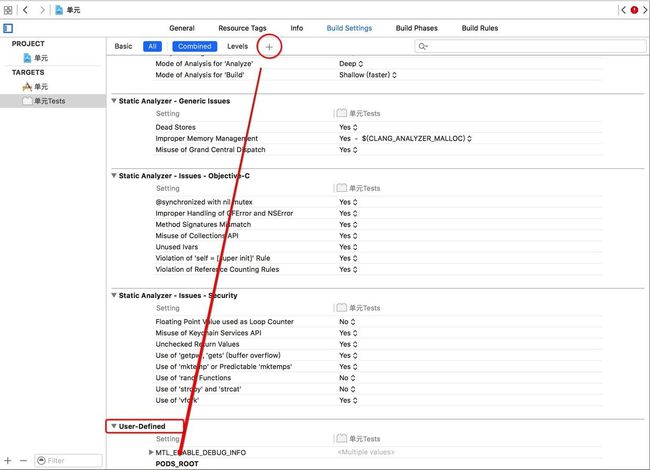
3.3、复制Target(App) - Build Setting - User-Defined - PODS_ROOT整条。
3.4、到Target(UnitTests) - Build Setting - User-Defined新建一条PODS_ROOT。
795875-601bbddba0354ed1.png.jpeg
4、OK了!
三、期望
期望实际上是异步测试,当测试异步方法时,因为结果并不是立刻获得,所以我们可以设置一个期望,期望是有时间限定的的,fulfill表示满足期望。
例如
- (void)testAsynExample {// 1. 创建期望XCTestExpectation *exp = [selfexpectationWithDescription:@"这里可以是操作出错的原因描述。。。"];NSOperationQueue*queue = [[NSOperationQueuealloc]init]; [queue addOperationWithBlock:^{//模拟:这个异步操作需要2秒后才能获取结果,比如一个异步网络请求sleep(2);//模拟:获取的异步操作后,获取结果,判断异步方法的结果是否正确XCTAssertEqual(@"a",@"a");//2. 如果断言没问题,就调用fulfill宣布测试满足[exp fulfill]; }];//3. 设置延迟多少秒后,如果没有满足测试条件就报错[selfwaitForExpectationsWithTimeout:3handler:^(NSError* _Nullable error) {if(error) {NSLog(@"Timeout Error: %@", error); } }];}
这个测试肯定是通过的,因为设置延迟为3秒,而异步操作2秒就除了一个正确的结果,并宣布了条件满足 [exp fulfill],但是当我们把延迟改成1秒,这个测试用例就不会成功,错误原因是 expectationWithDescription:@"这里可以是操作出错的原因描述。。。
异步测试除了使用expectationWithDescription
以外,还可以使用expectationForPredicate和expectationForNotification
,
掌握expectationWithDescription
即可,后两者者仅仅了解
下面这个例子使用expectationForPredicate 测试方法,代码来自于AFNetworking,用于测试backgroundImageForState方法
- (void)testThatBackgroundImageChanges { XCTAssertNil([self.buttonbackgroundImageForState:UIControlStateNormal]);NSPredicate*predicate = [NSPredicatepredicateWithBlock:^BOOL(UIButton* _Nonnull button,NSDictionary * _Nullable bindings) {return[button backgroundImageForState:UIControlStateNormal] !=nil; }]; [selfexpectationForPredicate:predicate evaluatedWithObject:self.buttonhandler:nil]; [selfwaitForExpectationsWithTimeout:20handler:nil];}
利用谓词计算,button是否正确的获得了backgroundImage,如果正确20秒内正确获得则通过测试,否则失败。
expectationForNotification 方法 ,该方法监听一个通知,如果在规定时间内正确收到通知则测试通过。
- (void)testAsynExample1 { [selfexpectationForNotification:(@"监听通知的名称xxx") object:nilhandler:nil]; [[NSNotificationCenterdefaultCenter]postNotificationName:@"监听通知的名称xxx"object:nil];//设置延迟多少秒后,如果没有满足测试条件就报错[selfwaitForExpectationsWithTimeout:3handler:nil];}
这个例子也可以用expectationWithDescription实现,只是多些很多代码而已,但是这个可以帮助你更好的理解expectationForNotification 方法和 expectationWithDescription 的区别。同理,expectationForPredicate方法也可以使用expectationWithDescription实现。
functestAsynExample1(){letexpectation = expectationWithDescription("监听通知的名称xxx")letsub =NSNotificationCenter.defaultCenter().addObserverForName("监听通知的名称xxx", object:nil, queue:nil) { (not) ->Voidinexpectation.fulfill() }NSNotificationCenter.defaultCenter().postNotificationName("监听通知的名称xxx", object:nil) waitForExpectationsWithTimeout(1, handler:nil)NSNotificationCenter.defaultCenter().removeObserver(sub)}
四、期望实战:
-(void)testRequest{# 创建期望XCTestExpectation *expectation =[selfexpectationWithDescription:@"没有满足期望"]; AFHTTPSessionManager *sessionManager = [AFHTTPSessionManager manager]; sessionManager.responseSerializer= [AFHTTPResponseSerializer serializer]; [sessionManager GET:@"http://www.weather.com.cn/adat/sk/101110101.html"parameters:nilsuccess:^(NSURLSessionDataTask* _Nonnull task,id_Nullable responseObject) {NSLog(@"responseObject:%@", [NSJSONSerializationJSONObjectWithData:responseObject options:1error:nil]);# 不为nil 通过,XCTAssertNotNil(responseObject,@"返回出错");# 满意[expectation fulfill]; } failure:^(NSURLSessionDataTask* _Nullable task,NSError* _Nonnull error) {# 为nil 通过,XCTAssertNil(error,@"请求出错"); }];# 设置5秒的超时时间[selfwaitForExpectationsWithTimeout:3.0handler:^(NSError*error) {if(error) {NSLog(@"Timeout Error: %@", error); } }];}


