1、前言
在这之前,我相信大家都知道CIDetector能够做到人脸检测这一功能吧,注意是检测并不是识别,如果要做到识别的话也即区别人脸的异同就要用到OpenCV了,说了这么多就是要引出苹果在今年新推出的Speech新框架,能够做到语音识别~~~额,其实只是能够做到把一段语音转化成文字。
2、框架主要类
#import

#import
#import
#import
#import
#import
#import
#import
3、怎么用
#import "NFSpeechViewController.h"
#import

@interface NFSpeechViewController ()

@property (nonatomic ,strong) SFSpeechRecognitionTask *recognitionTask;
@property (nonatomic ,strong) SFSpeechRecognizer      *speechRecognizer;
@property (nonatomic ,strong) UILabel                 *recognizerLabel;

@end

@implementation NFSpeechViewController

- (void)dealloc {
    [self.recognitionTask cancel];
    self.recognitionTask = nil;
}

- (void)viewDidLoad {
    [super viewDidLoad];
    // Do any additional setup after loading the view.
    self.view.backgroundColor = [UIColor whiteColor];

    //0.0获取权限
    //0.1在info.plist里面配置
    /*
     typedef NS_ENUM(NSInteger, SFSpeechRecognizerAuthorizationStatus) {
     SFSpeechRecognizerAuthorizationStatusNotDetermined,
     SFSpeechRecognizerAuthorizationStatusDenied,
     SFSpeechRecognizerAuthorizationStatusRestricted,
     SFSpeechRecognizerAuthorizationStatusAuthorized,
     };
     */
    [SFSpeechRecognizer requestAuthorization:^(SFSpeechRecognizerAuthorizationStatus status) {
        switch (status) {
            case SFSpeechRecognizerAuthorizationStatusNotDetermined:
                NSLog(@"NotDetermined");
                break;
            case SFSpeechRecognizerAuthorizationStatusDenied:
                NSLog(@"Denied");
                break;
            case SFSpeechRecognizerAuthorizationStatusRestricted:
                NSLog(@"Restricted");
                break;
            case SFSpeechRecognizerAuthorizationStatusAuthorized:
                NSLog(@"Authorized");
                break;
            default:
                break;
        }
    }];

    //1.创建SFSpeechRecognizer识别实例
    self.speechRecognizer = [[SFSpeechRecognizer alloc] initWithLocale:[[NSLocale alloc] initWithLocaleIdentifier:@"zh_CN"]];

    //2.创建识别请求
    SFSpeechURLRecognitionRequest *request = [[SFSpeechURLRecognitionRequest alloc] initWithURL:[NSURL fileURLWithPath:[[NSBundle mainBundle] pathForResource:@"游子吟.mp3" ofType:nil]]];

    //3.开始识别任务
    self.recognitionTask = [self recognitionTaskWithRequest1:request];
}

- (SFSpeechRecognitionTask *)recognitionTaskWithRequest0:(SFSpeechURLRecognitionRequest *)request{
    return [self.speechRecognizer recognitionTaskWithRequest:request resultHandler:^(SFSpeechRecognitionResult * _Nullable result, NSError * _Nullable error) {
        if (!error) {
            NSLog(@"语音识别解析正确--%@", result.bestTranscription.formattedString);
        }else {
            NSLog(@"语音识别解析失败--%@", error);
        }
    }];
}

- (SFSpeechRecognitionTask *)recognitionTaskWithRequest1:(SFSpeechURLRecognitionRequest *)request{
    return [self.speechRecognizer recognitionTaskWithRequest:request delegate:self];
}

- (void)didReceiveMemoryWarning {
    [super didReceiveMemoryWarning];
    // Dispose of any resources that can be recreated.
}

#pragma mark- SFSpeechRecognitionTaskDelegate

// Called when the task first detects speech in the source audio
- (void)speechRecognitionDidDetectSpeech:(SFSpeechRecognitionTask *)task {

}

// Called for all recognitions, including non-final hypothesis
- (void)speechRecognitionTask:(SFSpeechRecognitionTask *)task didHypothesizeTranscription:(SFTranscription *)transcription {

}

// Called only for final recognitions of utterances. No more about the utterance will be reported
- (void)speechRecognitionTask:(SFSpeechRecognitionTask *)task didFinishRecognition:(SFSpeechRecognitionResult *)recognitionResult {
    NSDictionary *attributes = @{
                                 NSFontAttributeName:[UIFont systemFontOfSize:18],
                                 };

    CGRect rect = [recognitionResult.bestTranscription.formattedString boundingRectWithSize:CGSizeMake(self.view.bounds.size.width - 100, CGFLOAT_MAX) options:NSStringDrawingUsesLineFragmentOrigin attributes:attributes context:nil];
    self.recognizerLabel.text = recognitionResult.bestTranscription.formattedString;
    self.recognizerLabel.frame = CGRectMake(50, 120, rect.size.width, rect.size.height);
}

// Called when the task is no longer accepting new audio but may be finishing final processing
- (void)speechRecognitionTaskFinishedReadingAudio:(SFSpeechRecognitionTask *)task {

}

// Called when the task has been cancelled, either by client app, the user, or the system
- (void)speechRecognitionTaskWasCancelled:(SFSpeechRecognitionTask *)task {

}

// Called when recognition of all requested utterances is finished.
// If successfully is false, the error property of the task will contain error information
- (void)speechRecognitionTask:(SFSpeechRecognitionTask *)task didFinishSuccessfully:(BOOL)successfully {
    if (successfully) {
        NSLog(@"全部解析完毕");
    }
}

#pragma mark- getter

- (UILabel *)recognizerLabel {
    if (!_recognizerLabel) {
        _recognizerLabel = [[UILabel alloc] initWithFrame:CGRectMake(50, 120, self.view.bounds.size.width - 100, 100)];
        _recognizerLabel.numberOfLines = 0;
        _recognizerLabel.font = [UIFont preferredFontForTextStyle:UIFontTextStyleBody];
        _recognizerLabel.adjustsFontForContentSizeCategory = YES;
        _recognizerLabel.textColor = [UIColor orangeColor];
        [self.view addSubview:_recognizerLabel];
    }
    return _recognizerLabel;
}

@end
上面一坨代码就是新框架的一个简单的不能在简单的例子,你可以复制代码试一试,你可以创建一个和我同名的类,这样直接拷贝上面代码就可以了。
4、步骤解析
首先、我们要做的就是获取权限,苹果对权限安全这一面是做了很大的改进的,通过iOS10关于权限的新特性不难看出来。
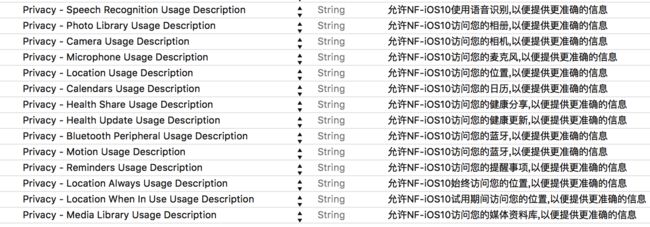
权限.png
通过上图,我们需要在info.plist配置文件中添加对应的权限,这次iOS10更新之后我们终于不需要像以前那样Copy、Paste了,因为有输入提示了~~~~开心
其次、接下来就是创建SFSpeechRecognizer实例了
这里需要提一下的就是本地化语言的坑,如果你不知道
[[NSLocale alloc] initWithLocaleIdentifier:@"zh_CN"]
@"zh_CN"字符串的话,你可以使用
[SFSpeechRecognizer supportedLocales];
进行查看,选取合适的使用,这里@"zh"在iOS9之后就不是简体中文了,而是TW繁体中文,简体中文就要使用@"zh_CN"了!!!!
for (NSLocale *lacal in [SFSpeechRecognizer supportedLocales].allObjects) {
        NSLog(@"countryCode:%@  languageCode:%@ ", lacal.countryCode, lacal.languageCode);
}
第2步 创建识别请求,就简单了直接把要识别的语音url传进去就行了(这里使用的是本地资源)
第3步中开始识别任务我用的是delegate的方式在代理方法中去做处理,苹果还提供了block方式。对应的代码:
- (SFSpeechRecognitionTask *)recognitionTaskWithRequest0:(SFSpeechURLRecognitionRequest *)request{
    return [self.speechRecognizer recognitionTaskWithRequest:request resultHandler:^(SFSpeechRecognitionResult * _Nullable result, NSError * _Nullable error) {
        if (!error) {
            NSLog(@"语音识别解析正确--%@", result.bestTranscription.formattedString);
        }else {
            NSLog(@"语音识别解析失败--%@", error);
        }
    }];
}

- (SFSpeechRecognitionTask *)recognitionTaskWithRequest1:(SFSpeechURLRecognitionRequest *)request{
    return [self.speechRecognizer recognitionTaskWithRequest:request delegate:self];
}
怎么识别我已经在代码新的很清楚了,按照步骤来就可以了,注释也很清楚。
好啦~~
赶紧试试去吧~~