目录:
1. SpringBoot集成和配置LogBack
2. 封装LogUtil,集中处理日志
3. SpringBoot集成LogStash
4. 单独安装配置LogStash
5. docker-compose一键部署ELK,简单任性
6. 常见问题和解决方法
日志在系统中至关重要,尤其是生产环境,一旦出现问题,首先是日志中的错误信息触发预警系统,然后通过邮件、短信甚至电话通知的方式报警给系统负责人。在排查修复问题阶段,开发测试人员通常也要查看系统日志,分析故障原因。
ELK是常用的日志处理系统,SpringBoot集成LogBack和LogStash非常方便,配置LogBack将日志发送给LogStash。
代码下载:https://github.com/jextop/StarterApi/
一,SpringBoot集成和配置LogBack
SpringBoot默认使用SLF4J和LogBack,可在application.yml中定制配置。
代码文件 |
功能要点 |
|
SpringBoot集成SLF4J和LogBack |
pom.xml |
引入log依赖:spring-boot-starter-logging,注:spring-boot-starter和spring-boot-starter-web已经引入了spring-boot-starter-logging |
application.yml |
定制配置log属性 |
|
封装LogUtil |
LogUtil.java |
集中处理日志 |
LogUtilTest.java |
单元测试log输出 |
|
功能调用 |
xxx.java |
调用LogUtil函数,如LogUtil.info() |
1. spring-boot-starter和spring-boot-starter-web默认引入了SLF4J和LogBack依赖。如果需要单独引入,可在pom.xml中添加spring-boot-starter-logging
2. 在application.yml中定制配置log属性:
logging.level:指定package的输出日志级别,可选:debug, info, warn, error
logging.file.path:指定日志文件路径
logging.file.max-size:指定单个文件大小,超过时将滚动生成多个文件
logging.file.max-history:指定归档日志文件保留的最长历史记录
logging.pattern.console:输出到console工作台的日志格式
logging.pattern.file:输出到日志文件的格式
logging:
level:
com.starter: info
file:
path: logs
max-size: 10MB
max-history: 7
pattern:
console: "%d %-5level [%thread] %logger : %msg%n"
file: "%d %-5level [%thread] %logger : %msg%n"
二,封装LogUtil.java集中处理日志
1. LogUtil集中处理日志
![]()
2. 单元测试LogUtil
@SpringBootTest(classes = StarterApplication.class)
public class LogUtilTest {
@Test
public void testLog() {
LogUtil.debug("debug", "message.");
LogUtil.info("info", "message.");
LogUtil.warn("warn", "message.");
LogUtil.error("error", "message.");
}
}
输出日志:
2020-01-31 14:21:13,796 INFO [main] com.common.util.LogUtil : info, message.
2020-01-31 14:21:13,796 WARN [main] com.common.util.LogUtil : warn, message.
2020-01-31 14:21:13,796 ERROR [main] com.common.util.LogUtil : error, message.
3. 代码中调用LogUtil
- 调用LogUtil.info(“xxx”)
LogUtil.info("Check cache to set str", key, str);
- Console工作台和日志文件输出:
2020-01-31 14:19:02,438 INFO [http-nio-8011-exec-2] com.common.util.LogUtil : Check cache to set str, cache_test_192.168.3.9_200131014871354985900257_缓存, cache_test_192.168.3.9_200131014871354985900257_缓存
注意:LogUtil输出的信息中logger都是LogUtil,如果需要不同的类中使用不同的logger,那么就请在类中创建自己的logger:
private static final Logger log = LoggerFactory.getLogger(LogUtil.class);
三,SpringBoot集成LogStash
代码文件 |
功能要点 |
|
SpringBoot集成LogStash |
pom.xml |
引入LogStash依赖:logstash-logback-encoder |
logback.xml |
配置LogStash日志格式 |
|
application.yml |
引用logback.xml配置 |
|
启动LogStash |
安装包bin目录 |
配置logstash.conf,启动logstash -f logstash.conf |
1. 在pom.xml中添加LogStash依赖
2. 在resouces目录下添加logback.xml
xml version="1.0" encoding="UTF-8"?>
3. 在application.yml中引用logback.xml配置:
logging:
config: classpath:logback.xml
四,单独安装配置LogStash
1. 下载LogStash:https://www.elastic.co/downloads/logstash
官网慢时可用网盘:https://pan.baidu.com/s/1b-czkB8z5aL6rdxZtBmNEw 提取码: arfb
2. 配置:在bin目录下添加logstash.conf:
input.tcp.host可设置本机ip
input.tcp.port设置端口
output.elasticsearch.hosts设置输出地址
input{
tcp {
mode => "server"
host => "0.0.0.0"
port => 9600
codec => json_lines
}
}
output{
stdout{
codec => rubydebug
}
elasticsearch {
hosts => ["elasticsearch:9200"]
}
}
3. 启动:logstash -f logstash.conf,看到端口信息提示,运行成功
4. 运行Spring项目,LogStash将收到日志信息
五,docker-compose一键部署ELK
ELK是常用的日志管理系统,使用Docker-compose一键部署,省去安装配置的繁琐步骤。
1. Docker安装:
https://docs.docker.com/install/linux/docker-ce/ubuntu/
https://docs.docker.com/docker-for-windows/install/
2. 脚本下载:
https://github.com/rickding/HelloDocker/tree/master/elk
├── docker-compose.yml
├── pull.sh
├── up.sh
├── logs.sh
├── down.sh
3. docker-compose.yml脚本配置ELK服务:
logstash和kibana需要连接elasticsearch实例,所以设置了depends_on属性。
version: '3'
services:
elasticsearch:
hostname: elasticsearch
image: elasticsearch:latest
ports:
- 9200:9200
- 9300:9300
log:
image: registry.cn-shanghai.aliyuncs.com/hellodock/logstash:latest
ports:
- 9600:9600
- 9601:9601
depends_on:
- elasticsearch
kibana:
image: registry.cn-shanghai.aliyuncs.com/hellodock/kibana:latest
ports:
- 5601:5601
depends_on:
- elasticsearch
4. pull.sh拉取镜像
可直接运行docker pull elasticsearch:latest拉取镜像,docker images查看:
5. up.sh启动容器
脚本中封装了docker-compose up -d命令,启动后运行docker ps查看容器实例:
6. logs.sh查看ELK运行日志
定制命令突出显示重要信息:
docker-compose logs -ft | grep --color -i -e error -e warn -e version -e exception
7. down.sh停止服务
docker-compose down --remove-orphans停止并删除容器:
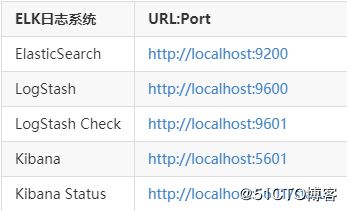
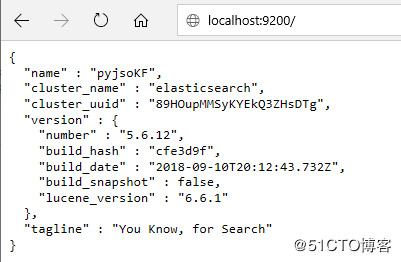
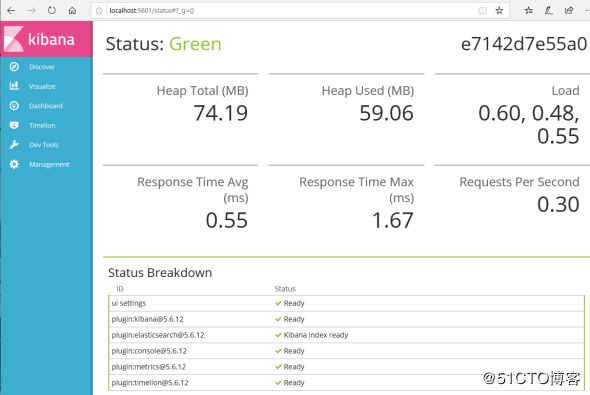
8. 查看ELK服务:
- elasticsearch:
- logstsh:
- kibana:
使用docker-compose一键部署ELK,就是这么简单任性。
五,常见问题和解决方法
l 多个log框架冲突,项目启动时出现信息:SLF4J: Class path contains multiple SLF4J bindings
原因:项目依赖的jar包中引入了别的log框架比如log4j
解决:pom.xml中引入依赖时配置exclude,将不需要的log4j排除


