主要讲解了在产品开发过程中,如何将代码变得具有“可测性”,这需要通过比如:添加辅助的对象、协议、参数来避免不可控环境对代码运行的影响;重构代码使得方法的状态明确,避免无输入输出状态不可测的情况。同样的,我们的测试代码本身也需要“可扩展性”比如避免写死的调用逻辑,以及我们对待测试代码本身也需要注意代码的质量。
简单来说,就是我们在写代码的过程中,要时刻想着是不是写出的代码比较容易的写相应的测试代码,写测试代码也得想着以后有改动的话,是不是很容易?
Testable App Code
Structure of a Unit Test:准备输入->跑代码->验证输出
Characteristics of Testable Code:可控输入+可见输出+显性状态
Testability Techniques
Protocols and parameterization
使用一个具体的“调用第三方APP打开一个文件”例子openTapped:
@IBAction func openTapped(_ sender: Any) {
    let mode: String
    switch segmentedControl.selectedSegmentIndex {
    case 0: mode = "view"
    case 1: mode = "edit"
    default: fatalError("Impossible case")
    }
    let url = URL(string: "myappscheme://open?id=\(document.identifier)&mode=\(mode)")!
    if UIApplication.shared.canOpenURL(url) {
        UIApplication.shared.open(url, options: [:], completionHandler: nil)
    } else {
        handleURLError()
    }
}
这种类型看起来应该使用UITesting,但是它实际上并不是太与UI相关,而是应该使用Unit Test,这里就来介绍如何实现可测性:
protocol URLOpening {
  func canOpenURL(_ url: URL) -> Bool
  func open(_ url: URL, options: [String: Any], completionHandler: ((Bool) -> Void)?)
}
extension UIApplication: URLOpening {
  // Nothing needed here!
}

class MockURLOpener: URLOpening {
    var canOpen = false
    var openedURL: URL?
    func canOpenURL(_ url: URL) -> Bool {
        return canOpen
    }
    func open(_ url: URL,
              options: [String: Any],
              completionHandler: ((Bool) -> Void)?) {
        openedURL = url
    }
}
这里的思想主要是使用Mock的代码来避免了实际调用需要跳转以及依赖于具体环境的问题,实现对当前方法功能的测试覆盖
func testDocumentOpenerWhenItCanOpen() {
    let urlOpener = MockURLOpener()
    urlOpener.canOpen = true
    let documentOpener = DocumentOpener(urlOpener: urlOpener)
    documentOpener.open(Document(identifier: "TheID"), mode: .edit)
    XCTAssertEqual(urlOpener.openedURL, URL(string: "myappscheme://open?id=TheID&mode=edit"))
}
最后又总结了一下
Reduce references to shared instances
Accept parameterized input
Introduce a protocol
Create a testing implementation
Separating logic and effects
这里使用一个“缓存清理”的例子,来介绍在无状态输出的情况下如何重构代码来实现可测性:
func cleanCache(maxSize: Int) throws {
    let sortedItems = self.currentItems.sorted { $0.age < $1.age }
    var cumulativeSize = 0
    for item in sortedItems {
        cumulativeSize += item.size
        if cumulativeSize > maxSize {
            try FileManager.default.removeItem(atPath: item.path)
        }
    }
}
这个方法没有返回值,也就是不能通过方法本身来知道它到底做了什么,是否成功。这里采用的方法是重构代码,将就有可测性的代码提取出来为一个新的方法:
protocol CleanupPolicy {
    func itemsToRemove(from items: Set) -> Set
}

class OnDiskCache {
    func cleanCache(maxSize: Int) throws { /* … */ }
}

struct MaxSizeCleanupPolicy: CleanupPolicy {
    let maxSize: Int
    func itemsToRemove(from items: Set) -> Set {
        var itemsToRemove = Set()
        var cumulativeSize = 0
        let sortedItems = allItems.sorted { $0.age < $1.age }
        for item in sortedItems {
            cumulativeSize += item.size
            if cumulativeSize > maxSize {
                itemsToRemove.insert(item)
            }
        }
        return itemsToRemove
    }
}

class OnDiskCache {
    /* … */
    func cleanCache(policy: CleanupPolicy) throws {
        let itemsToRemove = policy.itemsToRemove(from: self.currentItems)
        for item in itemsToRemove {
            try FileManager.default.removeItem(atPath: item.path)
        }
    }
}
这样的话,我们就可以比较容易的对MaxSizeCleanupPolicy进行单元测试,而避免将不具有显性状态的的文件删除逻辑混在一起:
func testMaxSizeCleanupPolicy() {
    let inputItems = Set([
        OnDiskCache.Item(path: "/item1", age: 5, size: 7),
        OnDiskCache.Item(path: "/item2", age: 3, size: 2),
        OnDiskCache.Item(path: "/item3", age: 9, size: 9)
        ])
    let outputItems =
        MaxSizeCleanupPolicy(maxSize: 10).itemsToRemove(from: inputItems)

    XCTAssertEqual(outputItems, [OnDiskCache.Item(path: "/item3", age: 9, size: 9)])
}
}
最后也总结了一下
Extract algorithms
Functional style with value types
Thin layer on top to execute effects
Scalable Test Code
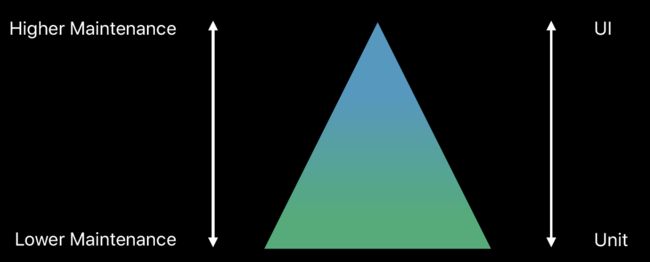
Balance between UI and unit tests
Unit Test和UI Test特点不同,针对的用例也是不同
- Unit tests great for testing small, hard-to-reach code paths
- UI tests are better at testing integration of larger pieces
Code to help UI tests scale
从代码上注意使UI测试更具有可扩展性
Abstracting UI element queries
这是针对UI相关元素的查询,避免一条一条的列出来,可以使用变量数组的形式,使得即使有新的条目也可以轻松加进来
下面是两种写法的对比:
最后是总结了一下:
- Store parts of queries in a variable
- Wrap complex queries in utility methods
- Reduces noise and clutter in UI test
Creating objects and utility functions
如下所示,所有的代码混在一起,非常难以维护
func testGameWithDifficultyBeginnerAndSoundOff() {
    app.navigationBars["Game.GameView"].buttons["Settings"].tap()
    app.buttons["Difficulty"].tap()
    app.buttons["beginner"].tap()
    app.navigationBars.buttons["Back"].tap()
    app.buttons["Sound"].tap()
    app.buttons["off"].tap()
    app.navigationBars.buttons["Back"].tap()
    app.navigationBars.buttons["Back"].tap()
    // test code
}
重构改用辅助性的对象后,代码就清晰了很多
enum Difficulty {
    case beginner
    case intermediate
    case veteran
}
enum Sound {
    case on
    case off
}

func setDifficulty(_ difficulty: Difficulty) {
    // code
}
func setSound(_ sound: Sound) {
    // code
}

func testGameWithDifficultyBeginnerAndSoundOff() {
    app.navigationBars["Game.GameView"].buttons["Settings"].tap()
    setDifficulty(.beginner)
    setSound(.off)
    app.navigationBars.buttons["Back"].tap()
    // test code
}
最后同样是总结:
- Encapsulate common testing workflows
- Cross-platform code sharing
- Improves maintainability
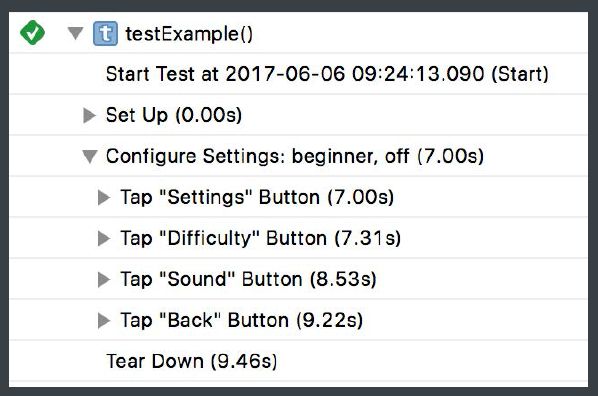
这里提到了一个新的功能,可以将一组子Action合成一个有意义的组:
Utilizing keyboard shortcuts
使用keyboard shortcut,避免逐行的调用
Quality of test code
测试代码也是代码,对质量的要求与产品代码同样重要!
Important to consider even though it isn't shipping
Test code should support the evolution of your app
Coding principles in app code also apply to test code
测试代码同样需要代码审阅!而不是说用测试代码来代替你的代码审阅!


