本文将对以下几个模块进行总结
  1、  沙盒
  2、  Plist
  3、  Preference偏好设置
  4、  NSKeyedArchiver归档 / NSKeyedUnarchiver解档
  5、  SQLite3的使用
  6、  FMDB
  7、  Core Data
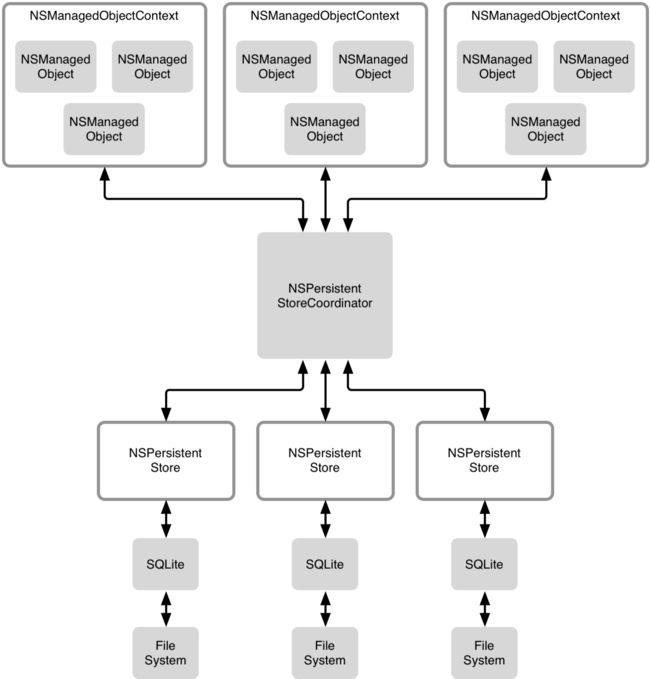
下图是Core Data堆栈的图示,在这里是为了做文章的封面图片,后文会介绍Core Data的使用方法。
一、沙盒
iOS本地化存储的数据保存在沙盒中, 并且每个应用的沙盒是相对独立的。每个应用的沙盒文件结构都是相同的,如下图所示:
Documents:iTunes会备份该目录。一般用来存储需要持久化的数据。
Library/Caches:缓存,iTunes不会备份该目录。内存不足时会被清除,应用没有运行时,可能会被清除,。一般存储体积大、不需要备份的非重要数据。
Library/Preference:iTunes同会备份该目录,可以用来存储一些偏好设置。
tmp: iTunes不会备份这个目录,用来保存临时数据,应用退出时会清除该目录下的数据。
如何拿到每个文件夹的路径呢?我这里就只说最好的一种方法。
// 这个方法返回的是一个数组,iOS中这个数组其实只有一个元素,所以我们可以用lastObject或lastObject来拿到Documents目录的路径
NSString *documentPath = NSSearchPathForDirectoriesInDomains(NSDocumentDirectory, NSUserDomainMask, YES).lastObject;
 // 得到Document目录下的test.plist文件的路径
 NSString *filePath = [documentPath stringByAppendingPathComponent:@"test.plist"];
上面的方法有三个参数,这里分别说一下。
NSDocumentDirectory: 第一个参数代表要查找哪个文件,是一个枚举,点进去看一下发现有很多选择,为了直接找到沙盒中的Documents目录,我们一般用NSDocumentDirectory。
NSUserDomainMask: 也是一个枚举,表示搜索的范围限制于当前应用的沙盒目录。我们一般就选择NSUserDomainMask。
YES (expandTilde): 第三个参数是一个BOOL值。iOS中主目录的全写形式是/User/userName,这个参数填YES就表示全写,填NO就是写成‘‘~’’,我们一般填YES。
根据上面的文字,你应用可以知道如何拿到Library/Caches目录下的文件路径了吧?没错,就是这样:
//获取Library/Caches目录路径
NSString *path = NSSearchPathForDirectoriesInDomains(NSCachesDirectory, NSUserDomainMask, YES).firstObject;
//获取Library/Caches目录下的test.data文件路径
NSString *filePath = [path stringByAppendingPathComponent:@"test.data"];
//获取temp路径
 NSString *tmp= NSTemporaryDirectory();
//获取temp下test.data文件的路径
 NSString *filePath = [tmp stringByAppendingPathComponent:@"test.data"];
所以,如果程序中有需要长时间持久化的数据,就选择Documents,如果有体积大但是并不重要的数据,就可以选择交给Library,而临时没用的数据当然是放到temp。至于Preference则可以用来保存一些设置类信息,后面会讲到偏好设置的使用方法。
//一行代码搞定
 NSString *filePath = [@"test.plist" appendDocumentPath];
//使用WHKit,上面这一行代码等同于下面这两行。
NSString *documentPath = NSSearchPathForDirectoriesInDomains(NSDocumentDirectory, NSUserDomainMask, YES).lastObject;
NSString *filePath = [documentPath stringByAppendingPathComponent:@"test.plist"];
二、Plist存储
Plist文件的Type可以是字典NSDictionary或数组NSArray,也就是说可以把字典或数组直接写入到文件中。
NSString、NSData、NSNumber等类型,也可以使用writeToFile:atomically:方法直接将对象写入文件中,只是Type为空。
下面就举个例子来看一下如何使用Plist来存储数据。
//准备要保存的数据
NSDictionary *dict = [NSDictionary dictionaryWithObject:@"first" forKey:@"1"];
 //获取路径,你也可以利用上面说WHKit更优雅的拿到路径
NSString *documentPath = NSSearchPathForDirectoriesInDomains(NSDocumentDirectory, NSUserDomainMask, YES).lastObject;
NSString *filePath = [documentPath stringByAppendingPathComponent:@"test.plist"];
//写入数据
[dict writeToFile:filePath atomically:YES];
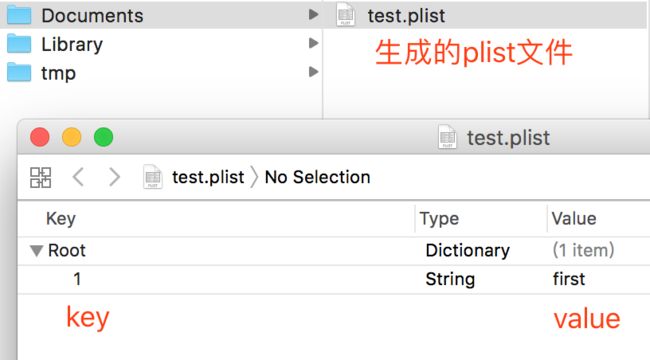
上面的代码运行之后,在应用沙盒的Documents中就创建了一个plist文件,并且已经写入数据保存。
数据存储了,那么如何读取呢?
//拿到plist文件路径,你也可以利用上面说WHKit更优雅的拿到路径
NSString *documentPath = NSSearchPathForDirectoriesInDomains(NSDocumentDirectory, NSUserDomainMask, YES).lastObject;
NSString *filePath = [documentPath stringByAppendingPathComponent:@"test.plist"];
//解析数据,log出的结果为first,读取成功
NSDictionary *dict = [NSDictionary dictionaryWithContentsOfFile:filePath];
NSString *result = dict[@"1"];
NSLog(@"%@",result);
上面这段代码就读出了plist种的数据。
三、Preference偏好设置
偏好设置的使用非常方便快捷,我们一般使用它来进行一些设置的记录,比如用户名,开关是否打开等设置。
Preference是通过NSUserDefaults来使用的,是通过键值对的方式记录设置。下面举个例子。
利用NSUserDefaults判断APP是不是首次启动。
// 启动的时候判断key有没有value,如果有,说明已经启动过了,如果没有,说明是第一次启动
if (![[NSUserDefaults standardUserDefaults] valueForKey:@"first"]) {
 //如果是第一次启动,就运用偏好设置给key设置一个value
 [[NSUserDefaults standardUserDefaults] setValue:@"start" forKey:@"first"];
NSLog(@"是第一次启动");
 } else {
NSLog(@"不是第一次启动");
}
通过键值对的方式非常easy的保存了数据。
注意:NSUserDefaults可以存储的数据类型包括:NSData、NSString、NSNumber、NSDate、NSArray、NSDictionary。如果要存储其他类型,则需要转换为前面的类型,才能用NSUserDefaults存储。
下面的例子是用NSUserDefaults存储图片,需要先把图片转换成NSData类型。
UIImage *image=[UIImage imageNamed:@"photo"];
 //UIImage对象转换成NSData
 NSData *imageData = UIImageJPEGRepresentation(image, 100);
//偏好设置可以保存NSData,但是不能保存UIimage
 [[NSUserDefaults standardUserDefaults] setObject:imageData forKey:@"image"];
// 读出data
 NSData *getImageData = [[NSUserDefaults standardUserDefaults] dataForKey:@"image"];
//NSData转换为UIImage
UIImage *Image = [UIImage imageWithData:imageData];
四、NSKeyedArchiver归档 / NSKeyedUnarchiver解档
归档和解档会在写入、读出数据之前进行序列化、反序列化,数据的安全性相对高一些。
NSKeyedArchiver可以有三个使用情景。
1.对单个简单对象进行归档/解档
与plist差不多,对于简单的数据进行归档,直接写入文件路径。
//获取归档文件路径
NSString *documentPath = NSSearchPathForDirectoriesInDomains(NSDocumentDirectory, NSUserDomainMask, YES).lastObject;
 NSString *filePath = [documentPath stringByAppendingPathComponent:@"test"];
//对字符串@”test”进行归档,写入到filePath中
[NSKeyedArchiver archiveRootObject:@"test" toFile:filePath];
//根据保存数据的路径filePath解档数据
NSString *result = [NSKeyedUnarchiver unarchiveObjectWithFile:filePath];
//log结构为@”test”,就是上面归档的数据
 NSLog(@"%@",result);
当然,也可以存储NSArray,NSDictionary等对象。
2.对多个对象进行归档/解档
这种情况可以一次保存多种不同类型的数据,最终使用的是与plist相同的writeToFile:(NSString *)path atomically:(BOOL)useAuxiliaryFile来写入数据。
//获取归档路径
NSString *documentPath = NSSearchPathForDirectoriesInDomains(NSDocumentDirectory,  NSUserDomainMask, YES).lastObject;
NSString *filePath = [documentPath stringByAppendingPathComponent:@"test"];
 //用来承载数据的NSMutableData
NSMutableData *data = [[NSMutableData alloc] init];
 //归档对象
NSKeyedArchiver *archiver = [[NSKeyedArchiver alloc] initForWritingWithMutableData:data];
 //将要被保存的三个数据
NSString *name = @"jack";
int age = 17;
double height = 1.78;
//运用encodeObject:方法归档数据
[archiver encodeObject:name forKey:@"name"];
[archiver encodeInt:age forKey:@"age"];
[archiver encodeDouble:height forKey:@"height"];
 //结束归档
[archiver finishEncoding];
 //写入数据(存储数据)
[data writeToFile:filePath atomically:YES];
//NSMutableData用来承载解档出来的数据
NSMutableData *resultData = [[NSMutableData alloc] initWithContentsOfFile:filePath];
//解档对象
NSKeyedUnarchiver *unArchiver = [[NSKeyedUnarchiver alloc] initForReadingWithData:resultData];
//分别解档出三个数据
NSString *resultName = [unArchiver decodeObjectForKey:@"name"];
int resultAge = [unArchiver decodeIntForKey:@"age"];
double resultHeight = [unArchiver decodeDoubleForKey:@"height"];
//结束解档
[unArchiver finishDecoding];
//成功打印出结果,说明成功归档解档
NSLog(@"name = %@, age = %d, height = %.2f",resultName,resultAge,resultHeight);
3.归档保存自定义对象
我认为这是归档最常使用的情景。
定义一个Person类,如果想对person进行归档解档,首先要让Person遵守
/********Person.h*********/
#import
//遵守NSCoding协议
@interface Person : NSObject
@property (nonatomic, copy) NSString *name;
@property (nonatomic, assign) NSInteger age;
//自定义的归档保存数据的方法
+(void)savePerson:(Person *)person;
//自定义的读取沙盒中解档出的数据
+(Person *)getPerson;
@end
NSCoding协议有2个方法:
- (void)encodeWithCoder:(NSCoder *)aCoder
归档时调用这个方法,在方法中使用encodeObject:forKey:归档变量。- (instancetype)initWithCoder:(NSCoder *)aDecoder
解档时调用这个方法,在方法中石油decodeObject:forKey读出变量。
@implementation Person
//归档,Key建议使用宏代替,这里就不使用了
- (void)encodeWithCoder:(NSCoder *)aCoder {
[aCoder encodeObject:self.name forKey:@"name"];
[aCoder encodeInteger:self.age forKey:@"age"];
}
//解档
-(instancetype)initWithCoder:(NSCoder *)aDecoder {
if (self=[super init]) {
self.name = [aDecoder decodeObjectForKey:@"name"];
self.age = [aDecoder decodeIntegerForKey:@"age"];
  }
return self;
}
//类方法,运用NSKeyedArchiver归档数据
+(void)savePerson:(Person *)person {
NSString *docPath = NSSearchPathForDirectoriesInDomains(NSDocumentDirectory, NSUserDomainMask, YES).lastObject;
NSString *path=[docPath stringByAppendingPathComponent:@"Person.plist"];
[NSKeyedArchiver archiveRootObject:person toFile:path];
}
//类方法,使用NSKeyedUnarchiver解档数据
+(Person *)getPerson {
NSString *docPath = NSSearchPathForDirectoriesInDomains(NSDocumentDirectory, NSUserDomainMask, YES).lastObject;
NSString *path=[docPath stringByAppendingPathComponent:@"Person.plist"];
Person *person = [NSKeyedUnarchiver unarchiveObjectWithFile:path];
return person;
}
@end
下面就可以在需要的地方归档或解档Person对象。
/*******ViewController.m*******/
//创建Person对象
Person *person = [Person new];
person.name = @"jack";
person.age = 17;
//归档保存数据
[Person savePerson:person];
//解档拿到数据
Person *resultPerson = [Person getPerson];
//打印出结果,证明归档解档成功
NSLog(@"name = %@, age = %ld",resultPerson.name,resultPerson.age);
五、SQLite3的使用
1、首先需要添加库文件libsqlite3.0.tbd
2、导入头文件#import
3、打开数据库
4、创建表
5、对数据表进行增删改查操作
6、关闭数据库
上代码之前,有些问题你需要了解。
SQLite 不区分大小写,但也有需要注意的地方,例如GLOB 和 glob 具有不同作用。
SQLite3有5种基本数据类型 text、integer、float、boolean、blob
SQLite3是无类型的,在创建的时候你可以不声明字段的类型,不过还是建议加上数据类型
create table t_student(name, age);
create table t_student(name text, age integer);
下面的代码就是SQLite3的基本使用方法,带有详细注释。
代码中用到了一个Student类,这个类有两个属性name和age。
/****************sqliteTest.m****************/
#import "sqliteTest.h"
 //1.首先导入头文件 #import
//2.数据库 static sqlite3 *db;
@implementation sqliteTest
/** 3.打开数据库 */
+ (void)openSqlite {
    //数据库已经打开
    if (db != nil) {
        NSLog(@"数据库已经打开");
        return;
    }
    //创建数据文件路径
    NSString *string = NSSearchPathForDirectoriesInDomains(NSDocumentDirectory, NSUserDomainMask, YES).firstObject;
    NSString *path = [string stringByAppendingPathComponent:@"Student.sqlite"];
    NSLog(@"%@",path);
    //打开数据库
    int result = sqlite3_open(path.UTF8String, &db);
    if (result == SQLITE_OK) {
        NSLog(@"数据库打开成功");
    } else {
        NSLog(@"数据库打开失败");
    }
}
/** 4.创建表 */
+ (void)createTable {
    //创建表的SQLite语句,其中id是主键,not null 表示在表中创建纪录时这些字段不能为NULL
    NSString *sqlite = [NSString stringWithFormat:@"create table if not exists t_student (id integer primary key autoincrement, name text not null, age integer)"];
    //用来记录错误信息 char *error = NULL;
    //执行SQLite语句
    int result = sqlite3_exec(db, sqlite.UTF8String, nil, nil, &error);
    if (result == SQLITE_OK) {
        NSLog(@"创建表成功");
    }else {
        NSLog(@"创建表失败");
    }
}
/** 5.添加数据 */
+ (void)addStudent:(Student *)stu {
    //增添数据的SQLite语句
    NSString *sqlite = [NSString stringWithFormat:@"insert into t_student (name,age) values ('%@','%ld')",stu.name,stu.age];
    char *error = NULL;
    int result = sqlite3_exec(db, [sqlite UTF8String], nil, nil, &error);
    if (result == SQLITE_OK) {
        NSLog(@"添加数据成功");
    } else {
        NSLog(@"添加数据失败");
    }
}
/** 6.删除数据 */
+ (void)deleteStuWithName:(NSString *)name {
    //删除特定数据的SQLite语句
    NSString *sqlite = [NSString stringWithFormat:@"delete from t_student where name = '%@'",name];
    char *error = NULL;
    int result = sqlite3_exec(db, sqlite.UTF8String, nil, nil, &error);
    if (result == SQLITE_OK) {
        NSLog(@"删除数据成功");
    } else {
        NSLog(@"删除数据失败");
    }
}
/** 7.更改数据 */
+ (void)upDateWithStudent:(Student *)stu WhereName:(NSString *)name {
    //更新特定字段的SQLite语句
    NSString *sqlite = [NSString stringWithFormat:@"update t_student set name = '%@', age = '%ld' where name = '%@'",stu.name,stu.age,name];
    char *error = NULL;
    int result = sqlite3_exec(db, sqlite.UTF8String, nil, nil, &error);
    if (result == SQLITE_OK) {
        NSLog(@"修改数据成功");
    } else { NSLog(@"修改数据失败");
    }
}
/** 8.根据条件查询 */
+ (NSMutableArray *)selectWithAge:(NSInteger)age {
    //可变数组,用来保存查询到的数据
    NSMutableArray *array = [NSMutableArray array];
    //查询所有数据的SQLite语句
    NSString *sqlite = [NSString stringWithFormat:@"select * from t_student where age = '%ld'",age];
    //定义一个stmt存放结果集
    sqlite3_stmt *stmt = NULL;
    //执行
    int result = sqlite3_prepare(db, sqlite.UTF8String, -1, &stmt, NULL);
    if (result == SQLITE_OK) {
        NSLog(@"查询成功");
        //遍历查询到的所有数据,并添加到上面的数组中
        while (sqlite3_step(stmt) == SQLITE_ROW) {
            Student *stu = [[Student alloc] init];
            //获得第1列的姓名,第0列是id
            stu.name = [NSString stringWithUTF8String:(const char *)sqlite3_column_text(stmt, 1)];
            //获得第2列的年龄
            stu.age = sqlite3_column_int(stmt, 2);
            [array addObject:stu];
        }
    } else {
        NSLog(@"查询失败");
    }
    //销毁stmt,防止内存泄漏
    sqlite3_finalize(stmt);
    return array;
}
/** 9.查询所有数据 */
+ (NSMutableArray *)selectStudent {
    //可变数组,用来保存查询到的数据
    NSMutableArray *array = [NSMutableArray array];
    //查询所有数据的SQLite语句
    NSString *sqlite = [NSString stringWithFormat:@"select * from t_student"];
    //定义一个stmt存放结果集
    sqlite3_stmt *stmt = NULL;
    //执行
    int result = sqlite3_prepare(db, sqlite.UTF8String, -1, &stmt, NULL); if (result == SQLITE_OK) {
        NSLog(@"查询成功");
        //遍历查询到的所有数据,并添加到上面的数组中
        while (sqlite3_step(stmt) == SQLITE_ROW) {
            Student *stu = [[Student alloc] init];
            //获得第1列的姓名,第0列是id
            stu.name = [NSString stringWithUTF8String:(const char *)sqlite3_column_text(stmt, 1)];
            //获得第2列的年龄 stu.age = sqlite3_column_int(stmt, 2);
            [array addObject:stu];
        }
    } else {
        NSLog(@"查询失败");
    }
    //销毁stmt,防止内存泄漏
    sqlite3_finalize(stmt);
    return array;
}
/** 10.删除表中的所有数据 */
+ (void)deleteAllData {
    NSString *sqlite = [NSString stringWithFormat:@"delete from t_student"];
    char *error = NULL;
    int result = sqlite3_exec(db, sqlite.UTF8String, nil, nil, &error);
    if (result == SQLITE_OK) { NSLog(@"清除数据库成功");
    } else {
        NSLog(@"清除数据库失败");
    }
}
/** 11.删除表 */
+ (void)dropTable {
    NSString *sqlite = [NSString stringWithFormat:@"drop table if exists t_student"];
    char *error = NULL;
    int result = sqlite3_exec(db, sqlite.UTF8String, nil, nil, &error);
    if (result == SQLITE_OK) {
        NSLog(@"删除表成功");
    } else {
        NSLog(@"删除表失败");
    }
}
/** 12.关闭数据库 */
+ (void)closeSqlite {
    int result = sqlite3_close(db);
    if (result == SQLITE_OK) {
        NSLog(@"数据库关闭成功");
    } else {
        NSLog(@"数据库关闭失败");
    }
}
附上SQLite的基本语句
创建表:
- create table if not exists 表名 (字段名1, 字段名2...);
create table if not exists t_student (id integer primary key autoincrement, name text not null, age integer)
- 增加数据:
insert into 表名 (字段名1, 字段名2, ...) values(字段1的值, 字段2的值, ...);
insert into t_student (name,age) values (@"Jack",@17);
- 根据条件删除数据:
delete from 表名 where 条件;
delete from t_student where name = @"Jack";
- 删除表中所有的数据:
delete from 表名
delete from t_student
- 根据条件更改某个数据:
update 表名 set 字段1 = '值1', 字段2 = '值2' where 字段1 = '字段1的当前值'
update t_student set name = 'lily', age = '16' where name = 'Jack'
- 根据条件查找:
select * from 表名 where 字段1 = '字段1的值'
select * from t_student where age = '16'
- 查找所有数据:
select * from 表名
select * from t_student
- 删除表:
drop table 表名
drop table t_student
- 排序查找:
select * from 表名 order by 字段
select * from t_student order by age asc (升序,默认)
select * from t_student order by age desc (降序)
- 限制:
select * from 表名 limit 值1, 值2
select * from t_student limit 5, 10 (跳过5个,一共取10个数据)
六、FMDB
FMDB封装了SQLite的C语言API,更加面向对象。
首先需要明确的是FMDB中的三个类。
FMDatabase:可以理解成一个数据库。
FMResultSet:查询的结果集合。
FMDatabaseQueue:运用多线程,可执行多个查询、更新。线程安全。
FMDB基本语法
查询:executeQuery: SQLite语句命令。
[db executeQuery:@"select id, name, age from t_person"]
// CREATE, UPDATE, INSERT, DELETE, DROP,都使用executeUpdte
[db executeUpdate:@"create table if not exists t_person (id integer primary key autoincrement, name text, age integer)"]
FMDB的基本使用
在项目中导入FMDB框架和sqlite3.0.tbd,导入头文件。
1. 打开数据库,并创建表
初始化FMDatabase:FMDatabase *db = [FMDatabase databaseWithPath:filePath];
其中的filePath是提前准备好要存放数据的路径。
打开数据库:[db open]
创建数据表:[db executeUpdate:@"create table if not exists t_person (id integer primary key autoincrement, name text, age integer)"];
#import "ViewController.h"
#import
@interface ViewController ()
@end @implementation ViewController{
    FMDatabase *db;
}
- (void)openCreateDB {
    //存放数据的路径
    NSString *path = NSSearchPathForDirectoriesInDomains(NSCachesDirectory, NSUserDomainMask, YES).firstObject;
    NSString *filePath = [path stringByAppendingPathComponent:@"person.sqlite"];
    //初始化FMDatabase
    db = [FMDatabase databaseWithPath:filePath];
    //打开数据库并创建person表,person中有主键id,姓名name,年龄age
    if ([db open]) {
        BOOL success = [db executeUpdate:@"create table if not exists t_person (id integer primary key autoincrement, name text, age integer)"];
        if (success) {
            NSLog(@"创表成功");
        }else {
            NSLog(@"创建表失败");

        }

    } else {
        NSLog(@"打开失败");

    }

}
2. 插入数据
运用executeUpdate方法执行插入数据命令: [db executeUpdate:@"insert into t_person(name,age) values(?,?)",@"jack",@17]
-(void)insertData {
    BOOL success = [db executeUpdate:@"insert into t_person(name,age) values(?,?)",@"jack",@17];
    if (success) {
        NSLog(@"添加数据成功");

    } else {
        NSLog(@"添加数据失败");

    }

}
3. 删除数据
删除姓名为lily的数据:[db executeUpdate:@"delete from t_person where name = 'lily'"]
-(void)updateData {
    BOOL success = [db executeUpdate:@"update t_person set name = 'lily' where age = 17"];
    if (success) {
        NSLog(@"更新数据成功");

    } else {
        NSLog(@"更新数据失败");

    }

}
未完待续


