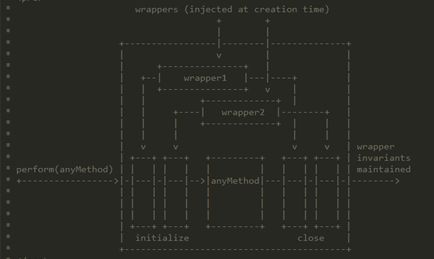
1、Transation
在上一篇文章中讲到在调用ReactDOM.render方法渲染组件时,其主要功能是通过ReactMount 文件下的_renderSubtreeIntoContainer方法实现的,该方法主要将组件渲染分为三个步骤:
(1) Diff算法判断新的虚拟DOM差异,首次渲染可以跳过
(2) 将虚拟DOM实例化
(3) 将实例化后的DOM写入到container中
步骤(3)调用了ReactUpdates.batchedUpdates方法,它的第一个参数是batchedMountComponentIntoNode方法,来看一看这个方法的源码
  var transaction = ReactUpdates.ReactReconcileTransaction.getPooled(
  /* useCreateElement */
  !shouldReuseMarkup && ReactDOMFeatureFlags.useCreateElement);
  transaction.perform(mountComponentIntoNode, null, componentInstance, container, transaction, shouldReuseMarkup, context);
  ReactUpdates.ReactReconcileTransaction.release(transaction);
}
可见,ReactUpdates是通过调用ReactUpdates.ReactReconcileTransaction 的transaction.perform()实现的,为什么调用perform呢?何为transation?
官方解释如下:
Transaction
creates a black box that is able to wrap any method such that certain invariants are maintained before and after the method is invoked (Even if an exception is thrown while invoking the wrapped method). Whoever instantiates a transaction can provide enforcers of the invariants at creation time. TheTransactionclass itself will supply one additional automatic invariant for you - the invariant that any transaction instance should not be run while it is already being run. You would typically create a single instance of aTransaction` for reuse multiple times, that potentially is used to wrap several different methods. Wrappers are extremely simple - they only require implementing two methods.
Transaction对需要执行的方法进行封装,只允许你在当前没有其他事物被运行时才运行当前事物。其结构如下:
Transaction将需要执行的函数封装成两个wrapper,每个wrapper包含了initialize方法和close方法。执行一个transaction其实就是调用它的perform,源码如下:
    /* eslint-enable space-before-function-paren */
    var errorThrown;
    var ret;
    try {//标志当前处于事物正在执行 ,将
      this._isInTransaction = true;
      errorThrown = true;
     //事物排队
      this.initializeAll(0);
     // 执行method
      ret = method.call(scope, a, b, c, d, e, f);
      errorThrown = false;
    } finally {
// 执行结束后 close transaction。
      try {
        if (errorThrown) {
          try {
            this.closeAll(0);
          } catch (err) {}
        } else {
          this.closeAll(0);
        }
      } finally {
       //将this._isInTransaction设置为false,结束当前事物,标志其他transform可以执行。
        this._isInTransaction = false;
      }
    }
    return ret;
  }
可见,transaction的perform方法其实就是对call方法进行了封装。
在执行transaction时,首先会先调用initializeAll()进行将需要进行的操作加入临时队列,
initializeAll: function (startIndex) {
    var transactionWrappers = this.transactionWrappers;
    for (var i = startIndex; i < transactionWrappers.length; i++) {
      var wrapper = transactionWrappers[i];
      try {
        this.wrapperInitData[i] = OBSERVED_ERROR;
        this.wrapperInitData[i] = wrapper.initialize ? wrapper.initialize.call(this) : null;
      } finally {
        if (this.wrapperInitData[i] === OBSERVED_ERROR) {
        try {
            this.initializeAll(i + 1);
          } catch (err) {}
        }
      }
    }
  }
当transaction执行结束时会调用close结束当前事物。
closeAll: function (startIndex) {
    var transactionWrappers = this.transactionWrappers;
    for (var i = startIndex; i < transactionWrappers.length; i++) {
      var wrapper = transactionWrappers[i];
      var initData = this.wrapperInitData[i];
      var errorThrown;
      try {
        errorThrown = true;
        if (initData !== OBSERVED_ERROR && wrapper.close) {
          wrapper.close.call(this, initData);
        }
        errorThrown = false;
      } finally {
        if (errorThrown) {
          try {
            this.closeAll(i + 1);
          } catch (e) {}
        }
      }
    }
    this.wrapperInitData.length = 0;
  }
可见,batchUpdate 功能都是通过执行各种 transaction 实现的。当虚拟DOM实例化之后并没有立刻插入到DOM中,而是通过 ReactUpdates.batchedUpdate 方法存入临时队列中。当一个 transaction 完成后,才会context写到container中。
batchedMountComponentIntoNode(componentInstance, container, shouldReuseMarkup, context)
在React中还有很多地方使用到了transaction,比如this.setState()。就是我们今天的主题:
2、React的更新机制
React更新机制来源于一个React.js网站React Kung Fu
,在此安利一下,个人觉得对学习react很有帮助。
在react需要更新时,通常需要调用setState(),我们来看一个实例:
var Counter = React.createClass({
getInitialState: function () {
return { clickCount: 0 };
},
handleClick: function () {
this.setState(function(state) {
return {clickCount: state.clickCount + 1};
});
},
render: function () {
return (点我!点击次数为: {this.state.clickCount}
);
}
});
ReactDOM.render(
在React文件中,其组件来自ReactBaseClasses文件下的ReactComponent,setState是它的一个方法。我们来看一看在ReactBaseClasses文件下的源码:
function ReactComponent(props, context, updater) {
  this.props = props;
  this.context = context;
  this.refs = emptyObject;
  this.updater = updater || ReactNoopUpdateQueue;
}
ReactComponent.prototype.setState = function (partialState, callback) {
   this.updater.enqueueSetState(this, partialState);
  if (callback) {
    this.updater.enqueueCallback(this, callback, 'setState');
  }
};
setState方法主要做了两件事情:
一是将setState放入updater的SetState 队列;
二是将callback放入updater的Callback队列。
在setState()方法中,使用了this.updater对象,那么什么是updater呢?顾名思义,它是一个更新作用的对象,定义在ReactClass 和 ReactComponent中,定义如下:
this.updater = updater || ReactNoopUpdateQueue;
如果没有传入参数updater,那么this.updater的值就是ReactNoopUpdateQueue来进行初始化。而ReactNoopUpdateQueue.enqueueSetState主要起到一个在非生产版本中警告(warning)的作用。真正的updater是在render中注入(inject)的。因此如果你在constructor中尝试调用setState,也会给出相应的警告表明在非安装或已卸载的组件中不能使用setState。
2-1 updater
那么updater是如何注入的呢?在React Kung Fu网有这么一句话:
React.js codebase relies heavily on a dependency injection principle. This allows to substitute parts of React.js based on the environment (server-side vs. client-side, different platforms) in which you’re rendering. ReactComponent is a part of the isomorphic namespace - it will always exist, no matter it is React Native, ReactDOM on browser or server-side. Also it contains only pure JavaScript which should run on every device capable of understanding the ECMAScript 5 standard of JS.
React.js的源码大量地依赖于注入原则,实现在其他平台环境的渲染。ReactComponent脚本存在于isomorphic目录这意味着它支持异构,即它可用于React Native,在浏览器端或服务器端运行的ReactDOM。那么真实的updater在哪里注入的呢?
* 初始化组件, 渲染层和注册事件监听器。
* @param {ReactReconcileTransaction|ReactServerRenderingTransaction} transaction
* @param {?object} hostParent
* @param {?object} hostContainerInfo
   * @param {?object} context
   * @return {?string} Rendered markup to be inserted into the DOM.
   * @final
   * @internal
   */
  mountComponent: function (transaction, hostParent, hostContainerInfo, context) {
…
var updateQueue = transaction.getUpdateQueue();
var inst = this._constructComponent(doConstruct, publicProps, publicContext, updateQueue);
inst.props = publicProps;
    inst.context = publicContext;
    inst.refs = emptyObject;
    inst.updater = updateQueue;
}
_constructComponent方法的返回值是同文件下_constructComponentWithoutOwner的返回值:
_constructComponent: function (doConstruct, publicProps, publicContext, updateQueue){
…
return this._constructComponentWithoutOwner(doConstruct, publicProps, publicContext, updateQueue);
}
   functio_constructComponentWithoutOwner:function (doConstruct, publicProps, publicContext, updateQueue) {
    …
          return new Component(publicProps, publicContext, updateQueue);
    …
    }
由此可见,更新队列updateQueue是在_constructComponentWithoutOwner方法中注入。现在知道了何为updater,接下来我们回归到setState中的两个回调方法enqueueSetState和enqueueCallback。
未完待续。。。
继续。。。
2-2 enqueueSetState和enqueueCallback
在ReactUpdateQueue.js中找到这两个方法的源码:
enqueueSetState: function (publicInstance, partialState) {
   … …
    var internalInstance = getInternalInstanceReadyForUpdate(publicInstance, 'setState');
    if (!internalInstance) {
      return;
    }
    var queue = internalInstance._pendingStateQueue || (internalInstance._pendingStateQueue = []);
    queue.push(partialState);
    enqueueUpdate(internalInstance);
  },
enqueueCallback: function (publicInstance, callback, callerName) {
    ReactUpdateQueue.validateCallback(callback, callerName);
    var internalInstance = getInternalInstanceReadyForUpdate(publicInstance);
    if (!internalInstance) {
      return null;
    }
    if (internalInstance._pendingCallbacks) {
      internalInstance._pendingCallbacks.push(callback);
    } else {
      internalInstance._pendingCallbacks = [callback];
    }
    enqueueUpdate(internalInstance);
  },
从上面两个函数可以发现,他们都使用了enqueueUpdate函数,这两个函数的逻辑如下:
(1) 创建对象internalInstance,它是getInternalInstanceReadyForUpdate的实例对象。
function getInternalInstanceReadyForUpdate(publicInstance, callerName) {
  var internalInstance = ReactInstanceMap.get(publicInstance);
}
由此可见internalInstance其实是ReactInstanceMap的实例,getInternalInstanceReadyForUpdate只是起到委托的作用。而ReactInstanceMap 是一个操作实例对象的函数封装。注:state初始化时会调用ReactInstanceMap.set方法
set: function (key, value) {
    key._reactInternalInstance = value;
  }
在更新队列时,用get方法取其值。初次之外还有remove和has方法。
(2) 对internalInstance进行修改,将setState写入internalInstance._pendingStateQueue队列中,将callback写入_pendingCallbacks。
(3) 最后调用enqueueUpdate(internalInstance)刷新更新。
来看一看enqueueUpate是如何实现刷新更新的:
function enqueueUpdate(internalInstance) {
  ReactUpdates.enqueueUpdate(internalInstance);
}
因此,由于ReactUpdate是中有共享方法,而它得问依赖是被注入的。
enqueueUpate是如何通过引用ReactUpdates.enqueueUpdate方法实现flush更新的。在ReactUpdates.js下找到enqueue的源码有:
/**
 * Mark a component as needing a rerender, adding an optional callback to a
 * list of functions which will be executed once the rerender occurs.
 */
function enqueueUpdate(component) {
  ensureInjected();
  // Various parts of our code (such as ReactCompositeComponent's
  // _renderValidatedComponent) assume that calls to render aren't nested;
  // verify that that's the case. (This is called by each top-level update
  // function, like setState, forceUpdate, etc.; creation and
  // destruction of top-level components is guarded in ReactMount.)
// 如果当前没有分批处理操作则使用batchingStrategy.batchedUpdates分批处理更新队列,结束后返回
  if (!batchingStrategy.isBatchingUpdates) {
    batchingStrategy.batchedUpdates(enqueueUpdate, component);
    return;
  }
// 如果当前有分批处理操作,则把需要更新的组件加入dirtyComponents队列中

  dirtyComponents.push(component);
  if (component._updateBatchNumber == null) {
    component._updateBatchNumber = updateBatchNumber + 1;
  }
}
enqueueUpdate的功能实现由两个重要的步骤,分别是ensureInjected()和
batchingStrategy(一种批量处理更新机制的策略)。
ensureInjected的源码如下:
function ensureInjected() {
  !(ReactUpdates.ReactReconcileTransaction && batchingStrategy) ? process.env.NODE_ENV !== 'production' ? invariant(false, 'ReactUpdates: must inject a reconcile transaction class and batching strategy') : _prodInvariant('123') : void 0;
}
由ensureInjected的代码逻辑可知,ReactUpdate必须要注入ReactUpdates.ReactReconcileTransaction(一个解调的事物类)和batchingStrategy(批量处理策略)。BatchingStrategy是一种React批量处理更新的策略。在源码中,当且仅有一个策略是ReactDefaultBatchingStrategy。ReactReconcileTransaction 依赖于环境,负责处理更新后的事物状态,比如在DOM中,修复更新后导致文本选择状态的丢失问题、在解调期间禁止事件和生命周期的方法进入队列。
enqueueUpdate的有些难理解,特别是第一眼好像并没有发生特别的事情。BatchingStrategy 能告诉你当前是否有transaction处于进程中。如果不在,enqueueUpdate会停下来,将它自身注册到transaction中并执行。然后一个组件会被添加到dirty组件列表中。但是到目前为止,还没有搞清楚状态是什么致使状态更新的。为了理解这个过程是如何发生的,我们必须要搞清楚batchingStrategy是从哪里注入的,传入了什么参数。
我们从ReactDOM入口文件开始找inject,在该文件require文件下的第一行,有ReactDefaultInjection.inject();找到ReactDefaultInjection文件,在它的更新属性中有
ReactInjection.Updates.injectReconcileTransaction(ReactReconcileTransaction);
 ReactInjection.Updates.injectBatchingStrategy(ReactDefaultBatchingStrategy);
找到ReactInjection,我们来看一看它是定义update:
var ReactInjection = {
  Updates: ReactUpdates.injection
};
继续向下ReactUpdates.js文件
var ReactUpdates = {
    injection: ReactUpdatesInjection,
};
var ReactUpdatesInjection = {
injectBatchingStrategy: function (_batchingStrategy) {
        batchingStrategy = _batchingStrategy;
  }
  }
到此为止,我们知道ReactInjection.Updates = ReactUpdatesInjection .injectReconcileTransaction;现在来看传入到其中的参数_batchingStrategy为何物,也就是ReactDefaultInjection文件中的传入的参数ReactDefaultBatchingStrategy。ReactDefaultBatchingStrategy中有两个封装对象RESET_BATCHED_UPDATES 和FLUSH_BATCHED_UPDATES 。
(1) RESET_BATCHED_UPDATES:负责在事物结束后清理isBatchingUpdates的标志位;
(2) FLUSH_BATCHED_UPDATES:
var FLUSH_BATCHED_UPDATES = {
  initialize: emptyFunction,
  close: ReactUpdates.flushBatchedUpdates.bind(ReactUpdates)
};
会在事物结束后调用来自ReactUpdates一个方法flushBatchedUpdates,它是状态更新的核心代码。我们来看一看了flushBatchedUpdates是如何实现状态更新的,在ReactUpdates文件下找到flushBatchedUpdates的定义
var flushBatchedUpdates = function () {
  // ReactUpdatesFlushTransaction's wrappers will clear the dirtyComponents
  // array and perform any updates enqueued by mount-ready handlers (i.e.,
  // componentDidUpdate) but we need to check here too in order to catch
  // updates enqueued by setState callbacks and asap calls.
  while (dirtyComponents.length || asapEnqueued) {
    if (dirtyComponents.length) {
      var transaction = ReactUpdatesFlushTransaction.getPooled();
      transaction.perform(runBatchedUpdates, null, transaction);
      ReactUpdatesFlushTransaction.release(transaction);
    }
    if (asapEnqueued) {
      asapEnqueued = false;
      var queue = asapCallbackQueue;
      asapCallbackQueue = CallbackQueue.getPooled();
      queue.notifyAll();
      CallbackQueue.release(queue);
    }
  }
};
在此有出现了一个新的事物ReactUpdatesFlushTransaction,它主要用来捕获在运行flushBatchedUpdate后将要运行的updates。这个过程比较复杂,因为componentDidUpdate或则setState后的回调方法需要进入下一个更新队列。另外这个事物是getpooled来的,而不是实时创建的,这样做的好处是避免不必要的垃圾收集。另外这个地方也涉及到asp update的内容,后续将介绍到。
未完待续。。。
