前言
你应该知道的,UICollectionView和UITableView都是继承于UISrollView,他们有很多相似的地方,所以你可以称他们为“双胞胎兄弟”。如果你使用过UITableView, 那下面的教程你会感觉到很熟悉。
以前,我们去做类似瀑布流这种效果的时候,必须把UITableView去旋转实现,从而显得很复杂。可喜的是,iOS6.0之后APPLE便推出了CollectionView,想想也是贴心呢。
UIColletionView基础
首先上图:本文就是来实现这图的结构:

1.先来创建一个UIColletionView对象
         @property (nonatomic ,strong) UICollectionView *basicCollectionView;

         在.m文件里添加宏定义
         #define kScreenHeigth self.view.frame.size.height
         #define kScreenWidth  self.view.frame.size.width
         #define kRBG(r,g,b) [UIColor colorWithRed:r/255.0 green:g/255.0  blue:b/255.0  alpha:1]
         #define basicBasicCollectionViewControllerCell @"basicBasicCollectionViewControllerCell"

         在@end上面添加下面get方法
         #pragma mark - GET
         //懒加载的方式去初始化UICollectionView对象
        - (UICollectionView *)basicCollectionView{
        if (!_basicCollectionView)

        UICollectionViewFlowLayout *layout = [[UICollectionViewFlowLayout alloc] init];

         //cell大小
        layout.itemSize = CGSizeMake(100, 50);

         //设置滑动的方向
        [layout setScrollDirection:UICollectionViewScrollDirectionVertical];

        //初始化
        _basicCollectionView = [[UICollectionView alloc] initWithFrame: CGRectMake(0, 0,kScreenWidth , kScreenHeigth -64) collectionViewLayout:layout];

         //签订协议
         _basicCollectionView.dataSource = self;
         _basicCollectionView.delegate   =self;
        //注册cell
        [_basicCollectionView registerClass:[UICollectionViewCell class]       forCellWithReuseIdentifier:basicBasicCollectionViewControllerCell];
          }
        return _basicCollectionView;
     }
2.在viewDidLoad最下面中加入
[self.view addSubview:self.basicCollectionView];
PS:你在上面可以看到UICollectionViewFlowLayout这个类,这是个为UICollectionViewCell布局的类,这是和UITableView不同的地方,所以它比UITableView要更加灵活。
3.实现协议(这个和UITableView很像)
       #pragma mark - UIcollectionView dataSource
       - (NSInteger)numberOfSectionsInCollectionView:(UICollectionView           *)collectionView{
       return 1;
       }

       - (NSInteger)collectionView:(UICollectionView *)collectionView numberOfItemsInSection:(NSInteger)section{
       return 10;
       }

       - (UICollectionViewCell *)collectionView:(UICollectionView *)collectionView cellForItemAtIndexPath:(NSIndexPath *)indexPath{
       UICollectionViewCell *cell = [collectionView dequeueReusableCellWithReuseIdentifier:basicBasicCollectionViewControllerCell forIndexPath:indexPath];
       cell.backgroundColor = kRBG(33, 52, 72);
       return cell;
       }
接下来可以运行了(效果如下:)

3.现在我们来加入头视图和尾视图:
1.首先添加宏定义
#define basicBasicCollectionViewControllerHeaderView @"UICollectionElementKindSectionHeader"
#define basicBasicCollectionViewControllerFooterView @"UICollectionElementKindSectionFooter"
2.在get方法注册cell下面添加下面两行代码
//注册头视图
[_basicCollectionView registerClass:[UICollectionReusableView class] forSupplementaryViewOfKind:basicBasicCollectionViewControllerHeaderView withReuseIdentifier:basicBasicCollectionViewControllerHeaderView];
//注册尾视图
[_basicCollectionView registerClass:[UICollectionReusableView class] forSupplementaryViewOfKind:basicBasicCollectionViewControllerFooterView withReuseIdentifier:basicBasicCollectionViewControllerFooterView];
3.添加dataSource方法
/**
*
*
* @param collectionView
* @param kind 根据字符串分辨是是头视图或者尾视图
* @param indexPath
*
* @return 返回头视图或者尾视图
*/
- (UICollectionReusableView *)collectionView:(UICollectionView *)collectionView viewForSupplementaryElementOfKind:(NSString *)kind atIndexPath:(NSIndexPath *)indexPath{
UICollectionReusableView *reusableView = nil;
if ([kind isEqualToString:basicBasicCollectionViewControllerFooterView]) {
UICollectionReusableView *view = [collectionView dequeueReusableSupplementaryViewOfKind:basicBasicCollectionViewControllerFooterView withReuseIdentifier:basicBasicCollectionViewControllerFooterView forIndexPath:indexPath];
view.backgroundColor = kRBG(58, 36, 63);
reusableView = view;
}else if ([kind isEqualToString:@"UICollectionElementKindSectionHeader"]) {
UICollectionReusableView *view = [collectionView dequeueReusableSupplementaryViewOfKind:basicBasicCollectionViewControllerHeaderView withReuseIdentifier:basicBasicCollectionViewControllerHeaderView forIndexPath:indexPath];
view.backgroundColor = kRBG(58, 36, 63);
reusableView = view;
}
return reusableView;
}
- (CGSize)collectionView:(UICollectionView *)collectionView layout:(UICollectionViewLayout*)collectionViewLayout referenceSizeForFooterInSection:(NSInteger)section{
return CGSizeMake(kScreenWidth, 60);
}
- (CGSize)collectionView:(UICollectionView *)collectionView layout:(UICollectionViewLayout*)collectionViewLayout referenceSizeForHeaderInSection:(NSInteger)section{
return CGSizeMake(kScreenWidth, 60);
}
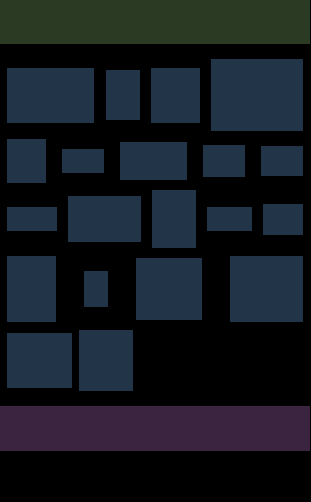
4.现在我们来设置图1中的top ,left ,bottom ,right。
- (UIEdgeInsets)collectionView:(UICollectionView *)collectionView layout:(UICollectionViewLayout*)collectionViewLayout insetForSectionAtIndex:(NSInteger)section{
return UIEdgeInsetsMake(20, 10, 20, 10);
}
运行结果如下:

5.单元格看起来太整齐,总觉得图一得放荡不羁要酷一些,添加一下代码在ViewController.m中:
    - (CGSize)collectionView:(UICollectionView *)collectionView layout:(UICollectionViewLayout *)collectionViewLayout sizeForItemAtIndexPath:(NSIndexPath *)indexPath{
       NSInteger randomHeigth = random()%70;
       NSInteger randomWidth = random()%100;
       return CGSizeMake(randomWidth +30, randomHeigth + 30);
    }
6.修改单元格的个数为20,效果图:
以上就是就是一个简单的UICollectionView对象的结构图。
认识UICollectionViewLayout
我们先看看官方的描述:
The UICollectionViewFlowLayout class is a concrete layout object that organizes items into a grid with optional header and footer views for each section. The items in the collection view flow from one row or column (depending on the scrolling direction) to the next, with each row comprising as many cells as will fit. Cells can be the same sizes or different sizes.
UICollectionViewFlowLayout是一个为section管理单元格布局的具体对象,而且这个section有可能附带着头视图或者尾视图。这些在子视图排列的方向取决于collectionview滑动方向,而且单元格的大小可以是随机可控的。
The UICollectionViewLayout class is an abstract base class that you subclass and use to generate layout information for a collection view. The job of a layout object is to determine the placement of cells, supplementary views, and decoration views inside the collection view’s bounds and to report that information to the collection view when asked. The collection view then applies the provided layout information to the corresponding views so that they can be presented onscreen.
UICollectionViewLayout是一个抽象的基类,你能够子类化这个基类来为一个collectionview设计布局信息。这个布局对象的任务就是决定摆放单元格,头视图,尾视图的摆放位置以及响应对collectionview信息请求的回应。接下来,collectionview将提供相关的布局信息给相应的视图,让其显示在屏幕上。
接下来看看UICollectionViewLayout关于布局的方法:
//Returns the layout attributes for the item at the specified index path.(返回对应单元格路径的布局信息)
- (UICollectionViewLayoutAttributes *)layoutAttributesForItemAtIndexPath:(NSIndexPath *)indexPath;

//Returns the layout attributes for all of the cells and views in the specified rectangle.(返回指定区域的所有单元格的布局信息容器)
- (NSArray<__kindof UICollectionViewLayoutAttributes *> *)layoutAttributesForElementsInRect:(CGRect)rect;

//Returns the width and height of the collection view’s contents.(返回内容所需要的长和宽,你可以理解为UIScrollView contentSize)
- (CGSize)collectionViewContentSize;
如果你子类化一个UICollectionViewLayout对象,你会发现上面的方法是按顺序调用的。根据indexPath拿到每一个的布局信息,然后拿到所有的布局信息。根据所有的布局信息来计算需要显示内容的尺寸。
有时候你可能需要定义两种Layout方式,在一个collectionview视图里面进行布局的切换。使用下面的方法就可以很简单的完成你需要的操作。
// transition from one layout to another
- (void)setCollectionViewLayout:(UICollectionViewLayout *)layout animated:(BOOL)animated;
你可以很方便的使用collectionview来添加,删除数据和相应的动画,在改变数据后执行
- (void)insertItemsAtIndexPaths:(NSArray *)indexPaths;
- (void)deleteItemsAtIndexPaths:(NSArray *)indexPaths;
当collectionview需要添加和删除的时候,UICollectionViewLayout一样可以完成上述操作。特别是一个单元格被移动,添加或者是删除。你可以利用下面的API组合你完成你想要的动作和动画
- (void)prepareForCollectionViewUpdates:(NSArray *)updateItems;

- (nullable UICollectionViewLayoutAttributes *)initialLayoutAttributesForAppearingItemAtIndexPath:(NSIndexPath *)itemIndexPath;

- (nullable UICollectionViewLayoutAttributes *)initialLayoutAttributesForAppearingItemAtIndexPath:(NSIndexPath *)itemIndexPath;

- (nullable UICollectionViewLayoutAttributes *)finalLayoutAttributesForDisappearingItemAtIndexPath:(NSIndexPath *)itemIndexPath;

- (void)finalizeCollectionViewUpdates;
更多了解您可以点击Demo。下面是demo效果: