1. 安装hadoop
详细请参见本人的另外一片文章《Hadoop 2.7.3 分布式集群安装》
2. 安装mysql数据库
详细请参见本人的另外一片文章《linux安装mysql5.7.27》
3. 下载hive 2.3.5
解压文件到/opt/software
tar -xzvf /opt/software/apache-hive-2.3.5-bin.tar.gz -C /opt/software/
4. 配置hive环境变量:
vim /etc/profile
在文件末尾添加:
#hive
export HIVE_HOME=/opt/software/apache-hive-2.3.5-bin
export HIVE_CONF_HOME=$HIVE_HOME/conf
export PATH=.:$HIVE_HOME/bin:$PATH
export HADOOP_CLASSPATH=$HADOOP_CLASSPATH:$HIVE_HOME/lib/*
export HCAT_HOME=$HIVE_HOME/hcatalog
export PATH=$HCAT_HOME/bin:$PATH
5. 配置hive配置文件
cd /opt/software/apache-hive-2.3.5-bin/conf/
mv beeline-log4j2.properties.template beeline-log4j2.properties
mv hive-env.sh.template hive-env.sh
mv hive-exec-log4j2.properties.template hive-exec-log4j2.properties
mv hive-log4j2.properties.template hive-log4j2.properties
mv llap-cli-log4j2.properties.template llap-cli-log4j2.properties
mv llap-daemon-log4j2.properties.template llap-daemon-log4j2.properties
mv hive-default.xml.template hive-site.xml
vim /opt/software/apache-hive-2.3.4-bin/conf/hive-site.xml
修改以下几个配置项:
javax.jdo.option.ConnectionURL
javax.jdo.option.ConnectionUserName
javax.jdo.option.ConnectionPassword
javax.jdo.option.ConnectionDriverName
    javax.jdo.option.ConnectionURL
    jdbc:mysql://127.0.0.1:3306/hive?characterEncoding=UTF8&useSSL=false&createDatabaseIfNotExist=true

    javax.jdo.option.ConnectionUserName
    hive

    javax.jdo.option.ConnectionPassword
    hive

    javax.jdo.option.ConnectionDriverName
    com.mysql.cj.jdbc.Driver
将${system:java.io.tmpdir}和${system:user.name}替换为/opt/software/apache-hive-2.3.5-bin/hive_tmp和hive
%s/\${system:java.io.tmpdir}/\/opt\/software\/apache-hive-2.3.5-bin\/hive_tmp/g
%s/\${system:user.name}/hive/g
如果不替换,在运行的时候会报错,类似
Failed with exception java.io.IOException:java.lang.IllegalArgumentException: java.net.URISyntaxException: Relative path in absolute URI: ${system:user.name%7D
是为了让hive支持事务,即行级更新.
or you can use the following script in hive hql script to enable transaction:
set hive.support.concurrency=true;
set hive.enforce.bucketing=true;
set hive.exec.dynamic.partition=true;
set hive.exec.dynamic.partition.mode=nonstrict;
set hive.txn.manager=org.apache.hadoop.hive.ql.lockmgr.DbTxnManager;
set hive.compactor.initiator.on=true;
set hive.compactor.worker.threads=2;
此外,如果要支持行级更新,还要在hive元数据库(mysql)中执行一下sql语句
use hive;
truncate table hive.NEXT_LOCK_ID;
truncate table hive.NEXT_COMPACTION_QUEUE_ID;
truncate table hive.NEXT_TXN_ID;

insert into hive.NEXT_LOCK_ID values(1);
insert into hive.NEXT_COMPACTION_QUEUE_ID values(1);
insert into hive.NEXT_TXN_ID values(1);
commit;
默认情况下,这几张表的数据为空.如果不添加数据,会报以下错误:
org.apache.hadoop.hive.ql.lockmgr.DbTxnManager FAILED: Error in acquiring locks: Error communicating with the metastore
配置hive-env.sh
cp  /opt/software/apache-hive-2.3.4-bin/conf/hive-env.sh.template /opt/software/apache-hive-2.3.4-bin/conf/hive-env.sh
vim /opt/software/apache-hive-2.3.4-bin/conf/hive-env.sh
添加以下配置:
export HADOOP_HEAPSIZE=1024
HADOOP_HOME=/opt/hadoop-2.7.3/ #这里设置成自己的hadoop路径
export HIVE_CONF_DIR=/opt/software/apache-hive-2.3.5-bin/conf/
export HIVE_AUX_JARS_PATH=/opt/software/apache-hive-2.3.5-bin/lib/
export HADOOP_CLASSPATH=$HADOOP_CLASSPATH:$HIVE_HOME/lib/*
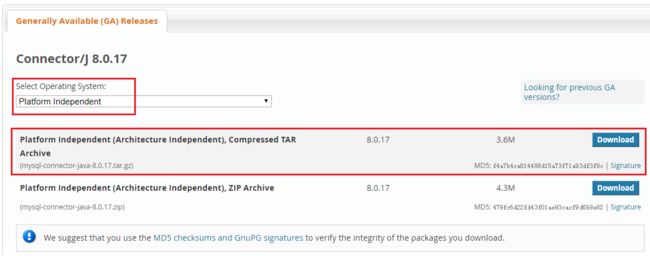
6. 下载mysql-connector-java-8.0.17.jar
打开mysql官方网站)下载mysql-connector-java-8.0.17.tar.gz
将下载的mysql-connector-java-8.0.17.tar.gz放在/opt/software/,并解压。
cd /opt/software/
tar -zxvf mysql-connector-java-8.0.17.tar.gz
cd mysql-connector-java-8.0.17
cp mysql-connector-java-8.0.17.jar $HIVE_HOME/lib/
7. 创建并初始化hive mysql元数据库
mysql -uroot -proot
mysql> create database hive DEFAULT CHARSET utf8 COLLATE utf8_general_ci; #在mysql中创建hive数据库
Query OK, 1 row affected, 2 warnings (0.11 sec)

mysql> create user 'hive' identified by 'hive';                           #创建hive用户,密码为hive
Query OK, 0 rows affected (0.03 sec)

mysql> grant all privileges on  *.*  to 'hive' with grant option;            #授权hive用户的权限
Query OK, 0 rows affected (0.11 sec)

mysql> flush privileges;                                                  #刷新权限
Query OK, 0 rows affected (0.01 sec)

mysql> exit
初始化hive元数据库:
[root@wkh11 lib]# $HIVE_HOME/bin/schematool -initSchema -dbType mysql
SLF4J: Class path contains multiple SLF4J bindings.
SLF4J: Found binding in [jar:file:/opt/software/apache-hive-2.3.5-bin/lib/log4j-slf4j-impl-2.6.2.jar!/org/slf4j/impl/StaticLoggerBinder.class]
SLF4J: Found binding in [jar:file:/opt/hadoop-2.7.3/share/hadoop/common/lib/slf4j-log4j12-1.7.10.jar!/org/slf4j/impl/StaticLoggerBinder.class]
SLF4J: See http://www.slf4j.org/codes.html#multiple_bindings for an explanation.
SLF4J: Actual binding is of type [org.apache.logging.slf4j.Log4jLoggerFactory]
Metastore connection URL:        jdbc:mysql://127.0.0.1:3306/hive?characterEncoding=UTF8&useSSL=false&createDatabaseIfNotExist=true
Metastore Connection Driver :    com.mysql.cj.jdbc.Driver
Metastore connection User:       hive
Starting metastore schema initialization to 2.3.0
Initialization script hive-schema-2.3.0.mysql.sql
Initialization script completed
schemaTool completed
执行该命令会自动读取hive配置文件中的连接信息,在mysql的hive库中创建表结构和数据的初始化
mysql> show tables;
+---------------------------+
| Tables_in_hive            |
+---------------------------+
| AUX_TABLE                 |
| BUCKETING_COLS            |
| CDS                       |
| COLUMNS_V2                |
| COMPACTION_QUEUE          |
| COMPLETED_COMPACTIONS     |
| COMPLETED_TXN_COMPONENTS  |
| DATABASE_PARAMS           |
| DBS                       |
| DB_PRIVS                  |
| DELEGATION_TOKENS         |
| FUNCS                     |
| FUNC_RU                   |
| GLOBAL_PRIVS              |
| HIVE_LOCKS                |
| IDXS                      |
| INDEX_PARAMS              |
| KEY_CONSTRAINTS           |
| MASTER_KEYS               |
| NEXT_COMPACTION_QUEUE_ID  |
| NEXT_LOCK_ID              |
| NEXT_TXN_ID               |
| NOTIFICATION_LOG          |
| NOTIFICATION_SEQUENCE     |
| NUCLEUS_TABLES            |
| PARTITIONS                |
| PARTITION_EVENTS          |
| PARTITION_KEYS            |
| PARTITION_KEY_VALS        |
| PARTITION_PARAMS          |
| PART_COL_PRIVS            |
| PART_COL_STATS            |
| PART_PRIVS                |
| ROLES                     |
| ROLE_MAP                  |
| SDS                       |
| SD_PARAMS                 |
| SEQUENCE_TABLE            |
| SERDES                    |
| SERDE_PARAMS              |
| SKEWED_COL_NAMES          |
| SKEWED_COL_VALUE_LOC_MAP  |
| SKEWED_STRING_LIST        |
| SKEWED_STRING_LIST_VALUES |
| SKEWED_VALUES             |
| SORT_COLS                 |
| TABLE_PARAMS              |
| TAB_COL_STATS             |
| TBLS                      |
| TBL_COL_PRIVS             |
| TBL_PRIVS                 |
| TXNS                      |
| TXN_COMPONENTS            |
| TYPES                     |
| TYPE_FIELDS               |
| VERSION                   |
| WRITE_SET                 |
+---------------------------+
57 rows in set (0.00 sec)
8. 先启动Hadoop,然后进入hive的lib目录,使用hive 命令 启动hive
在hdfs中建立hive文件夹
hdfs dfs -mkdir -p /tmp
hdfs dfs -mkdir -p /usr/hive/warehouse
hdfs dfs -chmod g+w /tmp
hdfs dfs -chmod g+w /usr/hive/warehouse
9. 启动hive meta service
在默认的情况下,metastore和hive服务运行在同一个进程中,使用这个服务,可以让metastore作为一个单独的进程运行,我们可以通过METASTOE——PORT来指定监听的端口号, 默认端口为9083
hive --service metastore &
10. 启动hiveservice2服务
Hive以提供Thrift服务的服务器形式来运行,可以允许许多个不同语言编写的客户端进行通信,使用需要启动HiveServer服务以和客户端联系,我们可以通过设置HIVE_PORT环境变量来设置服务器所监听的端口,在默认情况下,端口号为10000,这个可以通过以下方式来启动Hiverserver:
hive --service hiveserver2 10002
其中第二个参数也是用来指定监听端口的(例如10002),启动后,用java,python等编程语言可以通过jdbc等驱动的访问hive的服务了,适合编程模式。HiveServer2支持多客户端的并发和认证,为开放API客户端如JDBC、ODBC提供更好的支持。
hiveserver2
#或者
hive --service hiveserver2 10000 & #最后的&表示在后台运行 thrift端口号默认为10000, web http://{hive server ip address}:10000/ 访问
11. 连接hive方式
- 启动hive客户端
[root@wkh11 bin]# hive
hive> show databases;
OK
default
Time taken: 6.458 seconds, Fetched: 1 row(s)
- beeline方式连接
beeline -u jdbc:hive2//localhost:10000/default -n root -p root
- java client方式连接
备注:连接Hive JDBC URL:jdbc:hive://192.168.1.11:10000/default (Hive默认端口:10000 默认数据库名:default)
