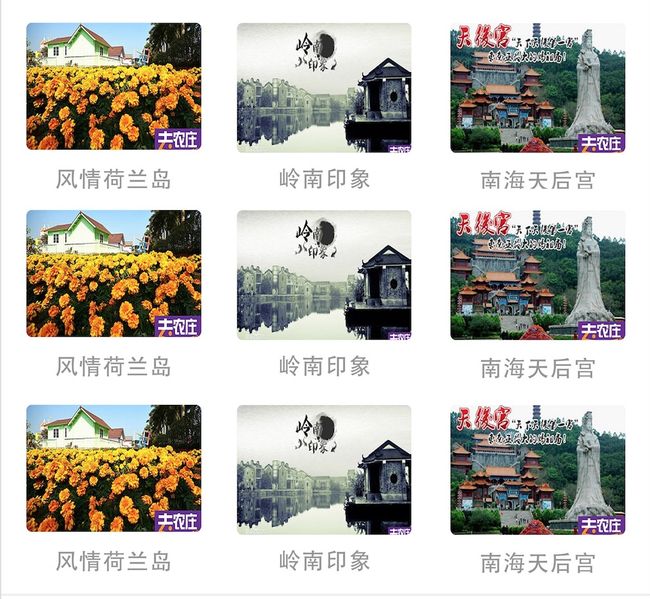
这两天把剩下的模块写了一下,今天一起更新了
先看一下效果图完成布局:
这个分区比上个分区更为简单了就两个值:照片和名称
//创建collectionView的Flowlayout
let flowlayout = UICollectionViewFlowLayout()
flowlayout.minimumInteritemSpacing = 0
flowlayout.minimumLineSpacing = 0
flowlayout.itemSize = CGSizeMake(Device_Width/3, 140)
    collectionView = UICollectionView(frame: CGRectZero, collectionViewLayout: flowlayout)
    collectionView.registerClass(ProductCollectionViewCell.classForCoder(), forCellWithReuseIdentifier: "item")
    collectionView.backgroundColor = UIColor.whiteColor()
    collectionView.delegate = self
    collectionView.dataSource = self
    self.addSubview(collectionView)
    collectionView.snp_makeConstraints { (make) -> Void in
        make.top.left.bottom.right.equalTo(0)
    }
然后自定义cell:
imageView = UIImageView()
imageView.backgroundColor = UIColor.purpleColor()
imageView.layer.masksToBounds = true
imageView.layer.cornerRadius = 3
contentView.addSubview(imageView)
imageView.snp_makeConstraints { (make) -> Void in
make.left.top.equalTo(10)
make.right.equalTo(-10)
make.height.equalTo(85)
}
    nameLable = UILabel()
    nameLable.backgroundColor = UIColor.whiteColor()
    nameLable.font = UIFont.systemFontOfSize(15)
    nameLable.textColor = UIColor.orangeColor()
    nameLable.textAlignment = .Center
    nameLable.text = "风情荷兰情"
    contentView.addSubview(nameLable)
    nameLable.snp_makeConstraints { (make) -> Void in
        make.top.equalTo(imageView.snp_bottom).offset(10)
        make.height.equalTo(20)
        make.width.equalTo(Device_Width/3)
        make.centerX.equalTo(self.snp_centerX)
    }
另一个是附近商品:
它可以自己自定义cell的,不用什么CollectionView的
productName = UILabel()
productName.text = "岭南印象"
productName.font = UIFont.systemFontOfSize(15)
productName.textAlignment = .Center
contentView.addSubview(productName)
productName.snp_makeConstraints { (make) -> Void in
make.top.equalTo(10)
make.left.equalTo(imageView.snp_right).offset(10)
make.width.equalTo(80)
make.height.equalTo(20)
}
    introduces = UILabel()
    introduces.textAlignment = .Center
    introduces.text = "10人通票套餐,含单个景点门票"
    introduces.font = UIFont.systemFontOfSize(10)
    contentView.addSubview(introduces)
    introduces.snp_makeConstraints { (make) -> Void in
        make.top.equalTo(productName.snp_bottom).offset(20)
        make.left.equalTo(imageView.snp_right).offset(15)
        make.width.equalTo(150)
        make.height.equalTo(15)
    }

    price = UILabel()
    price.text = "280"
    price.textAlignment = .Center
    price.font = UIFont.systemFontOfSize(15)
    price.textColor = UIColor.orangeColor()
    contentView.addSubview(price)
    price.snp_makeConstraints { (make) -> Void in
        make.top.equalTo(introduces.snp_bottom).offset(10)
        make.left.equalTo(imageView.snp_right).offset(18)
        make.width.equalTo(30)
        make.height.equalTo(20)
        make.bottom.equalTo(-5)
    }

    newPrice = UILabel()
    newPrice.text = "369"
    newPrice.textAlignment = .Center
    newPrice.font = UIFont.systemFontOfSize(10)
    contentView.addSubview(newPrice)
    newPrice.snp_makeConstraints { (make) -> Void in
        make.top.equalTo(introduces).offset(29)
        make.left.equalTo(price).offset(40)
        make.width.equalTo(30)
        make.height.equalTo(15)
    }

    distance = UILabel()
    distance.text = "1000KM"
    distance.textAlignment = .Center
    distance.font = UIFont.systemFontOfSize(10)
    contentView.addSubview(distance)
    distance.snp_makeConstraints { (make) -> Void in
        make.top.equalTo(15)
        make.right.equalTo(-20)
        make.width.equalTo(50)
        make.height.equalTo(20)
    }

    saleNumbel = UILabel()
    saleNumbel.text = "已售 1583"
    saleNumbel.textAlignment = .Center
    saleNumbel.font = UIFont.systemFontOfSize(10)
    contentView.addSubview(saleNumbel)
    saleNumbel.snp_makeConstraints { (make) -> Void in
        make.bottom.equalTo(0)
        make.right.equalTo(-10)
        make.width.equalTo(50)
        make.height.equalTo(20)
    }

    line = UIView()
    line.backgroundColor = UIColor.lightGrayColor()
    contentView.addSubview(line)
    line.snp_makeConstraints { (make) -> Void in
        make.bottom.equalTo(0)
        make.left.equalTo(0)
        make.width.equalTo(self.snp_width)
        make.height.equalTo(1)
    }
还有一个就是分区:
这个就不用贴代码的,跟之前的是一样的。
下面做Model
创建项目需要的Model类和字段:
class ProductModel: NSObject {
var productId: String = ""
var productName: String = ""
var productOriginalPrice: String = ""
var productCurrentPrice: String = ""
var productStore: StoreModel = StoreModel()
var productImageUrls: [String] = []
}
这是商铺Model
class StoreModel: NSObject {
var storeId: String = ""
var storeName: String = ""
var storeImageUrls: [String] = []
var storeIntroduces: String = ""
var storePrice:String = ""                   //之前的价格
var storeNewPrice:String = ""                //现在的价格
var storeDistance:String = ""                //距离
var storeSaleNumbel:String = ""              //销售的数量
}
然后创建数据源:
func createDataSource() {
let array = ["https://raw.githubusercontent.com/onevcat/Kingfisher/master/images/kingfisher-1.jpg", "https://raw.githubusercontent.com/onevcat/Kingfisher/master/images/kingfisher-1.jpg",
"https://raw.githubusercontent.com/onevcat/Kingfisher/master/images/kingfisher-1.jpg",
"https://raw.githubusercontent.com/onevcat/Kingfisher/master/images/kingfisher-1.jpg",
"https://raw.githubusercontent.com/onevcat/Kingfisher/master/images/kingfisher-1.jpg"]
for i in 0...8 {
let product = ProductModel()
product.productId = "(i+1)"
product.productName = "产品(i+1)"
product.productOriginalPrice = "3(i)"
product.productCurrentPrice = "2(i)"
product.productImageUrls = array
dataSource.append(product)
        let store = StoreModel()
        store.storeId = "\(i+1)"
        store.storeName = "商铺\(i+1)"
        store.storeImageUrls = array
        dataSource1.append(store)

        let store2 = StoreModel()
        store2.storeId = "\(i+1)"
        store2.storeName = "商铺\(i+1)"
        store2.storeImageUrls = array
        store2.storeIntroduces = "10人通票套餐,含单个景点门票"
        store2.storePrice = "369"
        store2.storeNewPrice = "280"
        store2.storeDistance = "1000KM"
        store2.storeSaleNumbel = "已售1583"
        dataSource2.append(store2)

        let categoryData = StoreModel()
        categoryData.storeName = "农庄"
        categoryData.storeImageUrls = array
        categoryDataSource.append(categoryData)

    }
    tableView.reloadData()
}
剩下的在每个自定义cell进行传递和接受:
func tableView(tableView: UITableView, cellForRowAtIndexPath indexPath: NSIndexPath) -> UITableViewCell {
switch indexPath.section{
        case 0:
            let cell = tableView.dequeueReusableCellWithIdentifier("productTableViewCell") as! ProductTableViewCell
            cell.products = dataSource

            return cell
        case 1:

            let cell = tableView.dequeueReusableCellWithIdentifier("businessTableViewCell") as! BusinessTableViewCell
            cell.stores = dataSource1

            return cell
        default:

            let cell = tableView.dequeueReusableCellWithIdentifier("comTableViewCell") as! ComTableViewCell
            cell.store = dataSource2[indexPath.row]

            return cell
    }
}
其他分区的接受和传递都是一样的举一个例子吧,另一个可以直接传递。
先贴都一样的的代码:
这是热销商品和热销店家的分区,因为他们用了collectionView所以需要接受数组,然后传递给cell。
var products: [ProductModel]? {
didSet {
collectionView.reloadData()
}
}
cell传值:
func collectionView(collectionView: UICollectionView, cellForItemAtIndexPath indexPath: NSIndexPath) -> UICollectionViewCell {
    let cell = collectionView.dequeueReusableCellWithReuseIdentifier("item", forIndexPath: indexPath)as!
    ProductCollectionViewCell
    cell.product = products![indexPath.row]

    return cell
}
cell接受和更新:
var product: ProductModel? {
didSet {
refreshUI()
}
}
func refreshUI() {
imageView.kf_setImageWithURL(NSURL(string: (product?.productImageUrls.first)!)!, placeholderImage: nil)
nameLable.text = product?.productName
oPriceLable.text = product?.productOriginalPrice
cPriceLable.text = product?.productCurrentPrice
}
另一个是附近商品,他是首页TableView的cell。可以直接传单条数据的:
let cell =tableView.dequeueReusableCellWithIdentifier("comTableViewCell") as! ComTableViewCell
cell.store = dataSource2[indexPath.row]
return cell
然后接受和更新就可以的:
var store: StoreModel? {
didSet {
refreshUI()
}
}
func refreshUI (){
imageView!.kf_setImageWithURL(NSURL(string: (store!.storeImageUrls.first)!)!, placeholderImage: nil)
productName.text = store!.storeName
introduces.text = store?.storeIntroduces
price.text = store?.storePrice
newPrice.text = store?.storeNewPrice
distance.text = store?.storeDistance
saleNumbel.text = store?.storeSaleNumbel
}
最后的效果:
最后谢谢大家的关注与支持,这是自己的学习笔记。由于本人脑子太笨,师傅也经常吐血而溃。。。以免老忘记所以写下来了。
好脑子不如烂笔头嘛,也方便一些类似我的朋友一起学习。


