前言
本文将通过对github的开源控件SwipeLayout的分析,来学习其拖拽效果的实现原理,以及对View中的事件分发和冲突的处理。
简介
SwipeLayout是Github上一个开源的滑动布局控件,适用与android平台,其作者为“代码家”,star数已经达到7k+,可以让开发者轻松的实现列表的滑动效果,是一个非常优秀的控件。
SwipLayout实现了复杂的手势操作处理,在使用上,可以通过不同的滑动手势来设置动画相应对应页面,大致有两种设置方法:
- 通过xml中配置layout_gravityla属性。该字段中的4个属性对应不同的方向划入
- 通过代码,在java代码中,通过SwipeLayout实例添加滑动视图,调用addDrag()方法来进行设置。
更详细的使用步骤可以看一下官方的Wiki。
实现原理
首先SwipeLayout继承于FrameLayout,因此SwipeLayout为一个ViewGroup即布局容器,其下可以设置多个子View。
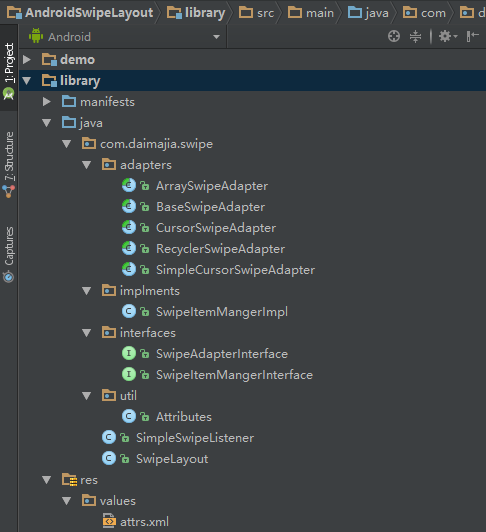
我们可以看到,在名为library的module中的项目结构
在该库中,提供了adapters包,下面适配了ListView,RecyclerView的adapter,并提供了一些管理列表状态的接口,方便自己实现adapter,在这里,我们主要分析下SwipeLayout的实现。
SwipeLayout的实现,主要难点在于以下两方面:
- View相关的动画
- View的事件分发
本文我们将分析View相关的动画的实现。
View相关动画
在一个SwipeLayout布局中,可将其内部的childView分为SurfaceView(需要注意的是该View不同于官方的SurfaceView,两者无关联,以下翻译为前景View)和BottomView(底部View)。当用户进行滑动存在时,前景View和底部View都会在特定的属性下进行相应的显示和隐藏效果。两者的层级关系可以看如下图:
在SipeLayout中,提供了四个方向的滑动操作下显示底部View,对应着layout_gravity中的四个属性:
- left 左滑时显示BottomView
- right 右滑时显示BottomView
- top 上滑时显示BottomView
- bottom 下滑时显示BottomView
同时,提供了两种滑动效果,可以通过布局中show_mode属性进行设置,当然也可以setShowMode方法进行操作,两种值如下:
- LayDown 平摊在前景View的下面
- PullOut 拉拽效果,紧随前景View的位置来变化
那对于子View的滑动动画时如何实现的呢?我们来分析一下源码,首先,关于子View的布局显示相关的方法,肯定离不开onLayout了。该方法主要调用了updateBottomViews来初始化子View的显示位置,我们看一下updateBottomViews的代码:
    /** 更新底部View的布局 */
    private void updateBottomViews() {
        View currentBottomView = getCurrentBottomView();
        //获取可滑动的范围
        if (currentBottomView != null) {
            if (mCurrentDragEdge == DragEdge.Left || mCurrentDragEdge == DragEdge.Right) {
                mDragDistance = currentBottomView.getMeasuredWidth() - dp2px(getCurrentOffset());
            } else {
                mDragDistance = currentBottomView.getMeasuredHeight() - dp2px(getCurrentOffset());
            }
        }

        //根据不同的显示模式设置子View
        if (mShowMode == ShowMode.PullOut) {
            layoutPullOut();
        } else if (mShowMode == ShowMode.LayDown) {
            layoutLayDown();
        }
        //设置根据状态来设置bottomView的显示和隐藏
        safeBottomView();
    }
在该方法主要通过计算活动了可滑动范围值,然后会根据不同的mode初始化不同的前景View与底部View的边界和位置,两种模式下的区别可以从下图理解:
onLayout中只是做了一些子View的初始布局的处理,而子View涉及到了拖拽动画,需要我们自己来处理,而android 在官方的V4包中提供了一个ViewDragHelper类,相对与gesturedetector,ViewDragHelper更适合用于处理子View的拖拽事件,该类可以让你轻松的实现子View的拖拽效果,通过实现该类提供的接口,设置和实现拖拽,在SwipeLayout中,该接口的实现如下:
    private ViewDragHelper.Callback mDragHelperCallback = new ViewDragHelper.Callback() {

        boolean isCloseBeforeDrag = true;
        //当子View位置发生变化时会调用
        @Override
        public void onViewPositionChanged(View changedView, int left, int top , int dx, int dy) {
            View surfaceView = getSurfaceView();
            if (surfaceView == null) {
                return;
            }
            View currentBottomView = getCurrentBottomView();
            int evLeft = surfaceView.getLeft(),
                    evRight = surfaceView.getRight(),
                    evTop = surfaceView.getTop(),
                    evBottom = surfaceView.getBottom();
            if (changedView == surfaceView) {   //更新的View为前景View

                if (mShowMode == ShowMode.PullOut && currentBottomView != null) {
                    //更新底部View的位置
                    if (mCurrentDragEdge == DragEdge.Left || mCurrentDragEdge == DragEdge.Right) {
                        currentBottomView.offsetLeftAndRight(dx);
                    } else {
                        currentBottomView.offsetTopAndBottom(dy);
                    }
                }

            } else if (getBottomViews().contains(changedView)) {//更新View为底部View

                if (mShowMode == ShowMode.PullOut) {
                    surfaceView.offsetLeftAndRight(dx);
                    surfaceView.offsetTopAndBottom(dy);
                } else {

                    int newLeft = surfaceView.getLeft() + dx, newTop = surfaceView.getTop() + dy;

                    if (mCurrentDragEdge == DragEdge.Left && newLeft < getPaddingLeft()) {
                        newLeft = getPaddingLeft();
                    } else if (mCurrentDragEdge == DragEdge.Right && newLeft > getPaddingLeft()) {
                        newLeft = getPaddingLeft();
                    } else if (mCurrentDragEdge == DragEdge.Top && newTop < getPaddingTop()) {
                        newTop = getPaddingTop();
                    } else if (mCurrentDragEdge == DragEdge.Bottom && newTop > getPaddingTop()) {
                        newTop = getPaddingTop();
                    }

                    //更新前景View的布局位置
                    surfaceView.layout(newLeft, newTop, newLeft + getMeasuredWidth(), newTop + getMeasuredHeight());
                }
            }

            dispatchRevealEvent(evLeft, evTop, evRight, evBottom);

            dispatchSwipeEvent(evLeft, evTop, dx, dy);

        }

        //手指释放的时候回调,可以在这里完成未结束的操作
        @Override
        public void onViewReleased(View releasedChild, float xvel, float yvel) {
            super.onViewReleased(releasedChild, xvel, yvel);
            processHandRelease(xvel, yvel, isCloseBeforeDrag);
            for (SwipeListener l : mSwipeListeners) {
                l.onHandRelease(SwipeLayout.this, xvel, yvel);
            }

            invalidate();
        }

        //确定范围
        @Override
        public int getViewHorizontalDragRange(View child) {
            return mDragDistance;
        }

        @Override
        public int getViewVerticalDragRange(View child) {
            return mDragDistance;
        }

        //View是否可捕获标志
        @Override
        public boolean tryCaptureView(View child, int pointerId) {
            boolean result = child == getSurfaceView() || getBottomViews().contains(child);
            if (result) {
                isCloseBeforeDrag = getOpenStatus() == Status.Close;
            }
            return result;
        }

        //设置拖拽后的最终位置
        @Override
        public int clampViewPositionHorizontal(View child, int left, int dx) {
            ……
            return left;
        }

        @Override
        public int clampViewPositionVertical(View child, int top, int dy) {
            ……
            return top;
        }
    };
在该接口中clampViewPositionHorizontal和clampViewPositionVertical用来确定最终的left点和top点,一般需要手动做一些计算来确定边界值。重点需要看onViewPositionChanged和onViewReleased方法,整个SwipeLayout就是通过这两个方法来实现拖拽和动画效果的。
在实现ViewDragHelper的接口后,该类会管理相应子View的拖拽功能,所以在onViewPositionChanged中,我们只需要处理另外一个View的layout值即可,从代码中可以发现,会先判断changeView所属位置,如果是前景View,那么接下来就需要手动处理底部View的layout,最终会调用offsetLeftAndRight/offsetTopAndBottom来更新底部View的位置。同理在changeView为底部View时,会对前景View设置layout。但这并不能满足我们的需求,这里仅处理了拖拽过程中的位置更新,如果在滑动过程中松手,就需要处理未完成的View状态动画。
因此,我们需要在onViewReleased里做一些处理,该方法会在手指释放时调用,最终会调用到processHandRelease方法,该方法中根据不同的条件做了判断,最终会确定调用open方法还是close方法来实现动画效果,两个方法处理过程类似,我们看一下open的代码:
    //ViewReleased最终的动画实现
    public void open(boolean smooth, boolean notify) {
        View surface = getSurfaceView(), bottom = getCurrentBottomView();
        if (surface == null) {
            return;
        }
        int dx, dy;
        //获取SurfaceView的布局区域的rect
        Rect rect = computeSurfaceLayoutArea(true);
        if (smooth) {
            //平滑效果打开动画,通过DragHelper实现
            mDragHelper.smoothSlideViewTo(surface, rect.left, rect.top);
        } else {
            //无过度效果,直接设置最后的layout
            dx = rect.left - surface.getLeft();
            dy = rect.top - surface.getTop();
            surface.layout(rect.left, rect.top, rect.right, rect.bottom);
            if (getShowMode() == ShowMode.PullOut) {
                Rect bRect = computeBottomLayoutAreaViaSurface(ShowMode.PullOut, rect);
                if (bottom != null) {
                    bottom.layout(bRect.left, bRect.top, bRect.right, bRect.bottom);
                }
            }
            if (notify) {
                dispatchRevealEvent(rect.left, rect.top, rect.right, rect.bottom);
                dispatchSwipeEvent(rect.left, rect.top, dx, dy);
            } else {
                safeBottomView();
            }
        }
        invalidate();
    }
open代码中,如果需要平滑的动画效果,就会调用ViewDragHelper里的smoothSlideViewTo方法更新前景View,而该方法后开始的滑动动画又会触发onViewPositionChanged方法,间接的给底部View添加了动画效果。而在smooth未false的情况下,会直接设置前景View和底部View的layout来完成子View的最终状态显示。
相关博文
Android ViewDragHelper完全解析 自定义ViewGroup神器
ViewDragHelper详解


