本文以Loadrunner的Java_Vuser脚本为例,来做一次HDFS的文件操作测试,由于LoadRunner 11只支持JDK1.6,所以Hadoop选择的Jar包也只能用Hadoop2.6.0,但是这不影响连接高版本的hadoop-HDFS(本次测试就实现了连接操作hadoop2.7下HDFS)。
1、在loadrunner中新建脚本(本文以LoadRunner11为例),要求选择协议类型为Java->Java Vuser
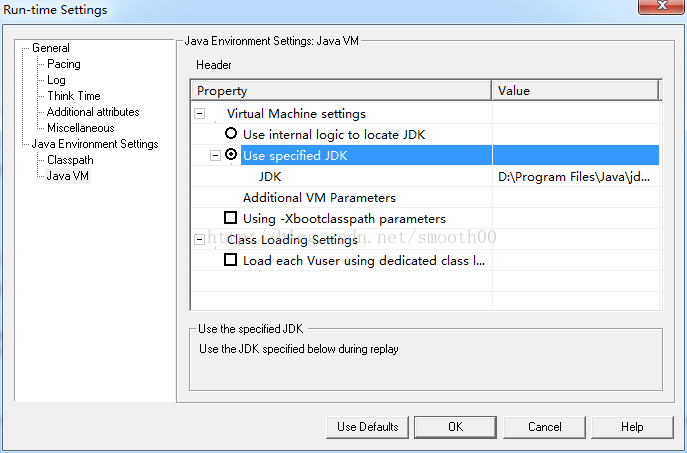
2、在Run-time Settings设置JDK路径,由于LoadRunner11不支持jdk1.8,本次测试是拷贝了一份低版本的JDK1.6,所以路径选择固定路径模式,如下所示:
3、可以上网下载一份Hadoop2.6.0的JAR包(官网和网上都能搜到),我专门准备了一份供大家下载(做了精简,去掉了一些与本次测试无关的Jar包):http://download.csdn.net/detail/smooth00/9881769,将JAR包放到Loadrunner的include目录下或其它指定目录下,并在Run-time Settings中配置Classpath:
4、在Loadrunner中以java Vuser协议创建脚本,脚本样例如下:
/*
* LoadRunner Java script. (Build: _build_number_)
*
* Script Description:
*
*/
import java.io.FileInputStream;
import java.io.FileNotFoundException;
import java.io.FileOutputStream;
import java.io.InputStream;
import java.io.IOException;
import java.io.OutputStream;
import java.net.URI;
import java.net.URISyntaxException;
import org.apache.hadoop.conf.Configuration;
import org.apache.hadoop.fs.BlockLocation;
import org.apache.hadoop.fs.FileStatus;
import org.apache.hadoop.fs.FileSystem;
import org.apache.hadoop.fs.FSDataOutputStream;
import org.apache.hadoop.fs.Path;
import org.apache.hadoop.io.IOUtils;
import org.apache.log4j.Logger;
import org.apache.log4j.PropertyConfigurator;
import org.apache.log4j.xml.DOMConfigurator;
import java.io.File;
import lrapi.lr;
public class Actions
{
FileSystem fs = null;
private Configuration configuration =null;
private String keyFS ="fs.defaultFS";
private String keyUser ="hadoop.user";
//上传文件 测试成功
// @uploadFile 要上传的本地文件
// @intputFile 输入到HDFS的文件
public void testUpload(String uploadFile,String intputFile) throws Exception{
InputStream in = new FileInputStream(uploadFile);
OutputStream out = fs.create(new Path(intputFile));
IOUtils.copyBytes(in, out, 1024, true);//in输入源, out输出源头, 1024缓冲区大小 ,true 是否关闭数据流。如果是false,就在finally里关掉
}
//创建文件夹 测试成功
public void testMkdir(String dirs) throws IllegalArgumentException, IOException{
boolean flag = fs.mkdirs(new Path(dirs));
System.out.println(flag);//如果创建目录成功会返回true
}
//下载文件 测试成功
// @outputFile 要下载的HDFS文件
// @downloadFile 要下载到本地的文件
public void testDownload(String outputFile,String downloadFile) throws IllegalArgumentException, IOException{
InputStream in = fs.open(new Path(outputFile));//intput.txt
OutputStream out = new FileOutputStream(downloadFile);//下载到本地路径 以及重命名后的名字
IOUtils.copyBytes(in, out, 4096, true);
}
//删除文件 测试成功
public void testDelFile(String delFile) throws IllegalArgumentException, IOException{
boolean flag = fs.delete(new Path(delFile),true);//如果是删除路径 把参数换成路径即可"/a/test4" inpufile
//第二个参数true表示递归删除,如果该文件夹下还有文件夹或者内容 ,会变递归删除,若为false则路径下有文件则会删除不成功
System.out.println("删除文件 or 路径");
System.out.println("delete?"+flag);//删除成功打印true
}
//重命名文件 测试成功
// @oldFile 要下载的HDFS文件
// @newFile 要下载到本地的文件
public void testRename(String oldFile,String newFile) throws IllegalArgumentException, IOException{
boolean flag = fs.rename(new Path(oldFile),new Path(newFile));//第一个参数改名为第二个参数
String result=flag?"成功":"失败";
System.out.println("result of rename?"+result);//删除成功打印true
}
//查看文件是否存在 测试成功
public void CheckFile(String existFile) throws IllegalArgumentException, IOException{
boolean flag = fs.exists(new Path(existFile));
System.out.println("Exist?"+flag);//如果创建目录成功会返回true
}
//寻找文件在文件集中位置 测试成功
public void FileLoc(String searchFile) throws IllegalArgumentException, IOException{
FileStatus filestatus = fs.getFileStatus(new Path(searchFile));
//System.out.println("filestatus?"+filestatus);//如果创建目录成功会返回true
BlockLocation[] blkLocations=fs.getFileBlockLocations(filestatus, 0, filestatus.getLen());//文件开始与结束
int blockLen=blkLocations.length;//块的个数
System.out.println("块数:"+blockLen);
System.out.println("---------分割线--------");
for(int i=0;i
String[] hosts=blkLocations[i].getHosts();
System.out.println("block_"+i+"location:"+hosts[0]);
}
System.out.println("---------分割线---------");
}
//直接在hdfs上创建文件并在其中输入文字 测试成功
// @content 要写入文件的文字内容
// @outputFile 写入的HDFS文件
public void testCreateTextFile(String content,String outputFile) throws IllegalArgumentException, IOException{
byte[] buff=content.getBytes();//想要输入内容
Path path=new Path(outputFile);//文件存放路径及文件名称 /a/test4/javawrite.txt
FSDataOutputStream outputStream=fs.create(path);
outputStream.write(buff, 0, buff.length);
System.out.println("输出文件成功");
}
public int init() throws Throwable {
//System.setProperty("hadoop.home.dir", "D:\\Program Files\\HP\\LoadRunner\\include\\hadoop\\hadoop-common-2.2.0-bin-master");
//加载日志输出方式
File directory = new File(".");
DOMConfigurator.configure(directory.getCanonicalPath()+"\\log4j.xml");//加载log4j.xml文件
//PropertyConfigurator.configure("E:/study/log4j/log4j.properties");//加载.properties文件
Logger log=Logger.getLogger("org.zblog.test");
System.setProperty("hadoop.home.dir", directory.getCanonicalPath()+"\\hadoop-common-2.2.0-bin-master");
//初始化
configuration=new Configuration();
//configuration.set(keyFS,"hdfs://172.17.2.12:8020");
configuration.set("fs.hdfs.impl", "org.apache.hadoop.hdfs.DistributedFileSystem");
configuration.set("fs.file.impl", "org.apache.hadoop.fs.LocalFileSystem");
//configuration.set("fs.hdfs.impl",org.apache.hadoop.hdfs.DistributedFileSystem.class.getName());
fs = FileSystem.get(new URI("hdfs://172.16.1.80:8020"), configuration,"hdfs");//hdfs为用户名
//fs = FileSystem.get(URI.create(fsname), configuration, user);
return 0;
}//end of init
public int action() throws Throwable {
testMkdir("/a//test4");
testCreateTextFile("hello hadoop world!\n","/a/test4/intput.txt");
testUpload("d://textdownload.txt","/a/test4/intput.txt");
testDownload("/a/test4/intput.txt","d://textdownload2.txt");
testRename("/a/test4/intput.txt","/a/test4/intput");
FileLoc("/a/test4/intput");
testDelFile("/a/test4/intput");
return 0;
}//end of action
public int end() throws Throwable {
return 0;
}//end of end
}
需要说明的,本次样例脚本中,还引用了hadoop-common-2.2.0-bin-master(主要是因为在windows下开发Hadoop需要用到winutils.exe,本次的目的是为了在Windows下运行以上脚本后,能同时输出hadoop-HDFS运行日志),下载地址为(免积分):http://download.csdn.net/detail/nma_123456/8663763
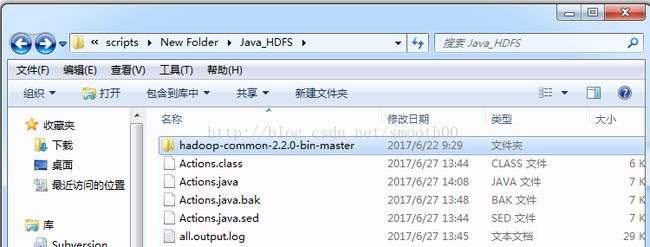
5、将下载的hadoop-common-2.2.0-bin-master解压到Loadrnner脚本目录下(hadoop-common-2.2.0-bin-master下一层是bin目录)
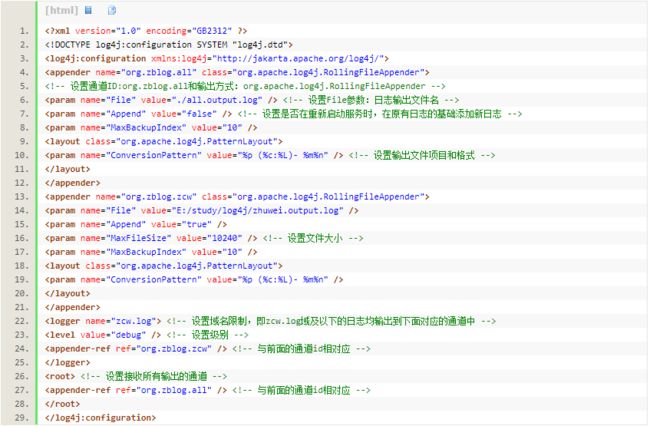
6、同样在Loadrnner脚本目录下创建hadoop的日志配置文件log4j.xml,配置内容如下:
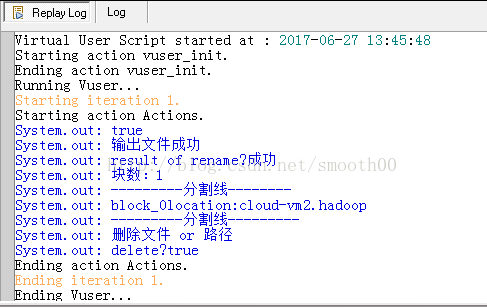
7、一切就绪后,就可以运行脚本了(记住HDFS的连接地址,如hdfs://172.17.2.12:8020和用户要配置正确),运行成功如下所示:


