@(C语言)[code]
用一段简单的代码,探讨下从C代码到最终可执行文件的编译过程,追根究底。
偶尔了解下底层,也就没那么多莫名其妙了。
工作原因有时候会用python写写测试工具,感受到其快速实现应用的便利,但由于偏底层开发,主力语言依然是C。对于开发语言没有什么优劣概念,在特定的情景下哪种实现更佳就用哪种,工具合适才是最好的。
个人开发环境 ubuntu 14.04
编译的作用
相比python,lua等脚本语言解释执行方式,编译C是为了提高程序的运行效率。把对用户友好的语言文本编译成对机器友好的特定指令直接执行,而不是执行时一条一条通过解释器解析执行,很大地提高了执行的效率。对应C主要用于底层,系统层次,追求高性能表现,亦或者,平台资源限制。
编译的过程
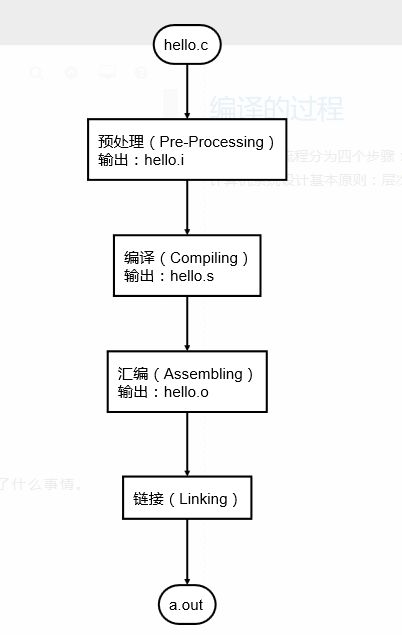
gcc 的编译流程分为四个步骤:
计算机系统设计基本原则:层次化和抽象。
编写一个最简单的程序 hello.c,以此为例,看看各个过程做了什么事情。
#include

#define NUM(x) ((x) + 1)
int main(void)
{
    printf("Hello world %d\\\\r\\\\n", NUM(1));
    return 0;
}
预处理(Pre-Processing)
预处理主要完成的工作:
- 根据
#if后面的条件决定需要编译的代码 - 将源文件中
#include格式包含的文件直接复制到编译的源文件中 - 用实际值替换用
#define定义的字符串
对源代码进行预处理操作
$ gcc -E hello.c -o hello.i
使用编辑器打开输出hello.i,一看吓一跳,原本7、8的代码变成800多行
截取开头结尾如下
# 1 "hello.c"
# 1 ""
# 1 ""
# 1 "/usr/include/stdc-predef.h" 1 3 4
# 1 "" 2
...
...
int main(void)
{
 printf("Hello world %d\\\\r\\\\n", ((1) + 1));
 return 0;
}
我打开文件 stdio.h 对比发现,hello.i 文件开头多出来的一大堆东西,就是stdio.h 经过#if条件选择后留下的(包括其他包含文件的展开,同理)。同时在最下面看到熟悉的printf函数中定义的宏被直接替换成对应的文本。
在这里提出两个问题
- 预处理宏展开可能陷入死循环?
我修改了了代码, 宏里面调用了自己,并且没有递归退出条件
#include

#define NUM(x) (NUM(x) + 1)
int main(void)
{
    printf("Hello world %d\\\\r\\\\n", NUM(1));
    return 0;
}
输出hello.i可以看到,宏展开遇到自己就会停止,避免陷入死循环
int main(void)
{
 printf("Hello world %d\\\\r\\\\n", (NUM(1) + 1));
 return 0;
}
-
include 包含头文件重复?
预处理会直接把对应的头问题展开,如果包含的头文件本身包含了自己,是否也会陷入死循环? 简单编写文件测试
inc.h 文件
#include "inc.h"
inc.c 文件
#include "inc.h"

int main(void)
{
    return 0;
}
预处理结果出错,提示如下:
inc.h:1:17: error: #include nested too deeply
 #include "inc.h"
说明对于文件的展开是可能出现重复,递归的,也说明了为什么在每个被包含的头文件,需要添加如下代码段。
#ifndef _XXX__XXX
#define _XXX_XXX

#endif
编译(Compiling)
这一环节,是把C代码转换为汇编代码并根据需求进行一定程度的优化处理。
执行命令进行编译
$ gcc -S hello.i -o hello.s
# gcc -S 实际调用cc1,所以也可以直接使用cc1编译
生成hello.s (AT&T 格式)
这代码初看起来晦涩难懂,再细细看起来,还是很难懂。
    .file   "hello.c"
    .section    .rodata
.LC0:
    .string "Hello world %d\\\\r\\\\n"
    .text
    .globl  main
    .type   main, @function
main:
.LFB0:
    .cfi_startproc
    pushq   %rbp
    .cfi_def_cfa_offset 16
    .cfi_offset 6, -16
    movq    %rsp, %rbp
    .cfi_def_cfa_register 6

    movl    $2, %esi  # 编译器直接替换为宏 NUM(1) 的结果
    movl    $.LC0, %edi # 设置字符串保存的地址
    movl    $0, %eax
    call    printf
    #  调用printf子例程,只有一个参数的printf gcc
    #  会把它替换成_puts提高效率, 加-fno-builtin 取消

    movl    $0, %eax  # main return 0
    popq    %rbp
    .cfi_def_cfa 7, 8
    ret
    .cfi_endproc
.LFE0:
    .size   main, .-main
    .ident  "GCC: (Ubuntu 4.8.4-2ubuntu1~14.04.1) 4.8.4"
    .section    .note.GNU-stack,"",@progbits
编译器的优化
编译会有一个中间过程,进行优化(前端)后再最终输出汇编代码(后端), gcc 可以通过以下命令查看, 感觉不是给人类看的。
$ gcc -S -fdump-rtl-expand hello.c
使用clang(<-编译器)也可以查看输出中间过程:
$ clang-3.5 -S -emit-llvm hello.c
clang 输出的可读性更强,可以大概看出程序的面貌(因为这个程序很简单...)
; ModuleID = 'hello.c'
target datalayout = "e-m:e-i64:64-f80:128-n8:16:32:64-S128"
target triple = "x86_64-pc-linux-gnu"

@.str = private unnamed_addr constant [17 x i8] c"Hello world %d\\\\0D\\\\0A\\\\00", align 1

; Function Attrs: nounwind uwtable
define i32 @main() #0 {
  %1 = alloca i32, align 4
  store i32 0, i32* %1
  %2 = call i32 (i8*, ...)* @printf(i8* getelementptr inbounds ([17 x i8]* @.str, i32 0, i32 0), i32 2)
  ret i32 0
}

declare i32 @printf(i8*, ...) #1

attributes #0 = { nounwind uwtable "less-precise-fpmad"="false" "no-frame-pointer-elim"="true" "no-frame-pointer-elim-non-leaf" "no-infs-fp-math"="false" "no-nans-fp-math"="false" "stack-protector-buffer-size"="8" "unsafe-fp-math"="false" "use-soft-float"="false" }
attributes #1 = { "less-precise-fpmad"="false" "no-frame-pointer-elim"="true" "no-frame-pointer-elim-non-leaf" "no-infs-fp-math"="false" "no-nans-fp-math"="false" "stack-protector-buffer-size"="8" "unsafe-fp-math"="false" "use-soft-float"="false" }

!llvm.ident = !{!0}

!0 = metadata !{metadata !"Ubuntu clang version 3.5.0-4ubuntu2~trusty2 (tags/RELEASE_350/final) (based on LLVM 3.5.0)"}
我尝试在hello.c 的源代码中添加一个无用的循环
for (int i = 0; i < 10; ++i) {
    i = i;
}
然后分别用以下两个条命令编译,查看输出中间文件.ll (使用clang是因为输出结果比较适合阅读)
# 默认不优化处理 -O0
$ clang-3.5 -S -emit-llvm hello.c
# 开启代码优化
$ clang-3.5 -O3 -S -emit-llvm hello.c
第一种不优化情况下,编译器老老实实把我写的"没啥作用"的代码原原本本的编译出来.
第二种进行了优化, 那段代码不见了......
我想起工作上遇到的,使用for 进行简单延时匹配一些硬件操作的时序,悲剧了.
(输出结果我就不贴上来了。)
中间层优化是和体系代码无关的情况下进行的,优化后再调用对应体系的后端生成汇编代码。 M中体系都可以共用中间层优化,而不是M中体系重新实现M中优化。
汇编(Assembling)
这一步骤相对简单,将汇编代码转换为对应的机器执行指令,由于这一步丢失的信息很少,所以可以通过反汇编把机器码还原为汇编代码,但是再进一步还原到高级语言就不可能了。
$ gcc -c hello.s -o hello.o
# 可以直接调用汇编器 as
$ as hello.s -o hello.o。
使用objdump对生成的ELF进行反汇编
$ objdump  -S hello.o

hello.o:     file format elf64-x86-64


Disassembly of section .text:

0000000000000000 :
   0:   55                      push   %rbp
   1:   48 89 e5                mov    %rsp,%rbp
   4:   be 02 00 00 00          mov    $0x2,%esi
   9:   bf 00 00 00 00          mov    $0x0,%edi
   e:   b8 00 00 00 00          mov    $0x0,%eax
  13:   e8 00 00 00 00          callq  18  # 看这里
  18:   b8 00 00 00 00          mov    $0x0,%eax
  1d:   5d                      pop    %rbp
  1e:   c3                      retq
看到 13行, 原本call printf 的那句被替换为一个跳转,而且跳转到下一条指令。因为printf是一个外部调用,这个地址需要下一步链接的时候才能确定,这时候只是一个占位。
链接(Linking)
主要是在不同模块间对符号进行重定位
在ELF文件 hello.o 里保存一张重定位表(relocation table),保存了其他地方的函数、变量(统称符号)的名字和地址。
可以通过readelf读取出来
$ readelf --relocs hello.o

Relocation section '.rela.text' at offset 0x5a0 contains 2 entries:
  Offset          Info           Type           Sym. Value    Sym. Name + Addend
00000000000a  00050000000a R_X86_64_32       0000000000000000 .rodata + 0
000000000014  000a00000002 R_X86_64_PC32     0000000000000000 printf - 4

Relocation section '.rela.eh_frame' at offset 0x5d0 contains 1 entries:
  Offset          Info           Type           Sym. Value    Sym. Name + Addend
000000000020  000200000002 R_X86_64_PC32     0000000000000000 .text + 0
可以看到,汇编后, printf的地址还是空的,没有填写上对应的地址。
使用nm可以查看文件的符号定义, 可以看到 "U", 表示该符号未定义。
$ nm hello.o
0000000000000000 T main
                 U printf
printf 是在lib.a库(由多个.O文件打包就成了.a库)里面实现所,所以查看下里面的定义,可以看到具体是到printf.o这个文件。
$ objdump  -t /usr/lib/x86_64-linux-gnu/libc.a | grep "printf"
...
printf.o:     file format elf64-x86-64
0000000000000000 g     F .text  000000000000009e __printf
0000000000000000         *UND*  0000000000000000 vfprintf
0000000000000000 g     F .text  000000000000009e printf
...
而当我手动尝试链接的时候,又被提示一堆未定义,而这些工作gcc会自动递归查找去解决。
$ gcc -static hello.c
$ ./a.out
Hello world 2
$ du -h a.out
856K    a.out
$ nm a.out  | grep " printf"
0000000000407ea0 T printf
编译后执行,发现一切正常,printf已经定义了,但是一个简单的程序竟然是856K....
$ gcc hello.c
$ ./a.out
Hello world 2
$ du -h a.out
12K a.out
$ nm a.out  | grep " printf"
                 U printf@@GLIBC_2.2.5
采用动态加载的模式编译,应用体积减小了很多,但是看到printf提示未定义,标记改了,表示是一个动态链接。
通过file也可以查看执行文件是否动态链接
dynamically linked 和 statically linked
$ gcc hello.c
$ file a.out
a.out: ELF 64-bit LSB  executable, x86-64, version 1 (SYSV), dynamically linked (uses shared libs), for GNU/Linux 2.6.24, BuildID[sha1]=8bdbcefb6289597b2123017d2678b11a6f742f23, not stripped
$ gcc -static hello.c
$ file a.out
a.out: ELF 64-bit LSB  executable, x86-64, version 1 (GNU/Linux), statically linked, for GNU/Linux 2.6.24, BuildID[sha1]=25ff17d24016dd4a453a5ac53e3a3fee0f00a5ec, not stripped
这就是动态链接库的好处了,把共用的代码加载到系统,每个程序需要用到时候直接调用,而不需要都包含到每个可执行文件中,减少开销。在执行的时候,通过加载器获取实际地址执行。
其实动态链接库是不知道自己会被加载到内存哪个位置的,所以对于这个种链接,程序在执行的时候,才能获取到实际的地址,涉及到GOT和PLI。
GOT中的信息需要在动态链接库被程序加载后立刻填写正确。这就给采用动态链接库的程序在启动时带来了一定额外开销,从而减缓了启动速度。ELF采用了做延迟绑定的做法来解决这一问题。基本思想就是通过增加另外一个间接层,使得函数第一次被用到时才进行绑定,这就是PLT(Procedure Linkage Table)的作用。
