接上一篇:Android仿微信图片选择器(一)
上一篇介绍了发表界面的编写及数据的处理,这一篇主要介绍图片选择界面的编写。
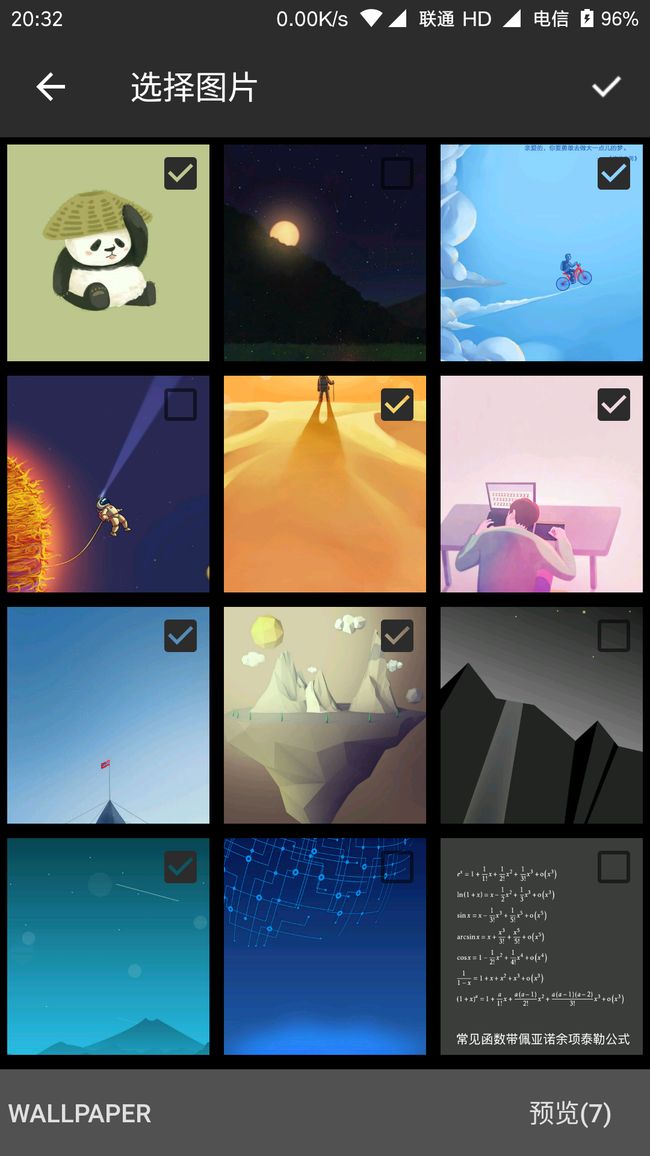
老规矩,先上效果图:
一、基础条件
1. 实体类设计
public class PhotoFolder {

    private String dir;

    private String firstPhotoPath;

    private String name;

    private int count;

    public String getDir() {
        return dir;
    }

    public void setDir(String dir) {
        this.dir = dir;
        int lastIndexOf = this.dir.lastIndexOf(File.separator);
        this.name = this.dir.substring(lastIndexOf + 1);
    }

    public String getFirstPhotoPath() {
        return firstPhotoPath;
    }

    public void setFirstPhotoPath(String firstPhotoPath) {
        this.firstPhotoPath = firstPhotoPath;
    }

    public String getName() {
        return name;
    }

    public int getCount() {
        return count;
    }

    public void setCount(int count) {
        this.count = count;
    }

}
2. 工具类
public class PhotoUtils {

    public static List getPhotoes(Context context) {
        Uri photoUri = MediaStore.Images.Media.EXTERNAL_CONTENT_URI;
        ContentResolver contentResolver = context.getContentResolver();
        Cursor cursor = contentResolver.query(photoUri, null,
                MediaStore.Images.Media.MIME_TYPE + "=? or " + MediaStore.Images.Media.MIME_TYPE + "=?",
                new String[]{"image/jpeg", "image/png"},
                MediaStore.Images.Media.DATE_MODIFIED);
        String firstImage = null;
        List photoFolders = null;
        HashSet dirPathSet = new HashSet<>();  // 辅助工具
        if (cursor != null) {
            photoFolders = new ArrayList<>();
            while (cursor.moveToNext()) {
                String path = cursor.getString(cursor.getColumnIndexOrThrow(MediaStore.Images.Media.DATA));
                if (firstImage == null) {
                    firstImage = path;
                }
                File parentFile = new File(path).getParentFile();
                if (parentFile == null) {
                    continue;
                }
                String dirPath = parentFile.getAbsolutePath();
                PhotoFolder photoFolder = null;
                if (dirPathSet.contains(dirPath)) {
                    continue;
                } else {
                    dirPathSet.add(dirPath);
                    photoFolder = new PhotoFolder();
                    photoFolder.setDir(dirPath);
                    photoFolder.setFirstPhotoPath(path);
                }
                if (parentFile.list() == null) {
                    continue;
                }
                int photoSize = parentFile.list(new FilenameFilter() {
                    @Override
                    public boolean accept(File file, String fileName) {
                        return fileName.endsWith(".jpg") || fileName.endsWith(".png") || fileName.endsWith(".jpeg");
                    }
                }).length;
                photoFolder.setCount(photoSize);
                photoFolders.add(photoFolder);
            }
            Log.i("PhotoUtils", "photoFolders.size() = " + photoFolders.size());
            cursor.close();
            dirPathSet = null;
        }
        return photoFolders;
    }

}
二、界面设计
1. 主界面
RecyclerView的作用是显示当前选择的文件夹的图片,其中一个按钮的作用是弹出选择文件夹的窗口,一个是预览的按钮。
先看RecyclerView的item布局,包含一个ImageView和CheckBox。
为RecyclerView编写Adapter,此处有一个坑是ViewHolder的复用机制会导致CheckBox乱序,通常的解决方法是使用一个HashMap来保存CheckBox的选中状态,在使用HashMap的时候,AS提示使用SparseBooleanArray会有更好的效率,有兴趣的同学可以去百度一下原理,这里就不解释了。但是,结合当前项目的需求,我可以通过点击按钮切换文件夹路径显示不同文件夹的图片,这时复用的机制再次成为一个坑。幸好机智如我,最后通过使用一个HashMap,为每一个路径创建一个SparseBooleanArray来保存对应路径的CheckBox的选中情况解决了乱序和复用的问题。
以下是adapter的代码:
public class PhotoPickAdapter extends AbsRecyclerAdapter {

    private Object tag;
    private int mImageWidth;
    private OnItemSelectedListener onItemSelectedListener;

    private HashMap mFolderSelectedMap = new HashMap<>();
    private String mCurrentFolder;
    private SparseBooleanArray mSelectedMap;

    public PhotoPickAdapter(Context context, String currentFolder, List list) {
        super(context, list);
        DisplayMetrics metrics = context.getResources().getDisplayMetrics();
        mImageWidth = metrics.widthPixels / 3;
        mCurrentFolder = currentFolder;
        mSelectedMap = new SparseBooleanArray();
        initArray(mSelectedMap, list);
        mFolderSelectedMap.put(mCurrentFolder, mSelectedMap);
    }

    @Override
    protected AbsViewHolder createHolder(ViewGroup parent, int viewType) {
        return new ItemViewHolder(mInflater.inflate(R.layout.layout_pick_image_item, parent, false));
    }

    @Override
    protected void showViewHolder(AbsViewHolder holder, final int position) {
        mSelectedMap = mFolderSelectedMap.get(mCurrentFolder);
        final ItemViewHolder viewHolder = (ItemViewHolder) holder;
        Picasso.with(mContext)
                .load(new File(mData.get(position)))
                .placeholder(R.drawable.ic_place_holder)
                .error(R.drawable.ic_load_error)
                .config(Bitmap.Config.RGB_565)
                .resize(mImageWidth, mImageWidth)
                .centerCrop()
                .tag(tag = mData.get(position))
                .into(viewHolder.image);
        viewHolder.select.setOnCheckedChangeListener(null);
        viewHolder.select.setChecked(mSelectedMap.get(position));
        viewHolder.select.setOnCheckedChangeListener(new CompoundButton.OnCheckedChangeListener() {
            @Override
            public void onCheckedChanged(CompoundButton compoundButton, boolean b) {
                mSelectedMap.put(position, b);
                if (b) {
                    if (onItemSelectedListener != null) {
                        onItemSelectedListener.onChecked(compoundButton, mData.get(position));
                    }
                } else {
                    if (onItemSelectedListener != null) {
                        onItemSelectedListener.onRemoved(mData.get(position));
                    }
                }
            }
        });
    }

    public void setOnItemSelectedListener(OnItemSelectedListener onItemSelectedListener) {
        this.onItemSelectedListener = onItemSelectedListener;
    }

    public interface OnItemSelectedListener {

        void onChecked(CompoundButton compoundButton, String image);

        void onRemoved(String image);

    }

    public Object getTag() {
        return tag;
    }

    public void setCurrentFolder(String folder, List data) {
        LogUtils.e("PickAdapter", "current folder" + folder);
        if (!mFolderSelectedMap.containsKey(folder)) {
            SparseBooleanArray array = new SparseBooleanArray();
            initArray(array, data);
            mFolderSelectedMap.put(folder, array);
        }
        mCurrentFolder = folder;
        mSelectedMap = mFolderSelectedMap.get(mCurrentFolder);
        mData.clear();
        mData.addAll(data);
        notifyDataSetChanged();
    }

    private void initArray(SparseBooleanArray array, List data) {
        for (int i = 0; i < data.size(); i++) {
            array.put(i, false);
        }
    }

    private static class ItemViewHolder extends AbsViewHolder {

        ImageView image;
        CheckBox select;

        ItemViewHolder(View itemView) {
            super(itemView);
            image = (ImageView) itemView.findViewById(R.id.id_pick_image);
            select = (CheckBox) itemView.findViewById(R.id.id_select_image);
        }
    }

}7
其中,OnItemSelectedListener的作用是为了把CheckBox的选中事件监听回调到Activity中,让Activity去处理相应的数据和逻辑。setCurrentFolder()是一个关键的方法,通过该方法可以为当前路径创建一个SparseBooleanArray来保存CheckBox的选中状态。adapter中的tag的作用是在RecyclerView滚动的时候可以通过tag来控制是否暂停加载图片,加快响应速度。
2. 弹出窗口设计
先看弹出窗口的效果图:
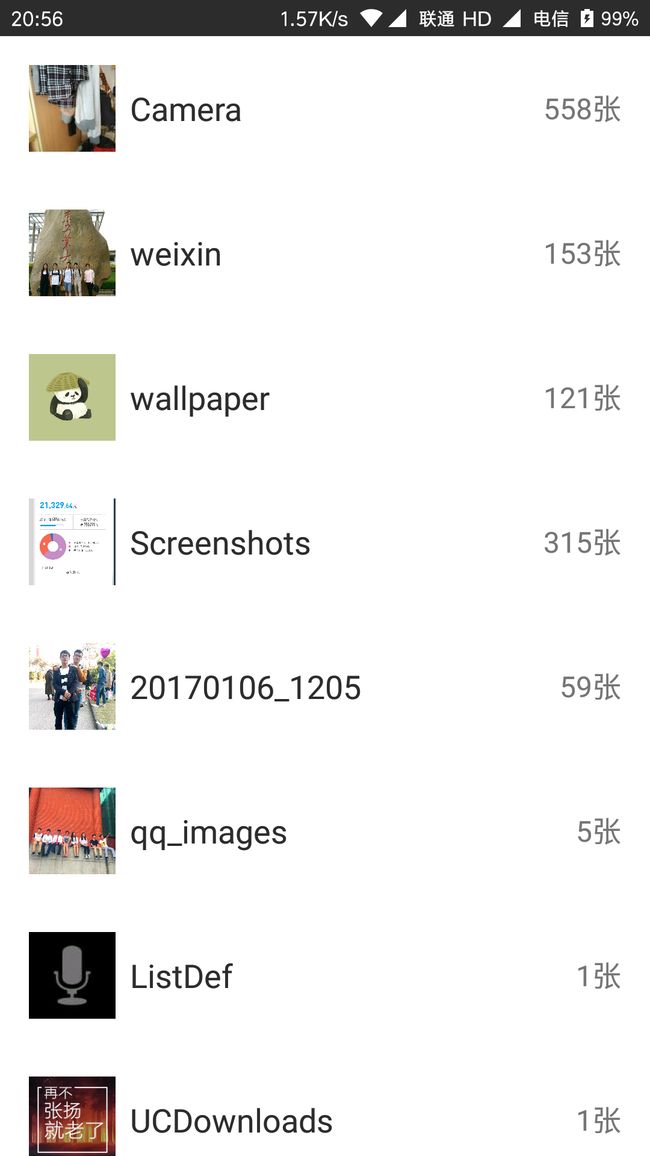
该效果通过一个PopupWindow实现,该PopupWindow布局仅包括一个RecyclerView。实现代码如下:
public class PhotoSpinnerWindow extends PopupWindow {

    public PhotoSpinnerWindow(Context context, final List list, final OnItemSelectedListener listener) {
        LayoutInflater inflater = LayoutInflater.from(context);
        RecyclerView view = new RecyclerView(context);
        view.setLayoutParams(new ViewGroup.LayoutParams(
                ViewGroup.LayoutParams.MATCH_PARENT, ViewGroup.LayoutParams.MATCH_PARENT));
        view.setLayoutManager(new LinearLayoutManager(context));
        PhotoFolderAdapter adapter = new PhotoFolderAdapter(context, list);
        view.setAdapter(adapter);
        adapter.setOnItemClickListener(new AbsRecyclerAdapter.DefaultItemClickListener() {

            @Override
            public void onClick(View view, int position) {
                String dir = list.get(position).getDir();
                String name = list.get(position).getName();
                File file = new File(dir);
                if (file.list() != null) {
                    List images = new ArrayList<>();
                    for (String path : file.list()) {
                        images.add(list.get(position).getDir() + File.separator + path);
                    }
                    if (listener != null) {
                        listener.onSelected(view, dir, name, images);
                    }
                }
            }
        });
        this.setContentView(view);
        this.setHeight(ViewGroup.LayoutParams.WRAP_CONTENT);
        this.setWidth(ViewGroup.LayoutParams.MATCH_PARENT);
        this.setFocusable(true);
        this.setOutsideTouchable(true);
        ColorDrawable bd = new ColorDrawable(0xb0000000);
        this.setBackgroundDrawable(bd);
        this.setAnimationStyle(R.style.bottom_popup_anim);
    }

    public interface OnItemSelectedListener {
        void onSelected(View view, String dir, String name, List images);
    }

}
在该PopupWindow中有一个OnItemSelectedListener,主要作用是将选中的路径下的图片的路径列表回调到Activity进行处理。PhotoFolderAdapter是该RecyclerView的适配器,具体实现如下:
public class PhotoFolderAdapter extends AbsRecyclerAdapter {

    public PhotoFolderAdapter(Context context, List list) {
        super(context, list);
    }

    @Override
    protected AbsViewHolder createHolder(ViewGroup parent, int viewType) {
        return new ItemViewHolder(mInflater.inflate(R.layout.layout_photo_spinner_item, parent, false));
    }

    @Override
    protected void showViewHolder(AbsViewHolder holder, int position) {
        ItemViewHolder viewHolder = (ItemViewHolder) holder;
        viewHolder.dir.setText(mData.get(position).getName());
        viewHolder.count.setText(mData.get(position).getCount() + "张");
        Picasso.with(mContext)
                .load(new File(mData.get(position).getFirstPhotoPath()))
                .placeholder(R.drawable.ic_place_holder)
                .error(R.drawable.ic_load_error)
                .config(Bitmap.Config.RGB_565)
                .into(viewHolder.image);
    }

    private static class ItemViewHolder extends AbsViewHolder {

        ImageView image;
        TextView dir;
        TextView count;

        ItemViewHolder(View itemView) {
            super(itemView);
            image = (ImageView) itemView.findViewById(R.id.id_spinner_image);
            dir = (TextView) itemView.findViewById(R.id.id_spinner_dir);
            count = (TextView) itemView.findViewById(R.id.id_spinner_count);
        }
    }
}
对应的布局文件:
至此,所有界面设计完成,接下来就是最核心的数据处理逻辑和功能实现。
三、功能实现
本项目是基于MVP模式实现的,为了简便实现和展示该功能,代码中并不完全符合MVP的设计。
1. 接口定义
公共接口定义:
public interface RequestCallback {

    void onSuccess(T t);

    void onFailure(String message);
}
获取图片接口定义:
public interface IPhotoPickModel {

    void getPhotoes(Context context, RequestCallback> callback);
}
具体实现如下:
public class PhotoPickModelImpl implements IPhotoPickModel {

    @Override
    public void getPhotoes(final Context context, final RequestCallback> callback) {
        new Thread(new Runnable() {
            @Override
            public void run() {
                final List list = PhotoUtils.getPhotoes(context);
                if (list != null) {
                    if (callback != null) {
                        new Handler(Looper.getMainLooper()).post(new Runnable() {
                            @Override
                            public void run() {
                                callback.onSuccess(list);
                            }
                        });
                    }
                } else {
                    new Handler(Looper.getMainLooper()).post(new Runnable() {
                        @Override
                        public void run() {
                            callback.onFailure("unknown error");
                        }
                    });
                }
            }
        }).start();
    }
}
因为查找本机图片是一个耗时的操作,所以我把它放到子线程中去处理,当获取到结果时,通过Handler把数据回调到主线程。
2. 数据处理
由于不完全按照MVP设计来,为了演示方便,并没有设计Presenter层去关联View和Model层,这里直接在View层使用Model层的接口,也就是在Activity中直接调用Model的方法。具体代码如下:
    private void loadImage() {
        IPhotoPickModel model = new PhotoPickModelImpl();
        model.getPhotoes(BasicApplication.getApplication(), new RequestCallback>() {
            @Override
            public void onSuccess(List photoFolders) {
                LogUtils.i("getPhotoList");
                mPhotoFolderList.clear();
                mPhotoFolderList.addAll(photoFolders);
                mPhotoFolderAdapter.notifyDataSetChanged();
                // 设置默认显示
                String dir = photoFolders.get(0).getDir();
                String name = photoFolders.get(0).getName();
                mSpinnerButton.setText(name);
                File file = new File(dir);
                if (file.list() != null) {
                    List images = new ArrayList<>();
                    for (String path : file.list()) {
                        images.add(dir + File.separator + path);
                    }
                    mPhotoPickAdapter.setCurrentFolder(dir, images);
                }
            }

            @Override
            public void onFailure(String message) {
                ToastUtils.showShort(BasicApplication.getApplication(), message);
            }
        });
    }
Bean类的设计是保存文件夹路径和文件夹下第一张图片的路径,这样做是为了把路径和图片分开,提高效率。Model层回调的数据是PopupWindow中的RecyclerView展示所需要的数据,所以要把数据填充到PhotoFolderAdapter中,然后默认取第一个文件夹的图片展示到界面上。
接下来我遇到了一个坑,一个没注意到的细节。因为Android6.0系统的特性,某些权限需要动态申请,而获取手机图片就是一个读取用户隐私信息的行为,需要用户授权方可继续。这时候我又去学习了一波动态权限申请的知识,然后顺利解决了这个问题。直接上代码:
    private static final int EXTERNAL_STORAGE_PERMISSION_CODE = 1000;

    private void getPermission() {
        if (ContextCompat.checkSelfPermission(this, Manifest.permission.READ_EXTERNAL_STORAGE)
                != PackageManager.PERMISSION_GRANTED) {
            ActivityCompat.requestPermissions(PhotoPickActivity.this,
                    new String[]{Manifest.permission.READ_EXTERNAL_STORAGE},
                    EXTERNAL_STORAGE_PERMISSION_CODE);
        } else {
            loadImage();
        }
    }

    @Override
    public void onRequestPermissionsResult(int requestCode, @NonNull String[] permissions, @NonNull int[] grantResults) {
        super.onRequestPermissionsResult(requestCode, permissions, grantResults);
        if (requestCode == EXTERNAL_STORAGE_PERMISSION_CODE) {
            if (grantResults[0] == PackageManager.PERMISSION_GRANTED) {
                loadImage();
            } else {
                showMessage("未授权");
            }
        }
    }
数据处理大致就到这里了,接下来是介绍一些逻辑处理,如选取不同文件夹的逻辑处理,图片选择个数的逻辑处理。
3. 逻辑处理
因为文件夹的选取是在PopupWindow中处理的,所以这里的逻辑主要是在PopupWindow中。具体看代码:
    private void initPhotoWindow() {
        mPhotoFolderList = new ArrayList<>();
        mPhotoFolderAdapter = new PhotoFolderAdapter(this, mPhotoFolderList);
        mPhotoSpinnerWindow = new PhotoSpinnerWindow(this, mPhotoFolderList, new PhotoSpinnerWindow.OnItemSelectedListener() {
            @Override
            public void onSelected(View view, String dir, String name, List images) {
                mSpinnerButton.setText(name);
                mPhotoPickAdapter.setCurrentFolder(dir, images);
                mPhotoSpinnerWindow.dismiss();
            }
        });
    }
因为在PopupWindow中做了数据的出来,回调的数据就是要显示到界面上的数据,所以将数据填充到adapter中,即调用PhotoPickAdapter.setCurrentFolder(dir, images)方法。
对于图片个数的限制,主要是对CheckBox监听回调的处理。先看代码:
    mPhotoPickAdapter.setOnItemSelectedListener(new PhotoPickAdapter.OnItemSelectedListener() {
            @Override
            public void onChecked(CompoundButton compoundButton, String image) {
                if (check(compoundButton)) {
                    mSelectedPhotos.add(image);
                }
                checkSelectedPhotoCount();
            }

            @Override
            public void onRemoved(String image) {
                mSelectedPhotos.remove(image);
                checkSelectedPhotoCount();
            }
        });
在监听回调中有两个判断方法,主要就是处理选取张数的逻辑,check()的作用是控制CheckBox状态,checkSelectedPhotoCount()控制预览按钮的可用以及选取的张数个数的显示。具体代码如下:
    private void checkSelectedPhotoCount() {
        if (mSelectedPhotos == null) return;
        if (mSelectedPhotos.size() == 0) {
            mPreviewButton.setText("预览");
            mPreviewButton.setEnabled(false);
        } else {
            mPreviewButton.setEnabled(true);
            mPreviewButton.setText(String.format(Locale.getDefault(), "预览(%d)", mSelectedPhotos.size()));
        }
    }

    private boolean check(CompoundButton compoundButton) {
        if (mSelectedPhotos.size() + 1 > mSelectedCount) {
            compoundButton.setChecked(false);
            showMessage(String.format(Locale.getDefault(), "您最多能选择%d张图片", mSelectedCount));
            return false;
        }
        return true;
    }
图片可选数量由mSelectedCount控制,该参数由启动该Activity的Activity觉得,该Activity向外提供一个方法进行调用:
    public static void startActivityForResult(Activity context, int requestCode, int resultCode, int selectedCount) {
        mResultCode = resultCode;
        mSelectedCount = selectedCount;
        Intent intent = new Intent(context, PhotoPickActivity.class);
        context.startActivityForResult(intent, requestCode);
    }
至此,图片选择的功能和核心代码已经介绍完毕,接下来一篇博客是介绍预览界面的实现。
Android仿微信图片选择器(三)