本文为翻译文章,对文章内容进行部分舍去,原文地址Webpack-the confusing parts。
一.Webpack的核心哲学
webpack有2个核心概念:
- 一切皆模块,就像JS文件能当作模块一样,其余文件(CSS, IMAGES, HTML)也能当作模块。即,你能够require("myJsFile.js") 或 require("myCSSFile.css"),这意味着我们可以任意“手工制品”拆分成任意更小的可控制的块,从而使之可重用;
- 只加载你想要的和你什么时候需要的, 一般模块打包将所有的模块生成一个大的单一的"bundle.js"文件。但是在现实中,这个"bundle.js"文件可能会10MB-15MB,这样加载会很慢! 因此webpack拥有丰富的功能来拆分代码, 产生多个"bundle"文件, 同时实现异步的加载,这就是 load what you need and when you need it.
二.开发和产品
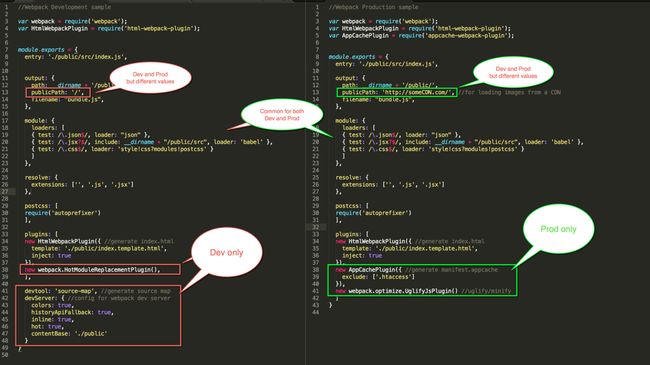
首先应该意识到的是webpack拥有丰富的功能,一些只能用于开发(Development-only), 一些只用于产品(Production-only), 一些两者都可以(Production-and-Development)。
// Development-only 列举部分只用于开发的配置
module.exports = {
    // ...
    devtoolo: "source-map",
    devServer: {
        colors: true,
        historyApiFallback: true,
        inline: true,
        hot: true,
        contentBase: "./public"
    },
    plugins: [
        new HotModuleReplacementPlugin(),
        // ...
    ],

}

// Production-only 只用于产品
{
    plugins: [
        // ...
        new AppCachePlugin({  // 产生"manifest.appcache"
            excluede: ["htaccess"]
        }),
        new webpack.optimize.UglifyJsPlugin() // 压缩代码
    ]
}

// Production-and-Development
{
    output: {
        publicPath: "/"    // 开发时用
    }
}
{
    output: {
        publicPath: "http://someCDN.com/"    // 产品时用,这个值产品和开发时不一样
    }
}
因此产品一般有2个webpack配置文件: webpack.config.js, webpack.config.production.js
在package.json中配置
"script": {
    // "npm run build": 生成产品打包的文件
    "build": "webpack --config webpack.config.production.js -p",

    // "npm run dev": 生成开发打包的文件
    "dev": "webpack-dev-server --colors --hot --inline"
}
二. webpack CLI 和 webpack-dev-server
webpack提供了2个接口:
- Webpack CLI tool, 默认接口(作为webpack的部分安装)
- webpack-dev-server tool, 一个Node.js server(单独安装的)
1.Webpack CLI(Good for Production Builds)
使用方法:
// 选项1: 全局安装, 在Termnal中使用
npm install webpack -g
$ webpack  // 产生打包文件

// 选项2: 本地安装,添加到package.json中
npm install webpack --save

// "package.json"
"scripts": {
    "build": "webpack --config webpack.config.production.js -p"
}

// 使用方法
$ npm run build
2.Webpack-dev-server(Good for Development Builds)
这是一个Exprss node.js server, 默认端口为8080,这个server内部调用Webpack。好处就是提供实时刷新(live Reloading) 和 只替代变化的模块, 比如Hot Module Replacement(HMR)
使用方法:
// 选项1: 全局安装, 终端使用
npm install -g webpack-dev-server
$ webpack-dev-server --inline --hot

// 选项2: 添加到"package.json"中
"scripts": {
    "start": "webpack-dev-server --inline --hot"
}
$ npm start
--inline: 表示实时刷新,一般将整个页面进行刷新
--hot: 表示热取代, 只替换变化的部分
一般这2个标签一起使用,在webpack.config.js中配置
{
    devServer: {
        inline: true,
        hot: true
    }
}
三."entry" --- 字符串, 数组, 对象###
配置文件中"entry"有3种表达形式,字符串,数组或对象, 不同的类型有不同的目的,如果时单一的starting point,任何形式功能一样:
entry: "./public/src/index.js"
entry: ["./public/src/index.js"]
entry: { index: "./public/src/index.js" }
1.entry - Array形式
如果要添加多个相互之间独立的文件,可以使用数组的形式, 比如在HTML中需要"googleAnalytics.js"
{
    entry: ["./public/src/index.js", "./public/src/googleAnalytics.js"],
    output: {
        path: "./dist",
        filename: "bundle.js"
    }
}
2.entry - 对象形式
如果有多页面应用,不是SPA,比如多个HTML文件(index.html和profile.html),可以使用webpack通过 entry object 一次性生成多个打包文件
{
    entry: {
        "indexEntry": "./public/src/index.js",
        "profileEntry": "./public/src/profile.js"
    },
    output: {
        path: "./dist",
        filename: "[name].js" // indxeEntry.js & profileEntry.js
    }
}
3.entry - combination
可以在对象entry中使用数组:
// 产生3个文件
{
    entry: {
        "vendor": ["jQuery", "analytics.js", "optimizely.js"],
        "index": "./public/src/index.js",
        "profile": "./public/src/profile.js"
    },
    output: {
        path: "./dist",
        filename: "[name].js" // vendor.js & indxe.js & profile.js
    }
}
四.output- "path" Vs "publicPath"
output告诉webpack在哪里存放产生的文件,有2个属性"path"和"publicPath":
- path: 仅告诉webpack在哪里存放结果
- publicPath: 使用插件用于更新CSS中的 URLs, HTML文件,比如,在开发时,css文件中图片使用本地图片"./test.png",在产品阶段, "test.png"可能存放在某个CDN上,可以手动更新这个URL, 也可以使用Webpack的publicPath和一些插件在产品阶段的自动更新这些URLs
.image {
    background-image: url("./test.png")
}

// 产品阶段
.image {
    background-image: url("https://someCDN/test.png")
}
五.链式加载器
多个Loaders能够链式的对相同文件类型进行操作,the chaining works from right-to-left and the loader are separated by
// npm install --save-dev style-loader css-loader sass-loader autoprefixer-loader
module: {
    loaders: [
        {
            test: /\.scss$/,
            loader: "style!css?modules&importLoaders=2&sourceMap&localIdentName=[local]__[hash:base64:5]!autoprefixer?browsers=last 2 version!sass?outputStyle=expanded&sourceMap"
        }
    ]
}
六.Loaders自身可配置
Loaders自身也有参数,也可以进行配置,比如 url-loader
// 使用"?"就像URLs
{
    test: /\.(png|jpg)$/,
    loader: "url-loader?limit=1024"
}
// 也可以使用"query"属性
{
    test: /\.(png|jpg)$/,
    loader: "url-loader",
    query: {
        limit: 1024
    }
}
上面的 "1024" 表示图标超过1024bytes就使用base64编码格式
七. ".babelrc" 文件###
babel-loader 使用 presets 配置转换ES6->ES5, JSX->JS, 可以通过 query 参数
module: {
    loaders: [
        {
            test: /\.jsx?$/,
            exclude: /(node_modules|bower_components)/,
            loader: "babel",
            query: {
                presets: ["react","es2015"]
            }
        }
    ]
}
在很多的项目中babel的配置会非常的大, 可以单独的放在 .babelrc 文件中, babel-loader会自动的加载 .babelrc 文件中的配置信息
// webpack.config.js
module: {
    loaders: [
        {
            test: /\.jsx?$/,
            exclude: /(node_modules|bower_components)/,
            loader: "babel"
        }
    ]
}

// .babelrc
{
    "presets": ["react", "es2015"]
}
八.插件
插件是额外的node模块,通常对打包好的bundle进行处理。 例如: UglifyJsPlugin对bundle.js进行压缩处理; extract-text-webpack-plugin内部使用 css-loader 和 style-loader将所用CSS集中到一个地方,最后提取结果,生成一个 style.css 外部文件。
// Take all the .css files, combine their contents and
//  it extract them to a single "style.css"

var ETP = require("extract-text-webpack-plugin");

module: {
    loaders: [
    { test: /\.css$/, loader: ETP.extract("style-loader", "css-loadeer") }
    ]
},
plugins: [
    new ExtractTextPlugin("style.css") // 提取到 style.css 文件
]
如果向将 内联css(inline css) 作为一个style元素加入到HTML中, 可以不适用 extract-text-webpack-plugin,而只使用css-loader, style-loader
module: {
    loaders: [
    { test: /\.css$/, loader: "style!css" }
    ]
}
九.插件和Loaders的区别
Loaders work at the individual file level during or before the bundle is generated.(加载器在bundle产生前或产生过程中对单独的文件进行处理)
Plugins work at bundle or chunk level and usually work at the end of the bundle generation process(插件在bundle生成之后对bundle 或 块级别进行处理), 有一些插件,比如 commonsChunksPlugins 对bundles的创建进一步的进行修改
十.Resolving File Extensions
许多webpack 配置文件有一个 resolve extensions 属性,拥有一个 empty string。 empty string时帮助解决 imports文件中没有扩展的文件的, 比如 require("./myJsFile") 或 import myJsFile from "./myJsFile"
{
    resolveL: {
        extensions: ["", ".js", ".jsx"]
    }
}
