开发环境:
Xcode 9开发语言:
Swift 4-
Demo gif:
Kapture 2017-11-07 at 11.22.51.gif
1. 新建app
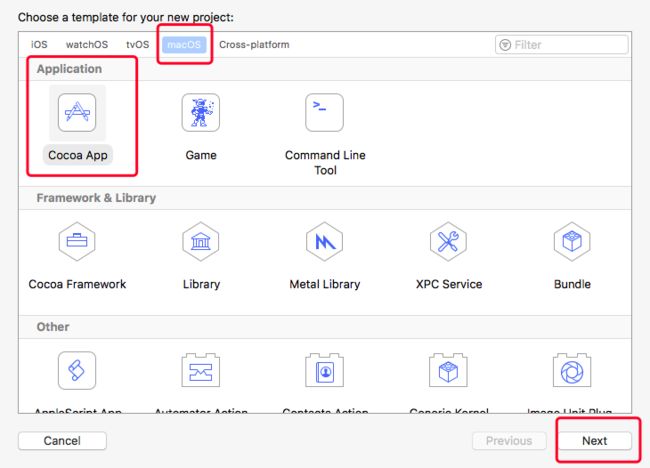
1.1 创建macOS app
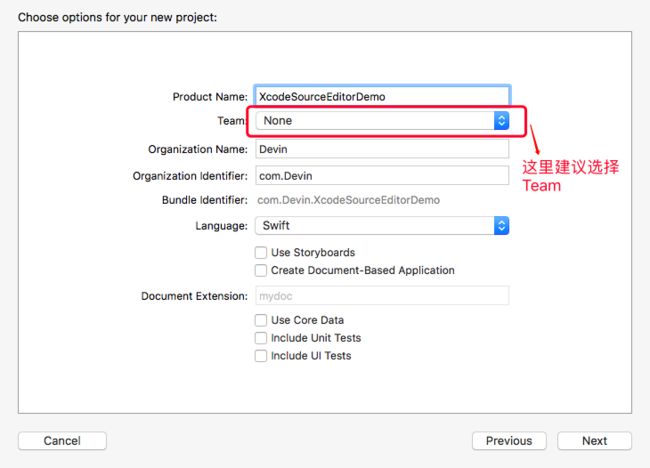
1.2 app取名和选择语言
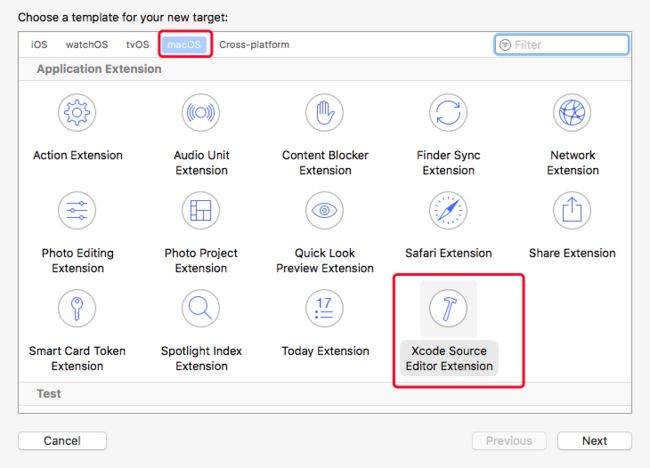
1.3 新建Target
1.4 选择xcode source editor extension
1.5 Target取名
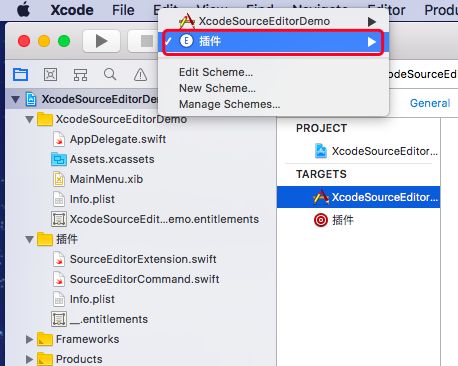
1.6 选择Activate
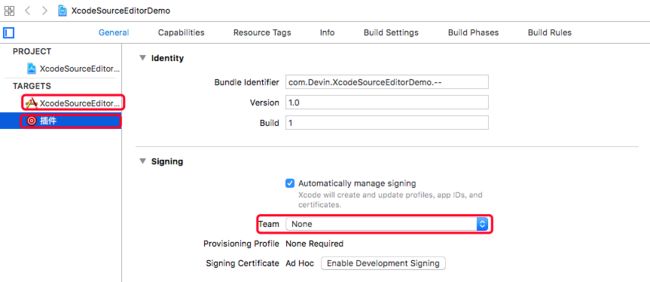
1.7 配置Team[如果已经配置可忽略,否则必须配置]
- 2个
TARGETS的Team需要一致
1.8 显示
- 选择新建的Target-> 运行
- 选择
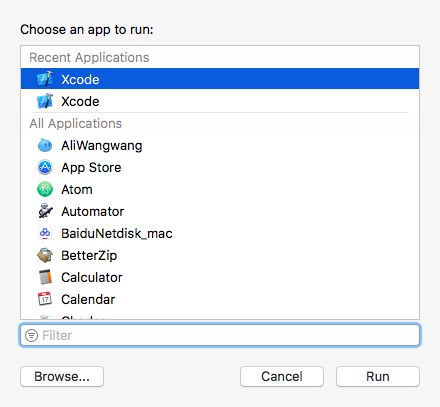
Xcode运行
- 会显示一个新的灰色的
Xcode,选择一个工程运行
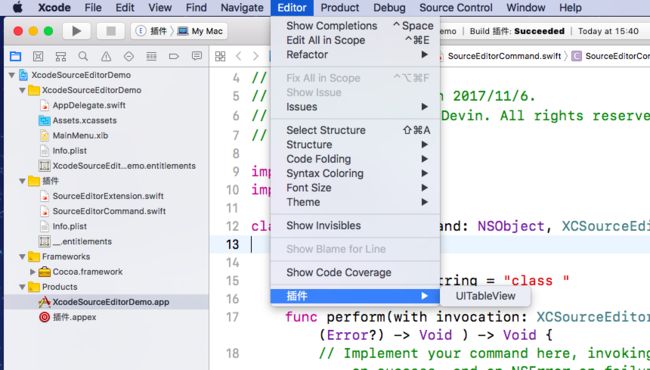
- 选中
Editor会显示插件名,只是个空插件
2. 关于xcode source editor extension
2.1 SourceEditorExtension.swift
-
func extensionDidFinishLaunching():在extension启动的时候会被调用,刚加载好插件但还未点击插件按钮时,可以执行某些准备工作。 -
commandDefinitions: [[XCSourceEditorCommandDefinitionKey: Any]]: 返回字典类型的数组,可以为每个插件重写名字、标识符和自定义类名等信息,设置后会覆盖Info.plist文件中对应的NSExtension
    var commandDefinitions: [[XCSourceEditorCommandDefinitionKey: Any]] {
        // If your extension needs to return a collection of command definitions that differs from those in its Info.plist, implement this optional property getter.
        return [
                [.classNameKey : "插件.SourceEditorCommand", // 格式:Target名.Command文件名
                 .identifierKey : "com.Devin.XcodeSourceEditorDemo.SourceEditorCommand", // 格式: BundleIdentifier.任意字符串
                 .nameKey : "UITableView"]
                ]
    }
2.2 SourceEditorCommand.swift
- 在这个文件里面可以实现extension的相关逻辑
-
perform(with:completionHandler:): 在用户启动你的extension的时候被调用 -
XCSourceEditorCommandInvocation对象包含了一个buffer属性,这个属性主要是用来访问当前文件的源代码,和光标选中范围 -
completionHandler将会以参数为nil进行调用,告诉Xcode命令执行完毕。否则将会给它传递一个Error实例。
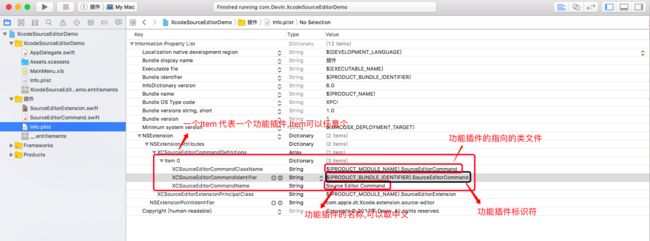
3. info.plist 配置
4. 示例代码
4.1 获取当前光标所在的类名
   /// 获取文件名
    /// 规则:1.根据光标所在的位置,获取距离光标上一行代码,最近的`class`
    ///      2.如果没有获取到。则获取第二行 `xxxx.swift` 文本
    ///      3.如果上述都不成立,则为`nil`
    /// - Parameters:
    ///   - selection: XCSourceTextRange
    ///   - comment: [String]
    /// - Returns: String?
    fileprivate func fileName(selection:XCSourceTextRange, comment: [String]) -> String? {
        let secondLine = comment[1]
        var filename:String?
        filename = selectionFileName(selection: selection, comment: comment).className ?? headerFileName(fromFileNameComment: secondLine)
        return filename
    }

    // "//  Classname.swift" -> "Classname"
    fileprivate func headerFileName(fromFileNameComment comment: String) -> String? {

        let comment = comment.trimmingCharacters(in: .whitespacesAndNewlines)

        let commentPrefix = "//"
        guard comment.hasPrefix(commentPrefix) else { return nil }

        let swiftExtensionSuffix = ".swift"
        guard comment.hasSuffix(swiftExtensionSuffix) else { return nil }

        let startIndex = comment.index(comment.startIndex, offsetBy: commentPrefix.characters.count)
        let endIndex = comment.index(comment.endIndex, offsetBy: -swiftExtensionSuffix.characters.count)

        return comment[startIndex.. (className:String?, classLine:Int) {
        var ownfileName:String?
        var classIndex = 0
        // 获取当前光标上面所在最近的类
        guard selection.end.line > 0 else {
            return (nil,classIndex)
        }
        let selectionEnd = selection.end.line - 1
        guard selectionEnd < comment.count else {
            return (nil,classIndex)
        }
        let selectionBefore = comment[0...selectionEnd]
        for (index,element) in selectionBefore.reversed().enumerated() {
            if element.hasPrefix(classString) {
                classIndex = selectionBefore.count - index
                // 去掉 classString
                var newElement = element.replacingOccurrences(of: classString, with: "")
                // 去掉 \n
                newElement = newElement.trimmingCharacters(in: .whitespacesAndNewlines)
                // 去掉 空格
                newElement = newElement.replacingOccurrences(of: " ", with: "")
                let nsNewElement = newElement as NSString
                if newElement.contains(":") {
                    let getRange = nsNewElement.range(of: ":")
                    ownfileName = nsNewElement.substring(to: getRange.location)
                }else if newElement.contains("{") {
                    let getRange = nsNewElement.range(of: "{")
                    ownfileName = nsNewElement.substring(to: getRange.location)
                }else {
                    ownfileName = newElement
                }
                break
            }
        }
        return (ownfileName,classIndex)
    }
4.2 代码文本
   fileprivate func insertSelectionCode() -> String {
        let result = """
        \t\tmainTableView.register(<#T##cellClass: AnyClass?##AnyClass?#>, forCellReuseIdentifier: <#T##String#>)
        \t\tmainTableView.register(<#T##nib: UINib?##UINib?#>, forCellReuseIdentifier: <#T##String#>)
        \t\tview.addSubview(mainTableView)
        """
        return result
    }

    fileprivate func insertVarCode() -> String {
        let result = """
        \n
        \tlazy var mainTableView:UITableView = {
        \t\tvar mainTableView = UITableView(frame: <#T##CGRect#>, style: <#T##UITableViewStyle#>)
        \t\tmainTableView.dataSource = self
        \t\tmainTableView.delegate = self
        \t\tmainTableView.tableFooterView = UIView()
        \t\tmainTableView.separatorStyle = .none
        \t\treturn mainTableView
        \t}()
        \n
        """
        return result
    }

    fileprivate func insertEndCode(_ className:String) -> [String] {
        let result = """
        \n
        extension \(className): UITableViewDataSource, UITableViewDelegate {

        \t// MARK: - UITableViewDataSource
        \tfunc tableView(_ tableView: UITableView, numberOfRowsInSection section: Int) -> Int {
        \t\t<#code#>
        \t}

        \tfunc tableView(_ tableView: UITableView, cellForRowAt indexPath: IndexPath) -> UITableViewCell {
        \t\t<#code#>
        \t}

        \tfunc numberOfSections(in tableView: UITableView) -> Int {
        \t\t<#code#>
        \t}

        \t// MARK: - UITableViewDelegate
        \tfunc tableView(_ tableView: UITableView, didSelectRowAt indexPath: IndexPath) {
        \t\t<#code#>
        \t}

        \tfunc tableView(_ tableView: UITableView, heightForRowAt indexPath: IndexPath) -> CGFloat {
        \t\t<#code#>
        \t}
        }
        """
        return [result]
    }
4.3 功能实现
func perform(with invocation: XCSourceEditorCommandInvocation, completionHandler: @escaping (Error?) -> Void ) -> Void {
      // Implement your command here, invoking the completion handler when done. Pass it nil on success, and an NSError on failure.

      // 获取光标所在位置的范围
      let selection = invocation.buffer.selections.firstObject as? XCSourceTextRange
      // 当前文件每行显示的内容
      let lines = invocation.buffer.lines
      let linesStr = lines.map{$0 as! String}

      guard selection != nil else {
          completionHandler(nil)
          return
      }

      // 获取类名
      let ownfileName = fileName(selection: selection!, comment: linesStr)
      // 插入代码 var
      lines.insert(insertVarCode(), at: selectionFileName(selection: selection!, comment: linesStr).classLine)
      // 光标处 插入代码
      lines.insert(insertSelectionCode(), at: selection!.end.line)

      // 尾部拼接代理
      if ownfileName != nil {
          lines.addObjects(from: insertEndCode(ownfileName!))
      }
      completionHandler(nil)
}
5. 打包DMG
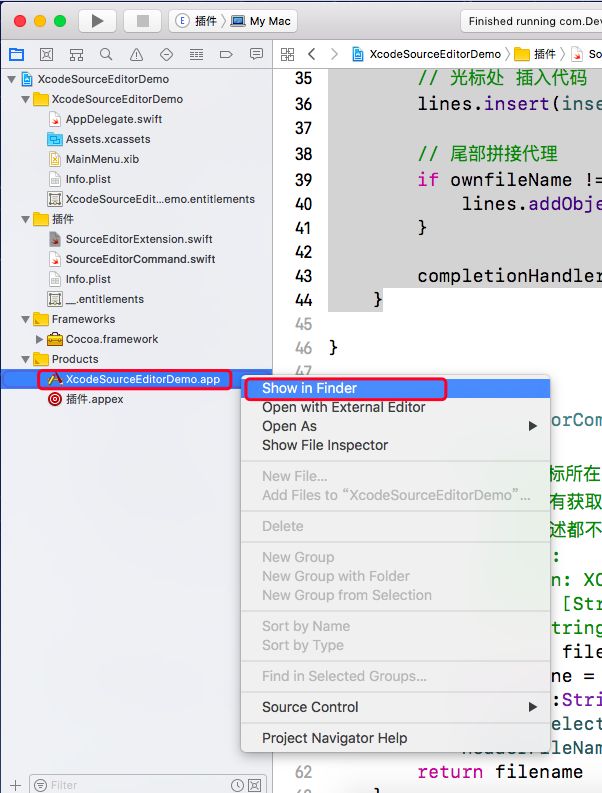
5.1 获取app所在文件位置
5.2 桌面新建文件夹,把app和Applications替身文件夹放入其中
- 制作Application的替身:cd到这个目录,建立一个软链接。
$ ln -s /Applications/ Applications
5.3 打包DMG
- 选择上面新建的文件夹,然后打开。会在文件夹中生成dmg
6. 使用
6.1 把app 拖入Applications文件夹放入其中
6.2 运行app
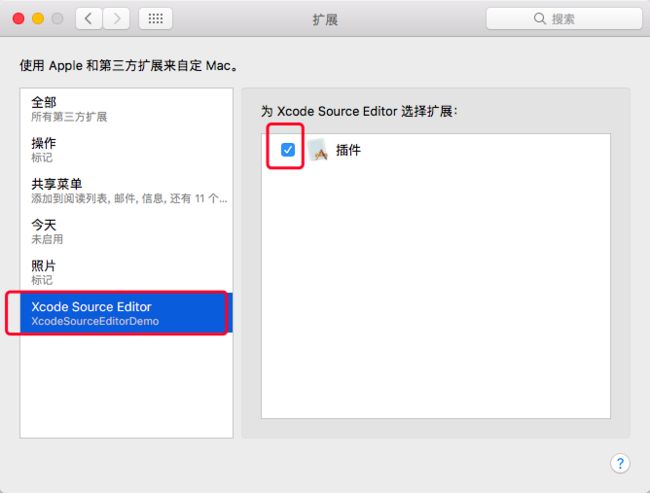
6.3 然后,打开“系统偏好设置” -> "扩展" -> "Xcode Source Editor" -> 确认插件名字前已打钩
6.4 退掉Xcode,重新运行
6.5 设置快捷键
-
Xcode -> "Preferences" -> "Key Bindings" -> 搜索插件名字 -> 添加对应的快捷键:
6.6 插件删除
-
直接把app移到废纸楼即可
7 Demo地址
Demo
8 其他Xcode Source Editor Extension
Awesome native Xcode extensions
