本文是一篇面向前端的iOS开发入门指南,通过完成一个天气应用的App,来了解最基本iOS开发,请注意最终目的是自产自用(当你需要某个功能时能够自己做一个使用)。比如说下面这个场景:
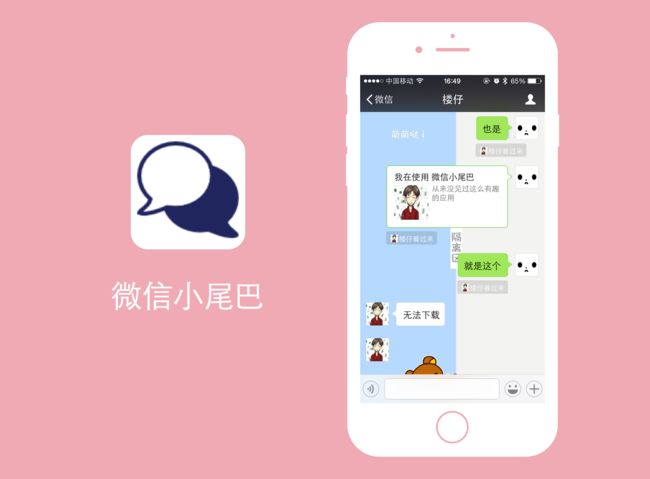
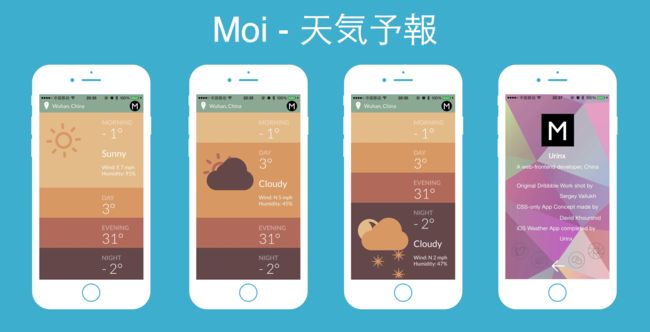
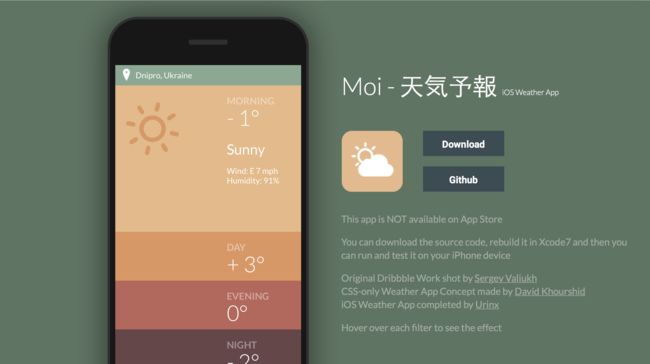
当我们和别人聊天时,带上自己霸气侧露引人瞩目的微信小尾巴。而本文要做的天气App的最终效果如下图:
通过该应用的实现,你将学到iOS动画,社交分享,音频播放,地理位置获取,HTML混合开发,微信SDK,应用打包分发等知识。总之,鉴于本人了解的也不多,与其说是指南,更不如说是一起学习。本文成文仓促,诸多错误,望各位包涵。
Design
不会设计的开发绝对不能成为好的产品经理,我们的第一步便是从整个产品的设计,构思,需求上进行行而上的架构。
首先我们要弄清楚四个问题:
- 我们做的这个是什么?—— 一个天气预报App。
- 为什么做这个?—— 每一个iOS开发入门都是从天气App开始的,可以说是必经之路。
- 针对的目标人群有哪些?—— 就我自己。
- 我们这个App解决了用户什么样的痛点?—— 让零基础的自己对iOS开发有了一个基本的认识。
当你对上面这些问题有了一个较深刻的认识后,便可以进行下一步了—— App UI Design。
为了进行 UI 设计,我们需要三样东西:灵感,工具,素材。
灵感的话我们可以从 Dribbble 上找,本文要做的这个App的设计就来自于 Sergey Valiukh 的作品。并且已经有一位仁兄 David Khourshid 已经用CSS3实现了其动画概念效果。
工具我们则使用的是Sketch,Sketch 是一款轻量,易使用的矢量设计工具,让 UI 设计更简单,更高效。 Sketch 让我们尽可能少的设计,将UI放在了首位,让我们专注于响应式的设计而不是照片的编辑,关注于交互和动画而不是人造的材质。

素材主要来自于一个提供免费Sketch素材的网站Sketch App Sources,
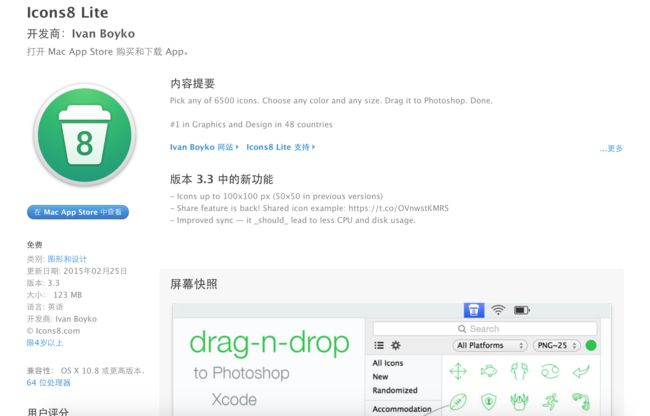
另外还有一些则来自于 Icons8 Lite。
App
下面我们就开始一步一步构建我们的天气App了。这里用的是Xcode7和Swift2语言,因为Xcode7允许可以在不加入每年99刀的Apple Developer Program的情况下真机调试应用,当然,这也给开源应用一个新的分发方式,即提供源码供大家自己下载然后编译安装到手机上。
新建一个项目,我起名叫Moi,语言Swift,设备只针对iPhone。
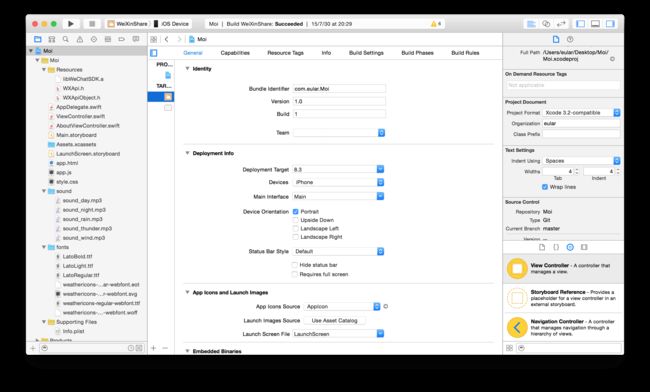
整个项目的结构和资源如图,其中用到的图片及声音字体文件请到github上下载。

Main.storyboard只用了两个View,取消Auto Layout和Size Classes,只针对4英寸屏,不兼容其他。第一个是主界面,布满UIWebView,然后一个Modal segue的Button,Flip Horizontal到下一个AboutView,给它添加一个viewController,这个上面主要是一些关于信息及分享。
首页我们将采用HTML5+CSS3完成,为什么,因为这样最快,我们只需重用前面提到已经写好的CSS实现的概念App,在codepen上下载源码然后针对手机稍作修改。
由于移动端不支持hover,所以用js将其绑定到touchend和touchmove事件上。
window.addEventListener('DOMContentLoaded', function(){
    var weather = $$('div.weather'),
        nowHour = new Date().getHours(),
        i = 0;

    // Morning 5-11
    // Day 11-18
    // Evening 18-22
    // Night 22-5
    if (nowHour >= 5 && nowHour < 11) {
        i = 0;
    }
    else if (nowHour >=11 && nowHour < 18) {
        i = 1;
    }
    else if (nowHour >=18 && nowHour < 22) {
        i = 2;
    }
    else {
        i = 3;
    }
    weather[i].classList.add('active');

    for (var i = 0; i < weather.length; i++) {
        var showup = (function(i){
            return function(){
                if (!weather[i].classList.contains('active')) {
                    $('.active').classList.remove('active');
                    weather[i].classList.add('active');
                }
            };
        })(i);
        weather[i].addEventListener('touchend',showup);
        weather[i].addEventListener('touchmove',showup);
    };
});
在ViewController的viewDidLoad函数里设置webView:
    override func viewDidLoad() {
        super.viewDidLoad()
        // Do any additional setup after loading the view, typically from a nib.

        ...

        let appFile = NSBundle.mainBundle().URLForResource("app", withExtension: "html")
        let localRequest = NSURLRequest(URL: appFile!)
        self.webView.loadRequest(localRequest)
        self.webView.scalesPageToFit = false
        self.webView.scrollView.scrollEnabled = false

        ...
    }
这样主界面就做好了。
Location
作为一个天气App,当然要获取地理位置才能查询所在位置的天气。
要获取天气,首先要import CoreLocation,并实现CLLocationManagerDelegate协议:
    let locationManager:CLLocationManager = CLLocationManager()

    override func viewDidLoad() {
        ...

        self.locationManager.delegate = self
        self.locationManager.desiredAccuracy = kCLLocationAccuracyBest
        self.locationManager.requestWhenInUseAuthorization()
        self.locationManager.startUpdatingLocation()
    }

    // 获取地理位置
    func locationManager(manager: CLLocationManager, didUpdateLocations locations: [CLLocation]) {
        let location:CLLocation = locations[locations.count - 1]
        if location.horizontalAccuracy > 0 {
            let latitude = location.coordinate.latitude
            let longitude = location.coordinate.longitude
            self.locationManager.stopUpdatingLocation()

            getWeatherData(latitude, lon: longitude)
        }
    }
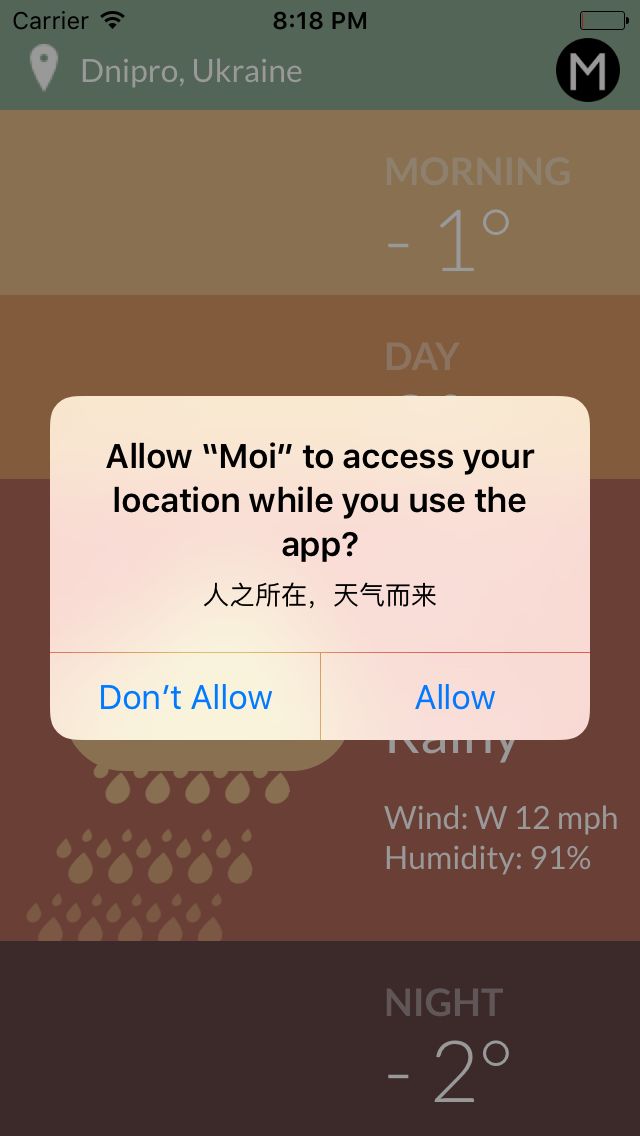
现在这样还是不能获取地理位置,我们还需要在info.plist文件中申请权限:

这样就能正确弹窗了!
Weather API
接下来我们通过经纬度来获取天气信息,这里用到的是Yahoo Weather API。
    func getWeatherData(lat: CLLocationDegrees, lon: CLLocationDegrees){
        let yahoo_api = "https://query.yahooapis.com/v1/public/yql?q=select%20*%20from%20weather.forecast%20where%20woeid%20in%20(select%20woeid%20from%20geo.placefinder%20where%20text%3D%22\(lat)%2C\(lon)%22%20and%20gflags%20%3D%20%22R%22)%20and%20u=%22c%22&format=json&diagnostics="

        NSURLConnection.sendAsynchronousRequest(NSURLRequest(URL: NSURL(string: yahoo_api)!), queue: NSOperationQueue(), completionHandler: {
            (resp: NSURLResponse?, data: NSData?, err: NSError?) -> Void in
            if let e = err {
                print(e)
            } else if let yahooData = data {
                let yahooJson = try! NSJSONSerialization.JSONObjectWithData(yahooData, options: NSJSONReadingOptions.AllowFragments)
                let channel = yahooJson.objectForKey("query")?.objectForKey("results")?.objectForKey("channel")
                let location = channel?.objectForKey("location")
                let wind = channel?.objectForKey("wind")
                let condition = channel?.objectForKey("item")?.objectForKey("condition")

                let city = location?.objectForKey("city")
                let country = location?.objectForKey("country")
                let w_direc = wind?.objectForKey("direction")
                let w_speed = wind?.objectForKey("speed")
                let humidity = channel?.objectForKey("atmosphere")?.objectForKey("humidity")
                let temp = condition?.objectForKey("temp")
                let weatherText = condition?.objectForKey("text")

                // 在主线程操作
                dispatch_sync(dispatch_get_main_queue(), { () -> Void in
                    self.webView.stringByEvaluatingJavaScriptFromString("setCity('\(city!)','\(country!)')")
                    self.webView.stringByEvaluatingJavaScriptFromString("setWeather('\(temp!)','\(weatherText!)','\(w_direc!)','\(w_speed!)','\(humidity!)')")

                    self.soundPlay(weatherText as! String)
                })

            }
        })
    }
这里用NSURLConnection.sendAsynchronousRequest发送异步请求,以防止主线程阻塞,得到结果后又以dispatch_sync回到主线程。而数据呢,则是用stringByEvaluatingJavaScriptFromString来注入js代码以实现数据互通。
在js文件中实现这两个调用api:
function setCity(city, country){
    $('.address').textContent = city+', '+country;
}

function setWeather(degrees, text, direction, speed, humidity){
    direction = parseInt(direction);
    speed = parseInt(speed);
    text = text.split(' ').pop();
    var Direct = ['N','NE','E','SE','S','SW','W','NW'],
        h = new Date().getHours(),
        state = (h >= 19 || h < 5) ?'moon':'sun';

    if (['Fair','Clear','Sunny'].indexOf(text) > -1) {
        $('.active .icon').innerHTML = '';
    }
    else if (['Cloudy','Fog'].indexOf(text) > -1) {
        $('.active .icon').innerHTML = '';
    }
    else if (['Rain','Showers','Thunderstorms'].indexOf(text) > -1) {
        $('.active .icon').innerHTML = '';
    }
    else if (['Snow'].indexOf(text) > -1) {
        $('.active .icon').innerHTML = '';
    }
    else {
        $('.active .icon').innerHTML = '';
    }

    $('.active .content .degrees').textContent = degrees;
    $('.active .content .data h2').textContent = text;
    $$('.active .content .data div')[0].textContent = 'Wind: '+Direct[ Math.floor(((direction+22.5)%360)/45) ]+' '+speed+' mph';
    $$('.active .content .data div')[1].textContent = 'Humidity: '+humidity+'%';
}
AVAudioPlayer
该应用的一大特点就是能根据当地的天气及时间播放不同的环境背景音,声音素材来源于Noizio—— 一款帮助人模拟周围环境声音,提高工作效率甚至睡眠的App。
首先要import AVFoundation。
    func soundPlay(weatherText: String){

        var condition: String?

        let today:NSDate = NSDate()
        let dateFormatter = NSDateFormatter()
        dateFormatter.dateFormat = "HH" //“HH"大写强制24小时制
        let hour = NSInteger(dateFormatter.stringFromDate(today))

        if weatherText.hasSuffix("Rain") || weatherText.hasSuffix("Showers") {
            condition = "rain"
        }
        else if weatherText.hasSuffix("Cloudy") || weatherText.hasSuffix("Fog"){
            condition = "wind"
        }
        else if weatherText.hasSuffix("Thunderstorms"){
            condition = "thunder"
        }
        else {
            // ['Fair','Clear','Sunny'] or default
            if hour > 19 || hour < 5 {
                condition = "night"
            }
            else {
                condition = "day"
            }
        }

        if let cond = condition {
            self.avPlayer = try! AVAudioPlayer(contentsOfURL: NSURL(fileURLWithPath: NSBundle.mainBundle().pathForResource("sound/sound_\(cond)", ofType: "mp3")!))
            self.avPlayer.play()
        }
    }
Animation
当你发现那个跳转到AboutView的按钮是如此没有活力的时候,你就忍不住想给它加上一个动画,就是这么随意啊。
    override func viewDidLoad() {
        ...

        self.jumpImg.transform = CGAffineTransformMakeScale(0, 0)

        ...
    }

    override func viewDidAppear(animated: Bool) {
        UIView.animateWithDuration(0.3, delay: 0.8, options: UIViewAnimationOptions.CurveEaseIn, animations: {
            self.jumpImg.transform = CGAffineTransformScale(self.jumpImg.transform, 0.5, 0.5)
            self.jumpImg.transform = CGAffineTransformMakeRotation(CGFloat(M_PI))
            }, completion: {
                _ in
                UIView.animateWithDuration(0.3, delay: 0, options: UIViewAnimationOptions.CurveEaseIn, animations: {
                    self.jumpImg.transform = CGAffineTransformScale(self.jumpImg.transform, 1, 1)
                    self.jumpImg.transform = CGAffineTransformRotate(self.jumpImg.transform, CGFloat(M_PI))
                    }, completion: nil)
        })
    }
Share
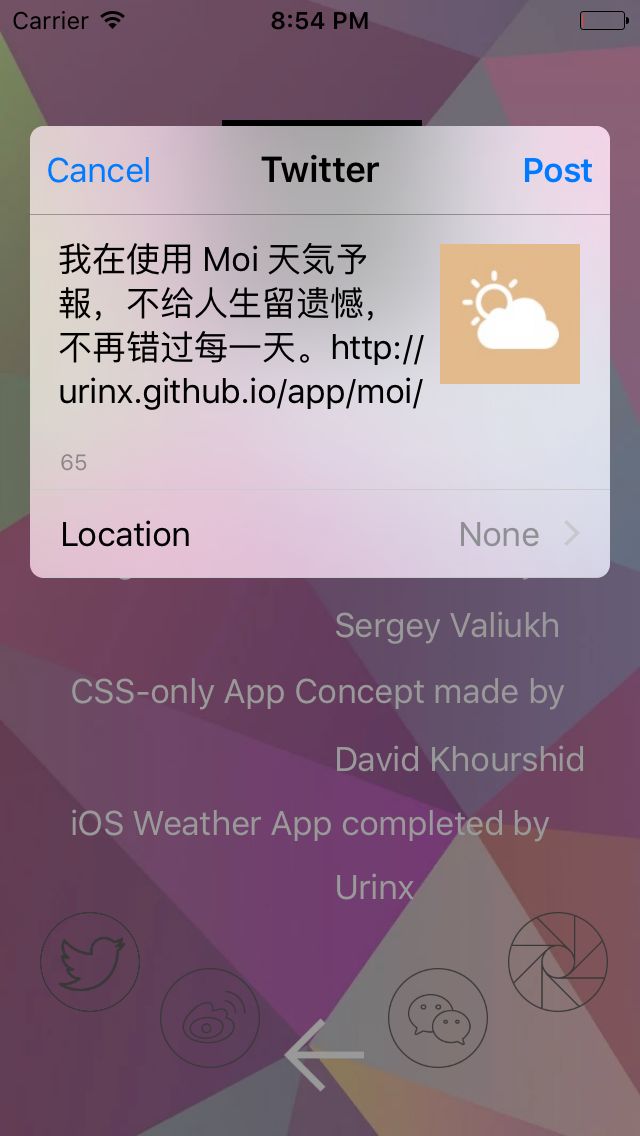
最后,为了能让跟多的人能够享受到此App,分享功能是必不可少的。
首先,我们用的是iOS自身提供的分享的功能,先import Social:
    func share(forServiceType shareMethod: String){
        let controller: SLComposeViewController = SLComposeViewController(forServiceType: shareMethod)
        controller.setInitialText("我在使用 Moi 天気予報,不给人生留遗憾,不再错过每一天。http://urinx.github.io/app/moi/")
        controller.addImage(UIImage(named: "shareImg"))
        self.presentViewController(controller, animated: true, completion: nil)
    }

    @IBAction func twitterTapped(sender: AnyObject) {
        share(forServiceType: SLServiceTypeTwitter)
    }
    @IBAction func sinaTapped(sender: AnyObject) {
        share(forServiceType: SLServiceTypeSinaWeibo)
    }
对于自身不提供的第三方App则使用其SDK,这里用的是微信。
首先要在微信开放平台上注册应用,通过后即获得一些基本的权限,比如分享权限。
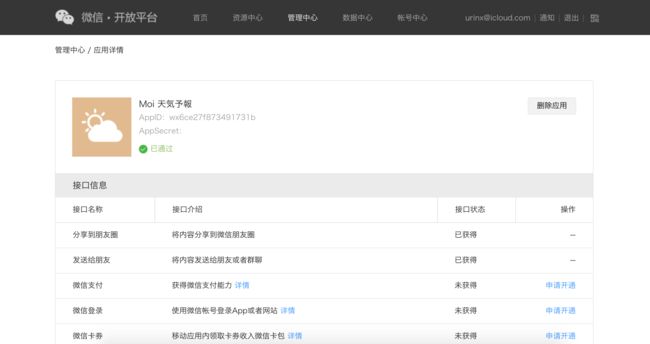
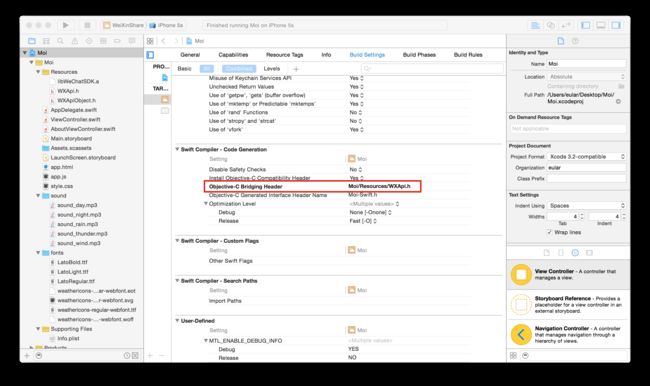
将微信SDK文件导入你的项目中,由于其是用Objective-C写的,所以还需要桥接,在Build Settings里找的Objective-C Bridging Header并将其设置为WXApi.h的路径。
然后在AppDelegate里注册appid:
    func application(application: UIApplication, didFinishLaunchingWithOptions launchOptions: [NSObject: AnyObject]?) -> Bool {
        // Override point for customization after application launch.
        WXApi.registerApp("wx6ce27f873491731b")
        sleep(2)
        return true
    }
接下来就可以直接使用了,下面是微信分享链接的例子:
    func sendLinkContent(_scene: Int32, title: String){
        let message =  WXMediaMessage()

        message.title = title
        message.description = "不给人生留遗憾,不想错过每一天"
        message.setThumbImage(UIImage(named:"shareImg"))

        let ext =  WXWebpageObject()
        ext.webpageUrl = "http://pre.im/40fb"
        message.mediaObject = ext

        let req =  SendMessageToWXReq()
        req.bText = false
        req.message = message
        req.scene = _scene
        WXApi.sendReq(req)
    }

    @IBAction func wechatTapped(sender: AnyObject) {
        sendLinkContent(WXSceneSession.rawValue, title: "我在使用 Moi - 天気予報")
    }
    @IBAction func wechatCircleTapped(sender: AnyObject) {
        sendLinkContent(WXSceneTimeline.rawValue, title: "不给人生留遗憾,不想错过每一天")
    }
至此,整个基本完成,还有很多后续可以继续改进,但本文就到此为止了。
Distribution
对于像我此等没钱加入Apple Developer Program的学生党(欢迎打赏),不上传到App Store,该如何分发我们的应用呢?
这里我用的是pre.im:
当然还有个fir.im:
至于用哪个,自己随意吧。
由于这两个网站均需要上传ipa包,而Xcode里每次build生成的是app文件,我们又没有证书进行打包成ipa,那怎么办呢?其实很简单,首先将App安装到真机上,然后用某助手将其备份应用导出,就可以得到ipa包了,然后上传即可。这样上传的其他人是无法安装的,但是pre.im提供了他们自己的企业证书帮我们重签名,这样就都可以安装了。

当然,除此之外,你可以将应用开源,放到github上,需要的人自行下载,然后本地build安装到真机上。
Last
App官网: http://urinx.github.io/app/moi/
Github:https://github.com/Urinx/Moi
Pre.im: http://pre.im/40fb
微信公众号:urinx