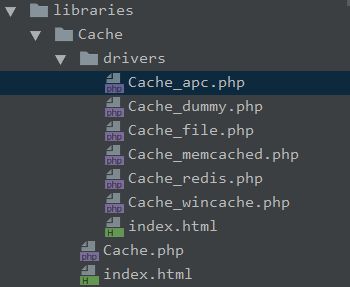
这节看下 CI 提供的缓存功能,缓存也是以驱动的方式运行的,由如下几部分组成
- Cache_apc.php:提供对 php 字节码 opcode 和用户数据的缓存。
- Cache_dummy.php:实现了驱动接口的一个空类,仅仅是为了防止某个驱动不存在时代码报错。
- Cache_file.php:文件缓存。
- Cache_memcached.php:memcache 缓存
- Cahce_redis.php:redis 缓存,不过只是封装一些基本功能。
- Cache_wincache.php :提供 Windows 上的缓存功能。
关于 APC
apc 全称 alternative php cache(可选 php 缓存),其提供对 opcode 和 用户数据 的缓存!
什么是 opcode?
opcode 是 php 脚本编程生成的机器码,一个 php 脚本的解析过程大致如下
正如你看到的,如果我们能将 Parse 和 Compile 这两步能省掉的话,直接得到机器码对于提升 php 脚本的执行性能是非常有帮助的,于是在早期 php 版本中出现了提供 Opcode 缓存的扩展 apc!
但是由于该扩展在 php 5.5.* 有严重的内存问题,就被废弃了,然后官方出了一个新的 Opcode 缓存 Zend Opcache,在 php 5.5 以后的版本中自带了该扩展!
apc 除了提供 Opcode 缓存,还提供用户数据缓存,既然 apc 被废了,于是后面就出了一个替代 apc 的扩展 acpu, 该扩展只被用作缓存用户数据,其接口完全兼容 apc!
那什么是用户数据缓存呢?
用户数据缓存就是编写 PHP 代码时用 apc_store 和 apc_fetch 函数操作读取、写入的数据;
apcu 提供的缓存可以看做是一个轻量级 key/value 存储系统,类似 memcache,如果你缓存的用户数据量大的话,还是建议你使用 memcache,redis 等专业缓存系统!
好了,说完基本概念,现在让我们写下这样一段缓存代码
 $this->load->driver('cache', array('adapter' => 'apc', 'backup' => 'file'));

if ( ! $foo = $this->cache->get('foo'))
{
    echo 'Saving to the cache!
';
    $foo = 'foobarbaz!';
    $this->cache->save('foo', $foo, 300);
}
echo $foo;
那它载入驱动后的运行流行是怎么样的呢?我们的源码分析就以此展开!
驱动抽象类加载
之前分析加载器源码时我们知道 CI 任何资源的载入都是通过加载器实现的,而缓存驱动是通过加载器中的 driver() 函数载入的。
注意:driver() 方法载入的是驱动抽象类!
driver()
public function driver($library, $params = NULL, $object_name = NULL)
{
        //如果加载了多个驱动,递归处理
        if (is_array($library))
        {
            foreach ($library as $driver)
            {
                $this->driver($driver);
            }

            return $this;
        }
        elseif (empty($library))
        {
            return FALSE;
        }

        // 该文件中实有两个类,分别为驱动抽象层父类和驱动器的基类,我们后面会分析这个文件的源码
        if ( ! class_exists('CI_Driver_Library', FALSE))
        {
            // We aren't instantiating an object here, just making the base class available
            require BASEPATH.'libraries/Driver.php';
        }

        // 这里可以看到,CI 默认驱动的的架构是 $driver/$driver,也就是说如果我们传入的驱动是 cache,
        // 那么解析到的驱动是 Cache/cache,而之前在加载器源码分析中我们知道在方法 library()
        // 内部会从指定的加载目录($path)中去查找这个驱动,最后会实例化该驱动;
        if ( ! strpos($library, '/'))
        {
            $library = ucfirst($library).'/'.$library;
        }

        return $this->library($library, $params, $object_name);
}
通过上面的源码看到最终的驱动是通过加载器的 library() 方法载入的,并在该方法内部会实例化 Cache 对象, 这样整个驱动抽象层的载入就完成了!
那么驱动抽象类实例化时到底做了呢?
驱动抽象类的继承
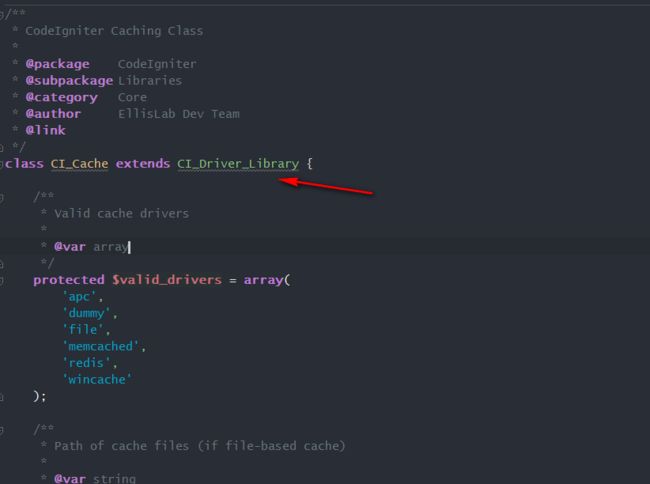
驱动抽象类位于 /libraries/Cache/Cache.php 中,进入该文件首先看到其继承了一个类 CI_Driver_Library!
那这个 CI_Driver_Library 类是从哪里来的呢?先留个疑问!
接着往下看,我们观察 CI_Cache 的构造方法。
驱动抽象类的构造函数
    // $config 参数就是 $this->load->driver('cache', array('adapter' => 'apc', 'backup' => 'file')) 时的传入的第二个的参数,
    // adapter 是驱动器(file,redis,memcache等),backup 是备用的驱动器,不清楚的话看文档:
    // https://codeigniter.org.cn/user_guide/libraries/caching.html#id2
    public function __construct($config = array())
    {
        $default_config = array(
            'adapter',
            'memcached'
        );

        // 将 $config 中的配置项挂到当前类的属性上,由于当前类的属性有个前缀,所以给加了个 _
        foreach ($default_config as $key)
        {
            if (isset($config[$key]))
            {
                $param = '_'.$key;

                $this->{$param} = $config[$key];
            }
        }

        //检测是否给缓存配置了前缀,主要是为了防止多个应用的命名冲突
        isset($config['key_prefix']) && $this->key_prefix = $config['key_prefix'];

        if (isset($config['backup']) && in_array($config['backup'], $this->valid_drivers))
        {
            $this->_backup_driver = $config['backup'];
        }


        // 使用 is_supported() 判断驱动器是否可用,不可用的话就降级到备用驱动器,如果还不可以用的话,就再次降级到 dummy,
        // dummy 这玩意就是空壳子,只是简单实现抽象层的接口并返回true,起到了容错的作用而已 !
        if ( ! $this->is_supported($this->_adapter))
        {
            if ( ! $this->is_supported($this->_backup_driver))
            {
                // Backup isn't supported either. Default to 'Dummy' driver.
                log_message('error', 'Cache adapter "'.$this->_adapter.'" and backup "'.$this->_backup_driver.'" are both unavailable. Cache is now using "Dummy" adapter.');
                $this->_adapter = 'dummy';
            }
            else
            {
                // Backup is supported. Set it to primary.
                log_message('debug', 'Cache adapter "'.$this->_adapter.'" is unavailable. Falling back to "'.$this->_backup_driver.'" backup adapter.');
                $this->_adapter = $this->_backup_driver;
            }
        }
    }
构造方法中我们看到只是处理了传入的参数解析到当前的属性上面;然后判断驱动器是否可用。
但是,有个问题让人挺纳闷的:
我们至今没有看到驱动器的实例化,之前在 driver() 看到载入的驱动只是将 CI_Cache 这个驱动抽象类给实例化了,那么驱动器到底是在哪被被载入并实例化的?
在驱动器都还没有实例化的情况下,竟然去根据 is_supported() 判断是否支持驱动器,这岂不是明显的逻辑bug?
如果不是,那么会不会是在 is_supported() 中载入了驱动器并实例化了呢?
那只能进入 is_supported() 一探究竟了!
is_supported()
public function is_supported($driver)
{
        static $support = array();

        if ( ! isset($support[$driver]))
        {
            $support[$driver] = $this->{$driver}->is_supported();
        }

        return $support[$driver];
}
可以看到 is_supported() 就是在驱动抽象层对各个驱动 is_supported() 方法的包装而已,我们依然没有看到 驱动器的实例化!
我就不卖关子了,其实驱动器就是在 is_supported() 方法中被实例化的,你肯定会有疑问: "并没有看见实例化驱动器的关键字 new 啊"? 是的,你确实没看见,不见得驱动器没被创建!
接下来我要说的我见到了截止目前分析 CI 框架源码最精妙的一段代码(哎!深邃的面向对象啊);
先说结论:驱动器是通过魔术方法给载入的 (想对 CI 说 FUCK U)!!!
那魔术方法又在哪?
之前在 driver() 函数中看到有一行如下的代码,魔术方法就出在载入的这个 Driver.php 中!
if ( ! class_exists('CI_Driver_Library', FALSE))
{
    // We aren't instantiating an object here, just making the base class available
    require BASEPATH.'libraries/Driver.php';
}
驱动器的载入和实例化就是在 Driver.php 实现的!,正如我们刚进入驱动抽象类 CI_Cache 看到的 CI_Driver_Library 类,这个 CI_Driver_Library 就位于Driver.php 中!
Driver.php 中驱动器的载入
Driver.php 中有两个类,CI_Driver_Library 和 CI_Driver:
- 前者被驱动抽象类 CI_Cache继承用来载入驱动器;
- 后者用来将 CI_Cache 这个抽象层的公共属性和方法分配给每个子驱动器;
魔术方法是如何被触发的?
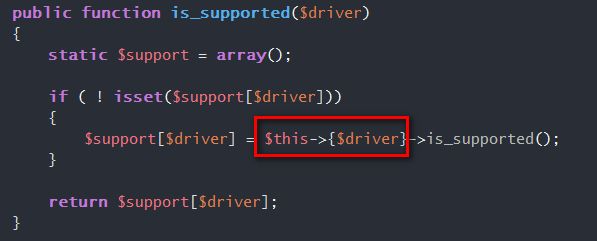
我们知道,如果对象找不到某个属性是就会触发魔术方法,该魔术方法是在 is_supported() 中被触发的!
注意看图中的红框部分:
由于 $driver 是驱动器,明显在这里驱动器还没被实例化,所以该驱动器是找不到的,那既然找不到,而 CI_Cache 又继承了 CI_Driver_Library ,那必然会触发其内部的魔术方法 __get()!
接下来我们看下 __get() 的内容
__get()
public function __get($child)
{
        // Try to load the driver
        return $this->load_driver($child);
}
注释说的很清楚了,$child 就是驱动器的名字,通过 load_driver() 载入的!
load_driver()
    /*
     * load_driver 就简单多了,就是从指定的 $path 下寻找到驱动然后实例化就行了
     */
    public function load_driver($child)
    {
        // 解析得到类名,反正 CI 自己的那套命名空间的的解析总是在 MY_,CI_ 这些命名空间倒来倒去
        $prefix = config_item('subclass_prefix');

        if ( ! isset($this->lib_name))
        {
            $this->lib_name = str_replace(array('CI_', $prefix), '', get_class($this));
        }

        //得到驱动器的名称,注意没前缀
        $child_name = $this->lib_name.'_'.$child;

        // valid_drivers 在 CI_Cache 中,是一个数组,定义了驱动器有哪些
        if ( ! in_array($child, $this->valid_drivers))
        {
            $msg = 'Invalid driver requested: '.$child_name;
            log_message('error', $msg);
            show_error($msg);
        }

        //很熟悉的套路了,得到 path,然后会从这些 path 去加载这个驱动器
        $CI = get_instance();
        $paths = $CI->load->get_package_paths(TRUE);

        // 加载扩展了的驱动器
        $class_name = $prefix.$child_name;
        $found = class_exists($class_name, FALSE);
        if ( ! $found)
        {
            // Check for subclass file
            foreach ($paths as $path)
            {
                // Does the file exist?
                $file = $path.'libraries/'.$this->lib_name.'/drivers/'.$prefix.$child_name.'.php';
                if (file_exists($file))
                {
                    // Yes - require base class from BASEPATH
                    $basepath = BASEPATH.'libraries/'.$this->lib_name.'/drivers/'.$child_name.'.php';
                    if ( ! file_exists($basepath))
                    {
                        $msg = 'Unable to load the requested class: CI_'.$child_name;
                        log_message('error', $msg);
                        show_error($msg);
                    }

                    // Include both sources and mark found
                    include_once($basepath);
                    include_once($file);
                    $found = TRUE;
                    break;
                }
            }
        }

        // 加载原生的驱动器
        if ( ! $found)
        {
            // Use standard class name
            $class_name = 'CI_'.$child_name;
            if ( ! class_exists($class_name, FALSE))
            {
                // Check package paths
                foreach ($paths as $path)
                {
                    // Does the file exist?
                    $file = $path.'libraries/'.$this->lib_name.'/drivers/'.$child_name.'.php';
                    if (file_exists($file))
                    {
                        // Include source
                        include_once($file);
                        break;
                    }
                }
            }
        }

        // 如果驱动抽象和驱动器都不存在就报错
        if ( ! class_exists($class_name, FALSE))
        {
            if (class_exists($child_name, FALSE))
            {
                $class_name = $child_name;
            }
            else
            {
                $msg = 'Unable to load the requested driver: '.$class_name;
                log_message('error', $msg);
                show_error($msg);
            }
        }


        // 看到没,驱动器终于被实例化了,实例化后将该驱动作为属性挂到驱动抽象层,
        // 然后就可以使用驱动器的 $this->{$driver}->is_supported() 去检测该驱动是否可用了;
        $obj = new $class_name();
        $obj->decorate($this);
        $this->$child = $obj;
        return $this->$child;
}
这样我们之前关于驱动器那几个疑问就可以解答完毕了,可以看到驱动抽象层中调用未实例化的驱动器时触发了魔术方法,进而实现了驱动器的载入,整个过程非常巧妙但又一开始让人觉得非常复杂!
另外上面的 load_driver() 倒数第三行我们看到有个 decorate() 方法,这个方法做了一些画龙点睛的事情,我们有必要看下!
decorate ()
decorate() 位于 Driver.php 的 CI_Driver 中, CI_Driver 类被各个驱动器给继承了!
decorate() 看名字是装饰的意思,它内部其实就是对装饰器模式的一种应用而已,而装饰器模式的定义是:
为已有的功能动态的添加更多功能的一种方式;如果你需要扩展一个类的功能,并且不想增加子类的话,那么装饰器模式就非常适合你!
public function decorate($parent)
{
        $this->_parent = $parent;

        $class_name = get_class($parent);

        // 利用反射将抽象类 CI_Cache 的公共属性和方法给遍历出来,并保存,
        // 至于保存起来要干嘛?我们待会说;
        // 关于什么是 PHP 中的反射见这里:http://php.net/manual/zh/book.reflection.php

        if ( ! isset(self::$_reflections[$class_name]))
        {
            $r = new ReflectionObject($parent);

            foreach ($r->getMethods() as $method)
            {
                if ($method->isPublic())
                {
                    $this->_methods[] = $method->getName();
                }
            }

            foreach ($r->getProperties() as $prop)
            {
                if ($prop->isPublic())
                {
                    $this->_properties[] = $prop->getName();
                }
            }

            self::$_reflections[$class_name] = array($this->_methods, $this->_properties);
        }
        else
        {
            list($this->_methods, $this->_properties) = self::$_reflections[$class_name];
        }
}
上面的代码中我们看到,将抽象类的接口通过反射遍历处理并保存,那么为什么要保存起来呢?
答案是:由于驱动抽象类和驱动器是非继承关系,我们知道非继承关系要保持接口对外的统一行为,如果驱动器中某个行为不存在,我们必须能够为其动态添加该行为,所以看到 decorate() 将抽象层的行为给保存起来了!
那又是如何动态的为驱动器添加抽象的行为呢?
答案是:驱动器通过自身的魔术方法,当调用不存在的某个行为,就可以通过魔术方法调用保存$_reflections中抽象类的行为,所以你看,这不就是动态添加上了抽象层的行为么?活生生装饰器模式的应运!
驱动器自身的魔术方法继承自 CI_driver 类中,该类的这几个魔术方法就是对 _reflections 中保存的抽象层行为的操作罢了!
public function __call($method, $args = array())
{
    if (in_array($method, $this->_methods))
    {
        return call_user_func_array(array($this->_parent, $method), $args);
    }

    throw new BadMethodCallException('No such method: '.$method.'()');
}

public function __get($var)
{
    if (in_array($var, $this->_properties))
    {
        return $this->_parent->$var;
    }
}

public function __set($var, $val)
{
    if (in_array($var, $this->_properties))
    {
        $this->_parent->$var = $val;
    }
}
驱动抽象和驱动器的载入实例化的源码我们就分析到此了,代码量虽然不多,可足够复杂,可以说是解读 CI 框架源码以来最难读的一部分源码了!
接下来我们看下具体驱动器对于驱动抽象层接口实现的细节,驱动器接口实现部分的源码也没多复杂,我们就只是看下 redis,file 这两个驱动的接口实现!
File
整个 Cache_file 的实现很简单,大家有兴趣自己看下,几行代码一会就扫完了!
// 写入缓存,注意:是以序列化的方式写入的,并保存了缓存过期的时间
    public function save($id, $data, $ttl = 60, $raw = FALSE)
    {
        $contents = array(
            'time'      => time(),
            'ttl'       => $ttl,
            'data'      => $data
        );

        if (write_file($this->_cache_path.$id, serialize($contents)))
        {
            chmod($this->_cache_path.$id, 0640);
            return TRUE;
        }

        return FALSE;
    }

    // ------------------------------------------------------------------------


    public function get($id)
    {
        $data = $this->_get($id);
        return is_array($data) ? $data['data'] : FALSE;
    }

    // 读取缓存,可以看到反序列化后还判断了时间是否过期
    protected function _get($id)
    {
        if ( ! file_exists($this->_cache_path.$id))
        {
            return FALSE;
        }

        $data = unserialize(file_get_contents($this->_cache_path.$id));

        if ($data['ttl'] > 0 && time() > $data['time'] + $data['ttl'])
        {
            unlink($this->_cache_path.$id);
            return FALSE;
        }

        return $data;
    }


    // ------------------------------------------------------------------------

    //缓存删除就是直接将文件干掉了
    public function delete($id)
    {
        return file_exists($this->_cache_path.$id) ? unlink($this->_cache_path.$id) : FALSE;
    }
Redis
CI 提供的对 redis 驱动非常轻量,只是做了一些简单的包装而已,缺失了 redis 的很多操作复杂数据结构的接口,如果你对 redis 有一些复杂的使用,笔者不建议你使用 CI 自带的 redis 驱动,你完全可以自己在封装一个 redis 库!
下面是笔者在 CI 中自己封装了一个 redis 操作类,经供参考
config->item('host');
            $port   = $CI->config->item('port');
            $passwd = $CI->config->item('password');

            $this->connect($host, $port);
            $this->auth($passwd);
            self::$init = true;
        }
    }


    /**
     * 关闭 redis 连接
     */
    public function __destruct()
    {
        if (self::$init)
        {
            $this->close();
        }
    }
}
该类继承 redis 后, 经过这样一层包装,redis 中所有的接口你都可以通过该类使用!
至此整个缓存驱动的源码就分析结束了!


