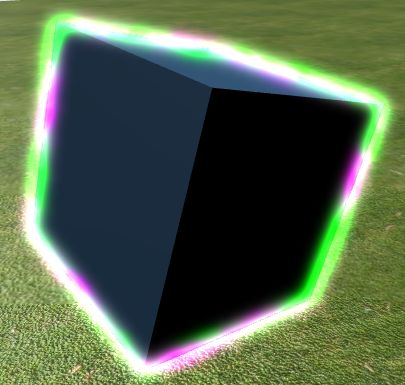
这次效果制作主要学习了Value Noise的活用以及使用脚本处理屏幕后期效果。
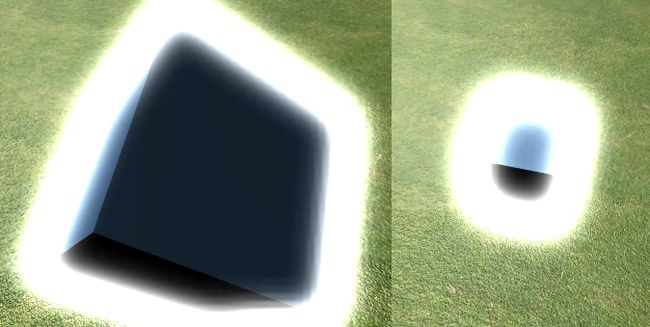
大致步骤是:首先用一个新的相机(注:已使用Command Buffer,现在只需要主相机)使用SetReplacementShader把屏幕中材质标记有Glowable的物体替换为只渲染全白的颜色的shader,得到的RT记为贴图1;然后在OnRenderImage中使用Graphics.Blit将生成的RT提供给模糊后处理材质进行全屏模糊,得到的RT记为贴图2。将贴图1贴图2提供给一个混合材质,其shader的作用是先得到贴图1贴图2的差值的绝对值(纯白的辉光),并计算Value Noise的采样得到最终混合的彩色加性辉光效果。
模糊
这里采用了高斯模糊。一种比较有效的方法是在shader中写两个Pass,一个纵向模糊一个横向模糊,然后在OnRenderImage中开一个临时RT(记得最后要RenderTexture.ReleaseTemporary(temp)),我们需要做的就是将srcRT做一次横向模糊再做一次纵向模糊,即达到二维高斯模糊的效果。如果再增加模糊的迭代次数可以得到较好的效果,但是相对的也消耗性能。
for (int i = 0; i < 5; i++)
{
       var temp = RenderTexture.GetTemporary(Blurred.width, Blurred.height);
       Graphics.Blit(Blurred, temp, _blurMat, 0);
       Graphics.Blit(temp, Blurred, _blurMat, 1);
       RenderTexture.ReleaseTemporary(temp);
}
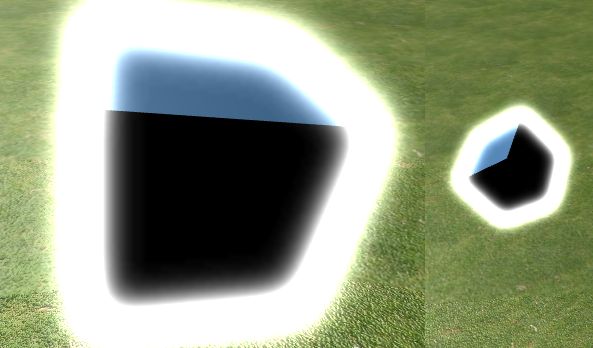
另外,如果一直保持高斯模糊采样的距离不变的话,会导致离得太远的物体辉光过于强烈。
因此我们可以在脚本中计算好物体和相机的距离,然后在模糊的过程中将高斯模糊的距离除以一个和距离正相关的数即可(类似透视除法)。
_BlurSize.x /= _Distance / 10;
fixed4 s = tex2D(_MainTex, i.uv) * 0.38774;
s += tex2D(_MainTex, i.uv + float2(_BlurSize.x * 2, 0)) * 0.06136;
s += tex2D(_MainTex, i.uv + float2(_BlurSize.x, 0)) * 0.24477;
s += tex2D(_MainTex, i.uv + float2(_BlurSize.x * -1, 0)) * 0.24477;
s += tex2D(_MainTex, i.uv + float2(_BlurSize.x * -2, 0)) * 0.06136;
如果在最后混合时将采用的贴图1贴图2的差绝对值改为差最小为0的话,也能做出无对内发光的效果。
//fixed4 glow = abs(tex2D(_GlowBlurredTex, uvTemp) - tex2D(_GlowPrePassTex,uvTemp));
fixed4 glow = max(0, tex2D(_GlowBlurredTex, uvTemp) - tex2D(_GlowPrePassTex,uvTemp));
Value Noise
开始时的想法是制作类似寒气向外消散的效果,于是在网上搜索了一番发现了Shadertoy的Ball of Fire这个效果。虽然只有短短三四十行代码,但是效果确实惊艳。
分析效果和代码后发现,这个效果其实是由一个非常简单的3D Value 噪声得到的,这里就不具体讲其定义了。
第一维是屏幕坐标相对中心的角度,第二维是屏幕坐标相对中心的距离加上时间(以达到向外扩散的效果),第三个维度是时间(以达到得到图像整体随时间变化的效果)。不过此处我们还有一个问题要解决,因为角度维度是从0到360度,如何保证在0度附近图像具有连续性?
这里shadertoy的作者使用了一种非常精妙的处理方法,让0度和360度的Value Noise网格顶点生成的是相同的数据。首先随机数的产生是如下所示:
float4 v = float4(xyz0.x + xyz0.y + xyz0.z , xyz1.x  + xyz0.y + xyz0.z,
                  xyz0.x   + xyz1.y + xyz0.z, xyz1.x  + xyz1.y + xyz0.z);
rand = frac(sin(v/res*6.2832)*1000.0);
其中v是根据网格顶点的整数坐标三维相加得到的,随机数是采用sinv值取其小数点第4位之后的数得到的伪随机数。那么如何保证0度和360度的Value Noise网格顶点生成相同随机数呢?只需要让网格x坐标0(角度0度)和晶格坐标x为最大值(res,角度360度)生成的v具有相同数值即可!因此我们使用v/res*6.2832就可以保证0度和360度处具有连续性。当然,此处采用的三坐标相加的随机数产生,为了让三坐标之间互无相关,我们要让他们在数量级上各不相同。
在我们的脚本中,要记得把物体的屏幕坐标传送给shader,当做计算中屏幕的中心。
float3 xyz0 = floor(fmod(xyz,res)) * float3(1,200,1000);
float3 xyz1 = floor(fmod(xyz + float3(1,1,1),res))  * float3(1,200,1000);
最后,经过一定的颜色处理我们就能得到这种十分酷炫的向外喷射的效果。
混合
得到上述的噪声后,其实这里就很简单了,自定义自己想要的Color Ramp即可。封面图采用的是简单的
n = smoothstep(0.1,0.9,n);
return col +  glow * _Intensity * float4(n,1-n,1,0);
其中n是叠加了三个不同分辨率的octave得到的采样值,会生成类似云彩的效果(Photoshop的云彩效果就是这么做出来的)。
float n = noiseSampler(float3(x,y*0.75 - _Time.x * 2, _Time.x * 0.15),16) * 0.5;
n += noiseSampler(float3(x,y*0.75 - _Time.x * 2, _Time.x * 0.15),32) * 0.25;
n += noiseSampler(float3(x,y*0.75 - _Time.x * 2, _Time.x * 0.15),64) * 0.125;
n += noiseSampler(float3(x,y*0.75 - _Time.x * 2, _Time.x * 0.15),128) * 0.0625;
类似的改变Color Ramp、噪声叠加方式以及模糊距离我们还能得到许多有趣的效果。
return col + glow * _Intensity * float4(frac(sin( 4 * n)),frac(sin(4 * n + 3)),frac(sin(4 * n + 5)),0);
float n = noiseSampler(float3(x,y*0.75 - _Time.x * 2, _Time.x * 0.15),16) * 1;
return col +  glow * _Intensity * n;
优化
以上噪声效果都是基于实时计算的,如果我们暂且不用效果不是最明显的噪声第三个维度(整体随时间慢慢变化),那么实际上我们的噪声可以通过直接采样一张tileable的噪声图得到。将角度以及离中心长度度映射到UV的0-1,采样tileable的图既能保证角度上采样的连续性也能保证随时间向外扩散的采样连续性。
生成tileable噪声的具体方法是在四维空间生成两个正交圆,然后将第一第二个维度代表的圆的角度映射为0-1,将第三第四个维度代表的圆的角度也映射为0-1,然后将这两个0-1作为UV,用对应的圆查找四维空间的采样值即可生成tileable的噪声。这个贴图的生成我们可以在Unity中写一个小插件做到。
使用Command Buffer优化脚本结构
最近看了相关command buffer的内容,回想起这个效果能够只用一个相机就完成,脚本的数量也减少了。现在我们只需要为command buffer提供一串指令让主相机在渲染过程中完成即可,因此我们不再需要一个专门的相机去渲染标记发光的物体,而只需要使用CommandBuffer.DrawRenderer指令去单独渲染某一个想要的物体即可。完整脚本内容如下:
using System.Collections;
using System.Collections.Generic;
using UnityEngine;
using UnityEngine.Rendering;

[RequireComponent(typeof(Camera))]
public class GlowComposite : MonoBehaviour

{
    [Range (0, 10)]
    public float Intensity = 2;
    public GameObject glowTargets = null;

    public static Material compositeMat;

    public static Material pureColorMaterial;
    public static Material blurMat;

    private CommandBuffer commandBuffer = null;


    private static RenderTexture prePass;
    private static RenderTexture blurred;
    private static RenderTexture temp;

    void OnEnable()
    {
        prePass = new RenderTexture(Screen.width, Screen.height, 24,RenderTextureFormat.Default);
        blurred = new RenderTexture(Screen.width >> 2, Screen.height >> 2, 0);

        pureColorMaterial = new Material(Shader.Find("Custom/WhiteReplace"));
        blurMat = new Material(Shader.Find("Hidden/Blur"));
        blurMat.SetVector("_BlurSize", new Vector2(blurred.texelSize.x * 1.5f, blurred.texelSize.y * 1.5f));

        Renderer[] renderers = glowTargets.GetComponentsInChildren();
        commandBuffer = new CommandBuffer();
        commandBuffer.SetRenderTarget(prePass);
        commandBuffer.ClearRenderTarget(true, true, Color.black);
        foreach (Renderer r in renderers)
        {
            commandBuffer.DrawRenderer(r, pureColorMaterial);
        }

        temp = RenderTexture.GetTemporary(blurred.width, blurred.height);
        commandBuffer.Blit(prePass,blurred);

        for (int i = 0; i < 5; i++)
        {
            commandBuffer.Blit(blurred, temp,blurMat, 0);
            commandBuffer.Blit(temp, blurred,blurMat, 1);
        }

        compositeMat = new Material(Shader.Find("Custom/GlowComposite"));
        compositeMat.SetTexture("_GlowPrePassTex", prePass);
        compositeMat.SetTexture("_GlowBlurredTex", blurred);

    }

    void OnRenderImage(RenderTexture src, RenderTexture dst)
    {
        Graphics.ExecuteCommandBuffer(commandBuffer);
        compositeMat.SetFloat("_Intensity", Intensity);
        Graphics.Blit(src, dst, compositeMat, 0);
    }

    void OnDisable()
    {
        RenderTexture.ReleaseTemporary(temp);
    }
}
Github: https://github.com/techizgit/UnityPlayground


