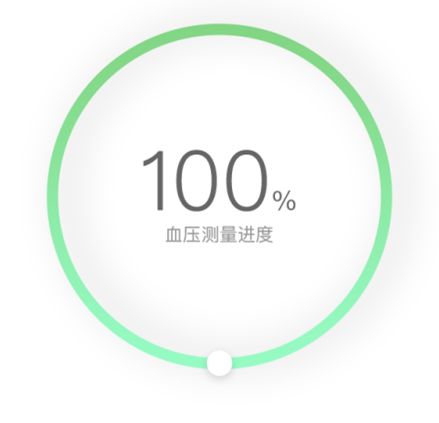
好几天不写博客了,这段时间一直没时间,感觉一直在忙,但是进度不大。
好了,言归正传,最近项目里要用到这么一个自定义view,是一个圆形的进度圆环,现在学习下怎么来自定义它。
源码下载地址
https://github.com/baojie0327/ViewAndGroup
自定义之前先分析一下,这个自定义View主要有以下几个部分组成:
- 最外层的圆环
- 圆环上的小圆点,会随着进度移动
- 圆弧,会随着小圆点移动,圆环上有个渐变度
- 文字
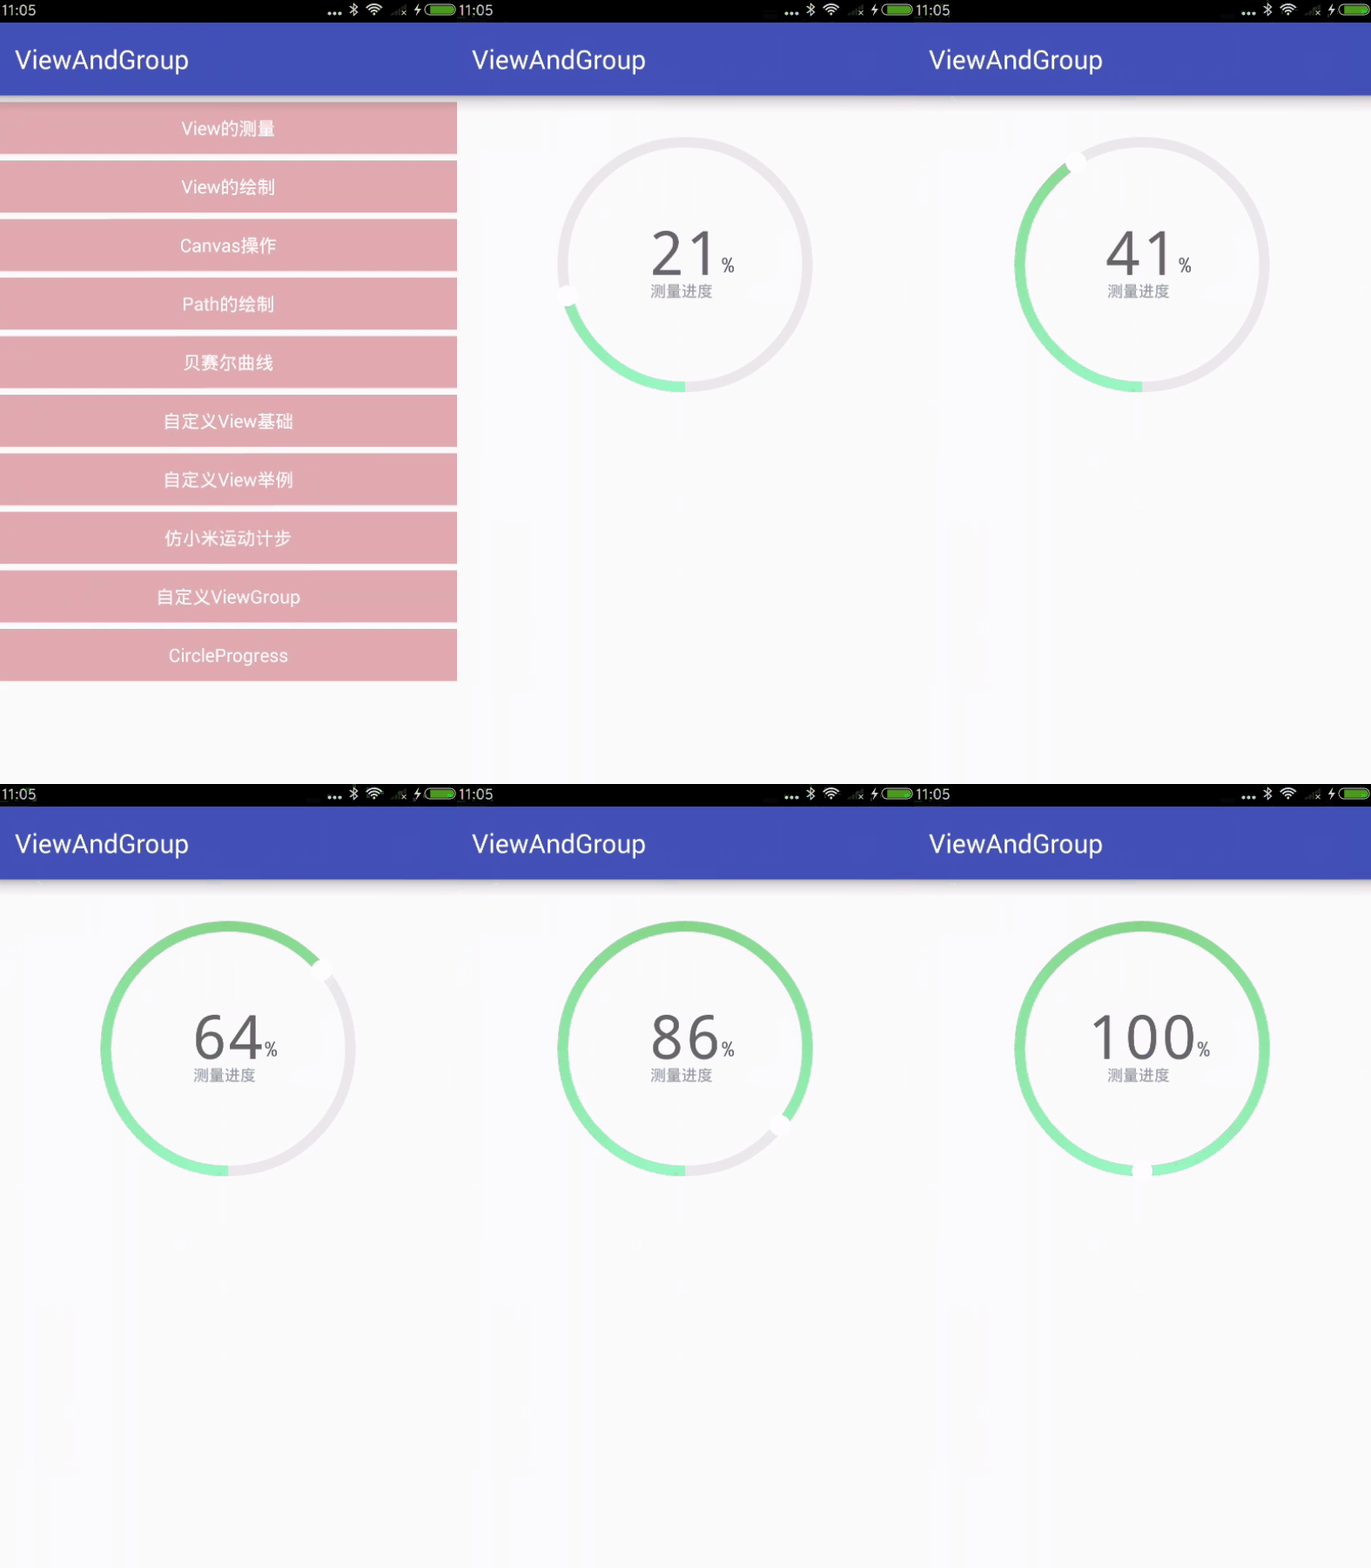
- 添加动画
1. 第一步还是先考虑一下进度圆环的属性信息。
我这里可以设置的有,背景颜色,最外层圆环的宽度,最外层圆环的颜色,进度圆环的颜色(只不过这里设置了一个渐进度),圆环上小圆点的颜色,大小,还有一些文字的设置,距离的设置等。
2. 当然,我们自定义view的名字必须叫CircleProgress,和上面attrs.xml里的名字相同,你可以试试如果不同会出现什么后果。
获得我们在attrs.xml中定义的属性
  public CircleProgress(Context context, @Nullable AttributeSet attrs, int defStyleAttr) {
        super(context, attrs, defStyleAttr);
        //获得atts.xml定义的属性值,存储在TypedArray中
        TypedArray ta = context.getTheme().obtainStyledAttributes(attrs, R.styleable.CircleProgress, defStyleAttr, 0);
        int n = ta.getIndexCount();
        for (int i = 0; i < n; i++) {
            int attr = ta.getIndex(i);
            switch (attr) {


                case R.styleable.CircleProgress_ringColors: //圆环颜色
                    ring_color = ta.getColor(attr, Color.BLACK);
                    break;
                case R.styleable.CircleProgress_ringSize: //圆环宽度
                    ringSize = ta.getDimension(R.styleable.CircleProgress_ringSize, 13);
                    break;
                case R.styleable.CircleProgress_ringprogressColor: //圆环进度颜色
                    ring_progress_color = ta.getColor(attr, Color.WHITE);
                    break;

                case R.styleable.CircleProgress_dotColor:  //小圆点
                    dot_color = ta.getColor(attr, Color.WHITE);
                    break;
                case R.styleable.CircleProgress_dotSize:  //小圆点大小
                    dotSize = ta.getDimension(R.styleable.CircleProgress_dotSize, 32);
                    break;

                case R.styleable.CircleProgress_textProgressColor: //字体进度的颜色
                    text_progress_color = ta.getColor(attr, Color.BLACK);
                    break;
                case R.styleable.CircleProgress_textProgressSize:  //字体进度大小
                    textProgressSize = ta.getDimension(R.styleable.CircleProgress_textProgressSize, 32);
                    break;

                case R.styleable.CircleProgress_textPercentColor:  //百分号颜色
                    percent_color = ta.getColor(attr, Color.BLACK);
                    break;

                case R.styleable.CircleProgress_showProgressText:  //固定字体显示
                    showText = ta.getString(R.styleable.CircleProgress_showProgressText);
                    break;
                case R.styleable.CircleProgress_texColor: //字体的颜色
                    text_color = ta.getColor(attr, Color.BLACK);
                    break;
                case R.styleable.CircleProgress_texSize:  //字体大小
                    texSize = ta.getDimension(R.styleable.CircleProgress_texSize, 17);
                    break;

                case R.styleable.CircleProgress_texMarginSize:  //字之间的款阿杜
                    texMarginSize = ta.getDimension(R.styleable.CircleProgress_texMarginSize, 9);
                    break;
            }
        }
        ta.recycle();
        init();
    }
重写onMeasure()方法,让控件支持wrap_content属性
 /**
     * 重写onMeasure()方法,支持wrap_content属性
     *
     * @param widthMeasureSpec
     * @param heightMeasureSpec
     */
    @Override
    protected void onMeasure(int widthMeasureSpec, int heightMeasureSpec) {
        // super.onMeasure(widthMeasureSpec, heightMeasureSpec);
        int width;
        int height;
        int widthMode = MeasureSpec.getMode(widthMeasureSpec);  //宽度的测量模式
        int widthSize = MeasureSpec.getSize(widthMeasureSpec);  //宽度的测量值
        int heightMode = MeasureSpec.getMode(heightMeasureSpec);  //高度的测量模式
        int heightSize = MeasureSpec.getSize(heightMeasureSpec); //高度的测量值
        //如果布局里面设置的是固定值,这里取布局里面的固定值;如果设置的是match_parent,则取父布局的大小
        if (widthMode == MeasureSpec.EXACTLY) {
            width = widthSize;
        } else {
            //如果布局里面没有设置固定值,这里取布局的宽度的1/2
            width = widthSize * 1 / 2;
        }

        if (heightMode == MeasureSpec.EXACTLY) {
            height = heightSize;
        } else {
            //如果布局里面没有设置固定值,这里取布局的高度的3/4
            height = heightSize * 3 / 4;
        }

        setMeasuredDimension(width, height);

    }
画最外层的圆
 // 画最外层的大圆环
        int centre = getWidth() / 2; //获取圆心的x坐标
        int radius = (int) (centre - 2 * ringSize); //圆环的半径
        mPaint.setColor(ring_color); //设置圆环的颜色
        mPaint.setStyle(Paint.Style.STROKE); //设置空心
        mPaint.setStrokeWidth(ringSize); //设置圆环的宽度
        mPaint.setAntiAlias(true);  //消除锯齿
        canvas.drawCircle(centre, centre, radius, mPaint); //画出圆环
画文字
 //画进度文字
        //设置进度值的大小颜色,字体样式
        textPaint.setStrokeWidth(0);
        textPaint.setColor(text_progress_color);
        textPaint.setTextSize(textProgressSize);
        textPaint.setTypeface(Typeface.MONOSPACE);

        //中间的进度百分比,先转换成float在进行除法运算,不然都为0
        int percent = (int) (((float) tempProgress / (float) maxProgress) * 100);
        String percent_draw;
        if (percent == 0) {
            percent_draw = "00";
        } else {
            percent_draw = percent + "";
        }
        float textHeight = textProgressSize; //进度字体的高度
        float textWidth = textPaint.measureText(percent_draw);

        textPaint.setTextSize(textHeight);
        //   canvas.drawText(percent_draw, centre - 5 * textWidth, centre, textPaint);
        canvas.drawText(percent_draw, centre - textWidth / 2, centre + textProgressSize / 6, textPaint);

        //画百分比号
        textPaint.setStrokeWidth(3);
        String text_percent = "%";
        textPaint.setTextSize(textHeight / 3);
        // canvas.drawText(text_percent, centre + 5 * textWidth , centre + textWidth / 2, textPaint);
        canvas.drawText("%", centre + textWidth / 2, centre + textProgressSize / 8, textPaint);

        //画展示文字
        textPaint.setColor(text_color);
        textPaint.setTextSize(texSize);
        canvas.drawText(showText, centre - textProgressSize / 2 - 10, centre + textProgressSize / 3 + texMarginSize, textPaint);
画圆弧
在画圆弧的过程中,我们创建了一个SweepGradient渲染器,来画我们的渐进色圆环。直接通过 ringProgressPaint.setShader(mSweepGradient)设置给Paint即可
        //画圆弧
        ringProgressPaint.setStyle(Paint.Style.STROKE);
        ringProgressPaint.setStrokeWidth(ringSize);

        //  ringProgressPaint.setColor(ring_progress_color);
        RectF oval = new RectF(centre - radius, centre - radius, centre
                + radius, centre + radius);  //用于定义的圆弧的形状和大小的界限

        //创建一个渲染器
        SweepGradient mSweepGradient=new SweepGradient(canvas.getWidth()/2
                ,canvas.getHeight()/2,new int[]{Color.rgb(130,213,131),Color.rgb(150,251,196),Color.rgb(130,213,131)},null);
        Matrix matrix=new Matrix();
        matrix.setRotate(-90f,canvas.getWidth()/2,canvas.getHeight()/2);
        mSweepGradient.setLocalMatrix(matrix);
        ringProgressPaint.setShader(mSweepGradient);
        canvas.drawArc(oval, 90, 360 * tempProgress / maxProgress, false, ringProgressPaint);
画小圆点
其中有个计算来计算小圆点的坐标,你可以修改这个计算部分来设置小圆点的位置,我把它放在了最下面的位置。
//画圆点
        // 画进度点   30°角度 的弧度 = 2 * PI / 360 * 30
        int rangle = 0;
        if (tempProgress == 0) {
            rangle = 360 / maxProgress;
        } else {
            rangle = 360 * (int) tempProgress / maxProgress;
        }

        double a = 0.0;//角度
        int pointX = 0;
        int pointY = 0;


        if (rangle > 0 && rangle <= 90) {
            a = 2 * Math.PI / 360 * (270 - rangle);
            pointX = centre + (int) (radius * Math.cos(a));
            pointY = centre - (int) (radius * Math.sin(a));
        } else if (rangle > 90 && rangle <= 180) {
            a = 2 * Math.PI / 360 * (rangle + 90);
            pointX = centre + (int) (radius * Math.cos(a));
            pointY = centre + (int) (radius * Math.sin(a));
        } else if (rangle > 180 && rangle <= 270) {
            a = 2 * Math.PI / 360 * (rangle);
            pointX = centre - (int) (radius * Math.sin(a));
            pointY = centre + (int) (radius * Math.cos(a));
        } else if (rangle > 270 && rangle <= 360) {
            a = 2 * Math.PI / 360 * (rangle - 90);
            pointX = centre - (int) (radius * Math.cos(a));
            pointY = centre - (int) (radius * Math.sin(a));
        }

        pointPaint.setColor(dot_color);
        pointPaint.setStyle(Paint.Style.FILL);
        pointPaint.setAntiAlias(true);  //消除锯齿
        pointPaint.setShadowLayer(10, 0, 0, Color.GRAY);
        //  Log.d("TAG", "pointX = " + pointX + "||pointY = " + pointY);
        canvas.drawCircle(pointX, pointY, dotSize, pointPaint);
其他的方法
主要是设置圆环的进度和动画的一些方法
 public synchronized void setMax(int maxProgress) {
        if (maxProgress < 0) {
            throw new IllegalArgumentException("maxProgress not less than 0");
        }
        this.maxProgress = maxProgress;
    }

    /**
     * 开启动画
     *
     * @param curProgress
     */
    public void setProgressWithAnimation(int curProgress) {
        this.curProgress = curProgress;
        animator = ValueAnimator.ofInt(0, curProgress);
        animator.setDuration(30000);
        animator.setInterpolator(new LinearInterpolator());
        animator.addUpdateListener(new ValueAnimator.AnimatorUpdateListener() {
            @Override
            public void onAnimationUpdate(ValueAnimator animation) {
                tempProgress = (int) animation.getAnimatedValue();
                invalidate();
            }
        });
        animator.start();

    }

    /**
     * 完成测量
     *
     * @param curProgress
     */
    public void completeMeasure(int curProgress) {
        animator.cancel();
        this.curProgress = curProgress;
        tempProgress = curProgress;
        invalidate();
    }

    /**
     * 停止Progress
     */
    public void stopProgress(){
        animator.cancel();
        invalidate();
    }
这里自定义的CircleProgress就定义完了,接下来可以在xml文件中引用,然后通过下面两行代码开启
  mCircleProgress.setMax(100);
  mCircleProgress.setProgressWithAnimation(100);
当然你也可以根据自己的需求添加其他的方法,再次就不一一添加了。
直接运行看效果图吧

