0. 基本知识准备
0.1 字形( Glyph)基本了解

基础原点(Origin)
首先是位于基线上
处于基线最左侧的位置
行间距(Leading)
行与行 之间的间距
上行高度(Ascent)和下行高度(Decent)
上行高度(Ascent) >>> 字形的最高点 ~ 基线的距离 >>>正数
下行高度(Decent) >>> 字形的最低点 ~ 基线的距离 >>>正数
一般情况下设置了UIFont,字形的Ascent和Decent也就确定了,后面会说图文混排时Ascent,Decent的特殊设置.
需要强调的是UIFont的属性ascender+属性descender与字形的Ascent+Decent并不是一回事,descender有可能是负值而这里的Decent不会是负值

lineHeight:行高 >>> 整个红色框的高度
Ascent:上行高度 >>> 红色框顶部线 ~ 绿色基线 的距离
Decent:下行高度 >>> 绿色基线 ~ 黄色框顶部线 的距离
leading:行间距 >>> 整个黄色框的高度
lineHeight(行高) = Ascent(上行高度) + Decent(下行高度) + Leading(行间距)
0.2 文字排版的层级关系
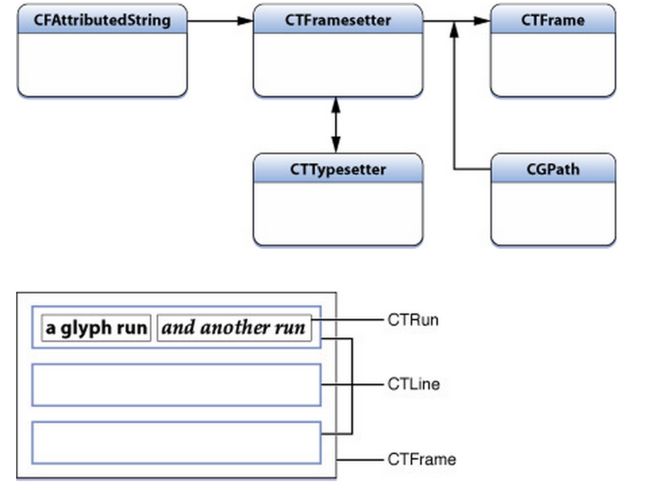
CFAttributedStringRef :属性字符串,用于存储需要绘制的文字字符和字符属性
CTFramesetterRef:通过CFAttributedStringRef进行初始化,作为CTFrame对象的生产工厂,负责根据path创建对应的CTFrame
CTFrame:用于绘制文字的类,可以通过CTFrameDraw函数,直接将文字绘制到context上
CTLine:在CTFrame内部是由多个CTLine来组成的,每个CTLine代表一行
CTRun:每个CTLine又是由多个CTRun组成的,每个CTRun代表一组显示风格一致的文本(CTRun可以混入图片,UI控件信息等等,CTRun可以设置自己想要的尺寸)
CTFramesetterRef frameSetter = CTFramesetterCreateWithAttributedString((CFAttributedStringRef)attributedString);
CTFrameRef frame = CTFramesetterCreateFrame(frameSetter, CFRangeMake(0, [attributedString length]), path, NULL);
0.3 一切显示的string都是attributedString
UILabel * label1 = [[UILabel alloc]initWithFrame:CGRectZero];
label1.backgroundColor = [UIColor lightGrayColor];
label1.font = [UIFont systemFontOfSize:16.0];
label1.textColor = [UIColor whiteColor];
label1.textAlignment = NSTextAlignmentCenter;
label1.frame = CGRectMake(20.0,64.0+20.0,300.0,30.0);
label1.text = @"show string is attributedString";
[self.view addSubview:label1];
UILabel * label2 = [[UILabel alloc]initWithFrame:CGRectZero];
label2.backgroundColor = [UIColor lightGrayColor];
NSMutableAttributedString * muAtt = [[NSMutableAttributedString alloc]initWithString:@"show string is attributedString"];
[muAtt addAttribute:NSFontAttributeName value:[UIFont systemFontOfSize:16.0] range:NSMakeRange(0, muAtt.string.length)];
[muAtt addAttribute:NSForegroundColorAttributeName value:[UIColor whiteColor] range:NSMakeRange(0, muAtt.string.length)];
NSMutableParagraphStyle * muParagraphStyle = [[NSMutableParagraphStyle alloc]init];
muParagraphStyle.alignment = NSTextAlignmentCenter;
[muAtt addAttribute:NSParagraphStyleAttributeName value:[muParagraphStyle copy] range:NSMakeRange(0 , [muAtt.string length])];
label2.attributedText= [muAtt copy];
label2.frame=CGRectMake(20.0,64.0+20.0+30.0+20.0,300.0,30.0);
[self.view addSubview:label2];
上述两段代码,结果如图显示效果一模一样
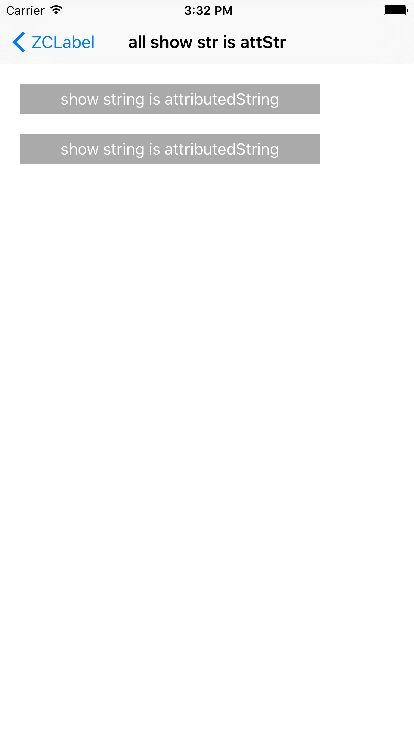
第一段看似我们修饰的好像是label,而最终这些修饰却全用于了label内部将text装扮组合成attributedString,然后再由label绘制显示
第二段label直接赋值装扮组合好的attributedString,然后label直接绘制显示
提纯显示文字过程就两步:
step1.装扮组合attributedString
step2.UI控件绘制显示
万变不离其宗,我们的任务把大象装冰箱(完成图文混排)主要就两步:
step1.装扮组合attributedString
step2.UI控件绘制显示
(只是图文混排中attributedString装扮组合方式+UI控件绘制显示方式都更特殊)
1. 代码实现
本文参考源码ZCLabel
1.1 组织attributedString
不过这边的attributedString多加了3个属性:
@property (assign, nonatomic) CTFrameRef ctFrame;
@property (assign, nonatomic) CGFloat calheight;
@property (nonatomic)CGSize suggestSize;
Why add suggestSize and calheight?
有过可变高度cell开发经验的人都知道,很多时候我们要在接触到UI控件之前,在数据源层面就要知道UI控件 的尺寸(特别是高度).所以先给予一个限制的尺寸suggestSize, attributedString就有了自己的预估高度calheight
Why add ctFrame?
一个说明:ctFrame可以由attributedString+suggestSize生成的
一个套路:ctFrame-->CTLine-->CTRun,这个套路会在显示图文混排前后反反复复的用到
而在显示的时候ctFrame是不变的,所以在ctFrame第一次生成的时候就将它记录下来,不用每回用到ctFrame的时候都去重新生成
ps:这也是借鉴巧神demo的做法
(当然可以提前剧透,这里的混排也是支持链接的点击的,链接点击不就意味着需要改变attributedString吗?改变attributedString不就意味着ctFrame要改变吗?本文1.3会做说明)

1.1.1 黑色剪头部分,装扮组合NSAttributedString
NSMutableAttributedString * text = [NSMutableAttributedString new];
//nomal attributedString
NSString * title = @"图文示例:";
[text appendAttributedString:[[NSAttributedString alloc] initWithString:title attributes:nil]];
//custom attributedString
UIButton * btn = [[UIButton alloc]init];
[btn setTitle:@"xx" forState:UIControlStateNormal];
btn.backgroundColor = [UIColor redColor];
[btn addTarget:self action:@selector(btnPress) forControlEvents:UIControlEventTouchUpInside];
NSAttributedString * attachText =  [NSAttributedString makeAttachmentStringWithContent:btn attachmentSize:CGSizeMake(80.0, 40.0) alignToFont:font alignment:ZCTextVerticalAlignmentCenter];
[text appendAttributedString:attachText];
/**
 * 生成自定义 NSAttributedString
 *
 * @param content内容可以是图片也可以是UI控件
 * @param attachmentSize期待显示的大小
 * @param alignToFont周围文字的font
 * @param alignment对齐方式
 */
+ (NSAttributedString *)makeAttachmentStringWithContent:(id)content
                                         attachmentSize:(CGSize)attachmentSize
                                            alignToFont:(UIFont *)font
                                              alignment:(ZCTextVerticalAlignment)alignment
{

    NSMutableAttributedString * atr = [[NSMutableAttributedString alloc] initWithString:@"\\uFFFC"];

    ZCCTRunDelegateRefOwner * zcdelegate = [ZCCTRunDelegateRefOwner new];
    zcdelegate.width = attachmentSize.width;
    switch (alignment) {
        case ZCTextVerticalAlignmentTop: {
            zcdelegate.ascent = font.ascender;//上对齐
            zcdelegate.descent = attachmentSize.height - zcdelegate.ascent;
            if (zcdelegate.descent < 0) {
                zcdelegate.ascent = attachmentSize.height;
                zcdelegate.descent = 0;
            }
        } break;
        case ZCTextVerticalAlignmentCenter: {
            CGFloat halfOut = (attachmentSize.height - font.lineHeight)/2;
            zcdelegate.ascent = font.ascender + halfOut;
            zcdelegate.descent = attachmentSize.height - zcdelegate.ascent;
            if (zcdelegate.descent < 0) {
                zcdelegate.ascent = attachmentSize.height;
                zcdelegate.descent = 0;
            }
        } break;
        case ZCTextVerticalAlignmentBottom: {
            zcdelegate.descent = -font.descender;//下对齐
            zcdelegate.ascent = attachmentSize.height - zcdelegate.descent;
            if (zcdelegate.ascent < 0) {
                zcdelegate.ascent = 0;
                zcdelegate.descent = attachmentSize.height;
            }
        } break;
        default: {
            zcdelegate.ascent = attachmentSize.height;
            zcdelegate.descent = 0;
        } break;
    }
    /*
     remain
     font.descender 负值
     zcdelegate.descent 不小于0
     */
    zcdelegate.customRunContent = content;
    CTRunDelegateRef delegate = zcdelegate.CTRunDelegate;

    [atr addAttribute:(id)kCTRunDelegateAttributeName value:(__bridge id)delegate range:NSMakeRange(0, 1)];
    if (zcdelegate) CFRelease(delegate);

    return [atr copy];
}
[muAtt addAttribute:(id)kCTForegroundColorAttributeName value:[UIColor whiteColor] range:NSMakeRange(0, muAtt.string.length)];
kCTForegroundColorAttributeName标记这个区段文字的前景色
key为kCTForegroundColorAttributeName对应的value是一个UIColor的对象
[atr addAttribute:(id)kCTRunDelegateAttributeName value:(__bridge id)delegate range:NSMakeRange(0, 1)];
kCTRunDelegateAttributeName就是标记这个区段会有特殊元素混入的
key为kCTRunDelegateAttributeName对应的value是一个CTRunDelegateRef的对象
所以CTRunDelegateRef持有所有特殊元素的信息吗?
不,是他的母体!也就是这里的ZCCTRunDelegateRefOwner,CTRunDelegateRef不携带特殊元素的信息,但CTRunDelegateRef有callback方法向外围获取如:宽,上行高,下行高信息,更重要的是有方法(CTRunDelegateGetRefCon)可以反拿到母体,而且可以进一步说明的是,我们代码上的操作近乎都是由CTRunDelegateRef反拿到母体,然后拿母体进行操作的
Method1: ZCCTRunDelegateRefOwner get CTRunDelegateRef
- (CTRunDelegateRef)CTRunDelegate CF_RETURNS_RETAINED {
    CTRunDelegateCallbacks callbacks;
    callbacks.version = kCTRunDelegateCurrentVersion;
    callbacks.dealloc = DeallocCallback;
    callbacks.getAscent = GetAscentCallback;
    callbacks.getDescent = GetDecentCallback;
    callbacks.getWidth = GetWidthCallback;
    return CTRunDelegateCreate(&callbacks, (__bridge_retained void *)(self.copy));
}
Method2:CTRunDelegateRef get ZCCTRunDelegateRefOwner
ZCCTRunDelegateRefOwner * zcTextRunDelegate = CTRunDelegateGetRefCon(delegate);
也许你会说那干脆
key为kCTRunDelegateAttributeName对应的value是一个ZCCTRunDelegateRefOwner的对象 不就ok了,干嘛还有来个CTRunDelegateRef做中间商?
混排特殊元素与普通元素,混排大环境在位置上需要确定上一个元素的位置才能排版下一个元素,所以混排大环境不关心某个特殊元素是什么(是UIImage还是UIButton),但绝对关心特殊元素的宽+高信息,这样才能确定特殊元素的位置,而CTRunDelegateRef就有callback方法向外围获取如:宽+高(上行高,下行高),所以CTRunDelegateRef是给大环境确定排版位置用的
ZCCTRunDelegateRefOwner知道某个特殊元素是什么,便于在所有元素的位置都已经确定之后,绘制到某个特殊元素的时,针对不同元素的类型采取不同的排版策略
CTRunDelegateRef 为排版大环境所用,用于确定所有元素的位置
ZCCTRunDelegateRefOwner 为我们代码级别的排版方法所用,用于确定单个元素的排版策略
1.1.2 绿色剪头部分,给自定义的AttributedString配置frame
-(void)setSuggestSize:(CGSize)suggestSize
{
    objc_setAssociatedObject(self, &suggestSizeKey, [NSValue valueWithCGSize:suggestSize], OBJC_ASSOCIATION_ASSIGN);
    [self afterSetSuggstSizeAct];
}
-(void)afterSetSuggstSizeAct
{
    CTFramesetterRef framesetter = CTFramesetterCreateWithAttributedString((CFAttributedStringRef)self);

    CGSize coreTextSize = CTFramesetterSuggestFrameSizeWithConstraints(framesetter, CFRangeMake(0,0), nil, self.suggestSize, nil);
    CGFloat textHeight = coreTextSize.height;

    // 生成CTFrameRef实例
    CTFrameRef ctFrame = [self createFrameWithFramesetter:framesetter width:self.suggestSize.width height:textHeight];

    self.ctFrame = ctFrame;
    self.calheight = textHeight;

    [self setCustomRunsFrame];

    // 释放内存
    CFRelease(framesetter);
}

- (void)setCustomRunsFrame
{
    // 获得CTLine数组
    NSArray *lines = (NSArray *)CTFrameGetLines(self.ctFrame);
    NSInteger lineCount = [lines count];
    CGPoint lineOrigins[lineCount];
    CTFrameGetLineOrigins(self.ctFrame, CFRangeMake(0, 0), lineOrigins);

    // 遍历每个CTLine
    for (NSInteger i = 0 ; i < lineCount; i++) {
        CTLineRef line = (__bridge CTLineRef)lines[i];
        NSArray *runObjArray = (NSArray *)CTLineGetGlyphRuns(line);

        // 遍历每个CTLine中的CTRun
        for (id runObj in runObjArray) {
            CTRunRef run = (__bridge CTRunRef)runObj;
            NSDictionary * runAttributes = (NSDictionary *)CTRunGetAttributes(run);
            CTRunDelegateRef delegate = (__bridge CTRunDelegateRef)[runAttributes valueForKey:(id)kCTRunDelegateAttributeName];
            if (delegate == nil) {
                continue;
            }

            /*
             方法:CTRunDelegateGetRefCon 由CTRunDelegateRef 反拿 CTRunDelegateRefCon
             参见方法:CTRunDelegateCreate 可以知道缘由
             */
            ZCCTRunDelegateRefOwner * zcTextRunDelegate = CTRunDelegateGetRefCon(delegate);
            if (![zcTextRunDelegate isKindOfClass:[ZCCTRunDelegateRefOwner class]]) {
                continue;
            }

            CGRect runBounds;
            CGFloat ascent;
            CGFloat descent;

            runBounds.size.width = CTRunGetTypographicBounds(run, CFRangeMake(0, 0), &ascent, &descent, NULL);
            runBounds.size.height = ascent + descent;

            CGFloat xOffset = CTLineGetOffsetForStringIndex(line, CTRunGetStringRange(run).location, NULL);
            runBounds.origin.x = lineOrigins[i].x + xOffset;
            runBounds.origin.y = lineOrigins[i].y;
            runBounds.origin.y -= descent;

            CGPathRef pathRef = CTFrameGetPath(self.ctFrame);
            CGRect colRect = CGPathGetBoundingBox(pathRef);

            CGRect delegateBounds = CGRectOffset(runBounds, colRect.origin.x, colRect.origin.y);
            zcTextRunDelegate.customRunFrame = delegateBounds;
        }
    }
}

- (CTFrameRef)createFrameWithFramesetter:(CTFramesetterRef)framesetter
                                   width:(CGFloat)width
                                  height:(CGFloat)height {

    CGMutablePathRef path = CGPathCreateMutable();
    CGPathAddRect(path, NULL, CGRectMake(0, 0, width, height));

    CTFrameRef frame = CTFramesetterCreateFrame(framesetter, CFRangeMake(0, 0), path, NULL);
    CFRelease(path);
    return frame;
}
为特殊元素设置frame,
如图:
套路:ctFrame-->CTLine-->CTRun
遍历每一个CTRun,看kCTRunDelegateAttributeName对应的value是否不为空,不为空设置frame
NSDictionary * runAttributes = (NSDictionary *)CTRunGetAttributes(run);
CTRunDelegateRef delegate = (__bridge CTRunDelegateRef)[runAttributes valueForKey:(id)kCTRunDelegateAttributeName];
if (delegate == nil) {
    continue;
}
//设置frame,具体见代码
1.2 ZCLabel的呈现

/**
 *  绘制自定义的内容
 *
 *  @param context 绘制上下文
 *
 */
- (void)coreCustomRunWithContext:(CGContextRef)context
{
    // 获得CTLine数组
    NSArray *lines = (NSArray *)CTFrameGetLines(_attributedText.ctFrame);
    NSInteger lineCount = [lines count];
    CGPoint lineOrigins[lineCount];
    CTFrameGetLineOrigins(_attributedText.ctFrame, CFRangeMake(0, 0), lineOrigins);

    // 遍历每个CTLine
    for (NSInteger i = 0 ; i < lineCount; i++) {

        CTLineRef line = (__bridge CTLineRef)lines[i];
        NSArray *runObjArray = (NSArray *)CTLineGetGlyphRuns(line);

        // 遍历每个CTLine中的CTRun
        for (id runObj in runObjArray) {

            CTRunRef run = (__bridge CTRunRef)runObj;
            NSDictionary * runAttributes = (NSDictionary *)CTRunGetAttributes(run);
            CTRunDelegateRef delegate = (__bridge CTRunDelegateRef)[runAttributes valueForKey:(id)kCTRunDelegateAttributeName];
            if (delegate == nil) {
                continue;
            }

            /*
             方法:CTRunDelegateGetRefCon 由CTRunDelegateRef 反拿 CTRunDelegateRefCon
             参见方法:CTRunDelegateCreate 可以知道缘由
             */
            ZCCTRunDelegateRefOwner * zcTextRunDelegate = CTRunDelegateGetRefCon(delegate);
            if (![zcTextRunDelegate isKindOfClass:[ZCCTRunDelegateRefOwner class]]) {
                continue;
            }

            id content = zcTextRunDelegate.customRunContent;
            CGRect frame = zcTextRunDelegate.customRunFrame;
            if ([content isKindOfClass:[UIImage class]]) {
                CGContextDrawImage(context, frame, ((UIImage *)content).CGImage);
            }else{
                frame.origin.y = self.frame.size.height - CGRectGetMaxY(frame);
                ((UIView *)content).frame = frame;
                [self addSubview:content];
            }
        }
    }
}
特殊内容排版操作
如图:
套路:ctFrame-->CTLine-->CTRun
遍历每一个CTRun,看kCTRunDelegateAttributeName对应的value是否不为空,不为空自定义排版
NSDictionary * runAttributes = (NSDictionary *)CTRunGetAttributes(run);
CTRunDelegateRef delegate = (__bridge CTRunDelegateRef)[runAttributes valueForKey:(id)kCTRunDelegateAttributeName];
if (delegate == nil) {
    continue;
}
//针对不同元素采取不同排版策略,具体见代码
UIImage 采取 coreImage
UIView子类 采取 addSubView
1.3 ZCLabel的AttributedString响应点击
响应点击无非是获取touchPoint所点中文字的index,然后看看哪个设定的range包含了这个index,这里就不作赘述了.只是需要注意的是点击响应区域的高亮效果要自行绘制
有 kCTForegroundColorAttributeName 对应  NSForegroundColorAttributeName
[text addAttribute:NSForegroundColorAttributeName value:[UIColor redColor] range:range1];
[text addAttribute:(NSString *)kCTForegroundColorAttributeName value:(id)[UIColor redColor].CGColor range:range];```
却没有 kCTBackgroundColorAttributeName 对应 NSBackgroundColorAttributeName.
这是因为文字的背景色不归CTFrame绘制(具体方法是CTFrameDraw(ctFrame, context);)
而需要进行额外的绘制.
总结一句话:链接点击效果无非是改变部分区域的背景色,而背景色而不归ctFrame管
这一点在上一篇文章《iOS Text Part1:Textkit》的链接选中的绘制方法中也有体现,textLayoutManager绘制字符和背景的方法是分开的
[self.textLayoutManager drawBackgroundForGlyphRange:glyphRange atPoint:textOffset];
[self.textLayoutManager drawGlyphsForGlyphRange:glyphRange atPoint:textOffset];
本文参考源码:绘制点击高亮背景参见方法
- (void)drawHighlightWithRect:(CGRect)rect context:(CGContextRef)ctx
见识浅薄,大神莫笑
有不对的地方还请大家指点
参考文献:
1.CTRunDelegateGetRefCon+CTRunDelegateCreate应用,混入图片
http://www.saitjr.com/ios/use-coretext-make-typesetting-picture-and-text.html
https://github.com/ClavisJ/CoreTextDemo
2.最接近我目标的一个轮子
http://xiangwangfeng.com/2014/03/06/iOS%E6%96%87%E5%AD%97%E6%8E%92%E7%89%88(CoreText)%E9%82%A3%E4%BA%9B%E4%BA%8B/
https://github.com/xiangwangfeng/M80AttributedLabel/
3.巧神 的 基于CoreText的排版引擎:基础
http://blog.devtang.com/2015/06/27/using-coretext-1/