科普一下
- 2013年谷歌i/o大会上介绍了两个新的layout: SlidingPaneLayout和DrawerLayout,现在这俩个类被广泛的运用,其实研究他们的源码你会发现这两个类都运用了ViewDragHelper来处理拖动。ViewDragHelper是Framework中不为人知却非常有用的一个工具。ViewDragHelper解决了android中手势处理过于复杂的问题,在DrawerLayout出现之前,侧滑菜单都是由第三方开源代码实现的,其中著名的当属MenuDrawer,MenuDrawer重写onTouchEvent方法来实现侧滑效果,代码量很大,实现逻辑也需要很大的耐心才能看懂。如果每个开发人员都从这么原始的步奏开始做起,那对于安卓生态是相当不利的。所以说ViewDragHelper等的出现反映了安卓开发框架已经开始向成熟的方向迈进。引用了网上的片段,其实说了那么多,ViewDragHelper就如名字说的一样,一个拖拽View的帮助类。只要我们这些普通开发者使用这个类,就可以轻松实现以前写了一大堆代码才实现的效果,代码更简洁,更优雅。
ViewDragHelper基本用法
- 创建ViewDragHelper,建议在ViewGroup内部创建使用,而不是在外面使用。
//第二个参数设置滑动灵敏度
mViewDragHelper = ViewDragHelper.create(this, 1.0f,mCallback);
- 看看mCallback回调接口ViewDragHelper.Callback,到底有什么重要的方法,直接上源码。
public static abstract class Callback {
        /**
         * 当ViewDragHelper状态发生变化时回调(IDLE,DRAGGING,SETTING[自动滚动时])
         * @see #STATE_IDLE
         * @see #STATE_DRAGGING
         * @see #STATE_SETTLING
         */
        public void onViewDragStateChanged(int state) {}

        /**
         * 当captureView的位置发生改变时回调
         * @param changedView View whose position changed
         * @param left New X coordinate of the left edge of the view
         * @param top New Y coordinate of the top edge of the view
         * @param dx Change in X position from the last call
         * @param dy Change in Y position from the last call
         */
        public void onViewPositionChanged(View changedView, int left, int top, int dx, int dy) {}

        /**
         *当CaptureView被捕获时回调
         * @param capturedChild Child view that was captured
         * @param activePointerId Pointer id tracking the child capture
         */
        public void onViewCaptured(View capturedChild, int activePointerId) {}

        /**
         *手指释放的时候回调
         *
         * @param releasedChild The captured child view now being released
         * @param xvel X velocity of the pointer as it left the screen in pixels per second.
         * @param yvel Y velocity of the pointer as it left the screen in pixels per second.
         */
        public void onViewReleased(View releasedChild, float xvel, float yvel) {}

        /**
         * 当触摸到边界时回调。
         *
         * @param edgeFlags A combination of edge flags describing the edge(s) currently touched
         * @param pointerId ID of the pointer touching the described edge(s)
         * @see #EDGE_LEFT
         * @see #EDGE_TOP
         * @see #EDGE_RIGHT
         * @see #EDGE_BOTTOM
         */
        public void onEdgeTouched(int edgeFlags, int pointerId) {}

        /**
         *true的时候会锁住当前的边界,false则unLock。
         *
         * @param edgeFlags A combination of edge flags describing the edge(s) locked
         * @return true to lock the edge, false to leave it unlocked
         */
        public boolean onEdgeLock(int edgeFlags) {
            return false;
        }

        /**
         *
         *在边界拖动时状态回调
         * @param edgeFlags A combination of edge flags describing the edge(s) dragged
         * @param pointerId ID of the pointer touching the described edge(s)
         * @see #EDGE_LEFT
         * @see #EDGE_TOP
         * @see #EDGE_RIGHT
         * @see #EDGE_BOTTOM
         */
        public void onEdgeDragStarted(int edgeFlags, int pointerId) {}

        /**
         * 改变同一个坐标(x,y)去寻找captureView位置的方法
         *
         * @param index the ordered position to query for
         * @return index of the view that should be ordered at position index
         */
        public int getOrderedChildIndex(int index) {
            return index;
        }

        /**
         *
         *水平方向,子View要是消耗事件,就要重写此方法返回大于1的数。
         * @param child Child view to check
         * @return range of horizontal motion in pixels
         */
        public int getViewHorizontalDragRange(View child) {
            return 0;
        }

        /**
         *垂直方向,子View要是消耗事件,就要重写此方法返回大于1的数。
         *
         * @param child Child view to check
         * @return range of vertical motion in pixels
         */
        public int getViewVerticalDragRange(View child) {
            return 0;
        }

        /**
         *tryCaptureView如何返回ture则表示可以捕获该view即是哪个View可以滑动,哪个不可以滑动,在这个方
         *法里面控制
         * @param child Child the user is attempting to capture
         * @param pointerId ID of the pointer attempting the capture
         * @return true if capture should be allowed, false otherwise
         */
        public abstract boolean tryCaptureView(View child, int pointerId);

        /**
         * 水平滑动的边界处理
         *
         *
         * @param child Child view being dragged
         * @param left Attempted motion along the X axis
         * @param dx Proposed change in position for left
         * @return The new clamped position for left
         */
        public int clampViewPositionHorizontal(View child, int left, int dx) {
            return 0;
        }

        /**
         * 垂直滑动的边界处理
         *
         *
         * @param child Child view being dragged
         * @param top Attempted motion along the Y axis
         * @param dy Proposed change in position for top
         * @return The new clamped position for top
         */
        public int clampViewPositionVertical(View child, int top, int dy) {
            return 0;
        }
    }
大概了解所有的回调方法后,回归主题。
一个上拉抽屉布局,我脑子里首先想到的就是这样一个东东,图1。
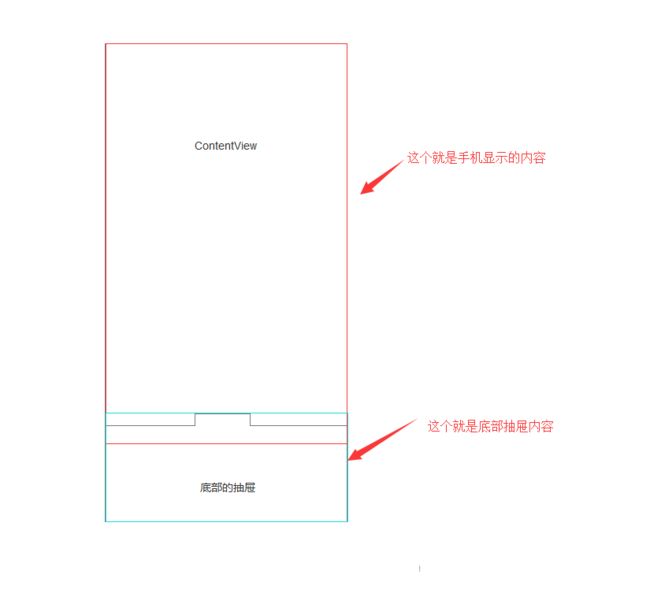
既然是这样,新建一个PullUpDragLayout直接继承ViewGroup,代码如下:
/**
 * @作 用:上拉的抽屉布局
 * @创 建 人: linguoding 邮箱:[email protected]
 * @日 期: 2016年11月16日  10:32
 */

public class PullUpDragLayout extends ViewGroup {
    private ViewDragHelper mViewDragHelper;//拖拽帮助类
    private View mBottomView;//底部内容View
    private View mContentView;//内容View
    private int mBottomBorderHeigth = 20;//底部边界凸出的高度
    public PullUpDragLayout(Context context) {
        super(context);
    }

    public PullUpDragLayout(Context context, AttributeSet attrs) {
        super(context, attrs);
    }

    public PullUpDragLayout(Context context, AttributeSet attrs, int defStyleAttr) {
        super(context, attrs, defStyleAttr);
    }

    @Override
    protected void onLayout(boolean b, int i, int i1, int i2, int i3) {
    }
}
PullUpDragLayout 有两个子View,这两个子View怎么创建?可以java代码new,可以在xml布局里面写,也可以自定义属性,引用属性得到。new 的话就pass掉,这里直接使用后面两种方式。
有了属性,接下来就可以实例化mBottomView , mContentView ,还有得到边界高度 mBottomBorderHeigth的值。代码如下:
/**
 * @作 用:上拉的抽屉布局
 * @创 建 人: linguoding 邮箱:[email protected]
 * @日 期: 2016年11月16日  10:32
 */
public class PullUpDragLayout extends ViewGroup {
    private ViewDragHelper mViewDragHelper;//拖拽帮助类
    private View mBottomView;//底部内容View
    private View mContentView;//内容View
    private LayoutInflater mLayoutInflater;
    private int mBottomBorderHeigth = 20;//底部边界凸出的高度

    public PullUpDragLayout(Context context) {
        this(context, null, 0);
    }

    public PullUpDragLayout(Context context, AttributeSet attrs) {
        this(context, attrs, 0);
    }

    public PullUpDragLayout(Context context, AttributeSet attrs, int defStyleAttr) {
        super(context, attrs, defStyleAttr);
        init(context);
        initCustomAttrs(context, attrs);
    }


    private void init(Context context) {
        mLayoutInflater = LayoutInflater.from(context);
    }

    /**
     * 初始化自定义属性,并实例化子View
     * @param context
     * @param attrs
     */
    private void initCustomAttrs(Context context, AttributeSet attrs) {
        TypedArray typedArray = context.obtainStyledAttributes(attrs, R.styleable.PullUpDragLayout);
        if (typedArray != null) {
            if (typedArray.hasValue(R.styleable.PullUpDragLayout_PullUpDrag_ContentView)) {
                inflateContentView(typedArray.getResourceId(R.styleable.PullUpDragLayout_PullUpDrag_ContentView, 0));
            }
            if (typedArray.hasValue(R.styleable.PullUpDragLayout_PullUpDrag_BottomView)) {
                inflateBottomView(typedArray.getResourceId(R.styleable.PullUpDragLayout_PullUpDrag_BottomView, 0));
            }
            if (typedArray.hasValue(R.styleable.PullUpDragLayout_PullUpDrag_BottomBorderHeigth)) {
                mBottomBorderHeigth = (int) typedArray.getDimension(R.styleable.PullUpDragLayout_PullUpDrag_BottomBorderHeigth, 20);
            }
            typedArray.recycle();
        }

    }

    private void inflateContentView(int resourceId) {
        mContentView = mLayoutInflater.inflate(resourceId, this, true);
    }

    private void inflateBottomView(int resourceId) {
        mBottomView = mLayoutInflater.inflate(resourceId, this, true);
    }


    @Override
    protected void onLayout(boolean b, int i, int i1, int i2, int i3) {

    }
}
实例化了子View后,PullUpDragLayout 既然是直接继承ViewGroup,那肯定要计算子View,还有子View在PullUpDragLayout怎么布局。那就要重写onMeasure(int widthMeasureSpec, int heightMeasureSpec),还有onLayout(boolean changed, int left, int top, int right, int bottom)方法。
- onMeasure(int widthMeasureSpec, int heightMeasureSpec)方法计算子View的大小
        @Override
        protected void onMeasure(int widthMeasureSpec, int heightMeasureSpec) {
             mContentView = getChildAt(0);
             mBottomView = getChildAt(1);
             measureChild(mBottomView, widthMeasureSpec, heightMeasureSpec);
             int bottomViewHeight = mBottomView.getMeasuredHeight();
             measureChild(mContentView, widthMeasureSpec, heightMeasureSpec);
             int contentHeight = mContentView.getMeasuredHeight();
             setMeasuredDimension(MeasureSpec.getSize(widthMeasureSpec), bottomViewHeight +contentHeight  + getPaddingBottom() + getPaddingTop());

    }
- onLayout(boolean changed, int left, int top, int right, int bottom)方法排列子View的位置
    @Override
    protected void onLayout(boolean changed, int left, int top, int right, int bottom) {
        mContentView = getChildAt(0);
        mBottomView = getChildAt(1);

        mContentView.layout(getPaddingLeft(), getPaddingTop(), getWidth() - getPaddingRight(), mContentView.getMeasuredHeight());
        mBottomView.layout(getPaddingLeft(), mContentView.getHeight() - mBottomBorderHeigth, getWidth() - getPaddingRight(), getMeasuredHeight() - mBottomBorderHeigth);

    }
应用ViewDragHelper实现上拉效果
到此,就实现上面图1的静态效果啦。想要底部可以上拉,或者点击上拉到指定位置。那就要用到ViewDragHelper。在init()方法中创建ViewDragHelper.create(this, 1.0f,mCallback)。重写onInterceptTouchEvent()、onTouchEvent,将event事件交给ViewDragHelper拦截及处理,代码如下:
    private void init(Context context) {
        mLayoutInflater = LayoutInflater.from(context);
        mViewDragHelper = ViewDragHelper.create(this, 1.0f, mCallback);
    }

    ViewDragHelper.Callback mCallback = new ViewDragHelper.Callback() {
        @Override
        public boolean tryCaptureView(View child, int pointerId) {
            return mBottomView == child;
        }
    };
    @Override
    public boolean onInterceptTouchEvent(MotionEvent ev) {
        return mViewDragHelper.shouldInterceptTouchEvent(ev);
    }

    @Override
    public boolean onTouchEvent(MotionEvent event) {
        mViewDragHelper.processTouchEvent(event);
        return true;
    }
这样底部抽屉就可以随意滑动啦,但是这样还远远没有达到我要的效果。我们要实现以下效果
- 指定方向滑动
- 边界检测、加速度检测
- 手指抬起,自动展开/收缩
- 点击Button,展开/关闭
- 监听展开/关闭,上拉过程发生改变时回调
慢慢来,下面一个一个地去实现。
- 指定方向滑动
控制水平方向不滑动,上下滑动。重写ViewDragHelper.Callback中的clampViewPositionHorizontal()方法,还有这个clampViewPositionVertical()。代码如下:
        @Override
        public int clampViewPositionHorizontal(View child, int left, int dx) {
            final int leftBound = getPaddingLeft();
            final int rightBound = getWidth() - mBottomView.getWidth() - leftBound;
            final int newLeft = Math.min(Math.max(left, leftBound), rightBound);

            return newLeft;
        }

        @Override
        public int clampViewPositionVertical(View child, int top, int dy) {
            int topBound = mContentView.getHeight() - mBottomView.getHeight();
            int bottomBound = mContentView.getHeight() - mBottomBorderHeigth;
            return Math.min(bottomBound, Math.max(top, topBound));
        }
- 手指抬起,自动展开/收缩
重写onViewReleased()方法:代码如下:
        //手指释放的时候回调
        @Override
        public void onViewReleased(View releasedChild, float xvel, float yvel) {
            if (releasedChild == mBottomView) {
                if (releasedChild.getY() < mBoundTopY || yvel <= -1000) {
                    mViewDragHelper.settleCapturedViewAt(mAutoBackTopPos.x, mAutoBackTopPos.y);
                    isOpen = true;
                    if (mOnStateListener != null) mOnStateListener.open();
                } else if (releasedChild.getY() >= mBoundTopY || yvel >= 1000) {
                    mViewDragHelper.settleCapturedViewAt(mAutoBackBottomPos.x, mAutoBackBottomPos.y);
                    isOpen = false;
                    if (mOnStateListener != null) mOnStateListener.close();
                }
                invalidate();
            }
        }
    };

      @Override
      public void computeScroll() {
             if (mViewDragHelper.continueSettling(true)) { invalidate();
          }
      }
- 点击Button,展开/关闭
    /**
     * 切换底部View
     */
    public void toggleBottomView() {
        if (isOpen) {
            mViewDragHelper.smoothSlideViewTo(mBottomView, mAutoBackBottomPos.x, mAutoBackBottomPos.y);
            if (mOnStateListener != null) mOnStateListener.close();
        } else {
            mViewDragHelper.smoothSlideViewTo(mBottomView, mAutoBackTopPos.x, mAutoBackTopPos.y);
            if (mOnStateListener != null) mOnStateListener.open();
        }
        invalidate();
        isOpen = !isOpen;
    }
- 监听展开/关闭,上拉过程发生改变时回调
定义两个接口
    public void setOnStateListener(OnStateListener onStateListener) {
        mOnStateListener = onStateListener;
    }

    public void setScrollChageListener(OnScrollChageListener scrollChageListener) {
        mScrollChageListener = scrollChageListener;
    }

    public interface OnStateListener {
        void open();

        void close();
    }

    public interface OnScrollChageListener {
        void onScrollChange(float rate);
    }
重写onViewPositionChanged 监听位置的改变,计算上拉过程的比率值0-1。代码如下:
        @Override
        public void onViewPositionChanged(View changedView, int left, int top, int dx, int dy) {
            if (changedView == mBottomView) {
                float startPosition = mContentView.getHeight() - mBottomView.getHeight();
                float endPosition = mContentView.getHeight() - mBottomBorderHeigth;
                float totalLength = endPosition - startPosition;
                float rate = 1 - ((top - startPosition) / totalLength);
                if (mScrollChageListener != null) {
                    mScrollChageListener.onScrollChange(rate);
                }

            }
        }
到此,整个过程就走一遍了。下面放上完整代码:
/**
 * @作 用:上拉的抽屉布局
 * @创 建 人:  linguoding 邮箱:[email protected]
 * @日 期: 2016年10月28日  14:13
 */

public class PullUpDragLayout extends ViewGroup {
    private ViewDragHelper mViewDragHelper;//拖拽帮助类
    private View mBottomView;//底部内容View
    private View mContentView;//内容View
    LayoutInflater mLayoutInflater;
    private int mBottomBorderHeigth = 20;//底部边界凸出的高度

    private Point mAutoBackBottomPos = new Point();
    private Point mAutoBackTopPos = new Point();
    private int mBoundTopY;
    private boolean isOpen;
    private OnStateListener mOnStateListener;
    private OnScrollChageListener mScrollChageListener;


    public void setOnStateListener(OnStateListener onStateListener) {
        mOnStateListener = onStateListener;
    }

    public void setScrollChageListener(OnScrollChageListener scrollChageListener) {
        mScrollChageListener = scrollChageListener;
    }

    public interface OnStateListener {
        void open();

        void close();
    }

    public interface OnScrollChageListener {
        void onScrollChange(float rate);
    }


    public PullUpDragLayout(Context context) {
        this(context, null, 0);
    }

    public PullUpDragLayout(Context context, AttributeSet attrs) {
        this(context, attrs, 0);
    }

    public PullUpDragLayout(Context context, AttributeSet attrs, int defStyleAttr) {
        super(context, attrs, defStyleAttr);
        init(context);
        initCustomAttrs(context, attrs);
    }

    private void init(Context context) {
        mLayoutInflater = LayoutInflater.from(context);
        mViewDragHelper = ViewDragHelper.create(this, 1.0f,mCallback);
    }

    ViewDragHelper.Callback mCallback = new ViewDragHelper.Callback() {
        @Override
        public boolean tryCaptureView(View child, int pointerId) {
            return mBottomView == child;
        }

        @Override
        public int getViewHorizontalDragRange(View child) {
            return getMeasuredWidth() - child.getMeasuredWidth();
        }

        @Override
        public int getViewVerticalDragRange(View child) {
            return getMeasuredHeight() - child.getMeasuredHeight();
        }

        @Override
        public int clampViewPositionHorizontal(View child, int left, int dx) {
            final int leftBound = getPaddingLeft();
            final int rightBound = getWidth() - mBottomView.getWidth() - leftBound;
            final int newLeft = Math.min(Math.max(left, leftBound), rightBound);

            return newLeft;
        }

        @Override
        public int clampViewPositionVertical(View child, int top, int dy) {
            int topBound = mContentView.getHeight() - mBottomView.getHeight();
            int bottomBound = mContentView.getHeight() - mBottomBorderHeigth;
            return Math.min(bottomBound, Math.max(top, topBound));
        }

        @Override
        public void onViewPositionChanged(View changedView, int left, int top, int dx, int dy) {
            if (changedView == mBottomView) {
                float startPosition = mContentView.getHeight() - mBottomView.getHeight();
                float endPosition = mContentView.getHeight() - mBottomBorderHeigth;
                float totalLength = endPosition - startPosition;
                float rate = 1 - ((top - startPosition) / totalLength);
                if (mScrollChageListener != null) {
                    mScrollChageListener.onScrollChange(rate);
                }

            }
        }

        //手指释放的时候回调
        @Override
        public void onViewReleased(View releasedChild, float xvel, float yvel) {
            if (releasedChild == mBottomView) {
                if (releasedChild.getY() < mBoundTopY || yvel <= -1000) {
                    mViewDragHelper.settleCapturedViewAt(mAutoBackTopPos.x, mAutoBackTopPos.y);
                    isOpen = true;
                    if (mOnStateListener != null) mOnStateListener.open();
                } else if (releasedChild.getY() >= mBoundTopY || yvel >= 1000) {
                    mViewDragHelper.settleCapturedViewAt(mAutoBackBottomPos.x, mAutoBackBottomPos.y);
                    isOpen = false;
                    if (mOnStateListener != null) mOnStateListener.close();
                }
                invalidate();
            }
        }


    };

    public boolean isOpen() {
        return isOpen;
    }

    /**
     * 切换底部View
     */
    public void toggleBottomView() {
        if (isOpen) {
            mViewDragHelper.smoothSlideViewTo(mBottomView, mAutoBackBottomPos.x, mAutoBackBottomPos.y);
            if (mOnStateListener != null) mOnStateListener.close();
        } else {
            mViewDragHelper.smoothSlideViewTo(mBottomView, mAutoBackTopPos.x, mAutoBackTopPos.y);
            if (mOnStateListener != null) mOnStateListener.open();
        }
        invalidate();
        isOpen = !isOpen;
    }


    private void initCustomAttrs(Context context, AttributeSet attrs) {
        TypedArray typedArray = context.obtainStyledAttributes(attrs, R.styleable.PullUpDragLayout);
        if (typedArray != null) {
            if (typedArray.hasValue(R.styleable.PullUpDragLayout_PullUpDrag_ContentView)) {
                inflateContentView(typedArray.getResourceId(R.styleable.PullUpDragLayout_PullUpDrag_ContentView, 0));
            }
            if (typedArray.hasValue(R.styleable.PullUpDragLayout_PullUpDrag_BottomView)) {
                inflateBottomView(typedArray.getResourceId(R.styleable.PullUpDragLayout_PullUpDrag_BottomView, 0));
            }
            if (typedArray.hasValue(R.styleable.PullUpDragLayout_PullUpDrag_BottomBorderHeigth)) {
                mBottomBorderHeigth = (int) typedArray.getDimension(R.styleable.PullUpDragLayout_PullUpDrag_BottomBorderHeigth, 20);
            }
            typedArray.recycle();
        }

    }

    private void inflateContentView(int resourceId) {
        mContentView = mLayoutInflater.inflate(resourceId, this, true);
    }

    private void inflateBottomView(int resourceId) {
        mBottomView = mLayoutInflater.inflate(resourceId, this, true);
    }


    @Override
    protected void onMeasure(int widthMeasureSpec, int heightMeasureSpec) {
        mContentView = getChildAt(0);
        mBottomView = getChildAt(1);
        measureChild(mBottomView, widthMeasureSpec, heightMeasureSpec);
        int bottomViewHeight = mBottomView.getMeasuredHeight();

        measureChild(mContentView, widthMeasureSpec, heightMeasureSpec);
        int contentHeight = mContentView.getMeasuredHeight();
        setMeasuredDimension(MeasureSpec.getSize(widthMeasureSpec), bottomViewHeight + contentHeight + getPaddingBottom() + getPaddingTop());


    }


    @Override
    protected void onLayout(boolean changed, int left, int top, int right, int bottom) {
        mContentView = getChildAt(0);
        mBottomView = getChildAt(1);
        mContentView.layout(getPaddingLeft(), getPaddingTop(), getWidth() - getPaddingRight(), mContentView.getMeasuredHeight());
        mBottomView.layout(getPaddingLeft(), mContentView.getHeight() - mBottomBorderHeigth, getWidth() - getPaddingRight(), getMeasuredHeight() - mBottomBorderHeigth);
        mAutoBackBottomPos.x = mBottomView.getLeft();
        mAutoBackBottomPos.y = mBottomView.getTop();

        mAutoBackTopPos.x = mBottomView.getLeft();
        mAutoBackTopPos.y = mContentView.getHeight() - mBottomView.getHeight();
        mBoundTopY = mContentView.getHeight() - mBottomView.getHeight() / 2;

    }

    @Override
    public boolean onInterceptTouchEvent(MotionEvent ev) {
        return mViewDragHelper.shouldInterceptTouchEvent(ev);
    }

    @Override
    public boolean onTouchEvent(MotionEvent event) {
        mViewDragHelper.processTouchEvent(event);
        return true;
    }

    @Override
    public void computeScroll() {
        if (mViewDragHelper.continueSettling(true)) {
            invalidate();
        }
    }
}
XML中使用:
效果大概可以是这样的:
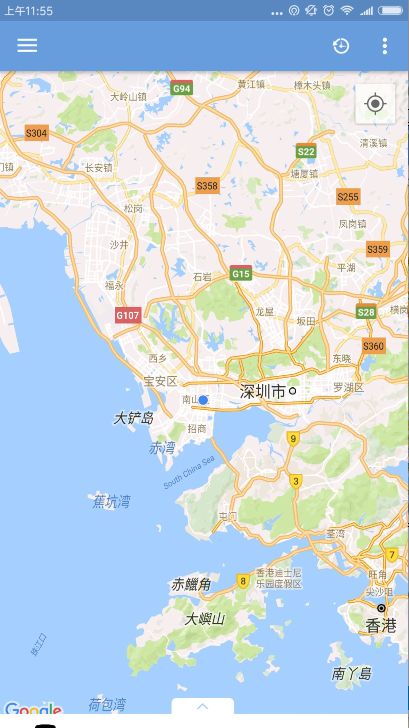
展开时:

大概就是这样的...............................