一、drawRect
这个方法是用来重绘的,一般为了降低视图层级,会选择在这里进行绘制。
-
drawRect在以下情况下会被调用:
- 如果在UIView初始化时没有设置rect大小,将直接导致
drawRect不被自动调用。drawRect调用是在Controller->loadView,Controller->viewDidLoad两方法之后调用的.所以不用担心在控制器中,这些View的drawRect就开始画了.这样可以在控制器中设置一些值给View(如果这些View draw的时候需要用到某些变量值). - 该方法在调用
sizeToFit后被调用,所以可以先调用sizeToFit计算出size。然后系统自动调用drawRect:方法。 - 通过设置
contentMode属性值为UIViewContentModeRedraw。那么将在每次设置或更改frame的时候自动调用drawRect:。 - 直接调用
setNeedsDisplay,或者setNeedsDisplayInRect:触发drawRect:,但是有个前提条件是rect不能为0。
以上1,2推荐;而3,4不提倡
使用注意点:
- 若使用UIView绘图,只能在
drawRect:方法中获取相应的contextRef并绘图。如果在其他方法中获取将获取到一个invalidate的ref并且不能用于画图。drawRect:方法不能手动显示调用,必须通过调用setNeedsDisplay或者setNeedsDisplayInRect,让系统自动调该方法。- 若使用CALayer绘图,只能在
drawInContext:中(类似于drawRect)绘制,或者在delegate中的相应方法绘制。同样也是调用setNeedDisplay等间接调用以上方法- 若要实时画图,不能使用gestureRecognizer,只能使用touchbegan等方法来掉用
setNeedsDisplay实时刷新屏幕.- 绘图时一定是layout之后,不必担心frame的问题
sizeToFit
- (void)sizeToFit
根据子视图的大小位置,调整视图,使其恰好围绕子视图, 也就是说自动适应子视图的大小,只显示子视图
- (CGSize)sizeThatFits:(CGSize)size
让视图计算最适合子视图的大小,即能把全部子视图显示出来所需要的最小的size
-
sizeToFit不应该在子类中被重写,应该重写sizeThatFits。sizeToFit会自动调用sizeThatFits方法; -
sizeThatFits传入的参数是receiver当前的size,返回一个适合的size -
sizeToFit可以被手动直接调用sizeToFit和sizeThatFits方法都没有递归,对subviews也不负责,只负责自己
重绘
-drawRect:(CGRect)rect方法:重写此方法,执行重绘任务
-setNeedsDisplay方法:标记为需要重绘,异步调用drawRect
-setNeedsDisplayInRect:(CGRect)invalidRect方法:标记为需要局部重绘

layoutSubviews对subviews重新布局
layoutSubviews方法调用先于drawRect
setNeedsLayout在receiver标上一个需要被重新布局的标记,在系统runloop的下一个周期自动调用layoutSubviews
layoutIfNeeded方法如其名,UIKit会判断该receiver是否需要layout.根据Apple官方文档,layoutIfNeeded方法应该是这样的
layoutIfNeeded遍历的不是superview链,应该是subviews链
drawRect是对receiver的重绘,能获得context。
总之,理解view布局的过程,可以帮助你理解View显示的相关问题,解决一些界面问题,合理使用以上方法对你自定义控件也有很大的帮助。
-drawRect:(CGRect)rect方法:重写此方法,执行重绘任务
-setNeedsDisplay方法:标记为需要重绘,异步调用drawRect
-setNeedsDisplayInRect:(CGRect)invalidRect方法:标记为需要局部重绘

sizeToFit会自动调用sizeThatFits方法;
sizeToFit不应该在子类中被重写,应该重写sizeThatFits
sizeThatFits传入的参数是receiver当前的size,返回一个适合的size
sizeToFit可以被手动直接调用
sizeToFit和sizeThatFits方法都没有递归,对subviews也不负责,只负责自己

layoutSubviews对subviews重新布局
layoutSubviews方法调用先于drawRect
setNeedsLayout在receiver标上一个需要被重新布局的标记,在系统runloop的下一个周期自动调用layoutSubviews
layoutIfNeeded方法如其名,UIKit会判断该receiver是否需要layout
layoutIfNeeded遍历的不是superview链,应该是subviews链
drawRect是对receiver的重绘,能获得context

setNeedDisplay在receiver标上一个需要被重新绘图的标记,在下一个draw周期自动重绘iPhone device的刷新频率是60hz,也就是1/60秒后重绘
简单使用
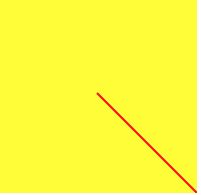
先画一条线
- (void)drawRect:(CGRect)rect {
    CGContextRef ctx = UIGraphicsGetCurrentContext();                   //获取当前绘制环境
    CGContextSetLineWidth(ctx, 2);                                      //设置线条宽度
    CGContextSetStrokeColorWithColor(ctx, [[UIColor redColor] CGColor]);//设置线条颜色
    CGContextBeginPath(ctx);                                            //开始配置绘制路径
    CGContextMoveToPoint(ctx, 100, 100);                                //设置起点为(100,100)
    CGContextAddLineToPoint(ctx, 200, 200);                             //添加一个直线到点(200,200)
    CGContextDrawPath(ctx, kCGPathStroke);                              //绘制路径
}
这里分为两部分:
- 获取当前上下文并设置相关设置
UIGraphicsGetCurrentContext()用来获取当前绘制环境,只能在drawRect里面获取该上下文。
这里设置了线条宽度为2,线条颜色为红色。 - 绘制路径
绘制路径要以CGContextBeginPath()开始。
直线、弧、曲线开始于当前点。空路径没有当前点,我们必须调用CGContextMoveToPoint来设置第一个子路径的起始点,或者调用一个便利函数来隐式地完成该任务。
最后使用CGContextStrokePath()绘制,也可以使用CGContextDrawPath()选择绘制方法。
设置上下文的属性
CGContextRef状态
//保存CGContextRef当前的绘图状态,方便以后恢复该状态。CGContextSaveGState()函数保存的绘图状态,不仅包括当前坐标系统的状态,也包括当前设置的填充风格、线条风格、阴影风格等各种绘图状态。但 CGContextSaveGState()函数不会保存当前绘制的图形
void CGContextSaveGState(CGContextRef__nullable c)

//把CGContextRef的状态恢复到最近一次保存时的状态
void CGContextRestoreGState(CGContextRef__nullable c)
坐标空间和变化
UIKit是iPhone SDK的Cocoa Touch层的核心framework,是iPhone应用程序图形界面和事件驱动的基础,它和传统的windows桌面一样,坐标系是y轴向下的; Core Graphics(Quartz)一个基于2D的图形绘制引擎,它的坐标系则是y轴向上的;而OpenGL ES是iPhone SDK的2D和3D绘制引擎,它使用左手坐标系,它的坐标系也是y轴向上的,如果不考虑z轴,在二维下它的坐标系和Quartz是一样的。
//缩放坐标系统
该方法控制坐标系统水平方向上缩放 sx,垂直方向上缩放 sy。在缩放后的坐标系统上绘制图形时,所有点的 X 坐标都相当于乘以 sx 因子,所有点的 Y 坐标都相当于乘以 sy因子。
void CGContextScaleCTM(CGContextRef__nullable c, CGFloat sx, CGFloat sy)

//平移坐标系统
 该方法相当于把原来位于 (0, 0) 位置的坐标原点平移到 (tx, ty)点。在平移后的坐标系统上绘制图形时,所有坐标点的 X坐标都相当于增加了 tx,所有点的 Y坐标都相当于增加了 ty。
void CGContextTranslateCTM(CGContextRef__nullable c,
    CGFloat tx, CGFloat ty)

//旋转坐标系统
 该方法控制坐标系统旋转 angle 弧度。在缩放后的坐标系统上绘制图形时,所有坐标点的 X、Y坐标都相当于旋转了 angle弧度之后的坐标。
void CGContextRotateCTM(CGContextRef__nullable c, CGFloat angle)

//使用 transform变换矩阵对 CGContextRef的坐标系统执行变换,通过使用坐标矩阵可以对坐标系统执行任意变换。
void CGContextConcatCTM(CGContextRef__nullable c,
    CGAffineTransform transform)

//获取CGContextRef的坐标系统的变换矩阵
CGAffineTransform CGContextGetCTM(CGContextRef__nullable c)
绘图属性设置相关函数
//设置绘制直线、边框时的线条宽度
void CGContextSetLineWidth(CGContextRef__nullable c, CGFloat width)

//设置线段端点的绘制形状。该属性支持如下三个值。
typedef CF_ENUM(int32_t, CGLineCap) {
    kCGLineCapButt, //没有端点,线条结尾处直接结束,这是默认值。
    kCGLineCapRound,//圆形端点,线条结尾处绘制一个直径为线条宽度的半圆。
    kCGLineCapSquare//方形端点。线条结尾处绘制半个边长为线条宽度的正方形。需要说明的是,这种形状的端点与“butt”形状的端点十分相似,只是采用这种形式的端点的线条略长一点而已
};
void CGContextSetLineCap(CGContextRef__nullable c, CGLineCap cap)

typedef CF_ENUM(int32_t, CGLineJoin) {
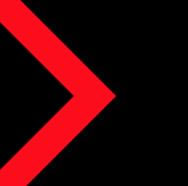
    kCGLineJoinMiter, // 这是默认的属性值。该方格的连接点形状如图1所示。
    kCGLineJoinRound, // 稍微圆角, 该方格的连接点形状如图2所示。
    kCGLineJoinBevel  // 斜角,该方格的连接点形状如图3所示。
};
//设置线条连接点的风格,该属性支持如上三个值:
void CGContextSetLineJoin(CGContextRef__nullable c, CGLineJoin join)

//当把连接点风格设为meter风格时,该方法用于控制锐角箭头的长度*/
void CGContextSetMiterLimit(CGContextRef__nullable c, CGFloat limit)
| 图1 | 图2 | 图3 |
|---|---|---|
/*
 Linedash pattern(虚线模式)允许我们沿着描边绘制虚线。我们通过在CGContextSetLineDash结构体中指定虚线数组和虚线相位来控制虚线的大小及位置。
其中lengths属性指定了虚线段的长度,该值是在绘制片断与未绘制片断之间交替(实线、空白、实线、空白、实线....)。phase属性指定虚线模式的起始点,phase实际是虚线中实线长度的余数,当phaselength向右偏移phase%length,phase或phase%length为0时不偏移。
*/
void CGContextSetLineDash(CGContextRef__nullable c, CGFloat phase,const CGFloat *__nullable lengths, size_t count)
注意:CGContextSetLineDash的使用需要在存在路径的基础上。
其他设置
//设置弯曲的路径中的图形上下文的准确性。
void CGContextSetFlatness(CGContextRef__nullable c, CGFloat flatness)

//设置全局透明度
void CGContextSetAlpha(CGContextRef__nullable c, CGFloat alpha)

//设置CGContextRef的叠加模式。Quartz 2D支持多种叠加模
void CGContextSetBlendMode(CGContextRef __nullable c, CGBlendMode mode)
绘制路径
绘制路径要以CGContextBeginPath()开始。
//开始创建路径.
void CGContextBeginPath(CGContextRef__nullable c)

//开始一个新的子路径点
void CGContextMoveToPoint(CGContextRef__nullable c,
    CGFloat x, CGFloat y)

//添加一条直线段从当前指向的(x,y)
void CGContextAddLineToPoint(CGContextRef__nullable c,
    CGFloat x, CGFloat y)

/**
 *  从当前添加一个三次Bezier曲线
 *  @param cp1x 控制点1 x坐标
 *  @param cp1y 控制点1 y坐标
 *  @param cp2x 控制点2 x坐标
 *  @param cp2y 控制点2 y坐标
 *  @param x    直线的终点 x坐标
 *  @param y    直线的终点 y坐标
 */
void CGContextAddCurveToPoint(CGContextRef__nullable c, CGFloat cp1x, CGFloat cp1y, CGFloat cp2x, CGFloat cp2y, CGFloat x, CGFloat y)

/**
 *  从当前添加一个二次Bezier曲线
 *  @param cpx 控制点 x坐标
 *  @param cpy 控制点 y坐标
 *  @param x   直线的终点 x坐标
 *  @param y   直线的终点 y坐标
 */
void CGContextAddQuadCurveToPoint(CGContextRef__nullable c, CGFloat cpx, CGFloat cpy,CGFloat x,CGFloat y)

//关闭当前上下文的子路径,且当前点和起点连接起来(需要在绘制之前调用)
void CGContextClosePath(CGContextRef__nullable c)

//添加一个矩形路径
void CGContextAddRect(CGContextRef__nullable c, CGRect rect)

//添加多个矩形路径
void CGContextAddRects(CGContextRef__nullable c,
    const CGRect * __nullable rects, size_t count)

//添加多条直线路径
void CGContextAddLines(CGContextRef__nullable c,
    const CGPoint * __nullable points, size_t count)

//根据一个矩形,绘制椭圆(圆形)
void CGContextAddEllipseInRect(CGContextRef__nullable c, CGRect rect)

/**
 *  添加弧形路径
 *  @param x          中心点x坐标
 *  @param y          中心点y坐标
 *  @param radius     半径
 *  @param startAngle 起始弧度
 *  @param endAngle   终止弧度
 *  @param clockwise  是否逆时针绘制,1逆时针,0顺时针
 */
void CGContextAddArc(CGContextRef__nullable c, CGFloat x,CGFloat y,CGFloat radius,CGFloat startAngle,CGFloat endAngle,int clockwise)

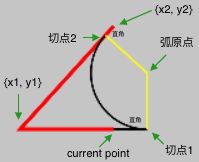
//这个函数使用一个序列的三次贝塞尔曲线创建一个弧 原理:首先画两条线,这两条线分别是 current point to (x1,y1)和(x1,y1) to (x2,y2).这样就是出现一个以(x1,y1)为顶点的两条射线,然后定义半径长度,这个半径是垂直于两条射线的,这样就能决定一个圆了,如果当前点和第一个切点的弧(起点)是不平等的,那么会添加一条直线段从当前指向第一个切点。弧的终点成为新的当前点的路径
void CGContextAddArcToPoin(CGContextRef __nullable c, CGFloat x1, CGFloat y1, CGFloat x2, CGFloat y2, CGFloat radius)
//添加路径到图形上下文
void CGContextAddPath(CGContextRef__nullable c, CGPathRef__nullable path)
绘制路径
//使用绘制当前路径时覆盖的区域作为当前CGContextRef中的新路径,一般配合CGContextClip使用
void CGContextReplacePathWithStrokedPath(CGContextRef__nullable c)

//当前路径是否包含任何的子路径
(Bool)CGContextIsPathEmpty(CGContextRef__nullable c)

//返回一个非空的路径中的当前点
(CGPoint)CGContextGetPathCurrentPoint(CGContextRef__nullable c)

//返回包含当前路径的最小矩形
(CGRect)CGContextGetPathBoundingBox(CGContextRef__nullable c)

//返回当前上下文的路径的副本
(CGPathRef __nullable)CGContextCopyPath(CGContextRef__nullable c)

//检查当前路径中是否包含指定的点
(Bool)CGContextPathContainsPoint(CGContextRef__nullable c,
    CGPoint point, CGPathDrawingMode mode)
绘制方式
typedef CF_ENUM (int32_t, CGPathDrawingMode) {
    kCGPathFill,        //填充
    kCGPathEOFill,      //奇偶填充(奇填偶不填)
    kCGPathStroke,      //描边
    kCGPathFillStroke,  //描边并填充
    kCGPathEOFillStroke //奇偶填充并描边
};
| kCGPathFill | kCGPathEOFill | kCGPathStroke | kCGPathFillStroke | kCGPathEOFillStroke |
|---|---|---|---|---|
//使用指定模式绘制当前CGContextRef中所包含的路径。
void CGContextDrawPath(CGContextRef__nullable c, CGPathDrawingMode mode)

 //填充该路径包围的区域
void CGContextFillPath(CGContextRef__nullable c)

//使用奇偶规则来填充该路径包围的区域。奇偶规则指某个点被路径包围了奇数次则绘制该点,否则不绘制
void CGContextEOFillPath(CGContextRef__nullable c)

//使用当前 CGContextRef设置的线宽绘制路径
void CGContextStrokePath(CGContextRef__nullable c)

//填充rect代表的矩形
void CGContextFillRect(CGContextRef__nullable c, CGRect rect)

//填充多个矩形
void CGContextFillRects(CGContextRef__nullable c,
    const CGRect * __nullable rects, size_t count)

//使用当前 CGContextRef设置的线宽绘制矩形框
void CGContextStrokeRect(CGContextRef__nullable c, CGRect rect)

//使用指定线宽绘制矩形框
void CGContextStrokeRectWithWidth(CGContextRef__nullable c,
    CGRect rect, CGFloat width)

//清除指定矩形区域上绘制的图形
void CGContextClearRect(CGContextRef__nullable c, CGRect rect)

//填充rect矩形的内切椭圆区域
void CGContextFillEllipseInRect(CGContextRef__nullable c,
    CGRect rect)

//使用当前 CGContextRef设置的线宽绘制rect矩形的内切椭圆
void CGContextStrokeEllipseInRect(CGContextRef__nullable c, CGRect rect)

/**
 *  使用当前 CGContextRef   设置的线宽绘制多条线段
 *  @param c               当前上下文
 *  @param points          线段数组(必须成对出现,起点终点配对)
 *  @param count           数组长度
 */
void CGContextStrokeLineSegments(CGContextRef__nullable c,
    const CGPoint * __nullable points, size_t count)

//修改当前剪贴路径,使用非零绕数规则
void CGContextClip(CGContextRef__nullable c)

//修改当前剪贴路径,使用奇偶规则
void CGContextEOClip(CGContextRef__nullable c)

//剪切遮罩处理(针对图片)
void CGContextClipToMask(CGContextRef__nullable c, CGRect rect, CGImageRef__nullable mask)

//获取到了需要绘制的图形上下文的位置与大小
CGRect CGContextGetClipBoundingBox(CGContextRef__nullable c)

//剪切指定矩形区域外的部分
void CGContextClipToRect(CGContextRef__nullable c, CGRect rect)

//剪切指定多个矩形区域外的部分
void CGContextClipToRects(CGContextRef__nullable c,const CGRect *  rects, size_t count)
设置颜色
// 设置描边和填充色为红色
[[UIColor redColor] set]

// 设置填充色为绿色
[[UIColor greenColor] setFill]

// 设置描边色为黄色
[[UIColor yellowColor] set]

//使用指定颜色来设置该CGContextRef的填充颜色
void CGContextSetFillColorWithColor(CGContextRef__nullable c,
    CGColorRef __nullable color)

//使用指定颜色来设置该CGContextRef的线条颜色
void CGContextSetStrokeColorWithColor(CGContextRef__nullable c,
    CGColorRef __nullable color)

//颜色空间填充
void CGContextSetFillColorSpace(CGContextRef__nullable c, CGColorSpaceRef__nullable space)

//设置线框颜色空间
void CGContextSetStrokeColorSpace(CGContextRef__nullable c,
    CGColorSpaceRef __nullable space)

//设置填充颜色空间 CGFloat redColor[4] = {1.0,0,0,1.0};
void CGContextSetFillColor(CGContextRef__nullable c,const CGFloat *__nullable components(redColor))

//设置画笔颜色 CGFloat redColor[4] = {1.0,0,0,1.0};
void CGContextSetStrokeColor(CGContextRef__nullable c,const CGFloat *__nullable components(redColor))

//设置该CGContextRef使用位图填充
void CGContextSetFillPattern(CGContextRef__nullable c, CGPatternRef__nullable pattern,const CGFloat * __nullable components)

//设置该CGContextRef使用位图绘制线条、边框
void CGContextSetStrokePattern(CGContextRef__nullable c, CGPatternRef__nullable pattern,const CGFloat * __nullable components)

//设置该CGContextRef采用位图填充的相位
void CGContextSetPatternPhase(CGContextRef__nullable c, CGSize phase)

//使用灰色来设置该CGContextRef的填充颜色
void CGContextSetGrayFillColor(CGContextRef__nullable c,
    CGFloat gray, CGFloat alpha)

//使用灰色来设置该CGContextRef的线条颜色
void CGContextSetGrayStrokeColor(CGContextRef__nullable c,
    CGFloat gray, CGFloat alpha)

//使用RGB颜色模式来设置该CGContextRef的填充颜色
void CGContextSetRGBFillColor(CGContextRef__nullable c, CGFloat red,
    CGFloat green, CGFloat blue, CGFloat alpha)

//设置画笔颜色
void CGContextSetRGBStrokeColor(CGContextRef__nullable c,
    CGFloat red, CGFloat green, CGFloat blue, CGFloat alpha)

//使用CMYK颜色模式来设置该CGContextRef的填充颜色
void CGContextSetCMYKFillColor(CGContextRef__nullable c,
    CGFloat cyan, CGFloat magenta, CGFloat yellow, CGFloat black, CGFloat alpha)

//使用CMYK颜色模式来设置该CGContextRef的线条颜色
void CGContextSetCMYKStrokeColor(CGContextRef__nullable c,
    CGFloat cyan, CGFloat magenta, CGFloat yellow, CGFloat black, CGFloat alpha)

//在当前图形状态设置渲染意向
void CGContextSetRenderingIntent(CGContextRef__nullable c,
    CGColorRenderingIntent intent)
图片
UIKit是坐标系是y轴向下的; Core Graphics(Quartz)一个基于2D的图形绘制引擎,它的坐标系则是y轴向上的;而OpenGL ES是iPhone SDK的2D和3D绘制引擎,它使用左手坐标系,它的坐标系也是y轴向上的,如果不考虑z轴,在二维下它的坐标系和Quartz是一样的。
所以图像绘制后会倒立过来,我们可以修改坐标系来处理;或者使用UIImage的drawInRect函数,该函数内部能自动处理图片的正确方向。
//绘制图像到图形上下文中
void CGContextDrawImage(CGContextRef__nullable c, CGRect rect,
    CGImageRef __nullable image)

//重复绘制的图像,扩展到提供的矩形,填补当前剪辑区域
void CGContextDrawTiledImage(CGContextRef__nullable c, CGRect rect,
    CGImageRef __nullable image)

//获取当前CGContextRef在放大图片时的插值质量
CGInterpolationQuality CGContextGetInterpolationQuality(CGContextRef__nullable c)

//设置图形上下文的插值质量水平
void CGContextSetInterpolationQuality(CGContextRef__nullable c,
    CGInterpolationQuality quality)
注意:因为UIKit和CG坐标系y轴相反,所以图片绘制将会上下颠倒。
1.可以通过修改当前坐标系来恢复。
CGContextTranslateCTM(context, 0, height);
CGContextScaleCTM(context, 1.0, -1.0);

2.使用UIImage的drawInRect函数,该函数内部能自动处理图片的正确方向
UIGraphicsPushContext(context);
[image drawInRect:CGRectMake(0, 0, width, height)];
UIGraphicsPopContext();
阴影
//设置阴影在X、Y方向上的偏移,以及模糊度和阴影的颜色
void CGContextSetShadowWithColor(CGContextRef__nullable c,
    CGSize offset, CGFloat blur, CGColorRef __nullable color)

//设置阴影在X、Y方向上的偏移,以及模糊度(blur值越大,阴影越模糊)。该函数没有设置阴影颜色,默认使用1/3透明的黑色(即RGBA{0, 0, 0, 1.0/3.0})作为阴影颜色
void CGContextSetShadow(CGContextRef__nullable c, CGSize offset,
    CGFloat blur)
渐变
//绘制一个渐变填充定义的出发点和落脚点沿线变化
void CGContextDrawLinearGradient(CGContextRef__nullable c,
    CGGradientRef __nullable gradient, CGPoint startPoint, CGPoint endPoint,
    CGGradientDrawingOptions options)

//绘制一个沿着由所提供的开始和结束的圆限定的区域变化的渐变填充
void CGContextDrawRadialGradient(CGContextRef__nullable c,
    CGGradientRef __nullable gradient, CGPoint startCenter, CGFloat startRadius,
    CGPoint endCenter, CGFloat endRadius, CGGradientDrawingOptions options)

//使用指定的阴影的背景,填充剪切路径
void CGContextDrawShading(CGContextRef __nullable c,
    __nullable CGShadingRef shading)


    //示例
    CGContextRef context = UIGraphicsGetCurrentContext();
    CGColorSpaceRef colorSpace = CGColorSpaceCreateDeviceRGB();
    NSArray *colors = @[(__bridge id)UIColor.redColor.CGColor,
                        (__bridge id)UIColor.yellowColor.CGColor];
    CGGradientRef gradient = CGGradientCreateWithColors(colorSpace,(__bridge CFArrayRef)colors, NULL);

    CGPoint startPoint = CGPointMake(0, rect.size.height / 2);
    CGPoint endPoint = CGPointMake(rect.size.width, startPoint.y);
    CGContextDrawLinearGradient(context, gradient, startPoint, endPoint, kCGGradientDrawsBeforeStartLocation);
    CGGradientRelease(gradient);
    CGColorSpaceRelease(colorSpace);
文本
//设置当前字符间距
void CGContextSetCharacterSpacing(CGContextRef__nullable c,
    CGFloat spacing)

//设置要绘制文本的位置
void CGContextSetTextPosition(CGContextRef__nullable c,
    CGFloat x, CGFloat y)

//返回在绘制文本的位置
CGPoint CGContextGetTextPosition(CGContextRef __nullable c)

//设置当前文本矩阵
void CGContextSetTextMatrix(CGContextRef__nullable c,
    CGAffineTransform t)

//返回当前文本矩阵
CGAffineTransform CGContextGetTextMatrix(CGContextRef__nullable c)

//设置当前文本的绘图模式
void CGContextSetTextDrawingMode(CGContextRef__nullable c,
    CGTextDrawingMode mode)

//设置上下文的字体
void CGContextSetFont(CGContextRef__nullable c,
    CGFontRef __nullable font)

//设置上下文的字体大小
void CGContextSetFontSize(CGContextRef__nullable c, CGFloat size)

//在所提供的位置绘制字形
void CGContextShowGlyphsAtPositions(CGContextRef__nullable c,
    const CGGlyph * __nullable glyphs, const CGPoint * __nullable Lpositions,
    size_t count)
//绘制一个PDF页面到当前的用户空间
void CGContextDrawPDFPage(CGContextRef__nullable c,
    CGPDFPageRef __nullable page)
输出页面
//基于页面的图形上下文中开始了新的一页
void CGContextBeginPage(CGContextRef__nullable c,const CGRect *__nullable mediaBox)

//在基于页面的图形上下文结束当前的页面
void CGContextEndPage(CGContextRef__nullable c)
上下文相关方法
//图形上下文的引用计数+1
(CGContextRef __nullable)CGContextRetain(CGContextRef__nullable c)

//图形上下文的引用计数-1
void CGContextRelease(CGContextRef__nullable c)

//强制所有挂起的绘图操作在一个窗口上下文中立即被渲染到目标设备
void CGContextFlush(CGContextRef__nullable c)

//将一个窗口的图像上下文内容更新,即所有的绘图操作都会在下次同步到窗口上
void CGContextSynchronize(CGContextRef__nullable c)
抗锯齿
//设置该CGContextRef是否应该抗锯齿(即光滑图形曲线边缘,让字体渲染比较清晰 提高画质以使之柔和 )
void CGContextSetShouldAntialias(CGContextRef__nullable c,
    bool shouldAntialias)

//设置该CGContextRef是否允许抗锯齿
void CGContextSetAllowsAntialiasing(CGContextRef__nullable c,
    bool allowsAntialiasing)
字体展示
//设置该CGContextRef是否允许光滑字体
void CGContextSetShouldSmoothFonts(CGContextRef__nullable c,
    bool shouldSmoothFonts)

//设置该CGContextRef是否允许光滑字体
void CGContextSetAllowsFontSmoothing(CGContextRef__nullable c,
    bool allowsFontSmoothing)

//启用或禁用图形上下文中的子像素定位。
void CGContextSetShouldSubpixelPositionFonts(
    CGContextRef __nullable c, bool shouldSubpixelPositionFonts)

//设置是否允许图形上下文的子像素定位
void CGContextSetAllowsFontSubpixelPositioning(
    CGContextRef __nullable c, bool allowsFontSubpixelPositioning)

//在图形上下文中启用或禁用子像素量化。
void CGContextSetShouldSubpixelQuantizeFonts(
    CGContextRef __nullable c, bool shouldSubpixelQuantizeFonts)

//设置是否允许图形上下文的子像素量化
void CGContextSetAllowsFontSubpixelQuantization(
    CGContextRef __nullable c, bool allowsFontSubpixelQuantization)
透明层
/* 开始一个透明层。
 直到相应的调用CGContextEndTransparencyLayer,在指定范围内的所有后续绘制操作组合到一个完全透明的背景(它被视为一个单独的目标缓冲区从上下文)。

在透明层中绘制需要三步:
 1.  调用函数 CGContextBeginTransparencyLayer
 2.  在透明层中绘制需要组合的对象
 3.  调用函数 CGContextEndTransparencyLayer*/
void CGContextBeginTransparencyLayer(CGContextRef__nullable c,
    CFDictionaryRef __nullable auxiliaryInfo)

//开始透明度层,它的边界是指定的矩形,其内容是有界的
void CGContextBeginTransparencyLayerWithRect(
    CGContextRef __nullable c, CGRect rect, CFDictionaryRef__nullable auxInfo)

//结束一个透明层
void CGContextEndTransparencyLayer(CGContextRef__nullable c)
用户空间对设备空间的变化
/*  获取Quartz转换用户空间和设备空间的仿射变换 */
CGAffineTransform CGContextGetUserSpaceToDeviceSpaceTransform(CGContextRef__nullable c)

/*———— 点 ————*/
/* 将一个CGPoint数据结构从一个空间变换到另一个空间(DeviceSpace). */
CGPoint CGContextConvertPointToDeviceSpace(CGContextRef__nullable c,
    CGPoint point)

/* 将一个CGPoint数据结构从一个空间变换到另一个空间(UserSpace). */
CGPoint CGContextConvertPointToUserSpace(CGContextRef__nullable c,
    CGPoint point)

/*———— 大小 ————*/
/* 将一个CGSize数据结构从一个空间变换到另一个空间(DeviceSpace). */
CGSize CGContextConvertSizeToDeviceSpace(CGContextRef__nullable c, CGSize size)

/* 将一个CGSize数据结构从一个空间变换到另一个空间(UserSpace). */
CGSize CGContextConvertSizeToUserSpace(CGContextRef__nullable c, CGSize size)

/*———— 矩形 ————*/
/* 将一个CGPoint数据结构从一个空间变换到另一个空间(DeviceSpace)。 */

CGRect CGContextConvertRectToDeviceSpace(CGContextRef__nullable c,
    CGRect rect)

/* 将一个CGPoint数据结构从一个空间变换到另一个空间(UserSpace)。 */
CGRect CGContextConvertRectToUserSpace(CGContextRef__nullable c,
    CGRect rect)


