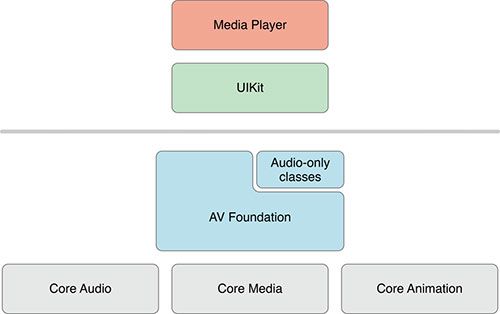
采集数据需要使用AVFoundation下的相关API
AVFoundation在相关框架栈中的的位置:
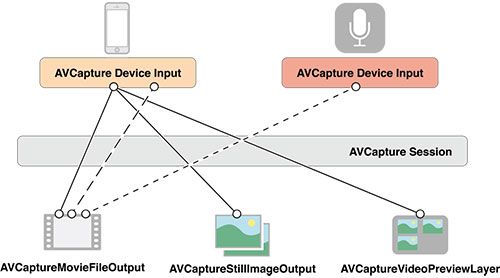
为了捕捉视频,我们需要这样几种类(与其它的子类)。
AVCaptureDevice 代表了输入设备,例如摄像头与麦克风。
AVCaptureInput 代表了输入数据源
AVCaptureOutput 代表了输出数据源
AVCaptureSession 用于协调输入与输出之间的数据流
并且还有AVCaptureVideoPreviewLayer提供摄像头的预览功能
可以用这样一幅图来概述:
实际应用AVFoundation来捕捉视频流并不复杂。
Talk is Cheap,Show me the Code.
我们用代码简单地描述用AVFoundation捕捉视频的过程,其他捕捉音频,静态图像的过程也是大同小异的。
1.创建AVCaputureSession。
作为协调输入与输出的中心,我们第一步需要创建一个Session
AVCaptureSession *session = [[AVCaptureSession alloc] init];
2.创建AVCaptureDevice
创建一个AVCaptureDevice代表代表输入设备。在这里我们制定设备用于摄像。
此方法是获得前摄像头的
AVCaptureDevice *videoDevice = [AVCaptureDevice defaultDeviceWithMediaType:AVMediaTypeVideo];
想要同时获得前后摄像头可以使用下面方法
NSArray *videoDevices = [AVCaptureDevice devicesWithMediaType:AVMediaTypeVideo];
AVCaptureDevice *frontCamera = [AVCaptureDeviceInput deviceInputWithDevice:videoDevices.firstObject error:nil];
AVCaptureDevice *backCamera =[AVCaptureDeviceInput deviceInputWithDevice:videoDevices.lastObject error:nil];
//初始化摄像头
self.frontCamera = [AVCaptureDeviceInput deviceInputWithDevice:videoDevices.firstObject error:nil];
self.backCamera =[AVCaptureDeviceInput deviceInputWithDevice:videoDevices.lastObject error:nil];
初始化麦克风
AVCaptureDevice *audioDevice = [AVCaptureDevice defaultDeviceWithMediaType:AVMediaTypeAudio];
3.创建AVCaptureDeviceInput,并添加到Session中
我们需要使用AVCaptureDeviceInput来让设备添加到session中, AVCaptureDeviceInput负责管理设备端口。我们可以理解它为设备的抽象。一个设备可能可以同时提供视频和音频的捕捉。我们可以分别用AVCaptureDeviceInput来代表视频输入和音频输入。
NSError *error;
AVCaptureDeviceInput *videoInput = [AVCaptureDeviceInput deviceInputWithDevice:videoDevice error:&error];
AVCaptureDeviceInput *audioInput = [AVCaptureDeviceInput deviceInputWithDevice:audioDevice error:&error];
[session addInput:input];
4.创建AVCaptureOutput
为了从session中取得数据,我们需要创建一个AVCaptureOutput
AVCaptureVideoDataOutput *videoDataOutput = [[AVCaptureVideoDataOutput alloc]init];
[videoDataOutput setAlwaysDiscardsLateVideoFrames:YES];
//设置视频输出格式
[videoDataOutput setVideoSettings:@{
(__bridge NSString *)kCVPixelBufferPixelFormatTypeKey:@(kCVPixelFormatType_420YpCbCr8BiPlanarVideoRange)
}];
self.captureVideoDataOutput.alwaysDiscardsLateVideoFrames = YES;
这里的kCVPixelFormatType_420YpCbCr8BiPlanarVideoRange是用于设置输出的YUV,这里先简单提一下,稍后会有详细的文章来介绍。
kCVPixelFormatType_420YpCbCr8BiPlanarVideoRange //NV12
5.设置output delegate,将output添加至session,在代理方法中分析视频流
为了分析视频流,我们需要为output设置delegate,并且指定delegate方法在哪个线程被调用。需要注意的是,线程必须是串行的,确保视频帧按序到达。
videoDataOutputQueue = dispatch_queue_create("VideoDataOutputQueue", DISPATCH_QUEUE_SERIAL);
[videoDataOutput setSampleBufferDelegate:self queue:videoDataOutputQueue];
[session addOutput:videoDataOutput];
我们可以在delegate方法中获得视频流及音频流,并进行编码。
-(void)captureOutput:(AVCaptureOutput *)captureOutput didOutputSampleBuffer:(CMSampleBufferRef)sampleBuffer fromConnection:(AVCaptureConnection *)connection{
if ([self.videoDataOutput isEqual:captureOutput]) {
//判断是视频流
}else if([self.audioDataOutput isEqual:captureOutput]){
//判断出是音频流
}
}
6.设置本机播放
AVCaptureVideoPreviewLayer *previewLayer = [AVCaptureVideoPreviewLayer layerWithSession:self.captureSession];
previewLayer.frame = preview.bounds;
[self.preview.layer addSublayer:self.previewLayer];
7.开始捕捉
[session startRunning];
通过上面的简单例子,我么可以看出使用AVFoundation来捕捉视频流并不是十分复杂。重点是使用的过程需要了解配置的细节,还有性能问题。

