上一节我们介绍了graph、tensor和session,这一节主要介绍operation。主要内容有:
- TensorBoard的基本用法
- Basic operations
- Tensor types
- Importing data
- Lazy loading
1- Visualize it with TensorBoard
TensorFlow提供了可视化graph的工具TensorBoard,之前我们看到的graph示意图就是TensorBoard生成的,下面介绍其使用方法。
1.1- 产生event文件
如果要使用TensorBoard,需要先产生graph的event文件,可以通过tf.summary.FileWriter,示例代码如下:
import tensorflow as tf
a = tf.constant(2)
b = tf.constant(3)
x = tf.add(a, b)
writer = tf.summary.FileWriter('./graphs', tf.get_default_graph())
with tf.Session() as sess:
    print(sess.run(x))
writer.close() # close the writer when you’re done using it
在graph定义结束后,session运行之前,通过tf.summary.FileWriter将graph输出到event文件。注意,event文件的产生,和session是否运行无关,它只和graph有关,比如下面的代码:
import tensorflow as tf
a = tf.constant(2)
b = tf.constant(3)
x = tf.add(a, b)
writer = tf.summary.FileWriter('./graphs', tf.get_default_graph())
writer.close()
1.2- 运行tensorboard命令
tf.summary.FileWriter生成event文件后,然后使用tensorboard命令去读取:
tensorboard --logdir="./graphs"
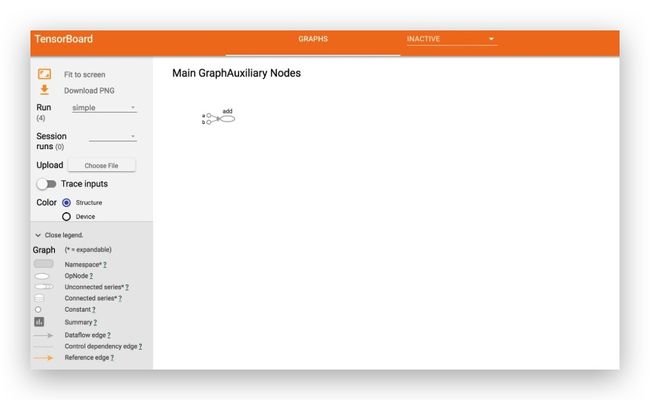
tensorboard命令是随TensorFlow安装自带的,上面的命令会在默认的6006端口启动了一个HTTP服务,读取./graphs目录下的event文件。浏览器打开http://localhost:6006 , 即可看到TensorBoard的界面,类似如下:
关于TensorBoard更多内容,请参考官网:https://www.tensorflow.org/guide/graph_viz
1.3- 命名
在TensorBoard上,可以看到每个节点都有一个名字,这个名字可以在代码里定义,如果没有定义,一般会被自动命名,比如,下面的代码,节点会根据其节点类型+序号自动命名:
import tensorflow as tf
a = tf.constant(2)
b = tf.constant(3)
x = tf.add(a, b)
writer = tf.summary.FileWriter('./graphs', tf.get_default_graph())
writer.close()
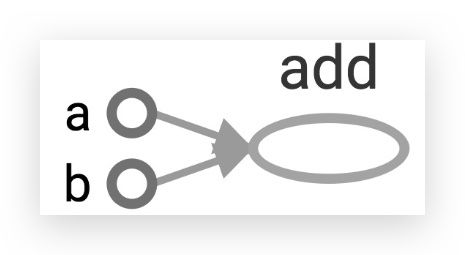
我们可以在代码里通过name参数,指定每个node的名字:
import tensorflow as tf
a = tf.constant(2, name='a')
b = tf.constant(3, name='b')
x = tf.add(a, b, name='add')
writer = tf.summary.FileWriter('./graphs', tf.get_default_graph())
with tf.Session() as sess:
    print(sess.run(x)) # >> 5
最后说明一下,上面只是介绍了TensorBoard的可视化功能,但其功能远不仅如此,它将是我们常用的工具。
2- Constants, Variables, Ops
这里介绍的constants和Variable,本质上都是Operation(简称为Ops),Operation在graph里表现为一个节点。
2.1- Constants
graph中使用tf.constant定义常量,常量不会被改变。tf.constant方法签名如下:
tf.constant(
    value,
    dtype=None,
    shape=None,
    name='Const',
    verify_shape=False
)
举例:
a = tf.constant([2, 2], name='a')
b = tf.constant([[0, 1], [2, 3]], name='b')
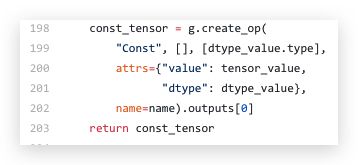
tf.constant定义了一个返回固定值的operation。有有点绕的地方是:tf.constant()方法的返回值还是tf.Tensor,可以理解为operation是在tf.constant()的内部定义了,但返回的是operation的输出,即tf.Tensor,我们通过TensorFlow的开源代码可以大概窥探:
2.1.1- 快捷方法生成常见constant
除了上面标准的定义constant的方法,对于一些常见的constant(比如比如全零,全一),与NumPy类似,tf也提供了一些同名方法,快速生成某类tensor,
tf.zeros(shape, dtype=tf.float32, name=None)
tf.zeros([2, 3], tf.int32) ==> [[0, 0, 0], [0, 0, 0]]
tf.zeros_like(input_tensor, dtype=None, name=None, optimize=True)
# input_tensor is [[0, 1], [2, 3], [4, 5]]
tf.zeros_like(input_tensor) ==> [[0, 0], [0, 0], [0, 0]]
类似的全一:
tf.ones(shape, dtype=tf.float32, name=None)
tf.ones_like(input_tensor, dtype=None, name=None, optimize=True)
或者填充某一个值的tensor
tf.fill(dims, value, name=None)
tf.fill([2, 3], 8) ==> [[8, 8, 8], [8, 8, 8]]
2.1.2- constant序列
下面介绍几种生成constant序列的方法,与NumPy类似。
tf.line_space生成start到stop的封闭线性空间,总的个数为num。start和stop必须包含在内。
方法签名:
tf.lin_space(start, stop, num, name=None)
举例:
tf.lin_space(10.0, 13.0, 4) ==> [10. 11. 12. 13.]
tf.range生成start到limit的序列,start必须包含在内,limit一定不包含,不一定包含在内。delta控制了步长。
方法签名:
tf.range(limit, delta=1, dtype=None, name='range')
tf.range(start, limit, delta=1, dtype=None, name='range')
举例:
tf.range(3, 18, 3) ==> [3 6 9 12 15]
tf.range(5) ==> [0 1 2 3 4]
lin_sapce 和range有什么区别?
- lin_space,严格准确的是start和stop,以及生成数量,每个数字之间并不一定严格步长相等。
- range,严格准确的是start和步长,limit是上限。
特别注意,tensor是不可迭代的(iterable),所以如下操作是非法的:
for _ in tf.range(4): # TypeError
2.1.3- 与随机数相关的方法:
下面是几个常见的生成随机数的方法:
tf.random_normal #(正态分布)
tf.truncated_normal
tf.random_uniform
tf.random_shuffle
tf.random_crop
tf.multinomial
tf.random_gamma
其中:
tf.truncated_normal很常见,它会剔除正太分布中超过2个标准差的随机值。
tf.random_shuffle,会将传入的tensor按第0个维度进行随机重排(shuffle)
另外可以设置随机数种子,让所有随机数变得固定。
tf.set_random_seed(seed)
2.1.4- broadcasting
Tensor可以像NumPy一样broadcasting,比如下面的element-wise乘法:
import tensorflow as tf
a = tf.constant([2, 2], name='a')
b = tf.constant([[0, 1], [2, 3]], name='b')
x = tf.multiply(a, b, name='mul')
with tf.Session() as sess:
    print(sess.run(x))
#  >>  [[0 2]
#      [4 6]]
2.1.5- verfiy_shape
关于verify_shape,默认是不校验value的shape和参数shape必须匹配,如果value的shape不一致的话,会按shape指定的维度,广播为一致,比如:tf.constant(2, shape=[2,2]) 相当于tf.constant([[2,2],[2,2]], shape=[2,2])
2.2- Operations
常见的operation:
值得注意都是,从上表看出tf.Variable属于一个operation
其中的算数运算如下,和NumPy非常类似:
更多数学操作,请参考:https://www.tensorflow.org/api_guides/python/math_ops
关于除法,需要特别注意,下面是几个举例:
a = tf.constant([2, 2], name='a')
b = tf.constant([[0, 1], [2, 3]], name='b')
with tf.Session() as sess:
    print(sess.run(tf.div(b, a)))             ⇒ [[0 0] [1 1]]
    print(sess.run(tf.divide(b, a)))          ⇒ [[0. 0.5] [1. 1.5]]
    print(sess.run(tf.truediv(b, a)))         ⇒ [[0. 0.5] [1. 1.5]]
    print(sess.run(tf.floordiv(b, a)))        ⇒ [[0 0] [1 1]]
    print(sess.run(tf.realdiv(b, a)))         ⇒ # Error: only works for real values
    print(sess.run(tf.truncatediv(b, a)))     ⇒ [[0 0] [1 1]]
    print(sess.run(tf.floor_div(b, a)))       ⇒ [[0 0] [1 1]]
总体来说,tf.div是TensorFlow风格的除法,而tf.divide对应Python风格的除法。
2.3- TensorFlow Data Types
2.3.1- python原生数据类型
首先,TensorFlow使用Python原生数据类型: boolean, numeric (int, float), strings
单个值,会被转换为0-d的tensor,list会被转换为1-d的tensor,含有list的list,会被转换为2-d tensor,以此类推。
t_0 = 19                                # scalars are treated like 0-d tensors
tf.zeros_like(t_0)                              # ==> 0
tf.ones_like(t_0)                               # ==> 1

t_1 = [b"apple", b"peach", b"grape"]    # 1-d arrays are treated like 1-d tensors
tf.zeros_like(t_1)                              # ==> [b'' b'' b'']
tf.ones_like(t_1)                               # ==> TypeError: Expected string, got 1 of type 'int' instead.

t_2 = [[True, False, False],
  [False, False, True],
  [False, True, False]]                 # 2-d arrays are treated like 2-d tensors

tf.zeros_like(t_2)                              # ==> 3x3 tensor, all elements are False
tf.ones_like(t_2)                               # ==> 3x3 tensor, all elements are True
2.3.2- TensorFlow数据类型
TensorFlow提供了如下数据类型:
-
tf.float16: 16-bit half-precision floating-point. -
tf.float32: 32-bit single-precision floating-point. -
tf.float64: 64-bit double-precision floating-point. -
tf.bfloat16: 16-bit truncated floating-point. -
tf.complex64: 64-bit single-precision complex. -
tf.complex128: 128-bit double-precision complex. -
tf.int8: 8-bit signed integer. -
tf.uint8: 8-bit unsigned integer. -
tf.uint16: 16-bit unsigned integer. -
tf.uint32: 32-bit unsigned integer. -
tf.uint64: 64-bit unsigned integer. -
tf.int16: 16-bit signed integer. -
tf.int32: 32-bit signed integer. -
tf.int64: 64-bit signed integer. -
tf.bool: Boolean. -
tf.string: String. -
tf.qint8: Quantized 8-bit signed integer. -
tf.quint8: Quantized 8-bit unsigned integer. -
tf.qint16: Quantized 16-bit signed integer. -
tf.quint16: Quantized 16-bit unsigned integer. -
tf.qint32: Quantized 32-bit signed integer. -
tf.resource: Handle to a mutable resource. -
tf.variant: Values of arbitrary types.
2.3.3- 关于TF数据类型和NumPy数据类型
tf定义的数据类型,几乎是和NumPy对应的。因此两者甚至可以无缝集成:
甚至两个类型直接判断相等,返回的是true
tf.int32 == np.int32 # ⇒ True
传入给Operation的参数,指定数据类型,用NumPy类型也是可以的。
tf.ones([2, 2], np.float32) # ⇒ [[1.0 1.0], [1.0 1.0]]
而且,在TensorFlow中,就是用NumPy的ndarray来表示Tensor value的,对于tf.Session.run(fetches),如果fetches是Tensor,则返回的是NumPy ndarray。
sess = tf.Session()
a = tf.zeros([2, 3], np.int32)
print(type(a))              # ⇒
a = sess.run(a)
print(type(a))              # ⇒
虽然如此,还是建议尽可能的使用TF的数据类型,原因如下:
- 使用Python原生类型,TensorFlow 必须引用numpy类型
- 最重要的是:NumPy不兼容GPU
2.4- 使用常量的注意
常量的值将作为graph定义的一部分被存储和序列化,如果常量过多,将使graph的加载成本太大。这一点,可以通过as_graph_def()证明:
my_const = tf.constant([1.0, 2.0], name="my_const")
with tf.Session() as sess:
    print(sess.graph.as_graph_def())
关于常量的使用,有两点指导意见:
- 仅对基本数据类型使用constant
- 对于需要更多内存的数据,使用Variable或reader
疑惑:用Variable有用吗?不是也要提供initializ吗?也会在模型内存储初始值啊。
解答:constant的value存储在graph的定义中,因此只要graph在哪里加载一次,constant就要复制一份。而Variable分开存储,而且可能放在单独的参数服务器上。
2.5- Variables
2.5.1- 两种创建Variable的方法:
# create variables with tf.Variable
s = tf.Variable(2, name="scalar")  # with scalar value
m = tf.Variable([[0, 1], [2, 3]], name="matrix") # with list vlue
W = tf.Variable(tf.zeros([784,10])) # with tensor

# create variables with tf.get_variable
s = tf.get_variable("scalar", initializer=tf.constant(2))
m = tf.get_variable("matrix", initializer=tf.constant([[0, 1], [2, 3]]))
W = tf.get_variable("big_matrix", shape=(784, 10), initializer=tf.zeros_initializer())
两种方法创建的都是tf.Variable对象,虽然tf.Variable()看起来更简洁,但这是一种老式的调用方法,并不推荐使用。tf.get_variable是对tf.Variable的包装,可以更容易的共享。
为什么tf.constant是小写开头,而tf.Variable要大写开头?这是因为tf.constant只是一个op,而tf.Variable是一个class,内部包含了多个op:
x = tf.Variable(...)

x.initializer # init op
x.value() # read op
x.assign(...) # write op
x.assign_add(...)
# and more
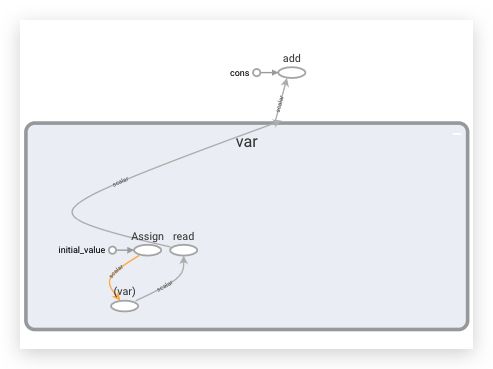
通过TensorBoard可以看出,一个Variable是一个子图:
2.5.2- Variable初始化
Variable在使用时必须初始化,否则会报错:
# create variables with tf.get_variable
s = tf.get_variable("scalar", initializer=tf.constant(2))
m = tf.get_variable("matrix", initializer=tf.constant([[0, 1], [2, 3]]))
W = tf.get_variable("big_matrix", shape=(784, 10), initializer=tf.zeros_initializer())

with tf.Session() as sess:
    print(sess.run(W))   >> FailedPreconditionError: Attempting to use uninitialized value Variable
最简单的方法是执行tf.global_variables_initializer()这个op,它会对graph中的所有Variable初始化
with tf.Session() as sess:
    sess.run(tf.global_variables_initializer())
也可以只初始化一部分变量tf.variables_initializer()
sess.run(tf.variables_initializer([a, b]))
或直接调用一个Variable自带的initializer
W = tf.Variable(tf.zeros([784,10]))
with tf.Session() as sess:
    sess.run(W.initializer)
还有一个输出所有为初始化的Variable列表的技巧:
print(session.run(tf.report_uninitialized_variables()))
2.5.3- Eval() a variable
# W is a random 700 x 10 variable object
W = tf.Variable(tf.truncated_normal([700, 10]))
with tf.Session() as sess:
    sess.run(W.initializer)
    print(W.eval())             # Similar to print(sess.run(W))
t.eval() 只是run的一个快捷方式: tf.get_default_session().run(t).
2.5.4- tf.Variable.assign()
assgin相当于对变量的赋值语句,需要注意assigin()也是一个op,因此要run或eval(),比如下面的assgin就没有起作用:
W = tf.Variable(10)
W.assign(100)
with tf.Session() as sess:
    sess.run(W.initializer)
    print(W.eval())     # >> 10
应该这样:
W = tf.Variable(10)
assign_op = W.assign(100)
with tf.Session() as sess:
    sess.run(W.initializer)
    sess.run(assign_op)
    print(W.eval())                 # >> 100
另外,如果已经有assign了,则Variable的initializer可以不用调用,initializer本质上也是一个assign。
assign语句反复运行,效果累加。
# create a variable whose original value is 2
my_var = tf.Variable(2, name="my_var")

# assign a * 2 to a and call that op a_times_two
my_var_times_two = my_var.assign(2 * my_var)

with tf.Session() as sess:
    sess.run(my_var.initializer)
    sess.run(my_var_times_two)              # >> the value of my_var now is 4
    sess.run(my_var_times_two)              # >> the value of my_var now is 8
    sess.run(my_var_times_two)              # >> the value of my_var now is 16
2.5.5- assign_add() and assign_sub()
my_var = tf.Variable(10)
With tf.Session() as sess:
    sess.run(my_var.initializer)

    # increment by 10
    sess.run(my_var.assign_add(10)) # >> 20
# decrement by 2
sess.run(my_var.assign_sub(2)) # >> 18
2.5.6- 每个session维护一份Variable的拷贝
可以看到在两个session内,同一个Variable对象的当前值互不干扰:
W = tf.Variable(10)

sess1 = tf.Session()
sess2 = tf.Session()

sess1.run(W.initializer)
sess2.run(W.initializer)

print(sess1.run(W.assign_add(10)))      # >> 20
print(sess2.run(W.assign_sub(2)))       # >> 8

print(sess1.run(W.assign_add(100)))         # >> 120
print(sess2.run(W.assign_sub(50)))      # >> -42

sess1.close()
sess2.close()
2.6- Session与InteractiveSession
有时你会看到InteractiveSession。与Session的唯一区别是,InteractiveSession创建后,会自动设置为默认session,相当于执行了session.as_default_session。因此在调用run()和eval()方法的时候不需要显式的调用session。InteractiveSession在命令行环境或jupyer notebook上很常用。
sess = tf.InteractiveSession()
a = tf.constant(5.0)
b = tf.constant(6.0)
c = a * b
print(c.eval()) # we can use 'c.eval()' without explicitly stating a session
sess.close()
另外,在with tf.Sessoin as sess语句内部,也相当于直接设置了default session。
tf.get_default_session()方法可以用来获取当前线程的默认session。
2.7- Importing Data
2.7.1- palceholder
之前我们谈到,TF程序分为两步:
- 组装一个graph
- 使用session执行graph上的操作
组装graph,并不需要知道要参与计算的具体值,这就像定义函数不需要知道函数的形参的具体值。
组装完graph后,我们(或者我们的客户端代码)可以在他们将要执行计算的时候提供它们自己的数据。
定义placeholder的方法:tf.placeholder(dtype, shape=None, name=None)。
其中shape可以是None,即不明确指定shape,根据最终输入的数据决定。虽然如此,还是推荐尽可能的准确定义shape,至少是一部分shape,比如shape=(None, 3)
这里有一个小小的疑问,Variable和placeholder有什么区别呢?
- Variable是变量,可以在graph里不断的被修改,而placeholder不行。
- 在机器学习模型里,Variable通常是需要学习的权重,而placeholder通常是训练数据。
- Variable使用initializer初始化,而placeholder在run的时候通过fee_dict赋值。
- 活着说,Variable类比于函数内定义的变量,而placeholder相当于函数方法签名上的形参。
2.7.1- feed_dict
如果使用了placeholder,就要在运行的时候传入实际值,否则报错:
tf.placeholder(dtype, shape=None, name=None)
# create a placeholder for a vector of 3 elements, type tf.float32
a = tf.placeholder(tf.float32, shape=[3])

b = tf.constant([5, 5, 5], tf.float32)

# use the placeholder as you would a constant or a variable
c = a + b  # short for tf.add(a, b)

with tf.Session() as sess:
    print(sess.run(c))          # >> InvalidArgumentError: a doesn’t an actual value
需要通过feed_dict参数对placeholder设值:
# create a placeholder for a vector of 3 elements, type tf.float32
a = tf.placeholder(tf.float32, shape=[3])

b = tf.constant([5, 5, 5], tf.float32)

# use the placeholder as you would a constant or a variable
c = a + b  # short for tf.add(a, b)

with tf.Session() as sess:
    print(sess.run(c, feed_dict={a: [1, 2, 3]}))    # the tensor a is the key, not the string ‘a’

# >> [6, 7, 8]
特别注意feed_dict的key就是placeholder对象,而不是字符串。placeholder也是有效的ops,tf.placeholer返回的也是一个tf.Tensor对象。
2.7.2- feed多次数据
比如下面的操作,通过一个循环,反复feed不同的数据:
with tf.Session() as sess:
    for a_value in list_of_values_for_a:
    print(sess.run(c, {a: a_value}))
这种做法不仅正确,而且很常见,机器学习算法中,定义一个训练op,然后不断feed不同的训练数据进行训练。虽然place_holder一直在传入,但里面的参数通过Variable一直在迭代。
2.7.3- is_feedable
事实上,feed_dict不仅可以feed的是placeholder,还可以feed任何可feed的tensor! placeholder只是一种方法表示必须被feed。
或者我们可以通过is_feedable判断是否可以被feed:
tf.Graph.is_feedable(tensor)
# True if and only if tensor is feedable.
这种操作在测试的时候特别有用,当一个graph太大,我们只想测试图的一个部分,就可以用这种方法提供虚假值,节省不必要的计算时间。
# create operations, tensors, etc (using the default graph)
a = tf.add(2, 5)
b = tf.multiply(a, 3)

with tf.Session() as sess:
    # compute the value of b given a is 15
    sess.run(b, feed_dict={a: 15})              # >> 45
2.7.4- tf.data
placeholder是一种简单、老旧的方式,更好的办法是td.data,下一章我们会通过linear和logistic regression为例介绍。
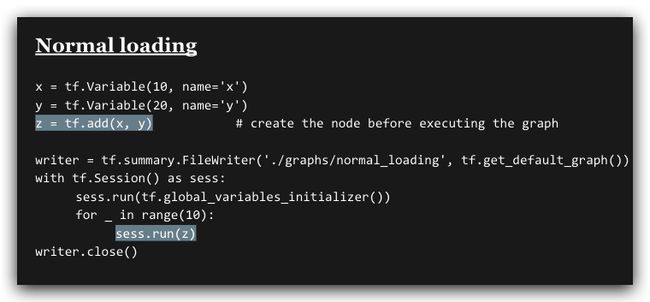
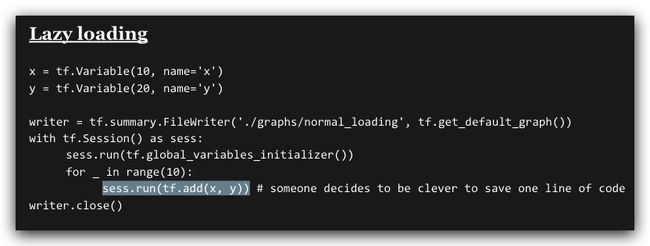
2.8- lazy loading
lazy loading是一种常见的错误。
比如下面的做法是正常的loading
下面这个做法是lazy loading
虽然两段程序的运行结果看似一样,后者好像还省了一行代码,但后者不断的在循环内创建了多个add节点,造成graph的定义膨胀(想象一下循环的是100万次,则代价非常大)。
程序运行后,我们查看两个graph的定义,可以发现,前者只有一个add节点:
node {
  name: "Add"
  op: "Add"
  input: "x/read"
  input: "y/read"
  attr {
    key: "T"
    value {
      type: DT_INT32
    }
  }
}
后者会生成Add_1到Add_10一共10个add节点:
node {
  name: "Add_1"
  op: "Add"
  ...
  }
...
node {
  name: "Add_10"
  op: "Add"
  ...
}
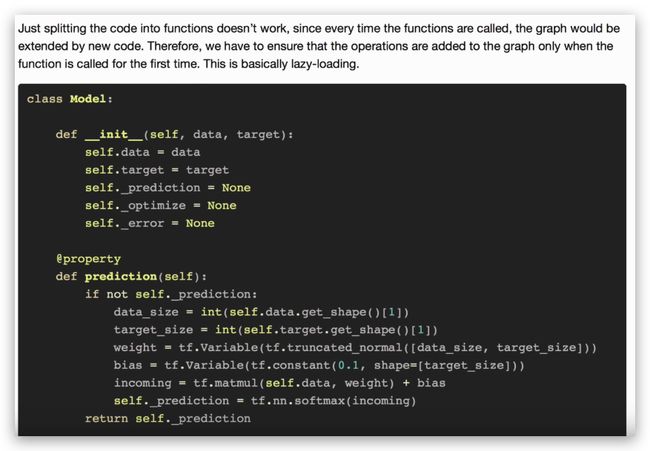
我们应该避免lazy loading,方法是:
- 将op的定义和运行区分开来。
- 使用Python的property保证function仅在第一次调用时加载。比如下面的做法:
lazy loading的更多内容,可参考:https://danijar.com/structuring-your-tensorflow-models/
同步发布于斯坦福CS20 TensorFlow学习笔记-毛帅的博客
