按照官方文档配置和安装好passport,文档在这里 https://laravel.com/docs/5.6/passport,中文文档看这里 http://laravelacademy.org/post/8909.html,当然与官方有一点区别,仔细看就会发现。
前提已经使用laravel开箱即用的auth
php artisan make:auth
重要:
$ php artisan passport:client

 Which user ID should the client be assigned to?:
 > 12

 What should we name the client?:
 > testwwww

 Where should we redirect the request after authorization? [http://localhost/auth/callback]:
 > http://127.0.0.1:8000/callback // 重要

New client created successfully.
Client ID: 12
Client secret: xxxxxxxx
这样地址就会重定向到
http://127.0.0.1:8000/callback
在/routes/api.php中添加
Route::get('/redirect', function (){
    $query = http_build_query([
        'client_id' => '12',
        'redirect_uri' => 'http://127.0.0.1:8000/callback',
        'response_type' => 'code',
        'scope' => '',
    ]);

    return redirect('http://127.0.0.1:8000/oauth/authorize?' . $query);
});
我没有配置 Frontend Quickstart ,直接跳到 Converting Authorization Codes To Access Tokens
官方配置,添加代码到:/routes/web.php
Route::get('/callback', function (Request $request) {
    $http = new GuzzleHttp\Client;

    $response = $http->post('http://your-app.com/oauth/token', [
        'form_params' => [
            'grant_type' => 'authorization_code',
            'client_id' => 'client-id',
            'client_secret' => 'client-secret',
            'redirect_uri' => 'http://example.com/callback',
            'code' => $request->code,
        ],
    ]);

    return json_decode((string) $response->getBody(), true);
});
注意:要在/routes/web.php和/routes/api.php文件使用:
use Illuminate\Http\Request;
当我按照上面配置测试时发现网页一直加载,很久都没有反应,这时需要强制关闭php连接服务,我想应该是
$http = new GuzzleHttp\Client;
惹的祸,我们改用postman测试就好了
Laravel passport 一直加载无响应?
Laravel passport authorize keeps loading?
mac 系统使用以下命令
mac 端口占用,我使用的是官方网页服务命令启动的(php artisan serve),会使用8000端口。
sudo lsof -i tcp:8000
kill pid xxx
杀掉这个进程后再次启动php连接服务,php artisan serve
这次我们修改一下官方代码
Route::get('/callback', function (Request $request) {
    print_r($request->code);
    exit;
});
如果没有授权将显示授权页面,完成授权后将直接打印code,复制code,然后在postman或者其他的api调试工具测试获取token
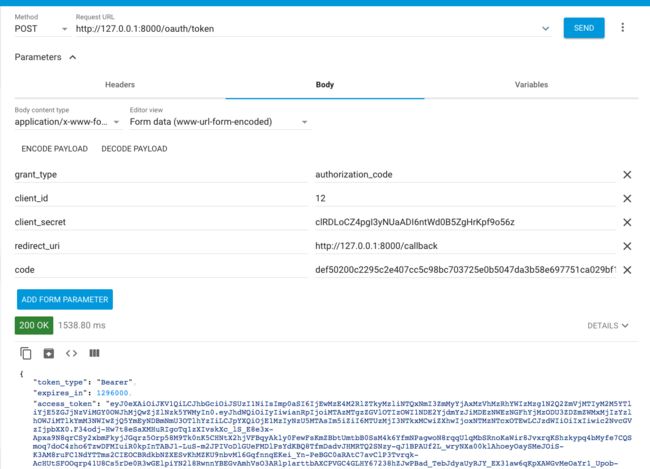
参数就是官方设置的那些参数,
'grant_type' => 'authorization_code',
'client_id' => '12',  // your client id
'client_secret' => 'xxxxxxxxxxxxxxx',   // your client secret
'redirect_uri' => 'http://127.0.0.1:8000/callback',
'code' => copied code
这时就会获取到授权码token了
{
"token_type":"Bearer",
"expires_in":1296000,
"access_token":"xxxxxx",
"refresh_token":"xxxxxxx"
}

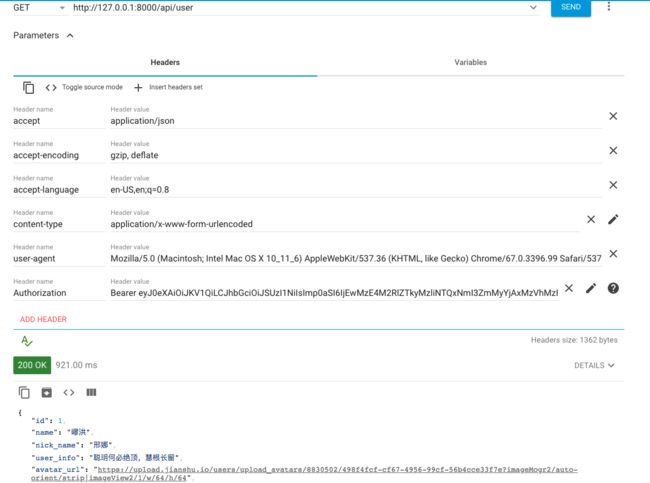
使用刚刚获取到的access_token,在postmen api调试工具测试获取用户信息
在/routes/api.php文件添加下面代码:
Route::middleware('auth:api')->get('/user', function (Request $request) {
    return $request->user();
});
url
http://127.0.0.1:8000/api/user
header
accept: application/json
accept-encoding: gzip, deflate
accept-language: en-US,en;q=0.8
content-type: application/x-www-form-urlencoded
user-agent: Mozilla/5.0 advanced-rest-client/ Safari/537.36
Authorization: Bearer xxxx
获取结果:
{
"id": 1,
"name": "xxx",
"nick_name":"xxxx",
"user_info": "xxxxx",
"avatar_url": "xxxxxxx",
}

刷新令牌
如果应用颁发的是短期有效的访问令牌,那么用户需要通过访问令牌颁发时提供的 refresh_token 刷新访问令牌,在本例中,我们使用 Guzzle HTTP 库来刷新令牌:
$http = new GuzzleHttp\Client;

$response = $http->post('http://blog.test/oauth/token', [
    'form_params' => [
        'grant_type' => 'refresh_token',
        'refresh_token' => 'the-refresh-token',
        'client_id' => 'client-id',
        'client_secret' => 'client-secret',
        'scope' => '',
    ],
]);
return json_decode((string) $response->getBody(), true);
/oauth/token 路由会返回一个包含 access_token 、 refresh_token 和 expires_in 属性的 JSON 响应,同样, expires_in 属性包含访问令牌过期时间(s)。
注意:我们这里只是参考它的form_params参数,不使用GuzzleHttp\Client发送请求,前面提了,GuzzleHttp\Client导致网页无响应,我们使用postman发送。
密码授权模式:
新建密码授权模式的客户端信息,得到Client ID与Client Secret
XdeMac-mini:laravel_5.6 $ php artisan passport:client --password

 What should we name the password grant client? [Laravel Password Grant Client]:
 > pass client

Password grant client created successfully.
Client ID: 3
Client Secret: xxxxxxxxxxxxxxxxxxxxxxxxxxxxxxxxxxxxx
新建第三方授权模式的客户端信息,观察一下有什么不同:
得到user ID、Client ID与Client Secret三个值,其中user ID是自己设置的,不能与其他客户端user ID重复。
XdeMac-mini:laravel_5.6 $ php artisan passport:client

 Which user ID should the client be assigned to?:
 > 4

 What should we name the client?:
 > san test client

 Where should we redirect the request after authorization? [http://localhost/auth/callback]:
 > http://127.0.0.1:8000/callback

New client created successfully.
Client ID: 4
Client secret: xxxxxxxxxxxxxxxxxxxxxxxxxxxxxxxxxxxxx


请求所有域
使用密码授权的时候,你可能想要对应用所支持的所有域进行令牌授权,这可以通过请求 * 域来实现。如果你请求的是 * 域,则令牌实例上的 can 方法总是返回 true,这个域只会分配给使用 password 授权的令牌:
$response = $http->post('http://your-app.com/oauth/token', [
    'form_params' => [
        'grant_type' => 'password',
        'client_id' => 'client-id',
        'client_secret' => 'client-secret',
        'username' => '[email protected]',
        'password' => 'my-password',
        'scope' => '*',
    ],
]);
注意:grant_type为password,Client ID与Client secret必须匹配
填坑完成,不知是什么原因导致网页不断加载的情况,如果哪位大侠知道,烦请给我留言,谢谢!