0 关于本文
本文利用 Stanford Dogs Dataset (其数据取自ImageNet, 包含120个狗分类), 训练了一个用于狗分类的深度学习模型. 本文的目标是TF的Getting Start.
1 环境搭建(CPU版本为例)
在Linux下, 环境的部署较为简单, 下载 Python2 或者Python3.x版本的TF安装包安装即可.
$ sudo pip install tensorflow-1.3.0rc0-cp27-none-linux_x86_64.whl
在Windows下也可类似的方法安装TF, 但是目前官方仅发布有Python3.x的二进制包, 因此需要在Python3的环境下工作. 另外, Windows 下, 诸如 Numpy/OpenCV 等计算库也较难编译, 推荐一个提供二进制包的地方: Unofficial Windows Binaries for Python Extension Packages. 可能会用到的库有:
Numpy、Scipy、OpenCV、PIL ……
相关的库安装完成后, 可以在 Python 环境运行一段最简单的代码:
>>> import tensorflow as tf  # 引入tf模块
>>> hello = tf.constant('Hello, TensorFlow!')  # 声明一个类型为string的常量
>>> sess = tf.Session()   # Session 是计算的环境
>>> sess.run(hello)   # 在session中执行语句
'Hello, TensorFlow!'
>>> a = tf.constant(10)
>>> b = tf.constant(32)
>>> sess.run(a + b)
42
>>>
由此可见, 在Python环境下使用TF, 实际上分为两个过程:
- 定义计算图: 描述计算节点和节点之间的关系.
- 使用Python接口, 向底层的计算图传入
输入数据, 执行计算图, 并获取相应的输出.
2 网络搭建与训练
2.1 用于分类任务的网络(计算图)的定义
在本文中, 使用了经典的alexnet来进行分类任务, 网络的定义见 slim-alexnet. 该网络接受大小为(224, 224, 3)的Tensor作为输入数据, 其输出为与分类任务类别数n相同的实值输出, 即大小为(n,).
可以通过如下语句来使用这个网络定义:
from tensorflow.contrib.slim.python.slim.nets.alexnet import alexnet_v2 as alexnet
2.2 训练目标
我们企图通过如上定义的网络来执行分类任务, 实际上, 是希望获得一个置信度较高的从二维图像到分类数的映射, 该映射对于给定图像的输出值应尽可能的与该图像对应的实际值(label)相似. 我们有很多方法来描述这种相似, 例如:
- 均方误差(Mean Squared Error, MSE), 其基于真实值和预测值的欧氏距离进行度量.
- 交叉熵(Cross Entropy), 交叉熵是信息论中的概念, 真实值p和预测值q的交叉熵定义为:
在交叉熵的定义中, 包含了另外一个比较有用的概念: Kullback-Leibler Divergence, 是对两个概率分布之间的距离的一种度量.
在本例中, 使用交叉熵来表示训练目标, 在TF下, 可以这样表述:
def net_graphic(image, label):
    # 使用上述alexnet, 并设置分类数为120(狗的分类共120类)
    # pred即预测值prediction
    pred, _ = alexnet(image, num_classes=120)
    # alexnet 网络的输出是120个实数, 如下函数将该输出使用`softmax`函数处理后计算与给定标签的交叉熵
    loss = tf.losses.softmax_cross_entropy(label, pred)
    # 根据真实值, 计算网络输出的准确率
    acc = tf.reduce_mean(tf.cast(tf.equal(tf.argmax(label, 1), tf.argmax(pred, 1)), tf.float32))
    return pred, loss, acc
2.3 在2.2节中隐含的信息
2.3.1 激活函数
激活函数对神经元节点对节点输入的响应函数, 激活函数将实值输入非线性的限定到一个规范的子集上, 其具体内容可参考WiKi. 上述的softmax函数便是激活函数, 对于第j个分量, 其定义为:
(0,1)区间上, 并且满足归一化条件.
2.3.2 one-hot 编码
在one-hot编码中, 有且仅有一位为1, 其余位置全部为0. 1在位串中的位置, 即为其编码的原始信息. one-hot编码的depth为位串的长度.
例如, 在深度为5的one-hot编码下, 3被编码为[0, 0, 0, 1, 0, 0].
在numpy中, 可通过如下方法获得一组one-hot编码:
import numpy as np
def one_hot(arr, depth):
    # 将输入的数组转为一维数组(确保为一维数组)
    targets = np.array(arr).reshape(-1)
    # np.eye 是numpy里的单位矩阵, depth为其阶数
    one_hot_targets = np.eye(depth)[targets]
    return one_hot_targets
one-hot编码的稀疏性, 使得其便于信息在网络里的表达.
2.3.3 TF 中常见的计算函数
在TF里, 封装了诸多计算函数, 利用这些函数, 可以很方便的进行各种矩阵运算. 以下举一些常见的函数:
- tf.reduce_sum, 默认情况下, 该函数计算tensor中所有元素的和, 通过
axis参数, 也可以将一些维数固定 - tf.reduce_mean, 该函数计算tensor中元素的均值, 行为与
tf.reduce_sum类似. - tf.argmax, 返回tensor在某个维度上的最大值的索引.
- tf.one_hot, TF 中用于 one-hot编码的函数.
- tf.cast, 用于tensor的类型转换
- ...
Tips: devdocs.io 提供了很方便的框架API文档, 涵盖了几乎所有的流行框架的文档.
2.4 计算图的完善
在2.2中, 定义了基于交叉熵的训练目标, 目前的任务是, 使用某个优化器来根据训练数据调整网络模型, 来追寻这个训练目标.
在具体的实现时, 追寻训练目标是通过反向传播过程来实现的, 可参考知乎 - 神经网络之梯度下降与反向传播(下), 形象地说, 该过程将真实值与预测值的差距传回各层神经元, 来修正各层神经元的参数.
这里, 需要一个算法来达到更好的训练目标, 即更小的误差. 通常, 会使用梯度下降法来完成这项工作, 可参考知乎 - 神经网络之梯度下降与反向传播(上)
在TF里, 可以如下完成这项工作:
# 在默认的计算图上定义变量, 并创建一个运算环境
with tf.Graph().as_default(), tf.Session() as sess:
    # 创建image输入的占位符(占位符用于标记计算图的输入节点, 在求解计算图时, 需要传入实际的数据)
    image = tf.placeholder(tf.float32, shape=[None, 224, 224, 3], name='image')
    # 创建one-hot标签的占位符
    # one hot with depth = 120
    label = tf.placeholder(tf.float32, shape=[None, 120], name='label')
    # 提取输出和度量
    pred, loss, acc = net_graphic(image, label)
    # 定义优化器优化目标
    target = tf.train.GradientDescentOptimizer(learning_rate=0.01).minimize(loss)
2.5 训练数据的预处理
在 Stanford Dogs Dataset 中, 按照种类将狗的图片放到不同的文件夹中, 由于网络需要经过处理的图像和one-hot形式的标签, 因此对数据的预处理是必须的.
在如下的代码中, 首先获取类别信息, 再对类别进行编号, 最后, 每张图片都对应一个编号(类别标签), 这些信息被存储到一个numpy数组里. 注意, 这里将所有的图片用于训练, 并直接在训练数据上采集预测精度, 这不是实际实验的做法. 在实际中, 会采用交叉验证等方式, 将数据有意识的区分为训练数据、验证数据和测试数据.
classes_path = 'classes.npy'
images_path = 'images_list.npy'
def data_collection(base_dir='./Images'):
    classes = None
    images = None
    if os.path.isfile(classes_path):
        classes = np.load(classes_path)
    else:
        # create dog classes list from directory info.
        classes = os.listdir(base_dir)
        classes = np.array(classes)
        np.save(classes_path, classes)
    if os.path.isfile(images_path):
        images = np.load(images_path)
    else:
        # create dog images list
        images = []
        for p, d, fs in os.walk(base_dir):
            for f in fs:
                file = os.path.join(p, f)
                label = p.split('/')[-1].strip('./')
                index = np.argwhere(classes == label)[0][0]
                images.append([file, index])
        images = np.array(images)
        # shuffle data
        np.random.shuffle(images)
        np.random.shuffle(images)
        # save list to file
        np.save(images_path, images)
之后, 可以通过Python的generator来返回数据:
    image_queue = np.zeros((batch_size, 224, 224, 3))
    label_queue = np.zeros((batch_size, 1))
    j = 0
    length = len(images)
    for i in range(length * epoch):
        i = i % length
        img = images[i]
        image_queue[j,:,:,:] = img_to_array(img[0])
        label_queue[j,:] = img[1]
        j = (j + 1) % batch_size
        if j == 0:
            yield image_queue.astype(np.float32), one_hot(
                    label_queue.flatten().astype(np.int32), 120).astype(np.float32)
这里面, 有几个额外的概念:
batch_size: 每一批数据的大小, 在实际的训练时, 通常不是将图片逐一送入网络进行计算, 而是将一批数据同时送入. 这通常是出于提高损失函数求解准确度和追求硬件资源最大化利用的考虑.epoch: 对于包含N个数据样本的数据集, 其上所有数据都被送入网络进行训练一次则称为一个epoch.- 图像预处理: 在上面的代码中,
img_to_array()函数的作用是将一个磁盘存储的图片转化为特定的数组:
def img_to_array(path):
    img = Image.open(path)
    img = img.resize((224, 224))
    img = np.asarray(img, np.float32)
    img = img - 127.5
    return img
其中, img = img - 128 是将图像中所有位置的RGB值做修正, 即从[0, 255]区间平移至[-127.5, 127.5]. 这是对数据样本的标准化处理. (通常会遵照样本集计算各通道的均值, 此处仅用减去127.5代替).
2.6 训练
在以上基础上, 可有如下迭代过程:
# 变量初始化
 sess.run(tf.global_variables_initializer())
# 训练计数
step = 0
# 每隔show_step次训练输出loss信息
show_step = 10
for img, lbl in data:
   # 传入数据, 进行计算
    _, loss_val, acc_val = sess.run([target, loss, acc], feed_dict={ image: img, label: lbl })
    if step % show_step == 0:
        print 'step: %d, loss: %.4f, acc: %.4f' % (step, loss_val, acc_val)
    step += 1
2.7 训练结果
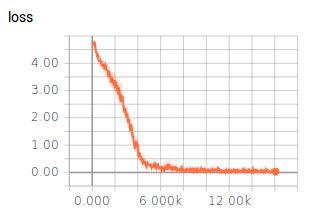
2.8 后续
在上述流程走通之后, 可以定义Saver保存模型参数, 以便于后续的模型使用. 另外, 可以借助TensorBorad等工具, 可视化相应的学习过程.
3 完整代码
import tensorflow as tf
import tensorflow.contrib.slim as slim
import os
import numpy as np
from PIL import Image

from tensorflow.contrib.slim.python.slim.nets.alexnet import alexnet_v2 as alexnet


classes_path = 'classes.npy'
images_path = 'images_list.npy'
classes = None

def img_to_array(path):
    img = Image.open(path)
    img = img.resize((224, 224))
    img = np.asarray(img, np.float32)
    img = img - 127.5
    return img


def one_hot(arr, depth):
    targets = np.array(arr).reshape(-1)
    one_hot_targets = np.eye(depth)[targets]
    return one_hot_targets


def data_generator(base_dir='./Images', batch_size=32, epoch=1):
    global classes
    images = None
    if os.path.isfile(classes_path):
        classes = np.load(classes_path)
    else:
        # create dog classes list from directory info.
        classes = os.listdir(base_dir)
        classes = np.array(classes)
        np.save(classes_path, classes)
    if os.path.isfile(images_path):
        images = np.load(images_path)
    else:
        # create dog images list
        images = []
        for p, d, fs in os.walk(base_dir):
            for f in fs:
                file = os.path.join(p, f)
                label = p.split('/')[-1].strip('./')
                index = np.argwhere(classes == label)[0][0]
                images.append([file, index])
        images = np.array(images)
        # shuffle data
        np.random.shuffle(images)
        np.random.shuffle(images)
        # save list to file
        np.save(images_path, images)

    image_queue = np.zeros((batch_size, 224, 224, 3))
    label_queue = np.zeros((batch_size, 1))
    j = 0
    length = len(images)
    for i in range(length * epoch):
        i = i % length
        img = images[i]
        image_queue[j,:,:,:] = img_to_array(img[0])
        label_queue[j,:] = img[1]
        j = (j + 1) % batch_size
        if j == 0:
            yield image_queue.astype(np.float32), one_hot(
                    label_queue.flatten().astype(np.int32), 120).astype(np.float32)


def net_graphic(image, label):
    # pred = vgg16(image)
    pred, _ = alexnet(image, num_classes=120)

    loss = tf.losses.softmax_cross_entropy(label, pred)
    acc = tf.reduce_mean(tf.cast(tf.equal(tf.argmax(label, 1), tf.argmax(pred, 1)), tf.float32))
    return pred, loss, acc


def train(batch_size=64, epoch=50, ckpt=False):
    data = data_generator(batch_size=batch_size, epoch=epoch)
    with tf.Graph().as_default(), tf.Session() as sess:
        image = tf.placeholder(tf.float32, shape=[None, 224, 224, 3], name='image')
        # one hot with depth = 120
        label = tf.placeholder(tf.float32, shape=[None, 120], name='label')
        pred, loss, acc = net_graphic(image, label)
        target = tf.train.GradientDescentOptimizer(0.01).minimize(loss)
        sess.run(tf.global_variables_initializer())

        step = 0
        show_step = 10
        for img, lbl in data:
            _, loss_val, acc_val = sess.run([target, loss, acc], feed_dict={ image: img, label: lbl })
            if step % show_step == 0:
                print 'step: %d, loss: %.4f, acc: %.4f' % (step, loss_val, acc_val)
            step += 1
        print 'done.'


if __name__ == '__main__':
    train()


