——2月2日
安装了jdk1.8
pyhon3.7
mysql5.7
idea
pycharm
cmder
scala
spark
hadoop
maven

——2月5日
看了scala、actor
——2月6日
看了akka、spark、RDD 挺迷惑的
看不懂
——2月7日
不想看了,明天再继续
——2.12
发现得在linux下,于是重新来一遍
。。。。。。。。。。。。。。。。。。。。。
安装
vmware-14.1.3
centos7-x64
——2.13
安装jdk1.8 scala2.12 hadoop2.10
https://www.cnblogs.com/lywJ/p/10710420.html
path被修改了:
https://blog.csdn.net/hui_yong/article/details/48707413?utm_source=blogxgwz6
https://www.cnblogs.com/yg6405816/p/5466879.html
环境变量
 #set java environment
JAVA_HOME=/usr/local/java/jdk1.8
CLASSPATH=.:$JAVA_HOME/lib.tools.jar
PATH=$JAVA_HOME/bin:$PATH
export JAVA_HOME CLASSPATH PATH

#set scala environment
export SCALA_HOME=/usr/scala/scala-2.12
export PATH=$PATH:$SCALA_HOME/bin
#SCALA VARIABLES END

#set hadoop environment
export HADOOP_HOME=/usr/local/hadoop/hadoop-2.10
export PATH=$PATH:$JAVA_HOME/bin:$HADOOP_HOME/bin:$HADOOP_HOME/sbin


//配置NameNode的主机名和端口号

    fs.defaultFS
    hdfs://hadoop01:9000

//文件存储目录

    hadoop.tmp.dir
    /usr/local/hadoop/hadoop-2.10/tmp


    dfs.replication
    2


    yarn.resourcemanager.address
    rmhostname:8032


#SPARK_HOME
export SPARK_HOME=/usr/local/spark/spark-2.4.4-bin-hadoop2.7
export PATH=$SPARK_HOME/bin:$PATH

192.168.146.10 master
192.168.146.11 slave1
192.168.146.12 slave2
hadoop的安装 环境配置再说。。还没搞完
虚拟机centos7克隆:
master 克隆了俩,ip: 192.168.146.10
一个slave1,ip: 192.168.146.11
一个slave2 ip: 192.168.146.12
注意:克隆的时候被克隆的虚拟机要关机,挂起没用。
https://www.jianshu.com/p/c4e7e8ce3dc3
改主机名(就是root@master 用户名@主机名)
https://blog.csdn.net/SXY16044314/article/details/90244783
ssh登录免密(还没完成——发现是开错虚拟机了cao)
https://blog.csdn.net/strongyoung88/article/details/53127978
https://blog.csdn.net/timchen525/article/details/75579611
https://blog.csdn.net/zzu09huixu/article/details/36416007 3个互相的
报错
https://www.cnblogs.com/huanghongbo/p/6254400.html
回到本机是 ctrl+D
我成了,好爽。
——2.14
搭建zookeeper3.5.5
https://blog.csdn.net/HcJsJqJSSM/article/details/85337209
报错:(因为没关防火墙)
https://blog.51cto.com/1385903/1886184
防火墙指令:
https://www.cnblogs.com/SunArmy/p/11117674.html
安装hadoop时报错:
slaver1: ssh: Could not resolve hostname slaver1: Name or service not known
https://www.cnblogs.com/yangchas/p/10469393.html
scp的用法:
https://blog.csdn.net/cyl101816/article/details/81170732
#scp /home/administrator/news.txt [email protected]:/etc/squid
/home/administrator/ 本地文件的绝对路径
news.txt 要复制到服务器上的本地文件
root 通过root用户登录到远程服务器(也可以使用其他拥有同等权限的用户)
192.168.6.129 远程服务器的ip地址(也可以使用域名或机器名)
/etc/squid 将本地文件复制到位于远程服务器上的路径
我要自闭了

——2月15日
https://blog.csdn.net/dante_003/article/details/54943774
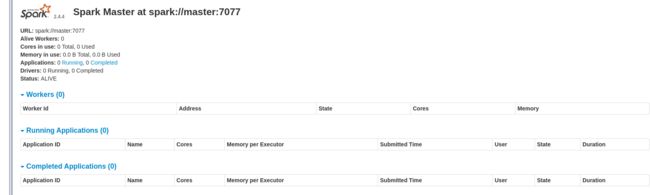
开启spark的指令(和hadoop重复了)
看这里,start master和slave。。
之前报的错都是因为,我屮艸芔茻我把主机名打错了,多加了一个r。https://blog.csdn.net/qq_42283543/article/details/81253494


为啥?
报错:
Caused by: java.net.URISyntaxException: Relative path in absolute URI: file:=/usr/local/hadoop/hadoop-2.10/dfs/data
        at java.net.URI.checkPath(URI.java:1823)
        at java.net.URI.(URI.java:745)
        at org.apache.hadoop.fs.Path.initialize(Path.java:251)
        ... 7 more
这里!不应该有等号啊我疯了file:=/usr/local/hadoop/hadoop-
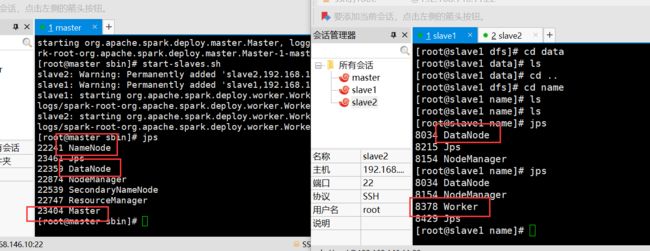
重启一下hadoop集群,就出现datanode了

但是还是没有节点出现,说明还存在问题

——2月17日
我死了,还是没有activenode
安装telnet,查看端口和连接端口是否可用
https://blog.csdn.net/doubleqinyan/article/details/80492421
出现了出现了,是防火墙的关系,我死了我死了,我太难了
之后又把master节点加到datanode里去了,重新删了几次tmp文件,初始化了好几次,终于完成了,接下来配spark、


报错:
    STARTUP_MSG:   java = 1.8.0_161
2020-02-17 13:24:23,430 INFO org.mortbay.log: jetty-6.1.26
2020-02-17 13:27:11,364 INFO org.apache.hadoop.ipc.Client: Retrying connect to server: master/192.168.146.10:9000. Already tried 6 time(s); retry policy is RetryUpToMaximumCountWithFixedSleep(maxRetries=10, sleepTime=1000 MILLISECONDS)
2020-02-17 13:27:12,366 INFO org.apache.hadoop.ipc.Client: Retrying connect to server: master/192.168.146.10:9000. Already tried 7 time(s); retry policy is RetryUpToMaximumCountWithFixedSleep(maxRetries=10, sleepTime=1000 MILLISECONDS)
2020-02-17 13:27:13,368 INFO org.apache.hadoop.ipc.Client: Retrying connect to server: master/192.168.146.10:9000. Already tried 8 time(s); retry policy is RetryUpToMaximumCountWithFixedSleep(maxRetries=10, sleepTime=1000 MILLISECONDS)
2020-02-17 13:27:14,370 INFO org.apache.hadoop.ipc.Client: Retrying connect to server: master/192.168.146.10:9000. Already tried 9 time(s); retry policy is RetryUpToMaximumCountWithFixedSleep(maxRetries=10, sleepTime=1000 MILLISECONDS)
2020-02-17 13:27:14,372 WARN org.apache.hadoop.hdfs.server.datanode.DataNode: Problem connecting to server: master/192.168.146.10:9000
防火墙:
https://blog.csdn.net/lovexiaoqiqi/article/details/81749992
关闭防火墙:
systemctl stop firewalld.service #停止firewall
systemctl disable firewalld.service #禁止firewall开机启动
看防火墙状态:firewall-cmd --state
not running 才行
找不到datanode问题:因为初始化太多次导致clusterid在master和slave中不一样
https://www.cnblogs.com/orange911/p/8670793.html
master:在dfs中name中current的version找到clusterid复制给分节点就行(在dfs的name的current的version中)

安装mysql-5.7.27-linux-glibc2.12-x86_64.tar.gz
镜像http://mirrors.sohu.com/mysql/MySQL-5.7/?C=M&O=A
安装教程:https://www.cnblogs.com/shizhongyang/p/8464876.html
没有my.cnf问题:
自己见一个my.cnf
https://blog.csdn.net/qq_36244623/article/details/102856912
报错:
root@slave1 etc]# /etc/init.d/mysqld start
my_print_defaults: Can't read dir of '/etc/my.cnf.d' (Errcode: 2 - No such file or directory)
my_print_defaults: [ERROR] Fatal error in defaults handling. Program aborted!
Starting MySQL ERROR! Couldn't find MySQL server (/usr/local/mysq/mysql-5.7.27l/bin/mysqld_safe)
https://blog.csdn.net/weixin_34008784/article/details/93007127
bash:mysql:未找到命令
建立软连接:
ln -s /usr/local/mysql/mysql-5.7.27/bin/mysql /usr/bin
https://blog.csdn.net/cs23405/article/details/82022047
设置开机启动:
chkconfig mysqld on
安装hive:apache-hive-2.3.6-bin.tar.gz
http://mirrors.hust.edu.cn/apache/hive/hive-1.2.2/
解压
tar –xvf file.tar 解压 tar包
tar -xzvf file.tar.gz 解压tar.gz
tar -xjvf file.tar.bz2 解压 tar.bz2
tar –xZvf file.tar.Z 解压tar.Z
unrar e file.rar 解压rar
unzip file.zip 解压zip
总结
*.tar 用 tar –xvf 解压
*.gz 用 gzip -d或者gunzip 解压
.tar.gz和.tgz 用 tar –xzf 解压
*.bz2 用 bzip2 -d或者用bunzip2 解压
*.tar.bz2用tar –xjf 解压
*.Z 用 uncompress 解压
*.tar.Z 用tar –xZf 解压
*.rar 用 unrar e解压
*.zip 用 unzip 解压
安装hive:Xml文件中不能使用&,要使用他的转义&来代替。
https://blog.csdn.net/dh2442897094/article/details/88775785
.hiverc 文件配置
https://blog.csdn.net/lzm1340458776/article/details/43119445
——2月18日
启动mysql5.7
systemctl start mysqld--开启mysql
systemctl status mysqld --检查状态 出错请看日记
mysql -uroot -p 或者 mysql 免密码
hive安装(namenode作为服务端,datanode(mysql安装的)作为客户端,两个都要安装hive)
https://blog.csdn.net/hellojoy/article/details/80495493
远程mysql,remote分开(主要看这个)
连接远程mysql:https://blog.csdn.net/thdline/article/details/51714431
报错:hdfs mkdir的文件读写权限
https://blog.csdn.net/dhtx_wzgl/article/details/46897413
报错: Caused by: java.sql.SQLException: Access denied for
user 'root'@'192.168.146.11' (using password: YES)
https://www.cnblogs.com/maanshancss/p/9272358.html
hive启动时报的错:
报错:找不到metastore版本
https://my.oschina.net/u/1240328/blog/1818803
mysql部署在其他机器,hive服务器开启metadata服务,在hive客户端访问hive的metadata服务

问题:hive --service metastore 卡住了可能是在监控?再开一个终端窗口就行
https://www.aboutyun.com/blog-61-171.html


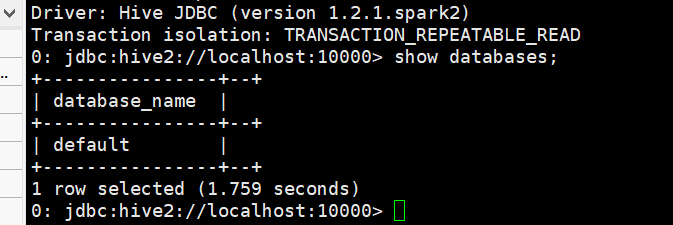
hive2启动(在master) https://blog.csdn.net/leanaoo/article/details/83351240
报错:hive2中使用beeline:Required field 'serverProtocolVersion' is unset!
https://blog.csdn.net/Brad_Q1/article/details/88773554?utm_source=distribute.pc_relevant.none-task
https://blog.csdn.net/qq_16633405/article/details/82190440?utm_source=distribute.pc_relevant.none-task


我是,配完linux环境了吗
哈哈哈哈哈哈哈哈哈哈哈哈哈哈哈哈哈哈哈哈哈哈哈哈哈哈哈哈哈哈哈哈哈
。
还没,日。
关联spark sql和hive
报错:Column length too big for column 'PARAM_VALUE' (max = 21845); use BLOB or TEXT instead
https://blog.csdn.net/qq_35078688/article/details/84147318
spark连接jdbc,连接mysql
1 最直接的方式
scala> val jdbcDF = spark.read.format("jdbc")
.option("url", "jdbc:mysql://hadoop1:3306/rdd")-------mysql 接口和库名
.option("dbtable", "rddtable")-----两张表名
.option("user", "root")----登陆的权限和用户名,照着写即可
.option("password", "cc123456")----登陆密码
.load()
结果:
jdbcDF: org.apache.spark.sql.DataFrame = [id: int, name: string]
准备工作是你的有要连接mysql的库名,表名,并且要准备好数据。
安装nginx-1.16.1和tengine-2.3.2
https://www.cnblogs.com/zeussbook/p/10757699.html
不用yum
https://www.cnblogs.com/well-666/p/11784237.html
nginx报错:80端口被占,kill掉
https://blog.csdn.net/qq_27252133/article/details/53646986

明天安装flume和kafka
——2月19日
安装flume-1.9.0
https://blog.csdn.net/starkpan/article/details/82765628
下载地址:http://flume.apache.org/download.html
下载二进制的
安装kafka_2.12-2.4.0
下载地址:http://kafka.apache.org/downloads
安装和启动:
集群安装https://blog.csdn.net/u011254180/article/details/79481088
启动https://www.cnblogs.com/toutou/p/linux_install_kafka.html
linux下的环境就此搭建好了
———2月22日
搭建FastDFS:
安装:https://www.cnblogs.com/huiyi0521/p/10255848.html#autoid-6-0-0
https://www.cnblogs.com/zeussbook/p/10757699.html
报错:文件不存在:
https://bbs.csdn.net/topics/391960604?page=1