前言
在上一篇文章Tomcat的生命周期(二)中我们分析了Container所有子容器的初始化和启动过程、Connector连接器的初始化,并介绍了Tomcat实现热加载的原理,本文同样基于之前所有Tomcat系列文章,主要对Connector的启动过程进行讲解,同时介绍Mapper和MapperListener的运行机制,为下一篇讲解Tomcat对请求响应的处理做铺垫
Connector的启动入口在StandardService的startInternal()中,最终调用Connector.startInternal()
启动方法可以分成两部分:1. 启动协议处理类,对于本文来说
Http11Protocol是其具体实现类,初始化过程已在 Tomcat架构中各个组件及组件间关系(二)中分析过;2. 容器组件映射关系监听器
MapperListener启动,该类非常重要,保存了
Host、
Context、
Wrapper之间的映射关系,试想一下,当一个请求过来时Tomcat是如何知道请求对应的是哪个war包,哪个
Servlet呢?
MapperListener和
Mapper类就做了请求“引路人”的作用。我们先看第一部分
本文的分析可能设置各种内部类、方法之间的跳转,读者可以借助 Tomcat的生命周期(二)中图6提供的类图帮助理解。
protocolHandler.start()会调用协议处理父类
AbstractProtocol.start()
方法内调用了端到端处理类
JIoEndpoint.start(),实际会调用父类
AbstractEndpoint.start()
模板方法进入具体实现
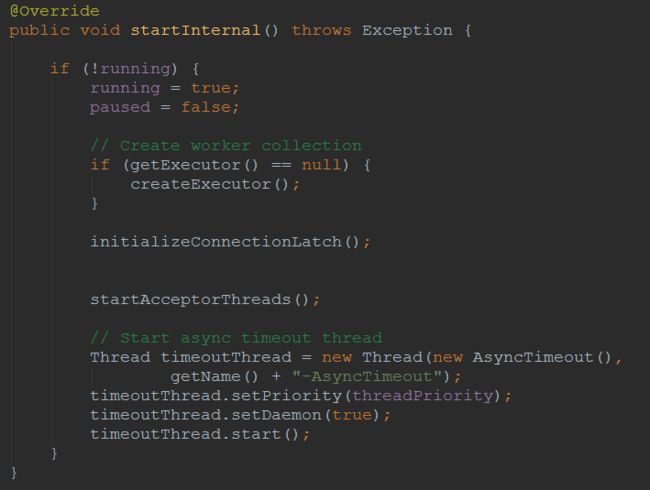
JIoEndpoint.startInternal(),如果读者顺着Tomcat系列文章顺序看下来,应该对这个“套路”非常熟悉了,我们就不把时间浪费在重复了很多次的思路上面了
在 Tomcat架构中各个组件及组件间关系(二)中讲到解析
server.xml中
Connector是没有线程池的,但是即使不在
server.xml中设置
executor在启动
Connector时Tomcat也会创建一个默认的线程池,对应的就是这里的
createExecutor(),从严谨的角度来说,这个线程池适用于处理端到端连接的线程池,即属于
AbstractEndpoint及其子类
TaskQueue继承自
LinkedBlockingQueue并重写了关键的
take()、
offer(Runnable)方法,通过创建的线程工厂
TaskThreadFactory设置了线程池的名称,开启守护线程并设置优先级为
NORMAL。线程池构造器中传递的参数分别设置
corePoolSize = 10,
maxPoolSize = 200,
keepAliveTime = 60s
图4中的
InitializeConnectionLatch()设置了端到端处理类最大连接数量为200,该数字在
JIoEndpoint.bind()中进行了设置,最后创建了一个异步请求超时线程,不是我们讲解的重点,我们来看下
startAcceptorThreads()
第一句得到
Acceptor线程的数量,该值同样在初始化时由
JIoEndpoint.bind()中进行了设置为1,调用
createAcceptor()创建对应端到端类型的
Acceptor线程,对应
代码清单1
protected class Acceptor extends AbstractEndpoint.Acceptor {

        @Override
        public void run() {

            int errorDelay = 0;

            // Loop until we receive a shutdown command
            while (running) {

                // Loop if endpoint is paused
                while (paused && running) {
                    state = AcceptorState.PAUSED;
                    try {
                        Thread.sleep(50);
                    } catch (InterruptedException e) {
                        // Ignore
                    }
                }

                if (!running) {
                    break;
                }
                state = AcceptorState.RUNNING;

                try {
                    //if we have reached max connections, wait
                    //    (1)
                    countUpOrAwaitConnection();

                    Socket socket = null;
                    try {

                        // Accept the next incoming connection from the server
                        // socket
                        //    (2)
                        socket = serverSocketFactory.acceptSocket(serverSocket);
                    } catch (IOException ioe) {
                      //    (3)
                        countDownConnection();
                        // Introduce delay if necessary
                        errorDelay = handleExceptionWithDelay(errorDelay);
                        // re-throw
                        throw ioe;
                    }
                    // Successful accept, reset the error delay
                    errorDelay = 0;

                    // Configure the socket
                    //    (4)
                    if (running && !paused && setSocketOptions(socket)) {

                        // Hand this socket off to an appropriate processor
                        //    (5)
                        if (!processSocket(socket)) {

                            countDownConnection();

                            // Close socket right away
                            closeSocket(socket);
                        }
                    } else {
                        countDownConnection();
                        // Close socket right away
                        closeSocket(socket);
                    }
                } catch (IOException x) {
                    if (running) {
                        log.error(sm.getString("endpoint.accept.fail"), x);
                    }
                } catch (NullPointerException npe) {
                    if (running) {
                        log.error(sm.getString("endpoint.accept.fail"), npe);
                    }
                } catch (Throwable t) {
                    ExceptionUtils.handleThrowable(t);
                    log.error(sm.getString("endpoint.accept.fail"), t);
                }
            }
            state = AcceptorState.ENDED;
        }
    }
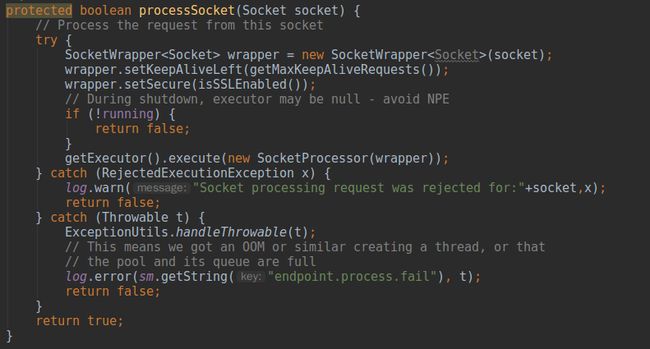
标注(1)对当前连接数进行判断,如果超过了阈值200则阻塞等待其他连接释放,底层用了AQS的无阻塞锁机制。之前分析过默认情况下或者说没有开启SSL的情况下产生Socket的工厂为DefaultServerSocketFactory,标注(2)底层其实就是服务端阻塞等待socket连接的过程,当连接过程出现异常时由标注(3)的代码释放latch门栓,防止资源被白白占用。标注(4)设置了一些socket的连接参数,Tomcat中将所有socket参数封装在SocketProperties中,在使用过程中我们可以根据请求状况调整这些参数。比如,在Tomcat的生命周期(二)中初始化协议处理类Http11Protocol时设置了socket连接超时时间,是否支持延迟等参数。标注(5)是处理请求的入口
SocketProcessor是在每一种类型的端到端处理类中的内部类,实现了
Runnable,总的来说一个
Acceptor线程监听端口得到
socket,一个
socket又对应一个
SocketProcessor线程,而所有的
SocketProcessor又会在一个
corePoolSize = 10,
maxPoolSize = 200的线程池中运行,进入
SocketProcessor意味着正式进入Tomcat处理请求响应的流程中,将在下一篇文章中详细分析
接着我们分析一下图1中启动的第二部分,在正式开始之前,我们先找到
mapperListener是何时创建的,因为之前的文章中并没有说到该类。实际上该类和另外一个有关系的类
Mapper是
Connector的两个成员变量,在创建
Connector时一同创建
Mapper中保存了所有
Container容器的对应关系,类中有几个内部类
MapElement、
Host、
ContextList、
Context、
ContextVersion和
Wrapper,其中
Host、
Context和
Wrapper继承了抽象类
MapElement,其中包含两个元素:1. name表示对应
Container容器的名称;2. object表示容器本身对象。
Host中持有
ContextList的引用,并维护了一个保存该
Host所有alias的集合;
ContextList持有
Context[]的引用;
Context中维护了一个
ContextVersion[]保存了一个war包的不同版本实例;
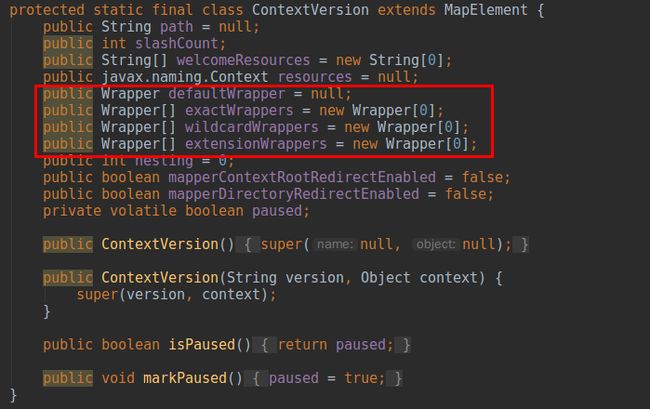
ContextVersion表示了某一特定版本的war包,其下必有代表多个
Servlet的
Wrapper数组
MapperListener实现了两个监听器接口,一个是经常出镜的
LifecycleListener,针对Tomcat整体生命周期进行监听;另一个是只用来监听
Container相关事件的
ContainerListener。前一个已经分析吐了,这里不再累述。所有
Container特有事件都保存在
Container接口中
当有上述任意事件发生时,
Container容器会首先调用
ContainerBase.fireContainerEvent(String, Object),进而封装成
ContainerEvent,调用
ContainerListener.conatinerEvent(ContainerEvent)的具体实现,由感兴趣的监听器进行处理,至于
MapperListener的
conatinerEvent(ContainerEvent)的分析暂且放一放,先回到主题
MapperListener的
startInternal()上来
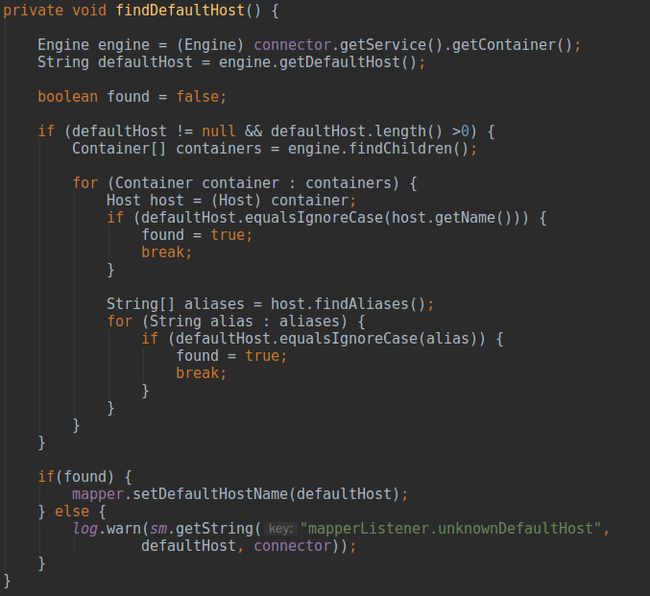
findDefaultHost()设置默认的
Host
StandardService作为Tomcat两大组件的“组合器”,因此
Connector需要通过上层容器
StandardService做一次中转找到对应的
Container容器
StandardEngine,然后得到
defaultHost属性的值,再与
StandardEngine下所有的
StandardHost一一比较,如果存在对应的实体(存在
name属性与
defaultHost host名称为
defaultHost属性的值
图10中
addListeners(engin)如上图所示,采用了和
ContainerBackgroundProcessor.processChildren(Container, ClassLoader)同样的递归处理,让
StandardEngine下所有的children都添加了
MapperListener。最后看一下
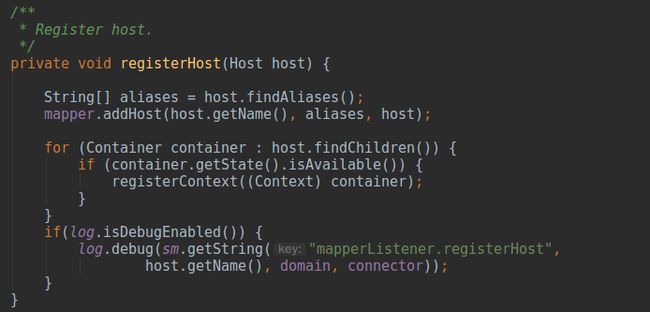
registerHost(Host)
代码中得到待注册
Host所有的别名,将别名数组,
Host名称和对象本身塞入
addHost(String, String[], Object)中
同
addService(Service)等添加子容器的方法思路一样,这里添加一个
Host也首先创建一个比原数组大1的新数组,然后通过
insertMap(Mapper.MapElement[], Mapper.MapElment[], Mapper.MapElement)方法将老数组copy到新数组中,最后将老数组的引用指向新数组
该方法是一个公共抽取方法,所有继承
MapElement的映射组件都能通过该方法完成添加操作。其中
find(MapElement[], String)根据第二个参数(新元素的名称,不限于Host的名称)与第一个参数的数组中元素的名称进行比较(数组中元素根据名称有序排列),返回名称相同元素或者closest inferior元素(知道意思但不会用中文如何优雅的表达,抱歉,哈哈)的索引,该索引就是新元素要插入的索引减一,如果找到同名的元素,该方法会返回false,新重复元素在图14else中代码会覆盖老重复元素。最后会将新
Host元素的所有alias与该元素进行关联
我们回到图13注册
Host流程的后半部分,在
Mapper添加新
Host之后会遍历该
Host下所有的children并开始
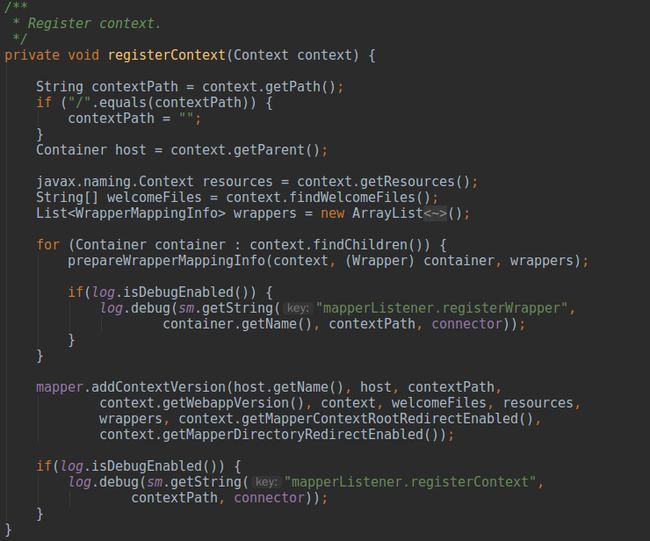
registerContext(Context)
从上图中可以发现在将
Context真正放入
Mapper之前程序首先遍历了
Context下所有的
StandardWrapper,并调用
prepareWrapperMappingInfo(Context, Wrapper, List)
在 Tomcat架构中各个组件及组件间关系(二)中我们曾经分析过解析
web.xml的规则,文件中就包含对于
WebXml的
addServletMapping(String, String),方法的两个参数对应了
Map servletMappings 集合中。而在
StandardContext启动的流程中会发送
CONFIGURE_START_EVENT给
ContextConfig,进而产生
configureStart()-->webConfig()-->configureContext(Context)-->StandardContext.addServletMapping(String, String)最终将
WebXml中
serlvetMappings的values(所有
StandardWrapper的成员变量
ArrayList mappings 中,该变量就对应上图中的
mappings数组。之后遍历所有的
servlet name为jsp并且
/*结束,则认为该
Servlet是专门处理jsp的
Servlet,置标志位
jspWildCard为true。最后将封装好的
WrapperMappingInfo放入参数集合
wrappers中
回到图16,最后将
Host、
Context、
WrapperMappingInfo集合等信息传入
addContextVersion方法中,虽然我能理解这个方法为什么要传递这么多参数,可能是因为添加的
ContextVersion对象属于承上启下的中间对象,既作为
Context中的一个版本对象,也要处理下属的
Wrapper对象间关系,但是还是觉得传递这么多参数对于一个方法而言略多,我们在
代码清单2中分析一下该方法
/**
 * Add a new Context to an existing Host.
 *
 * @param hostName Virtual host name this context belongs to
 * @param host Host object
 * @param path Context path
 * @param version Context version
 * @param context Context object
 * @param welcomeResources Welcome files defined for this context
 * @param resources Static resources of the context
 * @param wrappers Information on wrapper mappings
 * @param mapperContextRootRedirectEnabled Mapper does context root redirects
 * @param mapperDirectoryRedirectEnabled Mapper does directory redirects
 */
public void addContextVersion(String hostName, Object host, String path,
        String version, Object context, String[] welcomeResources,
        javax.naming.Context resources, Collection wrappers,
        boolean mapperContextRootRedirectEnabled, boolean mapperDirectoryRedirectEnabled) {
    //    (1)
    Host mappedHost = exactFind(hosts, hostName);
    if (mappedHost == null) {
        addHost(hostName, new String[0], host);
        mappedHost = exactFind(hosts, hostName);
        if (mappedHost == null) {
            log.error("No host found: " + hostName);
            return;
        }
    }
    //    (2)
    if (mappedHost.isAlias()) {
        log.error("No host found: " + hostName);
        return;
    }
    int slashCount = slashCount(path);
    synchronized (mappedHost) {
      //    (3)
        ContextVersion newContextVersion = new ContextVersion(version, context);
        newContextVersion.path = path;
        newContextVersion.slashCount = slashCount;
        newContextVersion.welcomeResources = welcomeResources;
        newContextVersion.resources = resources;
        newContextVersion.mapperContextRootRedirectEnabled = mapperContextRootRedirectEnabled;
        newContextVersion.mapperDirectoryRedirectEnabled = mapperDirectoryRedirectEnabled;

        if (wrappers != null) {
            //    (4)
            addWrappers(newContextVersion, wrappers);
        }

        ContextList contextList = mappedHost.contextList;
        //    (5)
        Context mappedContext = exactFind(contextList.contexts, path);
        if (mappedContext == null) {
            mappedContext = new Context(path, newContextVersion);
            //    (6)
            ContextList newContextList = contextList.addContext(
                    mappedContext, slashCount);
            if (newContextList != null) {
                //    (7)
                updateContextList(mappedHost, newContextList);
            }
        } else {
            ContextVersion[] contextVersions = mappedContext.versions;
            ContextVersion[] newContextVersions =
                new ContextVersion[contextVersions.length + 1];
            if (insertMap(contextVersions, newContextVersions, newContextVersion)) {
                //    (8)
                mappedContext.versions = newContextVersions;
            } else {
                // Re-registration after Context.reload()
                // Replace ContextVersion with the new one
                //    (9)
                int pos = find(contextVersions, version);
                if (pos >= 0 && contextVersions[pos].name.equals(version)) {
                    contextVersions[pos] = newContextVersion;
                }
            }
        }
    }

}
方法每个参数的含义在注释中写的很清楚,我们主要看代码逻辑。标注(1)从Host[]中查找匹配第二个参数hostName的Host,如果没有找到,说明该Host还没有注册,调用addHost(String, String[], Object)先添加到映射中,之后进行二次校验判断是否添加成功,如果还没有添加成功则结束流程。标注(2)说明了一点,Host必须存在别名,否则无法执行操作。标注(3)根据参数构建出本次版本的ContextVersion,如果参数wrappers不为空,则先进行Wrapper的映射添加,addWrappers(ContextVersion, Collection最终会调用代码清单3 中展示的方法
/**
 * Adds a wrapper to the given context.
 *
 * @param context The context to which to add the wrapper
 * @param path Wrapper mapping
 * @param wrapper The Wrapper object
 * @param jspWildCard true if the wrapper corresponds to the JspServlet
 *   and the mapping path contains a wildcard; false otherwise
 * @param resourceOnly true if this wrapper always expects a physical
 *                     resource to be present (such as a JSP)
 */
protected void addWrapper(ContextVersion context, String path,
        Object wrapper, boolean jspWildCard, boolean resourceOnly) {

    synchronized (context) {
        if (path.endsWith("/*")) {
            // Wildcard wrapper
            String name = path.substring(0, path.length() - 2);
            Wrapper newWrapper = new Wrapper(name, wrapper, jspWildCard,
                    resourceOnly);
            Wrapper[] oldWrappers = context.wildcardWrappers;
            Wrapper[] newWrappers =
                new Wrapper[oldWrappers.length + 1];
            if (insertMap(oldWrappers, newWrappers, newWrapper)) {
                context.wildcardWrappers = newWrappers;
                int slashCount = slashCount(newWrapper.name);
                if (slashCount > context.nesting) {
                    context.nesting = slashCount;
                }
            }
        } else if (path.startsWith("*.")) {
            // Extension wrapper
            String name = path.substring(2);
            Wrapper newWrapper = new Wrapper(name, wrapper, jspWildCard,
                    resourceOnly);
            Wrapper[] oldWrappers = context.extensionWrappers;
            Wrapper[] newWrappers =
                new Wrapper[oldWrappers.length + 1];
            if (insertMap(oldWrappers, newWrappers, newWrapper)) {
                context.extensionWrappers = newWrappers;
            }
        } else if (path.equals("/")) {
            // Default wrapper
            Wrapper newWrapper = new Wrapper("", wrapper, jspWildCard,
                    resourceOnly);
            context.defaultWrapper = newWrapper;
        } else {
            // Exact wrapper
            final String name;
            if (path.length() == 0) {
                // Special case for the Context Root mapping which is
                // treated as an exact match
                name = "/";
            } else {
                name = path;
            }
            Wrapper newWrapper = new Wrapper(name, wrapper, jspWildCard,
                    resourceOnly);
            Wrapper[] oldWrappers = context.exactWrappers;
            Wrapper[] newWrappers =
                new Wrapper[oldWrappers.length + 1];
            if (insertMap(oldWrappers, newWrappers, newWrapper)) {
                context.exactWrappers = newWrappers;
            }
        }
    }
}
从代码中可以和明显的看出,根据path参数(对应/*结尾的通配符匹配规则;2. 以*.开始的扩展名匹配规则;3. 代表默认匹配规则的路径/;4. 不满足上述三种的精确名匹配规则。如果大家对Servlet有一定深度了解的话就会秒懂,这里的四种路径匹配分类正好对应了Servlet的四种匹配规则,而这四种配置的Wrapper会分别放置在ContextVersion中对应的Wrapper[]中
我们回到代码清单2,标注(5)根据
context path在
Context[]中寻找匹配项,如果不存在匹配
context path的
Context,进入新增
Context流程,
ContextList.addContext(Context, int)将新增的
Context放入
ContextList中,而
updateContextList(Host, ContextList)更新改动后
ContextList所属
Host内的引用;如果存在同路径
Context则进入添加同路径
Context不同版本
ContextVersion流程,调用
inserMap(MapElement[], MapElement[], MapElement)进行顺位插入,如果发现存在一个同版本的
ContextVersion对象,则插入失败,进入最后的else流程,找到重复version的
ContextVersion并用新元素覆盖老元素
至此所有元素地址对应元素实体的关系都存储在
Mapper中,当请求到来时,可以根据
StandardHost中的成员变量
mapper定位到具体的
Servlet,最后我们再来看看上面提到的
ContainerEvent触发方法,
代码清单4
@Override
public void containerEvent(ContainerEvent event) {

    if (Container.ADD_CHILD_EVENT.equals(event.getType())) {
        Container child = (Container) event.getData();
        addListeners(child);
        // If child is started then it is too late for life-cycle listener
        // to register the child so register it here
        if (child.getState().isAvailable()) {
            if (child instanceof Host) {
                registerHost((Host) child);
            } else if (child instanceof Context) {
                registerContext((Context) child);
            } else if (child instanceof Wrapper) {
                // Only if the Context has started. If it has not, then it
                // will have its own "after_start" life-cycle event later.
                if (child.getParent().getState().isAvailable()) {
                    registerWrapper((Wrapper) child);
                }
            }
        }
    } else if (Container.REMOVE_CHILD_EVENT.equals(event.getType())) {
        Container child = (Container) event.getData();
        removeListeners(child);
        // No need to unregister - life-cycle listener will handle this when
        // the child stops
    } else if (Host.ADD_ALIAS_EVENT.equals(event.getType())) {
        // Handle dynamically adding host aliases
        mapper.addHostAlias(((Host) event.getSource()).getName(),
                event.getData().toString());
    } else if (Host.REMOVE_ALIAS_EVENT.equals(event.getType())) {
        // Handle dynamically removing host aliases
        mapper.removeHostAlias(event.getData().toString());
    } else if (Wrapper.ADD_MAPPING_EVENT.equals(event.getType())) {
        // Handle dynamically adding wrappers
        Wrapper wrapper = (Wrapper) event.getSource();
        Context context = (Context) wrapper.getParent();
        String contextPath = context.getPath();
        if ("/".equals(contextPath)) {
            contextPath = "";
        }
        String version = context.getWebappVersion();
        String hostName = context.getParent().getName();
        String wrapperName = wrapper.getName();
        String mapping = (String) event.getData();
        boolean jspWildCard = ("jsp".equals(wrapperName)
                && mapping.endsWith("/*"));
        mapper.addWrapper(hostName, contextPath, version, mapping, wrapper,
                jspWildCard, context.isResourceOnlyServlet(wrapperName));
    } else if (Wrapper.REMOVE_MAPPING_EVENT.equals(event.getType())) {
        // Handle dynamically removing wrappers
        Wrapper wrapper = (Wrapper) event.getSource();

        Context context = (Context) wrapper.getParent();
        String contextPath = context.getPath();
        if ("/".equals(contextPath)) {
            contextPath = "";
        }
        String version = context.getWebappVersion();
        String hostName = context.getParent().getName();

        String mapping = (String) event.getData();

        mapper.removeWrapper(hostName, contextPath, version, mapping);
    } else if (Context.ADD_WELCOME_FILE_EVENT.equals(event.getType())) {
        // Handle dynamically adding welcome files
        Context context = (Context) event.getSource();

        String hostName = context.getParent().getName();

        String contextPath = context.getPath();
        if ("/".equals(contextPath)) {
            contextPath = "";
        }

        String welcomeFile = (String) event.getData();

        mapper.addWelcomeFile(hostName, contextPath,
                context.getWebappVersion(), welcomeFile);
    } else if (Context.REMOVE_WELCOME_FILE_EVENT.equals(event.getType())) {
        // Handle dynamically removing welcome files
        Context context = (Context) event.getSource();

        String hostName = context.getParent().getName();

        String contextPath = context.getPath();
        if ("/".equals(contextPath)) {
            contextPath = "";
        }

        String welcomeFile = (String) event.getData();

        mapper.removeWelcomeFile(hostName, contextPath,
                context.getWebappVersion(), welcomeFile);
    } else if (Context.CLEAR_WELCOME_FILES_EVENT.equals(event.getType())) {
        // Handle dynamically clearing welcome files
        Context context = (Context) event.getSource();

        String hostName = context.getParent().getName();

        String contextPath = context.getPath();
        if ("/".equals(contextPath)) {
            contextPath = "";
        }

        mapper.clearWelcomeFiles(hostName, contextPath,
                context.getWebappVersion());
    }
}
事件处理中涉及的核心逻辑和方法本文中都细细分析过了,比如事件ADD_CHILD_EVENT流程中首先会调用addListener(Container)用递归方式将新添加的Container下所有children都加上MapperListener,再根据添加容器的不同类型调用不同的register方法。另外ADD_MAPPING_EVENT和REMOVE_MAPPING_EVENT事件只是添加/删除Wrapper的映射


