概述
上一篇讲到了属性动画,主要讲到了用法和大概的思路。但是没有讲到具体是如何实现动画的。这里我们分析下View动画和属性动画的源码,下一篇分析下动画中非常重要的插值器和估值器。最后总结下如何自己写一个动画效果。
View动画的源码及实现
我们知道view.startAnimation(anim);是动画开始的入口。这段代码并没有绘制的代码,那么是如何实现动画的呢。其实关键就在invalidate的时候。在这个方法中会重新绘制了画面,随带着计算了动画控件下一帧出现的位置。
    public void startAnimation(Animation animation) {
        // 在animation中设置时间为START_ON_FIRST_FRAME,这表示在刷新第一帧的时候开始动画
        animation.setStartTime(Animation.START_ON_FIRST_FRAME);
        // 重置参数,如果锁屏的话设置开始时间为当前,不然会在亮屏后会开始动画
        setAnimation(animation);
        invalidateParentCaches();
        // 重绘开始,刷新帧
        invalidate(true);
    }
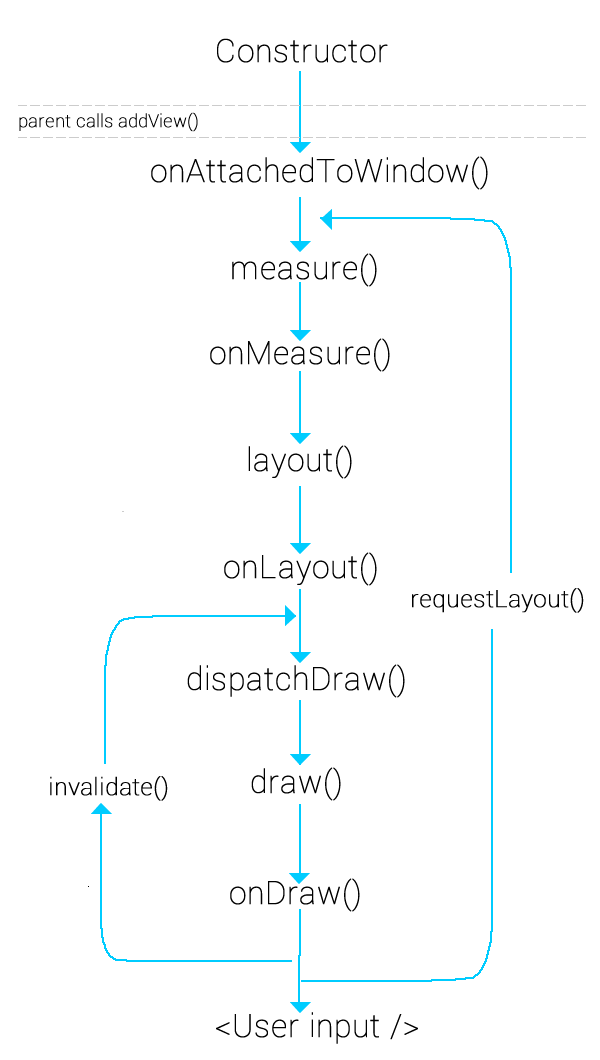
我们来看下这个方法调用的周期图,可以看到主要是重新调用了draw的相关方法。那么我们就找一找哪里调用了animation
最后在ondraw方法中发现了如下几行代码,这说明在draw方法中拿到了动画的对象,然后去执行一些操作。主要的代码在applyLegacyAnimation()中,点进去看下。
        // 获得设置的Animation
        final Animation a = getAnimation();
        if (a != null) {
            // 动画的主要方法
            more = applyLegacyAnimation(parent, drawingTime, a, scalingRequired);
            concatMatrix = a.willChangeTransformationMatrix();
            if (concatMatrix) {
                mPrivateFlags3 |= PFLAG3_VIEW_IS_ANIMATING_TRANSFORM;
            }
            transformToApply = parent.getChildTransformation();
        }
applyLegacyAnimation中代码比较复杂,如果动画没有初始化,那么先初始化。a.getTransformation(drawingTime, invalidationTransform, 1f)调用了Animation中的代码。其实上面还有一个疑问,就是draw方法中transformToApply = parent.getChildTransformation();中如何拿到的Transformation。从这里就可以找到答案,final Transformation t = parent.getChildTransformation();这个方法获取了父控件的Transformation对象,如果没有,父控件会创建一个。
 Transformation invalidationTransform;
        final int flags = parent.mGroupFlags;
        final boolean initialized = a.isInitialized();
        if (!initialized) {
            a.initialize(mRight - mLeft, mBottom - mTop, parent.getWidth(), parent.getHeight());
            a.initializeInvalidateRegion(0, 0, mRight - mLeft, mBottom - mTop);
            if (mAttachInfo != null) a.setListenerHandler(mAttachInfo.mHandler);
            onAnimationStart();
        }

        final Transformation t = parent.getChildTransformation();
        boolean more = a.getTransformation(drawingTime, t, 1f);
        if (scalingRequired && mAttachInfo.mApplicationScale != 1f) {
            if (parent.mInvalidationTransformation == null) {
                parent.mInvalidationTransformation = new Transformation();
            }
            invalidationTransform = parent.mInvalidationTransformation;
            a.getTransformation(drawingTime, invalidationTransform, 1f);
        } else {
            invalidationTransform = t;
        }
下面代码在Animaiton中,主要是计算插值后的时间进入,然后进行变换操作。首先,判断是否是第一次,如果是第一次设置开始时间为当前时间。然后获取duration等的一些参数。根据当前时间,开始时间和动画时长就可以计算出当前的时间进度。很重要的一点,就是会拿到插值器Interpolator去计算插值后的进度。最后调用applyTransformation方法。
    /**
     * Gets the transformation to apply at a specified point in time. Implementations of this
     * method should always replace the specified Transformation or document they are doing
     * otherwise.
     *
     * @param currentTime Where we are in the animation. This is wall clock time.
     * @param outTransformation A transformation object that is provided by the
     *        caller and will be filled in by the animation.
     * @return True if the animation is still running
     */
    public boolean getTransformation(long currentTime, Transformation outTransformation) {
        // 在startAnimation的时候我们设置了Animation.START_ON_FIRST_FRAME,值为-1,第一次调用设置为当前时间
        if (mStartTime == -1) {
            mStartTime = currentTime;
        }
        // 获取延时
        final long startOffset = getStartOffset();
        // 获取执行时长
        final long duration = mDuration;
        float normalizedTime;
        // 获取当前时间时,已经经历的动画时长占的百分比
        if (duration != 0) {
            normalizedTime = ((float) (currentTime - (mStartTime + startOffset))) /
                    (float) duration;
        } else {
            // time is a step-change with a zero duration
            normalizedTime = currentTime < mStartTime ? 0.0f : 1.0f;
        }
        // 判断是否已经完成了
        final boolean expired = normalizedTime >= 1.0f;
        // 是否超时,没有的话设置有更多的标志
        mMore = !expired;
        // 当我们设置不保持在动画开始之前的话,那么会设置到时间1时刻的状态。
        if (!mFillEnabled) normalizedTime = Math.max(Math.min(normalizedTime, 1.0f), 0.0f);
        // 开始动画
        if ((normalizedTime >= 0.0f || mFillBefore) && (normalizedTime <= 1.0f || mFillAfter)) {
            if (!mStarted) {
                // 回调listener中的开始方法
                fireAnimationStart();
                mStarted = true;
                if (USE_CLOSEGUARD) {
                    guard.open("cancel or detach or getTransformation");
                }
            }

            if (mFillEnabled) normalizedTime = Math.max(Math.min(normalizedTime, 1.0f), 0.0f);

            if (mCycleFlip) {
                normalizedTime = 1.0f - normalizedTime;
            }
            // 从插值其中拿到插值后的时间进度
            final float interpolatedTime = mInterpolator.getInterpolation(normalizedTime);
            // 执行变换操作
            applyTransformation(interpolatedTime, outTransformation);
        }
        // 动画结束后的判断
        if (expired) {
            if (mRepeatCount == mRepeated) {
                if (!mEnded) {
                    mEnded = true;
                    guard.close();
                    fireAnimationEnd();
                }
            } else {
                if (mRepeatCount > 0) {
                    mRepeated++;
                }

                if (mRepeatMode == REVERSE) {
                    mCycleFlip = !mCycleFlip;
                }

                mStartTime = -1;
                mMore = true;

                fireAnimationRepeat();
            }
        }

        if (!mMore && mOneMoreTime) {
            mOneMoreTime = false;
            return true;
        }

        return mMore;
    }
从上面的代码可以看出,最后执行的是applyTransformation方法,我们进去看一下,发现是抽象类。由于Animation是一个抽象类,所以我们看下TranslateAnimation类里面的实现。这里逻辑就非常清晰了,这个方法中只是将outTransformation 做了一个平移的变换。
据此猜测,View动画效果的实现主要是靠Matrix矩阵来实现的,所以这种动画没法改变点击区域的情况的原因就十分明朗了。
@Override
    protected void applyTransformation(float interpolatedTime, Transformation t) {
        float dx = mFromXDelta;
        float dy = mFromYDelta;
        if (mFromXDelta != mToXDelta) {
            dx = mFromXDelta + ((mToXDelta - mFromXDelta) * interpolatedTime);
        }
        if (mFromYDelta != mToYDelta) {
            dy = mFromYDelta + ((mToYDelta - mFromYDelta) * interpolatedTime);
        }
        t.getMatrix().setTranslate(dx, dy);
    }
执行完这个方法以后,就应该返回View里面的applyLegacyAnimation方法了,返回值是是否还有未执行完的动画。如果有的话会执行下面这段代码。主要的是 a.getInvalidateRegion(0, 0, mRight - mLeft, mBottom - mTop, region,invalidationTransform);这一行代码,主要是获得控件的重新绘制所在的位置。
        if (more) {
            if (!a.willChangeBounds()) {
                if ((flags & (ViewGroup.FLAG_OPTIMIZE_INVALIDATE | ViewGroup.FLAG_ANIMATION_DONE)) ==
                        ViewGroup.FLAG_OPTIMIZE_INVALIDATE) {
                    parent.mGroupFlags |= ViewGroup.FLAG_INVALIDATE_REQUIRED;
                } else if ((flags & ViewGroup.FLAG_INVALIDATE_REQUIRED) == 0) {
                    // The child need to draw an animation, potentially offscreen, so
                    // make sure we do not cancel invalidate requests
                    parent.mPrivateFlags |= PFLAG_DRAW_ANIMATION;
                    parent.invalidate(mLeft, mTop, mRight, mBottom);
                }
            } else {
                if (parent.mInvalidateRegion == null) {
                    parent.mInvalidateRegion = new RectF();
                }
                final RectF region = parent.mInvalidateRegion;
                a.getInvalidateRegion(0, 0, mRight - mLeft, mBottom - mTop, region,
                        invalidationTransform);

                // The child need to draw an animation, potentially offscreen, so
                // make sure we do not cancel invalidate requests
                parent.mPrivateFlags |= PFLAG_DRAW_ANIMATION;

                final int left = mLeft + (int) region.left;
                final int top = mTop + (int) region.top;
                parent.invalidate(left, top, left + (int) (region.width() + .5f),
                        top + (int) (region.height() + .5f));
            }
        }
        return more;
进入getInvalidateRegion方法,主要是去根据Transformation 中的参数,去重新拿到绘制区域。保存Transformation。
 public void getInvalidateRegion(int left, int top, int right, int bottom,
            RectF invalidate, Transformation transformation) {

        final RectF tempRegion = mRegion;
        final RectF previousRegion = mPreviousRegion;

        invalidate.set(left, top, right, bottom);
        transformation.getMatrix().mapRect(invalidate);
        // Enlarge the invalidate region to account for rounding errors
        invalidate.inset(-1.0f, -1.0f);
        tempRegion.set(invalidate);
        invalidate.union(previousRegion);

        previousRegion.set(tempRegion);

        final Transformation tempTransformation = mTransformation;
        final Transformation previousTransformation = mPreviousTransformation;

        tempTransformation.set(transformation);
        transformation.set(previousTransformation);
        previousTransformation.set(tempTransformation);
    }
然后就会退出到draw方法中,接下去执行中,会拿到一个Transformation类型的transformToApply的对象,这个对象保存着我们最终要执行的动画。然后ondraw方法中会调用如下代码,可以看到,最后通过canvas对象执行了一系列的动画操作。
        if (transformToApply != null
                || alpha < 1
                || !hasIdentityMatrix()
                || (mPrivateFlags3 & PFLAG3_VIEW_IS_ANIMATING_ALPHA) != 0) {
            if (transformToApply != null || !childHasIdentityMatrix) {
                int transX = 0;
                int transY = 0;

                if (offsetForScroll) {
                    transX = -sx;
                    transY = -sy;
                }

                if (transformToApply != null) {
                    if (concatMatrix) {
                        if (drawingWithRenderNode) {
                            renderNode.setAnimationMatrix(transformToApply.getMatrix());
                        } else {
                            // Undo the scroll translation, apply the transformation matrix,
                            // then redo the scroll translate to get the correct result.
                            canvas.translate(-transX, -transY);
                            canvas.concat(transformToApply.getMatrix());
                            canvas.translate(transX, transY);
                        }
                        parent.mGroupFlags |= ViewGroup.FLAG_CLEAR_TRANSFORMATION;
                    }

                    float transformAlpha = transformToApply.getAlpha();
                    if (transformAlpha < 1) {
                        alpha *= transformAlpha;
                        parent.mGroupFlags |= ViewGroup.FLAG_CLEAR_TRANSFORMATION;
                    }
                }

                if (!childHasIdentityMatrix && !drawingWithRenderNode) {
                    canvas.translate(-transX, -transY);
                    canvas.concat(getMatrix());
                    canvas.translate(transX, transY);
                }
            }
到这里View动画的过程大致分析完了。最主要的过程是通过每次invalidate来获取时间,然后通过Animation计算出动画的执行到了哪里,相应的设置Transformation中Matrix的变换参数。然后在Animation中也保存一些绘制区域和Transformation等参数。最后回到draw函数中,看是否有变换且需要去执行(transformToApply ),有的话执行平移、缩放和透明度操作。
属性动画
前面已经介绍了View动画,但是这和属性动画的实现方式非常的不同。接下去我们就看下属性动画的源码及实现。
我们从ObjectAnimator的主入口进去,这段代码还是比较长的,但是逻辑比较简单,首先看是否有执行中的,等待的和延迟的动画,若有则全部取消。然后调用父类的start方法。
@Override
    public void start() {
        // See if any of the current active/pending animators need to be canceled
        AnimationHandler handler = sAnimationHandler.get();
        if (handler != null) {
            int numAnims = handler.mAnimations.size();
            for (int i = numAnims - 1; i >= 0; i--) {
                if (handler.mAnimations.get(i) instanceof ObjectAnimator) {
                    ObjectAnimator anim = (ObjectAnimator) handler.mAnimations.get(i);
                    if (anim.mAutoCancel && hasSameTargetAndProperties(anim)) {
                        anim.cancel();
                    }
                }
            }
            numAnims = handler.mPendingAnimations.size();
            for (int i = numAnims - 1; i >= 0; i--) {
                if (handler.mPendingAnimations.get(i) instanceof ObjectAnimator) {
                    ObjectAnimator anim = (ObjectAnimator) handler.mPendingAnimations.get(i);
                    if (anim.mAutoCancel && hasSameTargetAndProperties(anim)) {
                        anim.cancel();
                    }
                }
            }
            numAnims = handler.mDelayedAnims.size();
            for (int i = numAnims - 1; i >= 0; i--) {
                if (handler.mDelayedAnims.get(i) instanceof ObjectAnimator) {
                    ObjectAnimator anim = (ObjectAnimator) handler.mDelayedAnims.get(i);
                    if (anim.mAutoCancel && hasSameTargetAndProperties(anim)) {
                        anim.cancel();
                    }
                }
            }
        }
        if (DBG) {
            Log.d(LOG_TAG, "Anim target, duration: " + getTarget() + ", " + getDuration());
            for (int i = 0; i < mValues.length; ++i) {
                PropertyValuesHolder pvh = mValues[i];
                Log.d(LOG_TAG, "   Values[" + i + "]: " +
                    pvh.getPropertyName() + ", " + pvh.mKeyframes.getValue(0) + ", " +
                    pvh.mKeyframes.getValue(1));
            }
        }
        super.start();
    }
进入父类的start方法,首先这个方法需要一个looper,如果没有looper则动画无法执行。然后是一些参数的初始化。最后会调用animationHandler.start();
private void start(boolean playBackwards) {
        if (Looper.myLooper() == null) {
            throw new AndroidRuntimeException("Animators may only be run on Looper threads");
        }
        mReversing = playBackwards;
        mPlayingBackwards = playBackwards;
        if (playBackwards && mSeekFraction != -1) {
            if (mSeekFraction == 0 && mCurrentIteration == 0) {
                // special case: reversing from seek-to-0 should act as if not seeked at all
                mSeekFraction = 0;
            } else if (mRepeatCount == INFINITE) {
                mSeekFraction = 1 - (mSeekFraction % 1);
            } else {
                mSeekFraction = 1 + mRepeatCount - (mCurrentIteration + mSeekFraction);
            }
            mCurrentIteration = (int) mSeekFraction;
            mSeekFraction = mSeekFraction % 1;
        }
        if (mCurrentIteration > 0 && mRepeatMode == REVERSE &&
                (mCurrentIteration < (mRepeatCount + 1) || mRepeatCount == INFINITE)) {
            // if we were seeked to some other iteration in a reversing animator,
            // figure out the correct direction to start playing based on the iteration
            if (playBackwards) {
                mPlayingBackwards = (mCurrentIteration % 2) == 0;
            } else {
                mPlayingBackwards = (mCurrentIteration % 2) != 0;
            }
        }
        int prevPlayingState = mPlayingState;
        mPlayingState = STOPPED;
        mStarted = true;
        mStartedDelay = false;
        mPaused = false;
        updateScaledDuration(); // in case the scale factor has changed since creation time
        AnimationHandler animationHandler = getOrCreateAnimationHandler();
        animationHandler.mPendingAnimations.add(this);
        if (mStartDelay == 0) {
            // This sets the initial value of the animation, prior to actually starting it running
            if (prevPlayingState != SEEKED) {
                setCurrentPlayTime(0);
            }
            mPlayingState = STOPPED;
            mRunning = true;
            notifyStartListeners();
        }
        animationHandler.start();
    }
AnimationHandler animationHandler = getOrCreateAnimationHandler();这里有一个Handler对象,我们先来看下这个Handler是什么,在这个内部静态类的上方官方给了一段解释
- This custom, static handler handles the timing pulse that is shared by
- all active animations. This approach ensures that the setting of animation
- values will happen on the UI thread and that all animations will share
- the same times for calculating their values, which makes synchronizing
- animations possible.
- The handler uses the Choreographer for executing periodic callbacks.
我想这段话的意思很明白,就是给了一个统一的心跳一样的handler。
start方法最后会定时调用Runnable方法,我们发现最终执行的是doAnimationFrame方法。
final Runnable mAnimate = new Runnable() {
            @Override
            public void run() {
                mAnimationScheduled = false;
                doAnimationFrame(mChoreographer.getFrameTime());
            }
        };
省略了一些内容,最后发现是调用的doAnimationFrame
        void doAnimationFrame(long frameTime) {
            ...
            // Now process all active animations. The return value from animationFrame()
            // tells the handler whether it should now be ended
            int numAnims = mAnimations.size();
            for (int i = 0; i < numAnims; ++i) {
                mTmpAnimations.add(mAnimations.get(i));
            }
            for (int i = 0; i < numAnims; ++i) {
                ValueAnimator anim = mTmpAnimations.get(i);
                if (mAnimations.contains(anim) && anim.doAnimationFrame(frameTime)) {
                    mEndingAnims.add(anim);
                }
            }
           ...
调用了commitAnimationFrame,这个方法最后调用了animationFrame。可以发现,正是animationFrame这个方法中计算了时间的fraction。这个值对任何动画来说都是相同的,代表着固定的时间流逝。然后调用了animateValue。
 boolean animationFrame(long currentTime) {
        boolean done = false;
        switch (mPlayingState) {
        case RUNNING:
        case SEEKED:
            float fraction = mDuration > 0 ? (float)(currentTime - mStartTime) / mDuration : 1f;
            if (mDuration == 0 && mRepeatCount != INFINITE) {
                // Skip to the end
                mCurrentIteration = mRepeatCount;
                if (!mReversing) {
                    mPlayingBackwards = false;
                }
            }
            if (fraction >= 1f) {
                if (mCurrentIteration < mRepeatCount || mRepeatCount == INFINITE) {
                    // Time to repeat
                    if (mListeners != null) {
                        int numListeners = mListeners.size();
                        for (int i = 0; i < numListeners; ++i) {
                            mListeners.get(i).onAnimationRepeat(this);
                        }
                    }
                    if (mRepeatMode == REVERSE) {
                        mPlayingBackwards = !mPlayingBackwards;
                    }
                    mCurrentIteration += (int) fraction;
                    fraction = fraction % 1f;
                    mStartTime += mDuration;
                    // Note: We do not need to update the value of mStartTimeCommitted here
                    // since we just added a duration offset.
                } else {
                    done = true;
                    fraction = Math.min(fraction, 1.0f);
                }
            }
            if (mPlayingBackwards) {
                fraction = 1f - fraction;
            }
            animateValue(fraction);
            break;
        }

        return done;
    }
这个方法比较短,但是非常重要,正是这里通过mInterpolator计算出插值。
void animateValue(float fraction) {
        fraction = mInterpolator.getInterpolation(fraction);
        mCurrentFraction = fraction;
        int numValues = mValues.length;
        for (int i = 0; i < numValues; ++i) {
            mValues[i].calculateValue(fraction);
        }
        if (mUpdateListeners != null) {
            int numListeners = mUpdateListeners.size();
            for (int i = 0; i < numListeners; ++i) {
                mUpdateListeners.get(i).onAnimationUpdate(this);
            }
        }
    }
然后调用了 mUpdateListeners.get(i).onAnimationUpdate(this);通过mValues[i].calculateValue(fraction);调用holder对象的方法,通过onAnimationUpdate来告诉监听者已经刷新了。
ObjectAnimator重写了animateValue这个方法
  @Override
    void animateValue(float fraction) {
        final Object target = getTarget();
        if (mTarget != null && target == null) {
            // We lost the target reference, cancel and clean up.
            cancel();
            return;
        }

        super.animateValue(fraction);
        int numValues = mValues.length;
        for (int i = 0; i < numValues; ++i) {
            mValues[i].setAnimatedValue(target);
        }
    }
调用PropertyValuesHolder的setAnimatedValue方法,最终是调用 mSetter.invoke(target, mTmpValueArray);
 void setAnimatedValue(Object target) {
        if (mProperty != null) {
            mProperty.set(target, getAnimatedValue());
        }
        if (mSetter != null) {
            try {
                mTmpValueArray[0] = getAnimatedValue();
                mSetter.invoke(target, mTmpValueArray);
            } catch (InvocationTargetException e) {
                Log.e("PropertyValuesHolder", e.toString());
            } catch (IllegalAccessException e) {
                Log.e("PropertyValuesHolder", e.toString());
            }
        }
    }
总结
这篇介绍了View动画和属性动画的源码,下篇具体介绍下如何写一个自定义的动画。