第一章:特殊字符
1.1 & 特殊字符
在Linux的 shell 文件中常会见到以 & 结尾的命令,例如:
perl script.pl > output.log &
命令尾的 & 表达的含义是当前行的命令将在后台运行且不阻塞,man bash 给出下面的解释:
If a command is terminated by the control operator &, the shell executes the command in the background in a subshell. The shell does not wait for the command to finish, and the return status is 0.
1.2 $? 特殊变量
在 Linux 下,不管你是启动一个桌面程序也好,还是在控制台下运行命令,所有的程序在结束时,都会返回一个数字值,这个值叫做返回值,或者称为错误号。
在控制台下,有一个特殊的环境变量 ? 是非零值,则表示上一条命令执行失败。
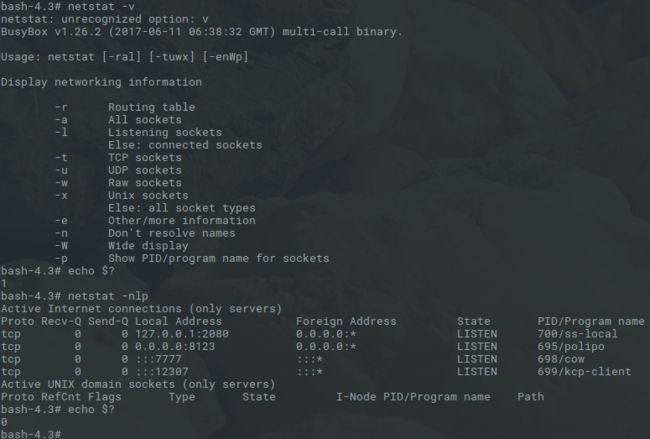
例如:下面通过netstat命令查看网络状态的实例第一条指令 netstat -v 中由于 netstat 命令不包含 -v 参数,命令执行失败,echo $? 打印结果为1;第二条指令正确执行,打印结果为0.
1.3 && 运算符
与许多其他语言相似,bash中的 && 运算符是具有阻断效果的左侧优先运算符,实现逻辑与操作,即在命令 command01 && command02 中,根据条件满足与否从左往右一次执行 command01 和 command02。只有左侧命令command01成功执行,command02才能被执行,如果command01执行失败,后面的命令将不会被执行。&&命令将返回从左向右执行顺序中第一个 【不能成功执行的 | 返回值为假 】的命令的返回值。
基本总结如下:
1.)命令之间使用 && 连接,实现逻辑与的功能;
2.)只有在 && 左边的命令返回真(命令返回值 ? == 1),后面的命令就不会被执行
4.)&& 命令返回第一个不满足条件的命令的返回值
1.4 ''(单引号),""(双引号)和``(反引号)特殊符号区别
‘’单引号和“”双引号都是为了处理空格问题,因为在操作系统中空格作为一种很典型的分隔符会阻碍命令的连续性,例如:shell 中的赋值操作
str=This is string
我们原想将 “ This is string ”赋值给str,结果在没有加单引号或双引号的情况下,上述指令被解释成
is string #str=This将被忽略
由于Linux中不存在 is 指令,指令将会报错。
''单引号和""双引号的区别在于对特殊符号的处理上,‘’单引号会剥夺其包围的字符的特殊意义,而”“双引号对'$'(参数替换)和'`'(命令替换,即反引号)是例外。所以单引号和双引号基本没有区别,除非内容中遇到参数替换符和命令替换符号。
# 示例
ECHO='hello world'
echo '`echo 'test'`:$ECHO\t$ECHO'  #输出 `echo test`:$ECHO\t$ECHO
echo "`echo 'test'`:$ECHO\t$ECHO"  #输出 test:hello world\thello world
我们可以看到单引号不能解析内容中符号的特殊意义。如果你疑问字符串中的Tab符为什么没有解析,这是因为不管是Tab还是换行符在字符串中也只是一个再正常不过的符号,其特殊意义只有在对应的环境中才有体现。在上例中由于 echo 指令默认屏蔽转义字符所以Tab没有体现出应该有的样子,为echo 添加 -e 参数(echo -e $str)将使结果更加符合预期。
` 反引号较单引号和双引号要显得更加特殊一些,shell中称为命令替换符。命令替换符是指指Shell可以先执行``中的命令,将输出结果暂时保存,在适当的地方输出。例如在上例双引号实验中,echo 'test' 优先执行,结果在echo 命令输出的时候输出到标准输出设备。举个很有意思的例子:
hello=123
$hello     #输出 123: command not found
echo $hello    #输出 123
$`echo hello`  #输出 No command '$hello' found
echo $`echo hello`   #输出 $hello
1.5 特殊shell符号$0, $#, $*, $@, $?, $$和命令行参数
#特殊变量及其意义
#------------------------------------#
#  $0,$1,$2...$n: 脚本或函数的第0,1,2...n个参数
#  $*: 脚本或函数的所有参数,默认以 "$1" "$2" ... "$n" 形式返回;
#      当被双引号("  ")包围时即"$*"则以"$1 $2 ... $n"整体形式返回。
#  $@: 脚本或函数的所有参数,默认以 "$1" "$2" ... "$n" 形式返回;
#      当被双引号("  ")包围时即"$@"仍以"$1" "$2" ... "$n"形式返回。
#  $#: 传递给脚本或函数的参数个数
#  $$: 当前Shell的PID;对于Shell脚本就是这些脚本的PID。
#  $?: 上个命令的退出状态或函数的返回值。一般情况下,大部分命令执行成功会返回 0,失败返回 1。
#------------------------------------#
为直观展示个符号的意义我们写一个简单的shell脚本,名为test.sh:
#!/bin/bash
echo "\$#=" $#
echo "\$$=" $$
echo "\$*=" $*
echo "\"\$*\"=" "$*"
echo "\$@=" $@
echo "\"\$@\"=" "$@"
echo "print each param from \$*"
for var in $*
do
    echo "$var"
done
echo "print each param from \$@"
for var in $@
do
    echo "$var"
done
echo "print each param from \"\$*\""
for var in "$*"
do
    echo "$var"
done
echo "print each param from \"\$@\""
for var in "$@"
do
    echo "$var"
done
执行test.sh a b c d 的运行结果是:
$#= 4
$$= 844
$*= a b c d
"$*"= a b c d
$@= a b c d
"$@"= a b c d
print each param from $*
a
b
c
d
print each param from $@
a
b
c
d
print each param from "$*"
a b c d
print each param from "$@"
a
b
c
d
References:
- Understanding Shell Script's idiom: 2>&1
- Shell特殊变量:Shell #, @, $?, $$和命令行参数
第二章:目录切换
Linux系统中切换目录常用的命令是cd,殊不知除了cd命令外,pushd和popd命令能实现更加灵活的目录切换。在介绍这些命令前,一些基本认知是需要你我达到共识的。
- 系统会维护一个目录栈,栈内保存用户最近访问过的系统目录列表,并以堆栈的形式管理。
cd,pushd和popd等目录切换命令会改变目录栈,dirs命令可查看、管理目录栈。
2.1 dirs命令目录栈管理
功能:查看和管理当前目录栈内容。
基本语法:dirs [options] (不带参数的dirs命令显示当前目录栈中的记录)
| 选项 | 说明 |
|---|---|
| -p | 一个目录一行的方式显示 |
| -v | 一个目录一行的方式显示,显示序号 |
| -l | 以完整格式显示 |
| -c | 删除目录栈中的所有记录 |
| +N | 显示从top到bottom的第n个目录,索引从0开始 |
| -N | 显示从bottom到top的第n个目录,索引从0开始 |
2.2 cd 命令切换路径
基本语法:cd destination_dir切换到指定路径。
打开一个终端时默认是没有$OLDPWD环境变量的,此时的路径堆栈中只有一个条目便是当前路径。当我们使用cd 命令切换到其他路径时,系统将自动创建$OLDPWD环境变量用于保存前一个路径,同时还将更改路径堆栈中的条目为当前路径。cd命令不改变路径堆栈长度或说是路径堆栈中路径的个数,只将堆栈中索引为0的路径即当前路径替换成指定路径。举例说明:
server-001:~ tuser$ echo $OLDPWD      # 初始终端没有$OLDPWD环境变量
server-001:~ tuser$ dirs -v          # 初始堆栈只有当前目录
0  ~
server-001:~ tuser$ cd Desktop && echo $OLDPWD
/home/tuser
server-001:~ tuser$ dirs -v
 0  ~/Desktop
如果使用中我们需要在两个目录间来回切换,cd $OLDPWD 可以满足改需求,如果嫌cd $OLDPWD写起来太麻烦可以用cd -代替。cd -和cd $OLDPWD功能一致,可实现两目录间来回往返快速切换,bash info 的cd项说明中指出“An argument of - is equivalent to $OLDPWD.”。
注:cd -在跳转目录时会打印出目标路径。
2.3 pushd命令切换路径
功能:pushd命令常用于将目录加入到目录栈顶部,并切换到该目录;若pushd命令不加任何参数,则会将位于目录栈最上面的2个目录对换位置。
基本语法:pushd [dest | -N | +N]
| 选项 | 说明 |
|---|---|
| dest | 目标路径,dest将入栈顶并切换到dest目录 |
| +N | 循环将从top到bottom的第n的目录调整到栈顶并切换到该目录,索引从0开始 |
| -N | 循环将从bottom到top的第n个目录调整到栈顶并切换到该目录,索引从0开始 |
server-001:~ tuser$ dirs -v
 0  ~
 1  ~/Downloads
 2  ~/Documents
 3  ~/Public
server-001:~ tuser$ pushd>/dev/null && dirs -v
 0  ~/Downloads
 1  ~
 2  ~/Documents
 3  ~/Public
server-001:Downloads tuser$ pushd>/dev/null && dirs -v
 0  ~
 1  ~/Downloads
 2  ~/Documents
 3  ~/Public
server-001:~ tuser$ pushd +2>/dev/null && dirs -v
 0  ~/Documents
 1  ~/Public
 2  ~
 3  ~/Downloads
server-001:Documents tuser$ pushd -2>/dev/null && dirs -v
 0  ~/Public
 1  ~
 2  ~/Downloads
 3  ~/Documents
server-001:Public tuser$
2.4 popd命令切换路径
功能:popd命令常用于将指定位置的目录出栈,即删除目录栈中的记录。popd不加参数时将栈顶目录从堆栈中删除,并切换到新的栈顶目录。
基本语法:popd [-N | +N]
| 选项 | 说明 |
|---|---|
| +N | 将从top到bottom的第n的目录移除,索引从0开始;若该目录是栈顶目录,移除后切换到新的栈顶目录 |
| -N | 循环将从bottom到top的第n个目录移除,索引从0开始 ;若该目录是栈顶目录,移除后切换到新的栈顶目录 |
## 接上文
server-001:Public tuser$ popd>/dev/null && dirs -v
 0  ~
 1  ~/Downloads
 2  ~/Documents
server-001:~ tuser$ popd +2>/de/null && dirs -v
0  ~
 1  ~/Downloads
server-001:~ tuser$ popd -1>/dev/null && dirs -v
0  ~/Downloads
server-001:Downloads tuser$
可见当popd命令改变栈顶目录,即移除的是栈顶目录时,将切换到新的栈顶目录,否则目录不变。
第三章: 用户和组管理
Linux是一个多用户多任务的分时系统,任何一个要使用系统资源的用户,都必须首先向系统管理员申请一个账号,然后以这个账号的身份进入系统。
用户的账号一方面可以帮助系统管理员对使用系统的用户进行跟踪,并控制他们对系统资源的访问;另一方面也可以帮助用户组织文件,并为用户提供安全性保护。
每个用户账号都拥有一个惟一的用户名和各自的口令。
3.1 useradd命令添加用户
功能:使用默认设置或自定义设置在系统中创建新用户。
基本用法:
useradd [options] 用户名 --- 使用自定义设置添加用户,如果options未设置则使用默认设置。
useradd -D [options] --- 查看或设置默认设置。设置options更改默认设置。
| 主要参数 | 说明 |
|---|---|
| -b, --base-dir BASE_DIR | base directory for the home directory of the new account |
| -c, --comment COMMENT | GECOS field for the new account |
| -d,--home-dir HOME_DIR | home directory for the new account |
| -D,--default | show or change the default useradd configure |
| -e,--expiredate EXPIRE_DATE | expiration date of the new account |
| -g,--gid GROUP | name or id of the primary group of the new account |
| -G,--groups GROUPS | list of supplementary groups of the new account |
| -m, --create-home | create the user's home directory |
| -M, --no-create-home | do not create the user's home directory |
| -N,--no-user-group | do not create a group with the same name as the user |
| -o,--no-unique | allow to create users with duplicate UUID |
| -p,--password PASSWORD | encrypted password of the user |
| -r,--system | create a system account |
| -s,--shell SHELL | login shell for the account |
## 显示默认设置
debug@server:~$ useradd -D
GROUP=100 #新添加用户默认属于该组
HOME=/home #新添加用户主目录默认放置在该目录下
INACTIVE=-1
EXPIRE=
SHELL=/bin/sh #默认使用的shell程序
SKEL=/etc/skel
CREATE_MAIL_SPOOL=no

## 配置默认设置
debug@server:~$ useradd -D -s /bin/bash # 改成默认使用bash程序作为shell

## 使用自定义设置创建新用户
# 在组users中创建一个名为debugger的用户,该用户同时属于sudo组
# 该用户使用bash作为shell,暂不创建用户目录,不创建同名组,密码未设置(后期需用passwd设置)
debug@server:~$ useradd -s /bin/bash -M -N -g users -G sudo deubgger
3.2 passwd设置用户口令
用户账户创建时没有指定口令是没有口令的,此时账户处于系统锁定状态无法使用,需为账户指定口令,即便是空口令。超级用户可以为自己和其他用户指定口令,普通用户只能用它修改自己的口令。
基本用法:passwd [options] [username] 。忽略options则为指定用户username设置新口令;忽略username默认针对当前用户操作。
| 主要参数 | 说明 |
|---|---|
| -d, --delete | delete the password for the named account |
| -l,--lock | lock the password for the named account |
| -S,--status | report the password status of the named account |
| -u,--unlock | unlock the password of the named account |
3.3 userdel命令删除用户
功能:从系统中删除一个用户以及相关文件,这是一个等级较低的删除用户的命令,在Debian系统中Administrator通常应该使用deluser命令。
基本用法:userdel [options] 用户名
| 主要参数 | 说明 |
|---|---|
| -f, --force | 强制删除用户即使用户已登陆,同时强制删除用户$HOME$目录和 mail pool 即便是其他用户也使用同一个目录或用户并没有mail pool的使用权限 |
| -r,--remove | 删除$HOME$目录及子目录和文件、删除 mail pool |
| -R,--root | Apply changes in the $CHROOT_DIR$ directory and use the config files from the directory |
| -Z,--selinux-user | Remove any SELinux user mapping for the usr's login |
注意:/etc/login.defs文件中的几个配置项将影响userdel命令的执行效果。
命令有几个返回值分别代表不同的意义:
| 返回值 | 说明 |
|---|---|
| 0 | 成功删除用户和相关文件 |
| 1 | 不能更新passwd文件 |
| 2 | 错误的命令使用 |
| 6 | 用户不存在 |
| 8 | 用户处于登陆状态 |
| 10 | 不能更新group文件 |
| 12 | 不能删除$HOME$目录 |
3.5 查看当前活动账户
Linux Server 运维中有时候我们需要知道当前有哪些活跃用户,比如需要重启设备的时候,作为运维人员需要及时通知活动用户保存信息以避免重启带来的信息丢失。Linux 下面我可以通过四条命令获得活跃用户信息。
- who 命令
- w 命令
- users 命令
- last 命令
## who command -- print the information about the users who are currently logged in.
deubg@server:~$ who

## w command -- display the information about the users who are currently logged in and what they are doing.
debug@server:~$ w

## users command -- print the user names of whom are currently logged in.
debug@server:~$ users

## last command -- show a listing of last logged in users.
debug@server:~$ last | grep 'still'
Reference:
- UNIX / Linux : How to lock or disable an user account
第四章: SSH命令远程登录
SSH是一种客户端和服务器端通信的加密协议,设备在通信之前要相互认证身份信息。服务器通过公钥来表明身份,用户要注意辨别服务器的身份避免连接到不可信服务器从而受到攻击。服务器当然只接受来自认证用户的通信请求,客户端有两种方式向服务器表示自己的身份:1)密码认证;2)密钥认证。
4.1 SSH服务器
SSH服务器是指部署在网络中的提供SSHD服务、支持SSH通信的主机或虚拟主机。当 客户端通过ssh首次连接到服务器时服务器会将自己的公钥返回给用户进行身份认证,客户端必须自己负责服务器身份的验证。一般公用服务器都会通过某种途径公布其公钥,客户端要认真对比服务器返回的公钥和公布的一致,避免受到恶意攻击。当 客户端确认服务器是可信的连接服务器时服务器的公钥便会存入客户端的$HOME\/.ssh/known_hosts文件中,下次客户端请求服务器时SSH将自动根据known_host中的信息完成服务器身份认证,如果公钥不同SSH将发出警告。
一般情况下发生警告时客户端应认真核对并确认服务器确实进行了密钥更改。但也有一些情况,比如一台服务主机上装有多个系统,不同的时段(上个月和这个月)运行不同的系统,这时候多个系统共享一个IP(因为共用一套硬件设备)但各自的密钥各不相同,在这些情况下客户端向服务器请求通信SSH会报告警告。客户端可以通过关闭服务器密钥检测的方式禁用SSH对服务器密钥进行检查:
## $HOME$/.ssh/config文件
StrictHostKeyChecking no
UserKnownHostsFile /dev/null
客户端也可以通过删除known_host内容的方式一时消除警告,但这种方式不是长久之计。我们不建议关闭客户端的密钥检测功能,这样会增大使用风险。
4.1 SSH密码认证
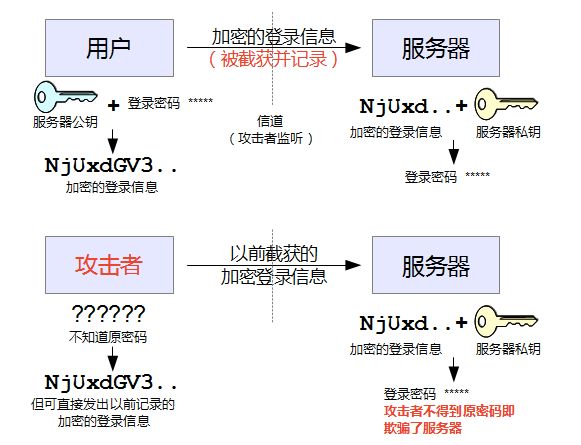
密码验证又称口令验证,假设用户已经信任了服务器公钥的正确性和可靠性,将口令通过服务器公钥加密后传输,这样只有目标服务器收到加密信息后能用私钥从中解析出正确的口令。
上图中第一部分即为常规口令登陆的简化版本,但这种策略看似安全却存在重大隐患:如果有人截获密文就能伪装成用户登录服务器。图中第二部分便是一种可能中间人攻击:重放攻击,攻击者截获密文后虽然无法从密文中解析密码或口令,但是只要将截获的加密信息重复发出,由于这个信息服务器解密后仍是正确的用户口令,则服务器就会受骗,误将攻击者当作原用户。
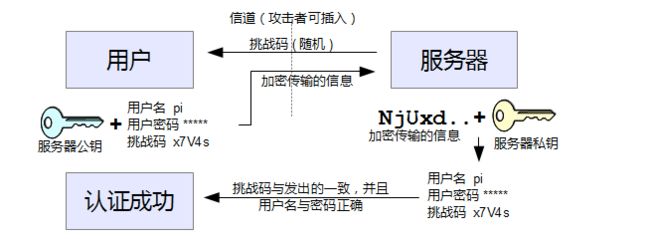
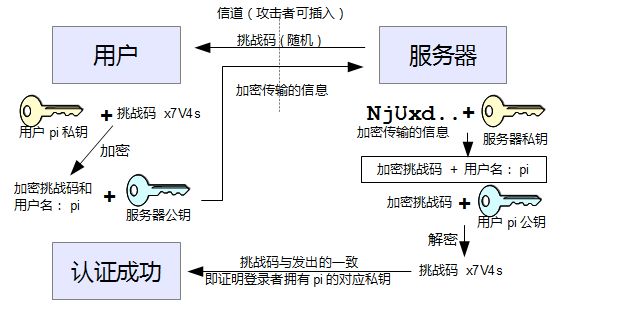
重放攻击可以通过 挑战机制 消除,具体来说就是服务器先向客户端发送一个随机、每次不同的挑战数据,要求客户端将挑战数据和密码一起加密后回复。服务器解密后,检查收到的挑战数据和发出的是否一致。若一致则表示登录请求正常,将继续检查用户发来的密码的正确性。只有当两次验证同时满足的时候才建立连接。挑战机制使得登陆密文仅一次有效,避免了重放攻击的威胁。下图展示了挑战机制下客户端身份的认证过程。
尽管如此,口令认证仍不安全。一般口令认证的密码长度上都不会太长而且也不会太复杂(为了用户方便记忆),很容易遭到暴力破解。
4.2 SSH密钥认证
SSH密钥认证作为口令认证的替代认证方式要显得更加安全。密钥认证基于 非对称加密算法,比如RSA,这种加密算法一般会生成两个密钥A和B,密钥有下面几个特点:
- 对等性:既可以A加B解又可以B加A解,作用互相等效
- 唯一性:A加只能B解,B加只能A解,其他密钥均不能解密密文
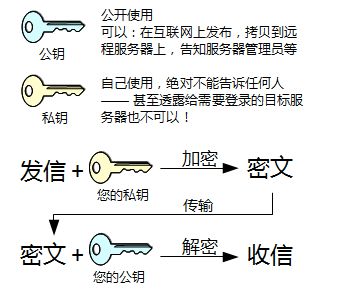
基于这样的特点就产生了公钥-私钥加密方法。密钥被一分为二,其中一个是公开的,任何人都能使用,被称为公钥;另一个要绝对保密,绝对不透露给任何其它人,甚至不可以和自己要登录到的服务器分享,被称为私钥。通信时信息通过私钥(或接收者的公钥)加密,收到密文后接收者使用发送者的公钥(或私钥)解密即可,见下图。
SSH通信中使用的是公钥加密,即通信信息分别通过通信双方的公钥加密和私钥解密。举例来说,甲和乙要相互通信,甲已经知道了乙的公钥,乙也知道了甲的公钥;甲向乙发数据时数据经乙的公钥加密成密文传到乙后乙用私钥解密得数据;相反,乙向甲发数据时数据经甲的公钥加密成密文,传到甲后被甲用私钥解密得数据。
但是这种方式也会遭到中间人攻击:通信可能被攻击者替换,攻击者将自己的公钥发给用户,用户不察之下,把密码用攻击者的公钥加密发出,攻击者截获后使用自己的私钥大大方方的将用户的密码解开窃走。
所以用户必须验证所发来的公钥,确实是属于正确的目标服务器的。这一点没有唯一的途径,用户必须通过其它方法,调查获得服务器的公钥,并自行比对。
在确认服务器身份后,我们就可以将客户端的公钥上传到服务器或者告知管理员,从而实现免密的密钥登陆(过程如上图):
1)客户端请求登陆服务器并接受服务器发来的挑战码
2)客户端对挑战码进行双重加密,先用私钥加密再用服务器公钥加密
3)服务器收到密文后用私钥解密再用客户端公钥解密的到挑战码,若果挑战码正确则客户端身份得到验证。
已知的客户端公钥存储在$HOME$/.ssh/authorized_keys文件中。
4.3 SSH区别认证
既然SSH支持口令验证和密钥验证,那当然能够为用户自定义验证方式,比如我们可以允许A通过口令登陆但是B只能通过密钥登陆。这种区别认证方式我们可以通过修改SSH服务配置来实现。服务器中SSH的配置文件在/etc/ssh/sshd_config,基本配置如下:
# Package generated configuration file
# See the sshd_config(5) manpage for details

# What ports, IPs and protocols we listen for
Port 22
# Use these options to restrict which interfaces/protocols sshd will bind to
#ListenAddress ::
#ListenAddress 0.0.0.0
Protocol 2
# HostKeys for protocol version 2
HostKey /etc/ssh/ssh_host_rsa_key
HostKey /etc/ssh/ssh_host_dsa_key
HostKey /etc/ssh/ssh_host_ecdsa_key
HostKey /etc/ssh/ssh_host_ed25519_key
#Privilege Separation is turned on for security
UsePrivilegeSeparation yes

# Lifetime and size of ephemeral version 1 server key
KeyRegenerationInterval 3600
ServerKeyBits 1024

# Logging
SyslogFacility AUTH
LogLevel INFO

# Authentication:
LoginGraceTime 120
PermitRootLogin prohibit-password
StrictModes yes

RSAAuthentication yes
PubkeyAuthentication yes
#AuthorizedKeysFile %h/.ssh/authorized_keys

# Don't read the user's ~/.rhosts and ~/.shosts files
IgnoreRhosts yes
# For this to work you will also need host keys in /etc/ssh_known_hosts
RhostsRSAAuthentication no
# similar for protocol version 2
HostbasedAuthentication no
# Uncomment if you don't trust ~/.ssh/known_hosts for RhostsRSAAuthentication
#IgnoreUserKnownHosts yes

# To enable empty passwords, change to yes (NOT RECOMMENDED)
PermitEmptyPasswords no

# Change to yes to enable challenge-response passwords (beware issues with
# some PAM modules and threads)
ChallengeResponseAuthentication no

# Change to no to disable tunnelled clear text passwords
#PasswordAuthentication yes

# Kerberos options
#KerberosAuthentication no
#KerberosGetAFSToken no
#KerberosOrLocalPasswd yes
#KerberosTicketCleanup yes

# GSSAPI options
#GSSAPIAuthentication no
#GSSAPICleanupCredentials yes

X11Forwarding yes
X11DisplayOffset 10
PrintMotd no
PrintLastLog yes
TCPKeepAlive yes
#UseLogin no

#MaxStartups 10:30:60
#Banner /etc/issue.net

# Allow client to pass locale environment variables
AcceptEnv LANG LC_*

Subsystem sftp /usr/lib/openssh/sftp-server

# Set this to 'yes' to enable PAM authentication, account processing,
# and session processing. If this is enabled, PAM authentication will
# be allowed through the ChallengeResponseAuthentication and
# PasswordAuthentication.  Depending on your PAM configuration,
# PAM authentication via ChallengeResponseAuthentication may bypass
# the setting of "PermitRootLogin without-password".
# If you just want the PAM account and session checks to run without
# PAM authentication, then enable this but set PasswordAuthentication
# and ChallengeResponseAuthentication to 'no'.
UsePAM yes
通过在配置文件中设置限制声明则可以为某用户、某些用户、某用户组、某些用户组、某主机和某些主机定义不同的认证方式。具体参见:SSH deamon configuration。
4.4 保持SSH连接
通过ssh连接上服务器后,只要我们和服务器频繁交互基本不会遇到ssh连接被断开的情况;但是更常见的情况是连上服务器后,出去倒杯水碰见同事聊个天回来发现ssh已经断开了,原因是空闲时间超过了ssh默认空闲时间,服务器主动断开连接以节省资源,增加安全系数。这个空闲时间默认是TCP允许空闲时间,还记得ssh配置文件中的这一项:TCPKeepAlive yes。由于不同设备上TCP允许空闲时间设置各不相同,短则几秒长则数小时,ssh保持连接的时长也各不相同。
一种保持ssh连接的思路是:既然ssh不断交互使用过程中连接是维持的,那么我们可以定时通过ssh通道发送信息以告诉通信双方彼此依然存在通信需求,请保持通道畅通。SSH为我们提供了两种方法来实现该目的,一个是在用户方,一个是在服务器方,理论上两者设置其一即可,不过很多教程同时设置两者,这样设置没有太多意义,姑且看作增加冗余来保证连接稳定性吧。
- 用户端定时向服务器发送保持连接请求
ServerAliveInterval 30    #每30秒发送一次请求
ServerAliveCountMax 3     #连续3次请求失败则连接超时,断开连接
- 服务器端向客户端发送保持连接请求
ClientAliveInterval 120    #每2分钟发送一次请求
ClientAliveCountMax 5      #连续5次请求失败则连接超时,断开连接
这种长时间保持连接的情况是存在安全隐患的,在一些敏感设备上我们不希望长时间保持连接。SSH提供了一种个性化连接的方法,使用Host关键字:
# 对所有连接生效的操作
Host *
     ForwardAgent no
     ForwardX11 no
     ForwardX11Trusted yes
     Port 22
     Protocol 2

# 仅对 192.168.0.123 生效的操作
Host local123
     Hostname 192.168.0.123
     ServerAliveInterval 30
     ServerAliveCountMax 3

# 仅对 192.168.0.129 生效的操作
Host local129
     Hostname 192.168.0.129
     ServerAliveInterval 60
     ServerAliveCountMax 1
这种设置一般放在用户配置文件~/.ssh/config中而不是系统配置文件/etc/ssh/sshd_config中,用户配置文件的设置会覆盖系统配置文件的设置
Reference:
1)SSH Config 那些你所知道和不知道的事
2)使用 SSH config 文件
3)How to Keep Alive SSH Sessions
第五章:系统硬件信息
当有一台计算机的时候我们对它到底了解多少?除了华丽丽的交互界面,我们还需要对她的内在有些许了解,本节将为大家介绍查看系统版本信息、内存、处理器、显卡等硬件信息的方法。
5.1 系统版本信息
5.2 内存信息
5.3 处理器信息
5.4 显卡信息
第六章:几个重要配置文件
- The
loginprogram sets it to a default value. How this default value is configured is system-dependent. On most non-embedded Linux systems, it's taken from/etc/login.defs, with different values for root and for other users. Consult thelogin(1)manual on your system to find out what it does.- Environment variables can be set in the system-wide file
/etc/environment.- Then most ways to log in (but not cron jobs) execute a login shell which reads system-wide and per-user configuration files. Which files are read depend on what the login shell is. Bourne/POSIX-style shells read
/etc/profileand~/.profile. Bash reads/etc/profile, but for the per-user file it only reads the first existing file among~/.bash_profile,~/.bash_loginand~/.profile. Zsh reads/etc/zshenv,~/.zshenv,/etc/zprofile,~/.zprofile,/etc/zloginand~/.zlogin. Many GUI sessions arrange to load/etc/profileand~/.profile, but this depends on the display manager, on the desktop environment or other session startup script, and how each distribution has set these up.
