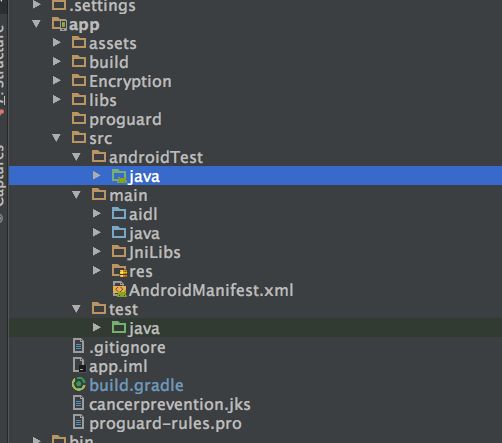
android单元测试分为两种类型,一种local unit test。另一种是instrumentation test。
1:Local unit test:主要是在本地,通过junit包,不依赖于android框架,来完成一些测试
测试目录:app/src/test
2:instrumentation test:则是通过打包安装到模拟器或真机上,依赖android框架,来完成测试。
测试目录:app/src/androidTest
一:配置安卓环境
我用的是android studio 2.3 ,gradle用的是3.3 ,这样在生成一个新项目的时候,就会自动生成对Espresso的依赖。为什么会选择Espresso呢,因为是google推荐的吗?而且的确是轻量级,能够方便简单对实现对view的查找,操作和断言,同时Espresso对google提供的一些框架也有较强对支持,比如对AsyncTask的异步调用,对Volly网络访问等,都可以实现等待异步完成,才开始继续操作下一步,省去了许多配置。Espresso属于instrumentation test,所以代码可以写在androidTest包中。
这里先把官方文档地址给出来,可以点这里 Espresso.
官方给出的依赖是:
apply plugin: 'com.android.application'

android {
    compileSdkVersion 22
    buildToolsVersion "22"

    defaultConfig {
        applicationId "com.my.awesome.app"
        minSdkVersion 10
        targetSdkVersion 22.0.1
        versionCode 1
        versionName "1.0"

        testInstrumentationRunner "android.support.test.runner.AndroidJUnitRunner"
    }
}

dependencies {
    // App's dependencies, including test
    compile 'com.android.support:support-annotations:22.2.0'

    // Testing-only dependencies
    androidTestCompile 'com.android.support.test:runner:0.5'
    androidTestCompile 'com.android.support.test.espresso:espresso-core:2.2.2'
}
本人实际项目的依赖:
  androidTestCompile('com.android.support.test.espresso:espresso-core:2.2.2', {
        exclude group: 'com.android.support',
                module: 'support-annotations'
    })
    androidTestCompile 'com.android.support.test:runner:0.5'
    androidTestCompile 'com.android.support.test:rules:0.5'
    androidTestCompile 'com.android.support.test.espresso:espresso-intents:2.2.2'
    androidTestCompile 'com.android.support:support-annotations:25.3.1'
二:测试页面
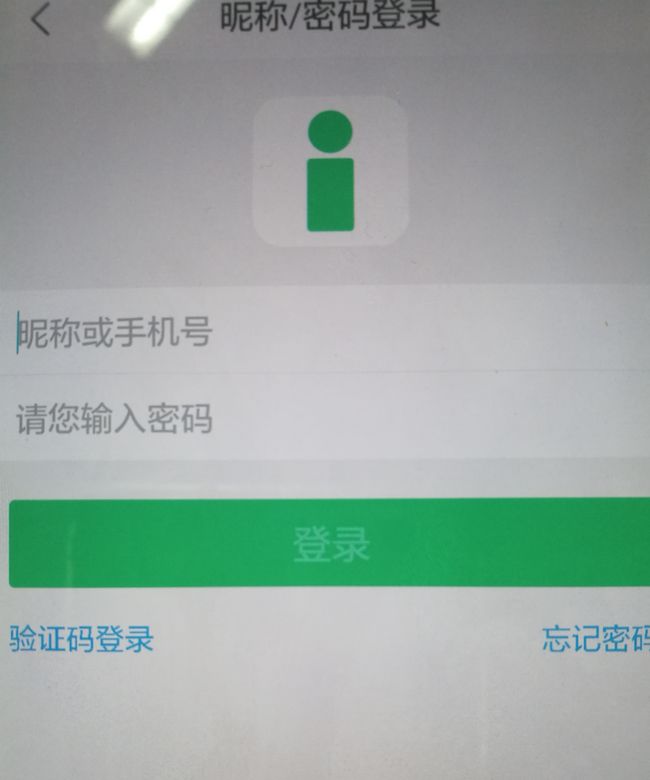
依赖结束之后,就可以同步sync project,然后开始在androidTest包中编写单元测试代码了。在编写代码之前,最好是能把与之对应的activity的测试,写在相应的androidTest包中,并在名字后面加上一个Test,以示区分。接下来我们就来测试这个登录页面,很简单也是功能很常见的一个页面,输入手机号和密码,然后点击登录按钮进行网络操作,等到连接服务器成功时,弹出“登录成功”toast,我们根据这个toast弹出内容是否是与我们预期的一致,来进一步判断这个测试是否成功。
@RunWith(AndroidJUnit4.class)
@LargeTest
public class LoginActivityTest {
    @Rule
    public ActivityTestRule activity=
            new ActivityTestRule<>(LoginActivity.class,true,false);

    AsynIdlingResource asynIdlingResource;
    @Test
    public void passwordLogin(){
        Intent intent=new Intent();
        activity.launchActivity(intent);
        onView(withId(R.id.edit_user)).perform(clearText(),typeText("15701306402"));
        onView(withId(R.id.edit_pwd)).perform(clearText(),typeText("123456"));
        onView(withId(R.id.bt_login)).perform(click());
//        Espresso.registerIdlingResources(asynIdlingResource);
        //注册之后一定需要有view的验证或者操作才会生效。如若不然就no response
       onView(withText("登录成功")).inRoot(withDecorView((is(activityTestRule.getActivity().getWindow().getDecorView())))).check(matches(isDisplayed()));
    }

    @Before
    public void setUp(){
//        Intent intent =new Intent(activity.getActivity(), MenuActivity.class);
//        activity.getActivity().startActivity(intent);
//        IdlingPolicies.setMasterPolicyTimeout(
//                10000, TimeUnit.MILLISECONDS);
//        IdlingPolicies.setIdlingResourceTimeout(
//                10000, TimeUnit.MILLISECONDS);
//        asynIdlingResource=new AsynIdlingResource(((LoginActivity)(activity.getActivity())));
    }
    @After
    public void release(){
//        Espresso.unregisterIdlingResources(asynIdlingResource);
    }
}
被注释掉的代码,是没有参考文章最后附录的两个链接的时候,自己通过IdlingResource这个类,实现的Espresso网络异步等待机制,但是参考了下面两个链接的代码之后,发现利用Espresso封装好了对AsyncTask的支持,可以很好的借用来为Retrofit服务,就不再需要自己手动编写IdlingResource了。
问题一:如何实现retrofit异步网络请求等待
因为要实现的是自动化的单元测试,而在实际项目中的网络请求,一般都是通过手动点击等待。但是这样一个操作怎么模拟呢?Espresso为什么提供了IdlingResource机制。下面我把在项目登录过程中自定义的IdlingResource的代码也贴一下,错误之处,还望指正:
public class AsynIdlingResource implements IdlingResource {

    private IdlingResource.ResourceCallback mCallback;
    private LoginActivity loginActivity;
    public AsynIdlingResource(LoginActivity loginActivity){
        this.loginActivity=loginActivity;
    }
    @Override
    public String getName() {
        return "AsynIdlingResource";// 注册回调的key,确保唯一
    }

    @Override
    public boolean isIdleNow() {
        boolean isIdle = loginActivity != null && loginActivity.isSyncFinished();
        if (isIdle && mCallback != null) {
            mCallback.onTransitionToIdle();
        }
        return isIdle;
    }

    @Override
    public void registerIdleTransitionCallback(ResourceCallback callback) {
        this.mCallback=callback;
    }
}
最后在LoginActivity中,我们只需要添加一个变量,用来配合IdlingResource来使用就可以了,当我们的登录网络链接请求成功,就将改变量设置为true。
private boolean syncFinished=false;

private void doLoginSuccess(LoginBean loginBean, String userName, String passWord,int mark) {
        mIsSyncFinished=true;
}
public boolean isSyncFinished() {
        return mIsSyncFinished;
}
当我们给Espresso注册了IdlingResource之后,就会不停回调isIdleNow()方法,当返回true的时候,就会结束等待,走下一步测试代码,这里需要注意一点,就是我们在调用Espresso的click之后,就需要给Espresso注册写好的这个IdlingResource。
Espresso.registerIdlingResources(asynIdlingResource);
onView(withText("登录成功")).inRoot(withDecorView((is(activityTestRule.getActivity().getWindow().getDecorView())))).check(matches(isDisplayed()));
如果采用的是retrofit,但是我们不使用IdlingResource,那么可以在构造RestAdapter的过程中,采用系统提供的线程池,因为Espresso默认已经为系统提供的这个线程池设置好了等待机制。
  RestAdapter.Builder builder = new RestAdapter.Builder();
  builder.setExecutors(AsyncTask.THREAD_POOL_EXECUTOR,new MainThreadExecutor()).build();
问题二:如何在activity启动时,通过Espresso框架将Intent携带的数据传递进去?
其实�ActivityTestRule 有一个重载构造方法
 @Rule
    public ActivityTestRule activityTestRule=
            new ActivityTestRule(SecondActivity.class,false,false);
这样构造出来的测试activity,就会暂时不会开启,而是等到测试方法运行的时候,才回开启。下面是启动
   @Test
    public void corrent() throws InterruptedException {
        Intent intent=new Intent();
        intent.putExtra("name","xiaomin");
        activityTestRule.launchActivity(intent);
        TimeUnit.SECONDS.sleep(2);
//        onView(withId(R.id.textView)).check(matches(withText("xiaomin")));
        onView(withId(R.id.textView)).perform(click());

    }
这里传递进去了一个name参数,同时让测试页面停留了两秒钟,以备观察效果。但是这里有一点值得我们注意,当我们通过测试intent传递进去的数据,在代码中的secondActivity中接收时,需要考虑接收时的位置。
String name = getIntent().getStringExtra("name");
如果是形如下面这样的话,最后执行点击事件的时候,name的值就已经不是我们传递进去的啦,而是会打印出来"onResume”。
 @Override
    protected void onCreate(Bundle savedInstanceState) {
        super.onCreate(savedInstanceState);
        setContentView(R.layout.activity_second);
        textView= (TextView) findViewById(R.id.textView);
        name = getIntent().getStringExtra("name");
        textView.setOnClickListener(new View.OnClickListener() {
            @Override
            public void onClick(View v) {
                Log.e("onClick ",name);
            }
        });
    }

    @Override
    protected void onResume() {
        super.onResume();
        SharedPreferences test = getSharedPreferences("test", Context.MODE_PRIVATE);
        name = test.getString("name", "onResume");
        textView.setText(testData);

    }
但是实际上我们测试,是希望在点击事件的时候能够打印出来“xiaomin”才对,那么我们只需要将在onCreate中通过getIntent获取测试数据的语句,转移到onResume中最下面即可。形如
   @Override
    protected void onResume() {
        super.onResume();
        SharedPreferences test = getSharedPreferences("test", Context.MODE_PRIVATE);
        name = test.getString("name", "onResume");
        name = getIntent().getStringExtra("name");
        textView.setText(testData);

    }
通过这个演示,我们能够看到,通过intent传递测试数据到被测试的activity中,需要考虑传递进来的值,被其他变量接收后,会不会被覆盖掉。
问题三:test.espresso.PerformException: Error performing 'single click - At Coordinates...
在使用Espresso进行测试的时候,出现了上面这样一个bug,说是在某个坐标下面点击操作,但是点击不成功。下面我们看看造成这个问题的测试页面
在这个页面中,有四个EditText输入框。而出现问题的代码是因为
onView(withId(R.id.phone)).perform(typeText("15555555555"),closeSoftKeyboard());
onView(withId(R.id.edit_password)).perform(typeText("123456"),closeSoftKeyboard());
onView(withId(R.id.edit_password_again)).perform(typeText("345678"),closeSoftKeyboard());
onView(withId(R.id.forgetpwd_edit_verify)).perform(typeText("678900"));
onView(withId(R.id.forgetpwd_submit)).perform(click());
无法点击这个完成按钮。下面我们再看一张图
通过上面这张图可以发现,当我们在EditText中输入的时候,输入框遮挡住了完成按钮,但是实际上使用Espresso测试的时候,如果view不可见的话,是不能够执行click点击事件的。因此就会出现这样的错误
android.support.test.espresso.PerformException: Error performing 'single click - At Coordinates: 539, 1099 and precision: 16, 16' on view 'with id: com.fengfutong.demo:id/forgetpwd_submit'.
……
Caused by: android.support.test.espresso.PerformException: Error performing 'Send down motion event' on view 'unknown'.
……
Caused by: java.lang.SecurityException: Injecting to another application requires INJECT_EVENTS permission
解决办法,就是在点击事件之前,一定要让被点击的view不被遮挡,并且能够出现在屏幕上。因此我们在输入文本的时候,一定不要忘记使用closeSoftKeyboard()),退出软键盘。
onView(withId(R.id.forgetpwd_edit_verify)).perform(typeText("678900"),closeSoftKeyboard());
三:命令行测试并获得jacoco代码覆盖率
接下来就可以通过命令行
gradle connectedAndroidTest
来进行仪器测试了。这里只是测试了一个单元,如果在LoginActivityTest 中,写了很多个@Test方法,那么当我们测试的时候,就会随机测试完里面的单元测试。比如有五个单元测试,那么假如就会按照,5,4,1,3,2这样的顺序将单元测试完毕,然后退出测试。
如果使用了jacoco,来自动生成测试覆盖率,需要在多配置一行代码(官方推荐,还需要配置jacoco的plugin,但是实际操作中,没有配置也不影响)
apply plugin: 'com.android.application'
apply plugin: 'jacoco'
jacoco{
    toolVersion = "0.7.1.201405082137"
}
android{
    buildTypes{
        debug{
            testCoverageEnabled true
        }
    }
}
然后,就可以直接通过
gradle createDebugCoverageReport
的命令,等到安装并测试完之后,就可以在app/build/reports/coverage文件夹中找到对应的index.html通过浏览器中查看了。
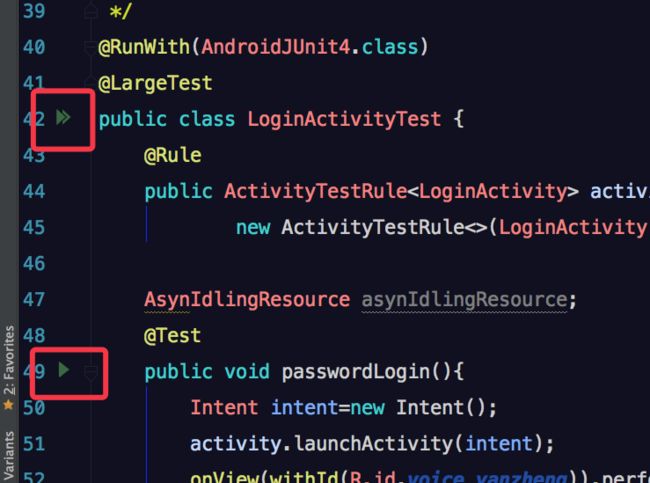
如果没有配置gradle,可以使用点击测试,如下图
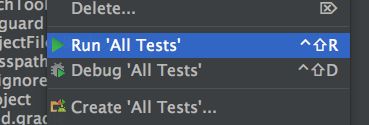
在android studio的界面中,我们可以看到这样的箭头,如果点击方法前面的一个箭头,那么就会只运行当前单元测试。如果点击测试类前面的重叠箭头,就会测试整个单元测试类,测试顺序为随机。要想运行全部单元测试包,可以右击点击androidTest包中的java包,会出现下图
点击Run 'All Tests'就可以了。
四:jacoco 检查代码测试覆盖率为0的问题
但是在华为H60-L02 android 6.0的机器上,覆盖率一直显示为0,但是在模拟器,android 5.0的机器上,覆盖率显示却是100%,同样的代码,同样的命令行,你说奇怪不奇怪?
后来在stackoverflow上看到了一个问题Jacoco Code Coverage in android studio,采用其中的答案,顺利解决。现顺便将方案记录如下:
创建一个coverage.gradle的文件,位置在app/coverage.gradle
apply plugin: 'jacoco'

/**
 * The correct path of the report is $rootProjectDir/app/build/reports/jacoco/index.html
 * to run this task use: ./gradlew clean jacocoTestReport
 */
task jacocoTestReport(type: JacocoReport, dependsOn: ['testDebugUnitTest', 'createDebugCoverageReport']) { //we use "debug" build type for test coverage (can be other)
    group = "reporting"
    description = "Generate unified Jacoco code coverage report"

    reports {
        xml.enabled = false
        html.enabled = true
        csv.enabled = false
        xml.destination = "${buildDir}/reports/jacocoTestReport.xml"
        html.destination = "${buildDir}/reports/jacoco"
        csv.destination = "${buildDir}/reports/jacocoTestReport.csv"
    }

    def fileFilter = [
            '**/*Test*.*',
            '**/AutoValue_*.*',
            '**/*JavascriptBridge.class',
            '**/R.class',
            '**/R$*.class',
            '**/Manifest*.*',
            'android/**/*.*',
            '**/BuildConfig.*',
            '**/*$ViewBinder*.*',
            '**/*$ViewInjector*.*',
            '**/Lambda$*.class',
            '**/Lambda.class',
            '**/*Lambda.class',
            '**/*Lambda*.class',
            '**/*$InjectAdapter.class',
            '**/*$ModuleAdapter.class',
            '**/*$ViewInjector*.class',
            '**/*_MembersInjector.class', //Dagger2 generated code
            '*/*_MembersInjector*.*', //Dagger2 generated code
            '**/*_*Factory*.*', //Dagger2 generated code
            '*/*Component*.*', //Dagger2 generated code
            '**/*Module*.*' //Dagger2 generated code
    ]
    def debugTree = fileTree(dir: "${buildDir}/intermediates/classes/debug", excludes: fileFilter) //we use "debug" build type for test coverage (can be other)
    def mainSrc = "${project.projectDir}/src/main/java"

    sourceDirectories = files([mainSrc])
    classDirectories = files([debugTree])
    executionData = fileTree(dir: "$buildDir", includes: [
            "jacoco/testDebugUnitTest.exec", //we use "debug" build type for test coverage (can be other)
            "outputs/code-coverage/connected/*coverage.ec"
    ])
}
修改build.gradle
apply plugin: 'com.android.application'
apply from: "$rootDir/app/coverage.gradle"
//...

android {
//...

    buildTypes {
//...
            debug {
                testCoverageEnabled true //we use "debug" build type for test coverage (can be other)
            }
    }
//...
    testOptions {
        unitTests.returnDefaultValues = true
        unitTests.all {
            jacoco {
                includeNoLocationClasses = true
            }
        }
    }
//...
}
此时,我们可以运行我们自己写的这个任务“task jacocoTestReport”,因为它的运行是依赖了createDebugCoverageReport这个任务的。
gradle jacocoTestReport
然后在app/build/reports/coverage/debug目录下就可以找到index.html。打开就可以看到代码覆盖率了。
参考引用:
1:Espresso 测试Retrofit 网络库环境
http://www.csdn.net/article/2015-08-19/2825493-using-espresso-for-easy-ui-testing
2:很不错的一篇Espresso帖子:
http://www.eoeandroid.com/thread-917976-1-1.html?_dsign=80084669
3:里面有介绍关于intent携带参数在测试中的使用问题:http://tbfungeek.github.io/2016/07/01/Android-%E8%BF%9B%E9%98%B6%E4%B9%8B%E8%87%AA%E5%8A%A8%E5%8C%96%E6%B5%8B%E8%AF%95Espreso/
4:stackoverflow上的关于覆盖率为0的讨论:http://stackoverflow.com/questions/29133761/jacoco-code-coverage-in-android-studio
