XiaomiRouter自学之路(04-GitHub搭建环境(U-boot))
为了方便版本管理及开源,使用免费的Git(版本管理工具)以及GitHub作为code server,下面将从code server(远程代码服务器)到Build server/Host(本地编译服务器)的搭建使用都进行详细的说明。
1.code server
1.登入GitHub账户,右上角的加号处选择New organization,如下:
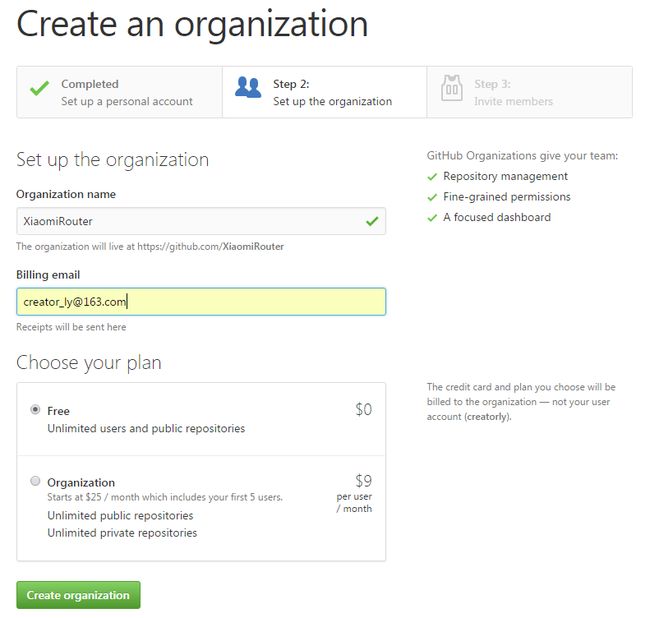
2.在Create an organization页面进行信息的填写,填写后点击Create organization按钮,如下:
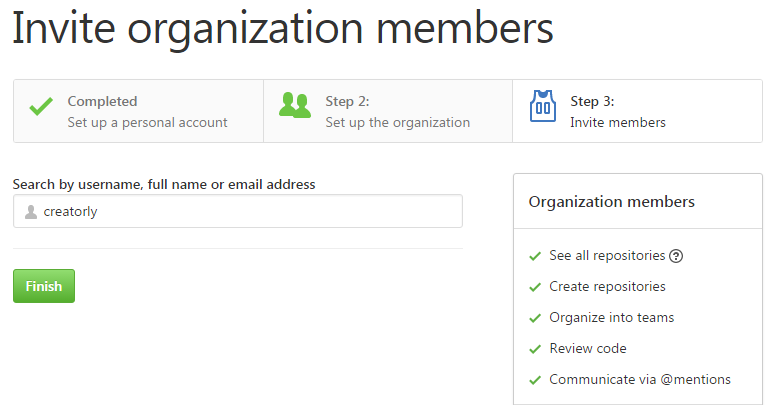
3.下一步是叫我们邀请其他成员,默认自己就是管理者,可以在添加其他成员,添加完后点击Finish。
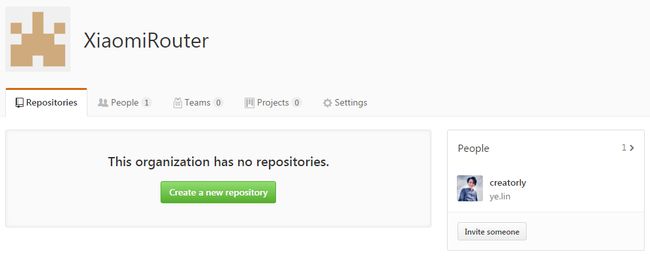
4.到这边我们的组织就已经创建好了,下面就进行仓库repository的创建,点击Create a new repository,如下:
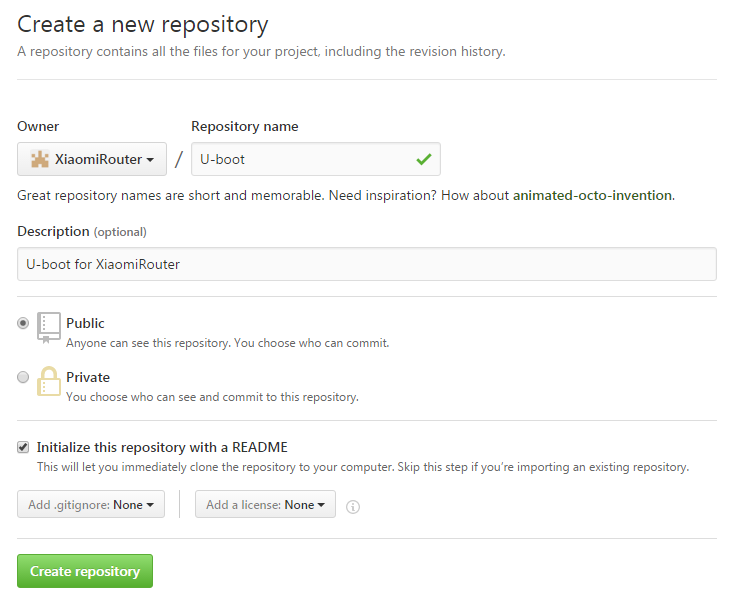
5.进行repository信息的添加,先创建U-boot的代码仓库,后面创建Openwrt的原理是一致的,填写完成点击Create repository按钮,如下:
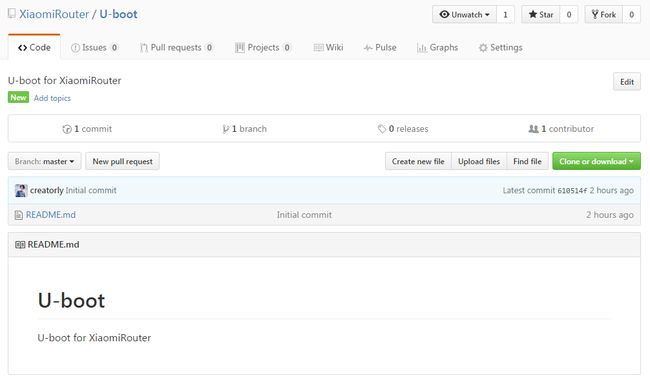
6.添加完后就会出现以下界面,现在XiaomiRouter的U-boot代码仓库已经创建完成。
代码服务器端的仓库已经创建了,接下去就在编译服务器端进行项目的clone,并将开源U-boot代码进行上传到代码服务器。
2.Add SSH Key
在clone之前,我们先把本地PC的SSH添加到GitHub中,否则再后面将无法push本地代码到代码仓库中,具体的细节可以查看
1.输入ssh-keygen -t rsa后,直接按三次回车键即可
linye@ly:~/XiaomiRouter/U-boot$ ssh-keygen -t rsa
Generating public/private rsa key pair.
Enter file in which to save the key (/home/linye/.ssh/id_rsa):
Created directory '/home/linye/.ssh'.
Enter passphrase (empty for no passphrase):
Enter same passphrase again:
Your identification has been saved in /home/linye/.ssh/id_rsa.
Your public key has been saved in /home/linye/.ssh/id_rsa.pub.
The key fingerprint is:
b8:46:21:0f:13:a3:2e:ac:bc:f5:23:56:b5:4f:b2:c9 linye@ly
The key's randomart image is:
+--[ RSA 2048]----+
|    o            |
|   . o           |
|  . + .          |
|..   = +         |
|...   = S        |
|o.   o + .       |
|.. .. + *        |
|  oo.o E .       |
| .. ...          |
+-----------------+
2.可以查看到在~/.ssh/下面生成三个文件
linye@ly:~/XiaomiRouter/U-boot$ cd ~/.ssh/
linye@ly:~/.ssh$ ls
id_rsa       id_rsa.pub   known_hosts
3.cat id_rsa.pub里面的内容将其复制
4.登录GitHub官网,打开Settings
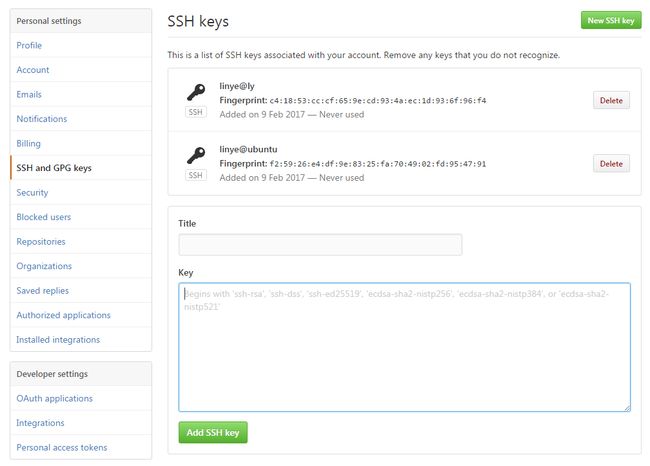
5.在点击左侧的SSH and GPG keys,点击右上角的New SSH key,然后将上面复制的id_rsa.pub粘贴到key格里面,点击Add SSH key即可。
3.Build server/Host
1.先在Ubuntu里面创建存放项目的文件夹,如下:
linye@ly:~$ mkdir XiaomiRouter
linye@ly:~$ cd XiaomiRouter/
2.进入文件XiaomiRouter文件夹,通过GitHub上的路径进行Clone代码,路径可以在页面上查看
3.输入git clone指令即可clone该代码(需要先安装git工具)
linye@ly:~/XiaomiRouter$ git clone https://github.com/XiaomiRouter/U-boot.git
Cloning into 'U-boot'...
remote: Counting objects: 3, done.
remote: Total 3 (delta 0), reused 0 (delta 0), pack-reused 0
Unpacking objects: 100% (3/3), done.
Checking connectivity... done.
4.clone后即可看到XiaomiRouter文件夹下多了一个U-boot文件夹,进入后只有一个README.md文件
linye@ly:~/XiaomiRouter$ ls
U-boot
linye@ly:~/XiaomiRouter$ cd U-boot/
linye@ly:~/XiaomiRouter/U-boot$ ls
README.md
5.在网络上可以下载到MTK提供的SDK,使用里面解压出来的Uboot,我这边使用GitHub上的一个项目“https://github.com/cleanwrt/u-boot_mt7620”。
6.将下载到的zip包拷贝到XiaomiRouter目录下,并进行解压,将解压后将u-boot_mt7620-master文件夹内部的全部内容都拷贝到U-boot目录下,删除掉u-boot_mt7620-master和u-boot_mt7620-master.zip
linye@ly:~/XiaomiRouter/U-boot$ unzip u-boot_mt7620-master.zip
linye@ly:~/XiaomiRouter/U-boot$ cp u-boot_mt7620-master/* U-boot/ -rf
linye@ly:~/XiaomiRouter/U-boot$ rm u-boot_mt7620-master* -rf
7.进入U-boot通过git status命令进行参看拷贝后的与原本的差异,可以看到提示我们使用git add命令进行添加需要commit的文件
linye@ly:~/XiaomiRouter/U-boot$ git status
On branch master
Your branch is up-to-date with 'origin/master'.

Untracked files:
  (use "git add ..." to include in what will be committed)

        Ai-BR100
        CHANGELOG
        COPYING
        CREDITS
        MAINTAINERS
        MAKEALL
        Makefile
        README
        board/
        common/
        config.in
        config.mk
        cpu/
        disk/
        doc/
        drivers/
        fs/
        httpd/
        include/
        lib_generic/
        lib_mips/
        mips_config.mk
        mkconfig
        net/
        rtc/
        scripts/
        stage1/
        tools/
        u-boot_version.h

nothing added to commit but untracked files present (use "git add" to track)
8.通过git add命令,将所有新增的文件添加到缓冲区
linye@ly:~/XiaomiRouter/U-boot$ git add Ai-BR100 CHANGELOG COPYING CREDITS MAINTAINERS MAKEALL Makefile README board/ common/ config.in config.mk cpu/ disk/ doc/ drivers/ fs/ httpd/ include/ lib_generic/ lib_mips/ mips_config.mk mkconfig net/ rtc/ scripts/ stage1/ tools/ u-boot_version.h
9.这是再次使用git status命令进行查看,可以发现原本待add的文件夹都没了,随之多出的是一个个new file等待commit
linye@ly:~/XiaomiRouter/U-boot$ git status
On branch master
Your branch is up-to-date with 'origin/master'.

Changes to be committed:
  (use "git reset HEAD ..." to unstage)

        new file:   Ai-BR100
        new file:   CHANGELOG
        new file:   COPYING
        new file:   CREDITS
        new file:   MAINTAINERS
        ...
10.接着使用git commit命令进行提交新增的代码,可是我们会发现有如下提示,如果没出现以下提示,最好也按第11步设置下,以防默认名不是你想要的,还得再来一遍。
linye@ly:~/openwrt/XiaomiRouter/XiaomiRouter_Uboot$ git commit -m "add MTK_SDK_Uboot into project"

*** Please tell me who you are.

Run

  git config --global user.email "[email protected]"
  git config --global user.name "Your Name"

to set your account's default identity.
Omit --global to set the identity only in this repository.

fatal: unable to auto-detect email address (got 'linye@ly.(none)')
11.在commit的时候会出现如下信息,所以我们需要设置下邮箱和名字,这时候再执行commit命令即可
linye@ly:~/XiaomiRouter/U-boot$ git config --global user.email "[email protected]"
linye@ly:~/XiaomiRouter/U-boot$ git config --global user.name "ye.lin"
linye@ly:~/XiaomiRouter/U-boot$ git commit -m "add MTK_SDK into project"
12.输入tig命令进行查看提交记录如下,多了一条add MTK_SDK_Uboot into project的记录
2017-02-09 19:26 ye.lin             o [master] add MTK_SDK_Uboot into project
2017-02-09 15:10 ye.lin             I [origin/HEAD] [origin/master] Initial commit
13.再次通过git status命令查看状态,提示我们使用git push进行将本地commit提交到远程代码仓库
linye@ly:~/XiaomiRouter/U-boot$ git status
On branch master
Your branch is ahead of 'origin/master' by 1 commit.
  (use "git push" to publish your local commits)

nothing to commit, working directory clean
14.使用git push命令提交到GitHub仓库
linye@ly:~/XiaomiRouter/U-boot$ git push origin master
Username for 'https://github.com': [email protected]
Password for 'https://[email protected]@github.com':
Counting objects: 461, done.
Delta compression using up to 4 threads.
Compressing objects: 100% (455/455), done.
Writing objects: 100% (460/460), 2.03 MiB | 454.00 KiB/s, done.
Total 460 (delta 62), reused 0 (delta 0)
remote: Resolving deltas: 100% (62/62), done.
To https://github.com/XiaomiRouter/U-boot.git
   610514f..8fe85af  master -> master
提交成功后,我们可以登录GitHub去看下提交的commit是否已经添加进去了。
GitHub搭建环境(U-boot)的分析就到这边,有感悟时会持续会更新。
注:以上内容都是本人在学习过程积累的一些心得,难免会有参考到其他文章的一些知识,如有侵权,请及时通知我,我将及时删除或标注内容出处,如有错误之处也请指出,进行探讨学习。文章只是起一个引导作用,详细的数据解析内容还请查看XiaomiRouter相关教程,感谢您的查阅。


