1.UITableViewCell 改变CheckBox image、大小、位置
- (void)layoutSubviews {

    [super layoutSubviews];
    for (UIControl*control in self.subviews) {
        if ([control isMemberOfClass:NSClassFromString(@"UITableViewCellEditControl")]) {
            for(UIView *v in control.subviews) {
                if([v isKindOfClass: [UIImageView class]]) {
                    UIImageView *img = (UIImageView*)v;
                    if(self.selected) {//选择状态图片
                        img.image= [UIImage imageNamed:@"icon_multiselect_select.png"];
                    } else {//未选中状态图片
                        img.image= [UIImage imageNamed:@"icon_multiselect_unselected.png"];
                    }
                    //改变系统的CheckBox 的布局方式
                    if (img.translatesAutoresizingMaskIntoConstraints ) {
                        img.translatesAutoresizingMaskIntoConstraints = NO;//消除系统的Frame 布局
                        [img.leftAnchor constraintGreaterThanOrEqualToAnchor:img.superview.leftAnchor constant:56].active = YES;
                        //生成一个布局约束,active  = YES,免除 addConstraint 操作,
                        /*
                             active 属性系统介绍
                             The receiver may be activated or deactivated by manipulating this property.
                             Only active constraints affect the calculated layout.
                             Attempting to activate a constraint whose items have no common ancestor will cause an exception to be thrown.
                             Defaults to NO for newly created constraints
                        */
                        [img.centerYAnchor constraintEqualToAnchor:img.superview.centerYAnchor].active = YES;

                    }
                }
            }
        }
    }
}
自定Cell, 拷贝上面的代码。
使用系统的 UITableViewCell 的 textLabel detailTextLabel,可以发现两个label 的上下间隔很小,在有需求改变这两个label 的间隔时,可以使用上面的方法,给两个label重新布局
2.UITableViewCell 改变 textLabel 的offset
需要用到cell 的两个属性 indentationLevel && indentationWidth,这两个值只会对add 在cell.contentView 的UIView 起作用 ,两个属性的乘积 (indentationLevel * indentationWidth) ,就是Cell 的left 到contentView 的left 的距离,但是textlabel 的left 和 conteView 的left 之间的间距最小为15,
也就是说当你遇到一个需求,让textlabel 紧贴着conteView 的left 的时候,使用这两个属性就不行了,但是可以考虑设置translatesAutoresizingMaskIntoConstraints 取消系统的Frame布局,然后自己写autolayout 布局代码。
-(NSInteger)tableView:(UITableView *)tableView numberOfRowsInSection:(NSInteger)section {

    return 4;
}

- (UITableViewCell *)tableView:(UITableView *)tableView cellForRowAtIndexPath:(NSIndexPath *)indexPath {

    UITableViewCell *cell = [tableView cellForRowAtIndexPath:indexPath];
    if (cell == nil) {
        cell = [[UITableViewCell alloc] initWithStyle:UITableViewCellStyleDefault reuseIdentifier:@"ider"];

        cell.separatorInset = UIEdgeInsetsZero;
    }
    if (indexPath.row == 1) {
        cell.indentationWidth = 50;
        cell.indentationLevel = 1;
    }
    cell.textLabel.text = @"Cell";
    cell.textLabel.textColor = [UIColor redColor];
    return cell;
}
- (void)tableView:(UITableView *)tableView willDisplayCell:(nonnull UITableViewCell *)cell forRowAtIndexPath:(nonnull NSIndexPath *)indexPath {

    cell.textLabel.backgroundColor = [UIColor greenColor];
}
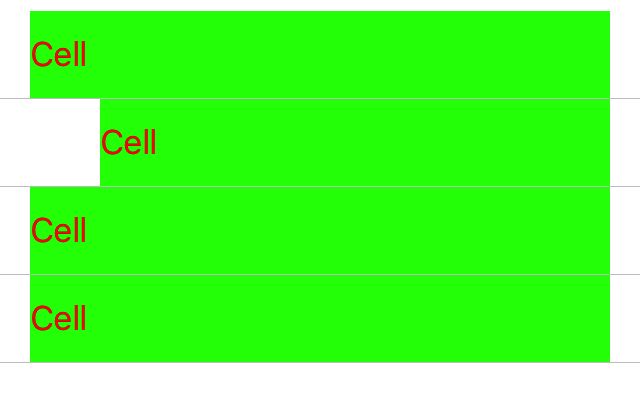
上面的代码效果如下(其中第二cell 到conteView left 边缘的距离为100,5s 模拟器 2x,所以为100):
3.UITableViewCell 侧滑,滑动回正常,didEndEditingRowAtIndexPath没有响应
假如有一个需求,在Cell 上有一个Button,在Cell 滑开的时候Button隐藏,在cell 划回正常的时候显示Button。
这个需求很明显用到两个方法,但是这个时候会有一个Bug。复现方法:向左滑动cell(不要松手),然后往右滑动一点,不要滑动到最右端,然后松手,可以看到- (void)tableView:(UITableView *)tableView didEndEditingRowAtIndexPath:(nullable NSIndexPath *)indexPath这个方法没有调用,
我的解决办法,创建一个类别,代码如下
@implementation UITableViewCell (Swizzle)

+ (void)load {
    static dispatch_once_t onceToken;
    dispatch_once(&onceToken, ^{

        Class class = [self class];
        SEL originalSelector = @selector(_endSwiping:);
        SEL swizzledSelector = @selector(my_endSwiping:);

        Method originalMethod = class_getInstanceMethod(class, originalSelector);
        Method swizzledMethod = class_getInstanceMethod(class, swizzledSelector);

        BOOL didAddMethod =
        class_addMethod(class,
                        originalSelector,
                        method_getImplementation(swizzledMethod),
                        method_getTypeEncoding(swizzledMethod));

        if (didAddMethod) {
            class_replaceMethod(class,
                                swizzledSelector,
                                method_getImplementation(originalMethod),
                                method_getTypeEncoding(originalMethod));
        } else {
            method_exchangeImplementations(originalMethod, swizzledMethod);
        }

        });
}
- (void)my_endSwiping:(BOOL)arg {

    [self my_endSwiping:YES];
}
/*+ (void)load {
     //这个方法会使所有的UITableViewCell 的行为改变而且还会Crash ,
     //所以使用method  Swizzle最好还是看下 NShipster 的 [ http://nshipster.cn/method-swizzling/ ]博客
    Method originalM = class_getInstanceMethod([self class], @selector(_endSwiping:));
    Method exchangeM = class_getInstanceMethod([self class], @selector(my_endSwiping:));
    method_exchangeImplementations(originalM, exchangeM);
}*/
@end
上面的类别可能会有副作用(目前我还没有遇到),如果你使用这段代码有副作用的时候请告诉我,多谢。
4.改变UITextField 的cleanButton image
UIButton *button = [_textField valueForKey:@"_clearButton"];
5.设置UITextField placeholder 颜色:
attributedPlaceholder = [[NSAttributedString alloc]initWithString:@"abcdecasdfj" attributes:@{NSForegroundColorAttributeName : color}];
or
textField.placeholder = @"username is in here!";
[textField setValue:[UIColor redColor] forKeyPath:@"_placeholderLabel.textColor"];
[textField setValue:[UIFont boldSystemFontOfSize:16] forKeyPath:@"_placeholderLabel.font"];
