前言:
之前想着每天都更新一篇文章,但是连续几天之后,发现有好多博客大佬,所以觉得还是不要献丑好一点,然后就学习一下关于安全防护的知识,毕竟安全意识强弱代表在互联网防护能力,类似ddos,xss,csrf等也是经常出现,比如一些基本的×××方式:SQL注入,web参数,cc。所以我就记录了下面全程的将WAF嵌入LNMP架构,应用于实战集群架构。附带lua语言写的防护模块。
实战:
服务器架构图如下:

一、web服务器集群高可用负载均衡
1.高可用使用:nginx+keepalived模式
master(web1) 192.168.0.230
slaver(web2) 192.168.0.211
VIP:192.168.0.100
2.两边安装keepalived
[root@web1 ~]# yum install -y keepalived
3.创建服务器监控脚本
[root@web1 ~]# mkdir -p /server/work
[root@web1 ~]# cd /server/work/
[root@web1 work]# vim check_ng.sh
#!/bin/bash
#write by leo
d=`date --date today +%Y%m%d_%H:%M:%S`
n=`ps -C nginx --no-heading|wc-l`
#如果进程为0,则启动nginx,并且再次检测nginx进程数量
#如果还为0,说明nginx无法启动,此时需要关闭keepalived
if[$n-eq"0"];then
/etc/init.d/nginx start
n2=`ps -C nginx --no-heading|wc-l`
if[$n2-eq"0"];then
echo"$dnginx down,keepalived will stop">> /server/logs/nginx/check_ng.log
systemctl stop keepalived
fi
fi
[root@web1 work]# mkdir -p /server/logs/nginx
[root@web1 work]# chmod +x check_ng.sh
4.修改master的keepalived配置文件
[root@web1 ~]# vim /etc/keepalived/keepalived.conf
! Configuration Fileforkeepalived
global_defs {
notification_email {
}
notification_email_from root@web1
smtp_server 127.0.0.1
smtp_connect_timeout 30
router_id LVS_DEVEL
}
vrrp_script chk_nginx {
script "/server/work/check_ng.sh"
interval 3
}
vrrp_instance VI_1 {
state MASTER
interface ens33
virtual_router_id 51
priority 100
advert_int 1
authentication {
auth_type PASS
auth_pass 000000
}
virtual_ipaddress {
192.168.0.100
}
track_script {
chk_nginx
}
}
[root@web1 ~]# systemctl stop nginx
[root@web1 ~]# systemctl status nginx
● nginx.service - LSB: starts the nginx web server Loaded: loaded (/etc/rc.d/init.d/nginx; bad; vendor preset: disabled) Active: inactive (dead) Docs: man:systemd-sysv-generator(8)
[root@web1 ~]# systemctl start keepalived
[root@web1 ~]# systemctl status keepalived
● keepalived.service - LVSandVRRP High Availability Monitor Loaded: loaded (/usr/lib/systemd/system/keepalived.service; disabled; vendor preset: disabled) Active: active (running) since Fri2018-07-1315:06:13CST;32s ago Process:14019ExecStart=/usr/sbin/keepalived $KEEPALIVED_OPTIONS (code=exited, status=0/SUCCESS)Main PID:14020(keepalived) CGroup: /system.slice/keepalived.service ├─14020/usr/sbin/keepalived -D ├─14021/usr/sbin/keepalived -D └─14022/usr/sbin/keepalived -DJul1315:06:15web1 Keepalived_vrrp[14022]: Sending gratuitous ARPon...Jul1315:06:15web1 Keepalived_vrrp[14022]: Sending gratuitous ARPon...Jul1315:06:15web1 Keepalived_vrrp[14022]: Sending gratuitous ARPon...Jul1315:06:15web1 Keepalived_vrrp[14022]: Sending gratuitous ARPon...Jul1315:06:20web1 Keepalived_vrrp[14022]: Sending gratuitous ARPon...Jul1315:06:20web1 Keepalived_vrrp[14022]: VRRP_Instance(VI_1) Sendi...Jul1315:06:20web1 Keepalived_vrrp[14022]: Sending gratuitous ARPon...Jul1315:06:20web1 Keepalived_vrrp[14022]: Sending gratuitous ARPon...Jul1315:06:20web1 Keepalived_vrrp[14022]: Sending gratuitous ARPon...Jul1315:06:20web1 Keepalived_vrrp[14022]: Sending gratuitous ARPon...Hint: Some lines were ellipsized, use -l to showinfull.
5.修改slaver的keepalived配置文件
[root@web2 ~]# vim /etc/keepalived/keepalived.conf
! Configuration Fileforkeepalivedglobal_defs {
notification_email {
}
notification_email_from root@web2
smtp_server 127.0.0.1
smtp_connect_timeout 30
router_id LVS_DEVEL
}
vrrp_script chk_nginx {
script "/server/work/check_ng.sh"
interval 3
}
vrrp_instance VI_1 {
stateBACKUP
interface ens33
virtual_router_id 51
priority 90
advert_int1
authentication {
auth_type PASS
auth_pass 000000
}
virtual_ipaddress {
192.168.0.100
}
track_script {
chk_nginx
}
}
[root@web2 ~]# systemctl stop nginx
[root@web2 ~]# systemctl status nginx
● nginx.service - LSB: starts the nginx web server Loaded: loaded (/etc/rc.d/init.d/nginx; bad; vendor preset: disabled) Active: inactive (dead) Docs: man:systemd-sysv-generator(8)
[root@web2 ~]# systemctl start keepalived
[root@web2 ~]# systemctl status keepalived
● keepalived.service - LVSandVRRP High Availability Monitor Loaded: loaded (/usr/lib/systemd/system/keepalived.service; disabled; vendor preset: disabled)
Active: active (running) since Fri 2018-07-13 15:07:20 CST; 43s ago
Process: 13279 ExecStart=/usr/sbin/keepalived$KEEPALIVED_OPTIONS (code=exited, status=0/SUCCESS)Main PID:13280(keepalived) CGroup:/system.slice/keepalived.service ├─13280/usr/sbin/keepalived -D ├─13281/usr/sbin/keepalived -D └─13282/usr/sbin/keepalived -DJul1315:07:20web2 Keepalived_vrrp[13282]: Registering Kernel netlin...Jul1315:07:20web2 Keepalived_vrrp[13282]: Registering gratuitous AR...Jul1315:07:20web2 Keepalived_vrrp[13282]: Opening file'/etc/keepal...
Jul 13 15:07:20 web2 Keepalived_vrrp[13282]: WARNING - default user 'k...Jul1315:07:20web2 Keepalived_vrrp[13282]: SECURITY VIOLATION - scri...Jul1315:07:20web2 Keepalived_vrrp[13282]: VRRP_Instance(VI_1) remov...Jul1315:07:20web2 Keepalived_vrrp[13282]: Using LinkWatch kernel ne...Jul1315:07:20web2 Keepalived_vrrp[13282]: VRRP_Instance(VI_1) Enter...Jul1315:07:20web2 Keepalived_vrrp[13282]: VRRP sockpool: [ifindex(2...Jul1315:07:20web2 Keepalived_vrrp[13282]: VRRP_Script(chk_nginx) su...Hint: Some lines were ellipsized,use-l to show in full.
6.在master上查看IP地址
[root@web1 ~]# ip a1: lo: mtu65536qdisc noqueue state UNKNOWN groupdefaultqlen1000link/loopback00:00:00:00:00:00brd00:00:00:00:00:00inet127.0.0.1/8scope host lo valid_lft forever preferred_lft forever inet6 ::1/128scope host valid_lft forever preferred_lft forever2: ens33: mtu1500qdisc pfifo_fast state UP groupdefaultqlen1000link/ether00:0c:29:c5:33:97brd ff:ff:ff:ff:ff:ff inet192.168.0.230/24brd192.168.0.255scopeglobalnoprefixroute dynamic ens33 valid_lft6103sec preferred_lft6103sec inet192.168.0.100/32scopeglobalens33 valid_lft forever preferred_lft forever
7.在slaver上查看IP地址
[root@web2 ~]# ip a
1: lo: mtu65536qdisc noqueuestateUNKNOWN group default qlen1000link/loopback00:00:00:00:00:00brd00:00:00:00:00:00inet127.0.0.1/8scope host lo valid_lft forever preferred_lft forever inet6 ::1/128scope host valid_lft forever preferred_lft forever2: ens33: mtu1500qdisc pfifo_faststateUP group default qlen1000link/ether00:0c:29:d7:df:dc brd ff:ff:ff:ff:ff:ff inet192.168.0.211/24brd192.168.0.255scope global noprefixroute dynamic ens33 valid_lft6107sec preferred_lft6107sec inet6 fe80::20c:29ff:fed7:dfdc/64scopelinkvalid_lft forever preferred_lft forever
8.在master上关闭keepalived服务(模拟master宕机或者脑裂情况)
[root@web1 ~]# systemctl stop keepalived
[root@web1 ~]# systemctl status keepalived
● keepalived.service - LVSandVRRP High Availability Monitor Loaded: loaded (/usr/lib/systemd/system/keepalived.service; disabled; vendor preset: disabled) Active: inactive (dead)Jul1315:06:20web1 Keepalived_vrrp[14022]: Sending gratuitous ARPon...Jul1315:06:20web1 Keepalived_vrrp[14022]: Sending gratuitous ARPon...Jul1315:06:20web1 Keepalived_vrrp[14022]: Sending gratuitous ARPon...Jul1315:11:20web1 systemd[1]: Stopping LVSandVRRP High Availabil....Jul1315:11:20web1 Keepalived[14020]: StoppingJul1315:11:20web1 Keepalived_vrrp[14022]: VRRP_Instance(VI_1) sent ...Jul1315:11:20web1 Keepalived_vrrp[14022]: VRRP_Instance(VI_1) remov...Jul1315:11:21web1 Keepalived_vrrp[14022]: StoppedJul1315:11:21web1 Keepalived[14020]: Stopped Keepalived v1.3.5(03...2Jul1315:11:21web1 systemd[1]: Stopped LVSandVRRP High Availabili....Hint: Some lines were ellipsized, use -l to showinfull.
9.在slaver上查看状态
[root@web2 ~]# ip a
1: lo: mtu65536qdisc noqueue state UNKNOWN groupdefaultqlen1000link/loopback00:00:00:00:00:00brd00:00:00:00:00:00inet127.0.0.1/8scope host lo valid_lft forever preferred_lft forever inet6 ::1/128scope host valid_lft forever preferred_lft forever2: ens33: mtu1500qdisc pfifo_fast state UP groupdefaultqlen1000link/ether00:0c:29:d7:df:dc brd ff:ff:ff:ff:ff:ff inet192.168.0.211/24brd192.168.0.255scopeglobalnoprefixroute dynamic ens33 valid_lft5895sec preferred_lft5895sec inet192.168.0.100/32scopeglobalens33 valid_lft forever preferred_lft forever inet6 fe80::20c:29ff:fed7:dfdc/64scope link valid_lft forever preferred_lft forever
[root@web2 ~]# systemctl status keepalived
● keepalived.service - LVSandVRRP High Availability Monitor Loaded: loaded (/usr/lib/systemd/system/keepalived.service; disabled; vendor preset: disabled) Active: active (running) since Fri2018-07-1315:07:20CST;7min ago Process:13279ExecStart=/usr/sbin/keepalived $KEEPALIVED_OPTIONS (code=exited, status=0/SUCCESS)Main PID:13280(keepalived) CGroup: /system.slice/keepalived.service ├─13280/usr/sbin/keepalived -D ├─13281/usr/sbin/keepalived -D └─13282/usr/sbin/keepalived -DJul1315:12:22web2 Keepalived_vrrp[13282]: Sending gratuitous ARPon...Jul1315:12:22web2 Keepalived_vrrp[13282]: Sending gratuitous ARPon...Jul1315:12:22web2 Keepalived_vrrp[13282]: Sending gratuitous ARPon...Jul1315:12:22web2 Keepalived_vrrp[13282]: Sending gratuitous ARPon...Jul1315:12:27web2 Keepalived_vrrp[13282]: Sending gratuitous ARPon...Jul1315:12:27web2 Keepalived_vrrp[13282]: VRRP_Instance(VI_1) Sendi...Jul1315:12:27web2 Keepalived_vrrp[13282]: Sending gratuitous ARPon...Jul1315:12:27web2 Keepalived_vrrp[13282]: Sending gratuitous ARPon...Jul1315:12:27web2 Keepalived_vrrp[13282]: Sending gratuitous ARPon...Jul1315:12:27web2 Keepalived_vrrp[13282]: Sending gratuitous ARPon...Hint: Some lines were ellipsized, use -l to showinfull.
10.查看丢包情况
在windows上模拟持续性访问,使用ping查看丢包情况

二、建立共享存储服务器
1.安装NFS方式,master 服务端
[root@web1 web]# yum install -y rpcbind nfs-utils
2.slaver 客户端
[root@web2 web]# yum install -y nfs-utils
3.master服务端启动共享存储服务
[root@web1 web]# cat /etc/exports
/server/web192.168.0.0/24(rw,sync,no_root_squash)
[root@web1 web]# systemctl start nfs
4.slaver客户端查看共享存储
[root@web2 web]# showmount -e 192.168.0.230
Export listfor192.168.0.230:/server/web192.168.0.0/24
[root@web2 web]# mount -t nfs 192.168.0.230:/server/web /server/web -o proto=tcp -o nolock
[root@web2 web]# ls
[root@web2 web]# df -h
Filesystem Size Used Avail Use% Mountedon/dev/mapper/centos-root 50G 4.2G 46G 9% /devtmpfs899M0899M0% /devtmpfs911M0911M0% /dev/shmtmpfs911M9.6M902M2% /runtmpfs911M0911M0% /sys/fs/cgroup/dev/sda11014M142M873M14% /boot/dev/mapper/centos-home47G74M47G1% /hometmpfs183M0183M0% /run/user/0192.168.0.230:/server/web50G4.2G46G9% /server/web
[root@web2 web]#
5.修改nginx配置文件(两边配置一致)
[root@web1 ~]# cd /usr/local/nginx/conf/vhost/
[root@web1 vhost]# vim zt.conf
server {
listen80;#listen [::]:80 default_server ipv6only=on;
server_name zt.linuxview.com ;
index index.html index.htm index.php;
root /server/web/test;
#error_page 404 /404.html;error_page404404/404.html;
include enable-php.conf;
location /nginx_status {
stub_statuson;
access_logoff;
}
location ~* ^/data/(attachment|avatar)/.*\.(php|php5)$ {
deny all;
}
location ~ .*\.(gif|jpg|jpeg|png|bmp|swf)$ {
expires30d;
}
location ~ .*\.(js|css)?$ {
expires12h;
}
location ~ /\. {
deny all;
}
access_log /server/logs/nginx/zuitu/access.log ;
error_log /server/logs/nginx/zuitu/error.log ;
}
6.访问网页

7.master上设置反向代理
[root@web1 vhost]# vim xs.conf
server {
listen80;
server_name xs.linuxview.com ;
location / {
proxy_pass http://192.168.0.211:80;
proxy_set_header Host xs.linuxview.com;
proxy_redirect off;
proxy_set_header X-Real-IP192.168.0.211;
proxy_set_header X-Forwarded-For $proxy_add_x_forwarded_for;
proxy_connect_timeout60;
proxy_read_timeout600;
proxy_send_timeout600;
}
access_log /server/logs/nginx/zuitu/access.log ;
error_log /server/logs/nginx/zuitu/error.log ;
}
[root@web1 vhost]# /usr/local/nginx/sbin/nginx -s reload
8.slaver上设置nginx的配置文件
[root@web2 vhost]# vim xs.conf
server {
listen80;
#listen [::]:80 default_server ipv6only=on;
server_name xs.linuxview.com ;
index index.html index.htm index.php;
root /server/web/test3;#error_page 404 /404.html;error_page404404/404.html;
include enable-php.conf;
location /nginx_status {
stub_statuson;
access_logoff;
}
location ~* ^/data/(attachment|avatar)/.*\.(php|php5)$ {
deny all;
}
location ~ .*\.(gif|jpg|jpeg|png|bmp|swf)$ {
expires30d;
}
location ~ .*\.(js|css)?$ {
expires12h;
}
location ~ /\. {
deny all;
}
access_log /server/logs/nginx/zuitu/access.log ;
error_log /server/logs/nginx/zuitu/error.log ;
}
[root@web2 vhost]# /usr/local/nginx/sbin/nginx -s reload
9.访问网页测试

三、WAF镶嵌lnmp架构
1.安装依赖包
[root@waf ~]# yum install -y readline-devel pcre-devel openssl-devel gcc* git* libxml2*
2.下载2.0.5版本的luajit,编译安装
[root@waf ~]# mkdir -p /server/source
[root@waf ~]# cd /server/source/
[root@waf source]# wget http://luajit.org/download/LuaJIT-2.0.5.tar.gz
[root@waf source]# tar -xf LuaJIT-2.0.5.tar.gz
[root@waf source]# cd LuaJIT-2.0.5
[root@waf LuaJIT-2.0.5]# export LUAJIT_LIB=/user/local/lib
[root@waf LuaJIT-2.0.5]# export LUAJIT_INC=/usr/local/include/luajit-2.0
[root@waf LuaJIT-2.0.5]# make && make install && ln -s /usr/local/lib/libluajit-5.1.so.2 /lib64/libluajit-5.1.so.2
成功安装标志:

3.下载并编译安装openresty
[root@waf source]# wget https://openresty.org/download/openresty-1.11.2.2.tar.gz
[root@waf source]# tar -xf openresty-1.11.2.2.tar.gz
[root@waf source]# cd openresty-1.11.2.2
[root@waf openresty-1.11.2.2]# ./configure --prefix=/usr/local/openresty --user=www --group=www --with-luajit --with-http_v2_module --with-http_stub_status_module --with-http_ssl_module --with-http_gzip_static_module --with-ipv6 --with-http_sub_module --with-pcre --with-pcre-jit --with-file-aio --with-http_dav_module
[root@waf openresty-1.11.2.2]# gmake && gmake install
4.修改最大文件打开数量
[root@waf openresty-1.11.2.2]# vim /proc/sys/fs/file-max100000
[root@waf openresty-1.11.2.2]# ulimit -l64
5.修改openresty内置的nginx配置文件(--prefix指定的是安装目录,所以配置文件就在安装目录里面,编译完成之后,就不用在源码包界面了)
[root@waf openresty]# mkdir /server/conf
[root@waf openresty]# pwd/usr/local/openresty
[root@waf openresty]# cd /server/conf/
[root@waf conf]# ls
[root@waf conf]# ln -s /usr/local/openresty /server/conf/openresty
[root@waf conf]# lsopenresty
[root@waf conf]# ln -s /usr/local/openresty/nginx /server/conf/nginx
[root@waf conf]# ll
total 0
lrwxrwxrwx1root root26Jul1009:25nginx ->/usr/local/openresty/nginx
lrwxrwxrwx1root root20Jul1009:23openresty ->/usr/local/openresty
[root@waf conf]#vim nginx.conf
(修改user为www ,在最后一行的括号上新增include vhost/*.conf;)
[root@waf conf]# useradd www -M -s /sbin/nologin
[root@waf conf]# mkdir vhost
[root@waf conf]# cd vhost/
##编写测试网页
[root@waf vhost]# vim waf.conf
server {
listen80;
server_name waf.linuxview.com ;
indexindex.html index.php index.htm ;
root /server/web/waf ;
error_log /server/logs/nginx/waf/error.log;
access_log /server/logs/nginx/waf/access.log;
}
[root@waf vhost]# mkdir -p /server/web/waf && cd /server/web/waf
##创建测试网页
[root@waf waf]# cat index.html
Welcome to Linuxview!!!
##重加载nginx
[root@waf waf]# /usr/local/openresty/nginx/sbin/nginx -s reload
6.访问测试网页

7.安装waf防护模块
[root@waf waf]# cd /server/source/
#这个目录用来存源码或软件包等
[root@waf source]# git clone https://github.com/leoheng/lua.git
#这些全是lua语言写的防护模块,复制到nginx的conf配置文件目录
[root@waf waf]# cp -a ./waf /server/conf/nginx/conf/
[root@waf waf]# cd /server/conf/nginx/conf/
[root@waf conf]# ls
fastcgi.conf koi-win scgi_params waffastcgi.conf.defaultmime.types scgi_params.defaultwin-utffastcgi_params mime.types.defaultuwsgi_paramsfastcgi_params.defaultnginx.conf uwsgi_params.defaultkoi-utf nginx.conf.defaultvhost
[root@waf conf]# cd waf/
[root@waf waf]# ls
access.lua config.lua init.lua lib.lua rule-config
[root@waf waf]#cd ..
##在http字段下添加lua模块
[root@waf conf]# vim nginx.conf
lua_shared_dict limit50m; ##CC,50M
lua_package_path/server/conf/nginx/conf/waf/?.lua ;
init_by_lua_file /server/conf/nginx/conf/waf/init.lua ;
access_by_lua_file /server/conf/nginx/conf/waf/access.lua ;
##检查配置文件并重加载服务
[root@waf conf]# /usr/local/openresty/nginx/sbin/nginx -t
nginx: the configuration file /usr/local/openresty/nginx/conf/nginx.conf syntaxisoknginx: configuration file /usr/local/openresty/nginx/conf/nginx.conf testissuccessful
[root@waf conf]# /usr/local/openresty/nginx/sbin/nginx -s reload
8.配置waf防护
[root@waf waf]# cat config.lua
--WAF config file,enable ="on",disable ="off" ##WAF功能选项
--waf status
config_waf_enable ="on" ##是否启动waf防护
--log dirconfig_log_dir ="/server/logs/waf_logs" ##waf的日志
--rule settingconfig_rule_dir ="/usr/local/openresty/nginx/conf/waf/rule-config" ##waf的防护规则配置文件
--enable/disable white urlconfig_white_url_check ="on" ##配置白名单url检查
--enable/disable white ip
config_white_ip_check ="on" ##配置白名单IP检查
--enable/disable block ipconfig_black_ip_check ="on" ##配置黑名单IP检查
--enable/disable url filteringconfig_url_check ="on" ##配置url检查过滤
--enalbe/disable url args filteringconfig_url_args_check ="on" ##配置url参数检查
--enable/disable user agent filteringconfig_user_agent_check ="on" ##配置用户代理检查
--enable/disable cookie deny filteringconfig_cookie_check ="on" ##配置cookie过滤检查
--enable/disable cc filteringconfig_cc_check ="on" ##配置CC×××检查过滤
--cc rate the xxx of xxx secondsconfig_cc_rate ="10/60" ##CC×××速率访问网页每60秒访问10次
--enable/disable post filteringconfig_post_check ="on" ##配置post检查过滤
--config waf output redirect/htmlconfig_waf_output ="html" ##配置匹配成功重定向或者输出警告页面
--if config_waf_output ,setting urlconfig_waf_redirect_url ="https://www.baidu.com" ##重定向到百度首页##输出HTML格式的警告信息[[ html警告内容 ]]
config_output_html=[[ WAF-TEST
WAF-TEST
// TODO SOMTHING HTML
]]
9.访问匹配模块
规则:检测白名单-》黑名单-》UA×××检测-》CC×××检测-》cookie检测-》URL检测-》URL×××检测-》URL参数检测-》post检测
[root@waf waf]# cat access.lua
require'init' ##先请求init.lua文件进行匹配,然后进行检查功能匹配
##配置检查顺序
function waf_main()
if white_ip_check() then
elseif black_ip_check() then
elseif user_agent_attack_check() then
elseif cc_attack_check() then
elseif cookie_attack_check() then
elseif white_url_check() then
elseif url_attack_check() then
elseif url_args_attack_check() then
--elseif post_attack_check() then
else
return
end
end
waf_main()
[root@waf waf]#
10.防护规则大概流程图:

11.url参数测试

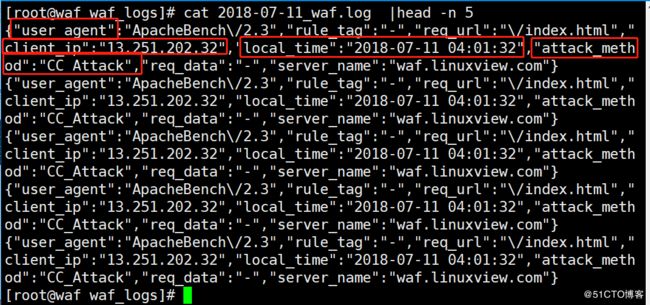
12.模拟CC×××测试
[root@waf waf]# ab -c 100 -t 100 http://waf.linuxview.com/


13.查看日志记录:×××方式,客户端地址,被×××的服务器时间等等
14.SQL测试

15.安装httpguard再升级CC防护
下载压缩包,复制lua配置到waf下
[root@waf waf]# cd /server/source/
[root@waf source]# wget --no-check-certificate https://github.com/centos-bz/HttpGuard/archive/master.zip
[root@waf source]# unzip master.zip
[root@waf source]# cd HttpGuard-master/
[root@waf HttpGuard-master]# cp guard.lua /server/conf/nginx/conf/waf/
[root@waf HttpGuard-master]# cp runtime.lua /server/conf/nginx/conf/waf/
四、MySQL5.7集群(双主多从模式)
当只有两台数据库的时候,使用双主模式(互为主从)
1.修改master的mysql配置文件
[root@web1 ~]# vim /etc/my.cnf
#在mysqld下新增一下配置
[mysqld]
log-bin=mysql-bin
binlog_format=mixed
server-id = 1
sync_binlog = 1
binlog_checksum = none
binlog_format = mixed
auto-increment-increment = 2
auto-increment-offset = 1
slave-skip-errors = all
[root@web1 ~]# systemctl restart mysql
[root@web1 ~]# systemctl status mysql
● mysql.service - LSB: start and stop MySQL Loaded: loaded (/etc/rc.d/init.d/mysql; bad; vendor preset: disabled) Active: active (exited) since Fri 2018-07-13 17:18:39 CST; 6s ago Docs: man:systemd-sysv-generator(8) Process: 37255 ExecStart=/etc/rc.d/init.d/mysql start (code=exited, status=0/SUCCESS)Jul 13 17:18:39 web1 systemd[1]: Starting LSB: start and stop MySQL...Jul 13 17:18:39 web1 mysql[37255]: Starting MySQL SUCCESS!Jul 13 17:18:39 web1 systemd[1]: Started LSB: start and stop MySQL.Jul 13 17:18:40 web1 mysql[37255]: 2018-07-13T09:18:40.050893Z mysqld_safe A mys...tsHint: Some lines were ellipsized, use -l to show in full.
2.进入数据库,赋权给web2用户,让它连接主数据库同步数据
[root@web1 ~]# mysql -uroot -p000000
mysql:[Warning] Using a password on the command line interface can be insecure.Welcome to the MySQL monitor. Commandsendwith ;or\g.Your MySQL connection id is3Serverversion:5.7.18-log Source distributionCopyright (c)2000,2017, Oracleand/orits affiliates. All rights reserved.Oracle is a registered trademark of Oracle Corporationand/oritsaffiliates. Other names may be trademarks of their respectiveowners.Type'help;'or'\h'forhelp. Type'\c'to clear the current input statement.
mysql> grant replication slave,replication client on *.* to web2@'192.168.0.%'identified by"000000";
Query OK,0rows affected,1warning (0.13sec)
mysql> flush privileges;
Query OK,0rows affected (0.03sec)
###查看log bin日志和post值位置
mysql> show master status;
+------------------+----------+--------------+------------------+-------------------+| File |Position| Binlog_Do_DB |Binlog_Ignore_DB| Executed_Gtid_Set |+------------------+----------+--------------+------------------+-------------------+| mysql-bin.000006 |620| || |+------------------+----------+--------------+------------------+-------------------+1 row in set (0.01sec)
mysql>
3.在slaver上修改MySQL配置文件
[root@web2 ~]# vim /etc/my.cnf
[mysqld]
server-id =2
log-bin = mysql-bin
sync_binlog =1
binlog_checksum = none
binlog_format = mixed
auto-increment-increment =2
auto-increment-offset =2
slave-skip-errors = all
[root@web2 ~]# systemctl restart mysql
[root@web2 ~]# systemctl status mysql
● mysql.service - LSB: startandstop MySQL Loaded: loaded (/etc/rc.d/init.d/mysql; bad; vendor preset: disabled) Active: active (running) since Fri2018-07-1317:29:56CST;20s ago Docs: man:systemd-sysv-generator(8) Process:31883ExecStart=/etc/rc.d/init.d/mysql start (code=exited, status=0/SUCCESS) CGroup: /system.slice/mysql.service ├─31891/bin/sh /usr/local/mysql/bin/mysqld_safe --datadir=/usr/local/m... └─32461/usr/local/mysql/bin/mysqld --basedir=/usr/local/mysql --datadi...Jul1317:29:38web2 systemd[1]: Starting LSB: startandstop MySQL...Jul1317:29:56web2 mysql[31883]: Starting MySQL................. SUCCESS!Jul1317:29:56web2 systemd[1]: Started LSB: startandstop MySQL.
4.创建数据库用户用于数据库同步数据
[root@web2 ~]# mysql -uroot -p000000
mysql: [Warning] Using a passwordonthe command line interface can be insecure.Welcome to the MySQL monitor. Commands end with ;or\g.Your MySQL connection idis3Server version:5.7.18-log Source distributionCopyright (c)2000,2017, Oracleand/orits affiliates. All rights reserved.Oracleisa registered trademarkofOracle Corporationand/oritsaffiliates. Other names may be trademarksoftheir respectiveowners.Type'help;'or'\h'forhelp. Type'\c'to clear the current input statement.
mysql> grant replication slave,replication clienton*.* to web2@'192.168.0.%'identifiedby"000000";
ERROR1064(42000): You have an errorinyour SQL syntax; check the manual that corresponds to your MySQL server versionforthe right syntax to use near'identiified by "000000"'at line1
mysql> grant replication slave,replication clienton*.* to web2@'192.168.0..%'identifiedby"000000";
Query OK,0rows affected,1warning (0.18sec)
mysql> flush privileges;
Query OK,0rows affected (0.00sec)
mysql> show master status;
+------------------+----------+--------------+------------------+-------------------+| File | Position | Binlog_Do_DB | Binlog_Ignore_DB | Executed_Gtid_Set |+------------------+----------+--------------+------------------+-------------------+| mysql-bin.000007|610| | | |+------------------+----------+--------------+------------------+-------------------+1rowinset (0.01sec)mysql>
5.在master上同步数据库到slaver上
mysql> stop slave;
Query OK, 0 rows affected, 1 warning (0.02 sec)
mysql>change master to master_host='192.168.0.211',master_user='web2',master_password='000000',master_log_file='mysql-bin.000006',master_log_pos=620;
Query OK, 0 rows affected, 2 warnings (0.03 sec)
mysql> start slave;
Query OK, 0 rows affected (0.00 sec)
mysql> show slave status \G;
*************************** 1. row *************************** Slave_IO_State: Waiting for master to send event Master_Host: 192.168.0.211 Master_User: web2 Master_Port: 3306 Connect_Retry: 60 Master_Log_File: mysql-bin.000008 Read_Master_Log_Pos: 1110 Relay_Log_File: web1-relay-bin.000002 Relay_Log_Pos: 312 Relay_Master_Log_File: mysql-bin.000008 Slave_IO_Running: Yes Slave_SQL_Running: Yes Replicate_Do_DB: Replicate_Ignore_DB: Replicate_Do_Table: Replicate_Ignore_Table: Replicate_Wild_Do_Table: Replicate_Wild_Ignore_Table: Last_Errno: 0 Last_Error: Skip_Counter: 0 Exec_Master_Log_Pos: 1110 Relay_Log_Space: 510 Until_Condition: None Until_Log_File: Until_Log_Pos: 0 Master_SSL_Allowed: No Master_SSL_CA_File: Master_SSL_CA_Path: Master_SSL_Cert: Master_SSL_Cipher: Master_SSL_Key: Seconds_Behind_Master: 0Master_SSL_Verify_Server_Cert: No Last_IO_Errno: 0 Last_IO_Error: Last_SQL_Errno: 0 Last_SQL_Error: Replicate_Ignore_Server_Ids: Master_Server_Id: 2 Master_UUID: ed87ba4b-8653-11e8-94fe-000c29d7dfdc Master_Info_File: /usr/local/mysql/var/master.info SQL_Delay: 0 SQL_Remaining_Delay: NULL Slave_SQL_Running_State: Slave has read all relay log; waiting for more updates Master_Retry_Count: 86400 Master_Bind: Last_IO_Error_Timestamp: Last_SQL_Error_Timestamp: Master_SSL_Crl: Master_SSL_Crlpath: Retrieved_Gtid_Set: Executed_Gtid_Set: Auto_Position: 0 Replicate_Rewrite_DB: Channel_Name: Master_TLS_Version:1 row in set (0.00 sec)
6.在slaver上同步master的数据库
mysql> stop slave;
Query OK, 0 rows affected, 1 warning (0.02 sec)
mysql>change master to master_host='192.168.0.230',master_user='web2',master_password='000000',master_log_file='mysql-bin.000006',master_log_pos=620;
Query OK, 0 rows affected, 2 warnings (0.03 sec)
mysql> start slave;
Query OK, 0 rows affected (0.00 sec)
mysql> show slave status \G;
*************************** 1. row *************************** Slave_IO_State: Connecting to master Master_Host: 192.168.0.230 Master_User: web1 Master_Port: 3306 Connect_Retry: 60 Master_Log_File: mysql-bin.000010 Read_Master_Log_Pos: 1110 Relay_Log_File: web2-relay-bin.000001 Relay_Log_Pos: 4 Relay_Master_Log_File: mysql-bin.000010 Slave_IO_Running: Yes Slave_SQL_Running: Yes
7.在master的数据库上创建数据库和表
mysql> create database leotest;
Query OK, 1 row affected (0.00 sec)
mysql> use leotest;
Database changed
mysql>create tabletest(id int(4),name varchar(10));
Query OK, 0 rows affected (0.04 sec)
mysql> show tables ;
+-------------------+| Tables_in_leotest |+-------------------+| test |+-------------------+1 row in set (0.00 sec)
mysql>
8.在slaver上查看同步的数据
mysql> show databases;
+--------------------+| Database |+--------------------+| information_schema || leotest || mysql || performance_schema || sys |+--------------------+5rowsinset (0.00sec)
mysql>
至此,MySQL集群已完成,而waf嵌入LNMP集群架构也完成了。
(原文来自:http://blog.51cto.com/leoheng/2148772)