手写数字识别在TensorFlow是一个非常常见的例子,本文将使用卷积神经网络来实现手写字体识别。我这里没有直接使用系统中已经提供好的数据来实现,而是从数据最开始的状态来一步步实现。
1.图像数据的获取
数据下载地址
2.图像数据读取
import struct
# 训练集文件
train_images_idx3_ubyte_file = './train-images-idx3-ubyte/train-images.idx3-ubyte'
# 训练集标签文件
train_labels_idx1_ubyte_file = './train-labels-idx1-ubyte/train-labels.idx1-ubyte'

# 测试集文件
test_images_idx3_ubyte_file = './t10k-images-idx3-ubyte/t10k-images.idx3-ubyte'
# 测试集标签文件
test_labels_idx1_ubyte_file = './t10k-labels-idx1-ubyte/t10k-labels.idx1-ubyte'


def decode_idx3_ubyte(idx3_ubyte_file):
    """
    解析idx3文件的通用函数
    :param idx3_ubyte_file: idx3文件路径
    :return: 数据集
    """
    # 读取二进制数据
    bin_data = open(idx3_ubyte_file, 'rb').read()

    # 解析文件头信息,依次为魔数、图片数量、每张图片高、每张图片宽
    offset = 0
    fmt_header = '>iiii'
    magic_number, num_images, num_rows, num_cols = struct.unpack_from(fmt_header, bin_data, offset)
    print('魔数:%d, 图片数量: %d张, 图片大小: %d*%d' % (magic_number, num_images, num_rows, num_cols))

    # 解析数据集
    image_size = num_rows * num_cols
    offset += struct.calcsize(fmt_header)
    fmt_image = '>' + str(image_size) + 'B'
    # images = np.empty((num_images, num_rows, num_cols))
    # images = np.empty((num_images, num_rows, num_cols),dtype=np.uint8)
    images = np.empty((num_images, image_size),dtype=np.uint8)
    for i in range(num_images):
        if (i + 1) % 10000 == 0:
            print('已解析 %d' % (i + 1) + '张')
        # images[i] = np.array(struct.unpack_from(fmt_image, bin_data, offset)).reshape((num_rows, num_cols))
        images[i] = np.array(struct.unpack_from(fmt_image, bin_data, offset))
        offset += struct.calcsize(fmt_image)
    return images


def decode_idx1_ubyte(idx1_ubyte_file):
    """
    解析idx1文件的通用函数
    :param idx1_ubyte_file: idx1文件路径
    :return: 数据集
    """
    # 读取二进制数据
    bin_data = open(idx1_ubyte_file, 'rb').read()

    # 解析文件头信息,依次为魔数和标签数
    offset = 0
    fmt_header = '>ii'
    magic_number, num_images = struct.unpack_from(fmt_header, bin_data, offset)
    print('魔数:%d, 图片数量: %d张' % (magic_number, num_images))

    # 解析数据集
    offset += struct.calcsize(fmt_header)
    fmt_image = '>B'
    # labels = np.empty(num_images)
    labels = np.empty(num_images,dtype=np.uint8)
    for i in range(num_images):
        if (i + 1) % 10000 == 0:
            print('已解析 %d' % (i + 1) + '张')
        labels[i] = struct.unpack_from(fmt_image, bin_data, offset)[0]
        offset += struct.calcsize(fmt_image)
    return labels


def load_train_images(idx_ubyte_file=train_images_idx3_ubyte_file):
    """
    TRAINING SET IMAGE FILE (train-images-idx3-ubyte):
    [offset] [type]          [value]          [description]
    0000     32 bit integer  0x00000803(2051) magic number
    0004     32 bit integer  60000            number of images
    0008     32 bit integer  28               number of rows
    0012     32 bit integer  28               number of columns
    0016     unsigned byte   ??               pixel
    0017     unsigned byte   ??               pixel
    ........
    xxxx     unsigned byte   ??               pixel
    Pixels are organized row-wise. Pixel values are 0 to 255. 0 means background (white), 255 means foreground (black).

    :param idx_ubyte_file: idx文件路径
    :return: n*row*col维np.array对象,n为图片数量
    """
    return decode_idx3_ubyte(idx_ubyte_file)


def load_train_labels(idx_ubyte_file=train_labels_idx1_ubyte_file):
    """
    TRAINING SET LABEL FILE (train-labels-idx1-ubyte):
    [offset] [type]          [value]          [description]
    0000     32 bit integer  0x00000801(2049) magic number (MSB first)
    0004     32 bit integer  60000            number of items
    0008     unsigned byte   ??               label
    0009     unsigned byte   ??               label
    ........
    xxxx     unsigned byte   ??               label
    The labels values are 0 to 9.

    :param idx_ubyte_file: idx文件路径
    :return: n*1维np.array对象,n为图片数量
    """
    return decode_idx1_ubyte(idx_ubyte_file)


def load_test_images(idx_ubyte_file=test_images_idx3_ubyte_file):
    """
    TEST SET IMAGE FILE (t10k-images-idx3-ubyte):
    [offset] [type]          [value]          [description]
    0000     32 bit integer  0x00000803(2051) magic number
    0004     32 bit integer  10000            number of images
    0008     32 bit integer  28               number of rows
    0012     32 bit integer  28               number of columns
    0016     unsigned byte   ??               pixel
    0017     unsigned byte   ??               pixel
    ........
    xxxx     unsigned byte   ??               pixel
    Pixels are organized row-wise. Pixel values are 0 to 255. 0 means background (white), 255 means foreground (black).

    :param idx_ubyte_file: idx文件路径
    :return: n*row*col维np.array对象,n为图片数量
    """
    return decode_idx3_ubyte(idx_ubyte_file)


def load_test_labels(idx_ubyte_file=test_labels_idx1_ubyte_file):
    """
    TEST SET LABEL FILE (t10k-labels-idx1-ubyte):
    [offset] [type]          [value]          [description]
    0000     32 bit integer  0x00000801(2049) magic number (MSB first)
    0004     32 bit integer  10000            number of items
    0008     unsigned byte   ??               label
    0009     unsigned byte   ??               label
    ........
    xxxx     unsigned byte   ??               label
    The labels values are 0 to 9.

    :param idx_ubyte_file: idx文件路径
    :return: n*1维np.array对象,n为图片数量
    """
    return decode_idx1_ubyte(idx_ubyte_file)
def loaddata():
    train_images = load_train_images()
    train_labels = load_train_labels()
    test_images = load_test_images()
    test_labels = load_test_labels()
    return (train_images,train_labels,test_images,test_labels)
这里使用struct这个模块来对对读取的数据进行解析(一张图片一张图片读取),其实也可以直接读取所有数据然后reshape。
对于图像训练数据返回的矩阵是(60000,28*28),测试数据只有10000个。
3.数据正则化
读取的数据是不能直接放到模型里进行训练的,对于标签数据需要转化为one-hot这样的矩阵。
def normalize(train_images,train_labels,test_images,test_labels):
    train_images = train_images/255
    new_lables = np.zeros((60000,10))
    for i in range(60000):
        l = train_labels[i]
        new_lables[i][int(l)] = 1
        #one-hot编码
    train_labels = new_lables

    test_images = test_images/255
    new_lables = np.zeros((10000,10))
    for i in range(10000):
        l = test_labels[i]
        new_lables[i][int(l)] = 1
    test_labels = new_lables
    return (train_images,train_labels,test_images,test_labels)
4.模型建立
我这里的模型使用两层卷积层,每个卷积层接一个max池化,然后接一个全连接层,最后是输出层。激活函数使用relu,最后一层使用softmax。
def cnn_train(train_images,train_labels,test_images,test_labels):
    x = tf.placeholder("float", [None, 784])
    y_ = tf.placeholder("float", [None,10])
    x_image = tf.reshape(x, [-1,28,28,1])
    '''
    卷积第一层,卷积核是5x5,输入是1个通道,输出是32个通道
    '''
    W_conv1 = weight_variable([5, 5, 1, 32])
    b_conv1 = bias_variable([32])

    h_conv1 = tf.nn.relu(conv2d(x_image, W_conv1) + b_conv1)
    h_pool1 = max_pool_2x2(h_conv1)

    '''
    卷积第二层,卷积核是5x5,输入时32个通道,输出是64个通道
    '''

    W_conv2 = weight_variable([5, 5, 32, 64])
    b_conv2 = bias_variable([64])

    h_conv2 = tf.nn.relu(conv2d(h_pool1, W_conv2) + b_conv2)
    h_pool2 = max_pool_2x2(h_conv2)

    '''
    全连接层
    '''
    W_fc1 = weight_variable([7 * 7 * 64, 1024])
    b_fc1 = bias_variable([1024])
    h_pool2_flat = tf.reshape(h_pool2, [-1, 7*7*64])
#数据必须进行平铺
    h_fc1 = tf.nn.relu(tf.matmul(h_pool2_flat, W_fc1) + b_fc1)
    '''
    抛弃部分节点,防止过拟合
    '''
    keep_prob = tf.placeholder(tf.float32)
    h_fc1_drop = tf.nn.dropout(h_fc1, keep_prob)

    y_conv = tf.matmul(h_fc1_drop, W_fc2) + b_fc2

    cross_entropy = tf.reduce_mean(tf.nn.softmax_cross_entropy_with_logits(logits=y_conv, labels=y_))
    train_step = tf.train.AdamOptimizer(1e-4).minimize(cross_entropy)
    correct_prediction = tf.equal(tf.argmax(y_conv,1), tf.argmax(y_,1))
    accuracy = tf.reduce_mean(tf.cast(correct_prediction, tf.float32))
    sess = tf.Session()
    sess.run(tf.global_variables_initializer())
    for i in range(2000):
        batch_xs, batch_ys = gettrains(train_images,train_labels,100)
        if i%100 == 0:
            train_accuracy = accuracy.eval(session=sess,feed_dict={x:batch_xs, y_: batch_ys, keep_prob: 1.0})
            print("step %d, training accuracy %g"%(i, train_accuracy))
        train_step.run(session=sess,feed_dict={x: batch_xs, y_: batch_ys, keep_prob: 0.5})

    print("test accuracy %g"%accuracy.eval(session=sess,feed_dict={x: test_images, y_: test_labels, keep_prob: 1.0}))
这里要注意在卷积层与全连接之间要平铺数据,也就是这时候不需要顾忌图像的长宽问题。
3.使用keras建立模型
from keras.models import Sequential
from keras.layers import Dense, Activation,Flatten
from keras.layers.convolutional import Convolution2D
import numpy as np
import matplotlib.pyplot as plt
from keras.layers.pooling import MaxPooling2D
from  keras.layers.convolutional import Conv2D
from keras.utils import plot_model
import cnn_1 as fun
%matplotlib inline
#加载数据
train_images,train_labels,test_images,test_labels = fun.loaddata()
t,l,ti,tl = fun.normalize(train_images,train_labels,test_images,test_labels)
t_i = t.reshape(-1,28,28,1)
ti_i = ti.reshape(-1,28,28,1)
model = Sequential()
#第一层卷积
model.add(Conv2D(32, kernel_size = (5, 5), padding='same', activation = 'relu',input_shape=(28,28,1)))
#池化
model.add(MaxPooling2D(pool_size=(2, 2)))
#第二层卷积
model.add(Conv2D(64, kernel_size = (5, 5), padding='same', activation = 'relu'))
model.add(MaxPooling2D(pool_size=(2, 2)))
model.add(Flatten())
model.add(Dense(1024, activation='relu'))
model.add(Dense(10, activation='softmax'))
model.compile(optimizer='rmsprop',
loss='categorical_crossentropy',
metrics=['accuracy'])
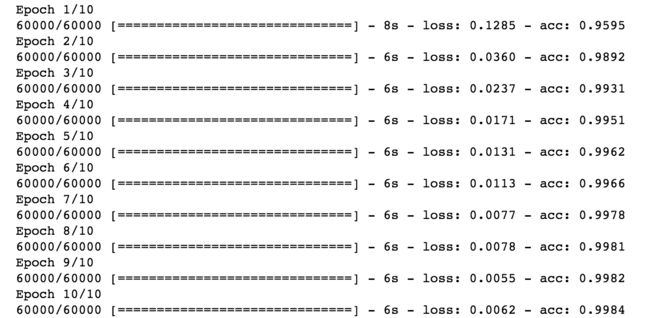
model.fit(t_i, l, nb_epoch=10, batch_size=100)
这里的fit要说明一下,我提供训练的数据是60000个,batch_size是100,批次是10,这里要注意每次都会把60000个数据测试完,重复训练10次。这跟我上面使用的TensorFlow是不同的,它一次获取100个数据,训练2000次,keras训练是6000次。

