需要适配的手机的尺寸
1.iphone4 4s (320 480)
2.iphone5 5s (320 568)
3.iphone6 6s (375x667)
4.iphone6p 6sp (414x736)
适配不同的屏幕尺寸常用的有三种形式
1.xib自动布局
2.使用NSLayoutConstraint类代码创建(包括第三方类库Masonry的使用)
3.使用VFM布局
今天我们了解的是Masonry第三方布局的时候用
VFM的使用可以参考http://www.jianshu.com/p/dfc11861cc85里面有比较详细的介绍
masonry下载地址:https://github.com/SnapKit/Masonry
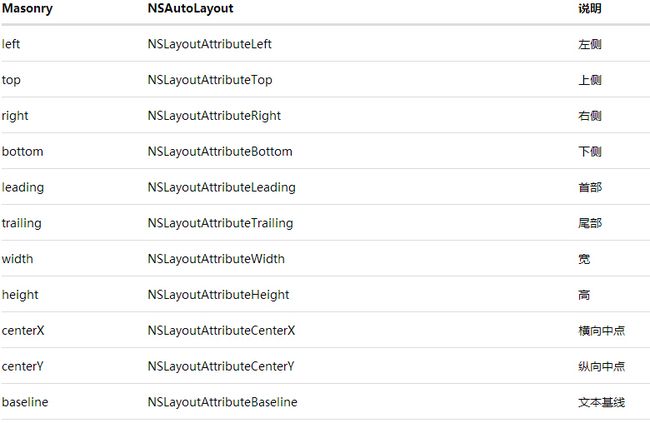
一 .查看mastory的属性
1.查看mastery的属性
@property (nonatomic, strong, readonly) MASViewAttribute *mas_left;
@property (nonatomic, strong, readonly) MASViewAttribute *mas_top;
@property (nonatomic, strong, readonly) MASViewAttribute *mas_right;
@property (nonatomic, strong, readonly) MASViewAttribute *mas_bottom;
@property (nonatomic, strong, readonly) MASViewAttribute *mas_leading;
@property (nonatomic, strong, readonly) MASViewAttribute *mas_trailing;
@property (nonatomic, strong, readonly) MASViewAttribute *mas_width;
@property (nonatomic, strong, readonly) MASViewAttribute *mas_height;
@property (nonatomic, strong, readonly) MASViewAttribute *mas_centerX;
@property (nonatomic, strong, readonly) MASViewAttribute *mas_centerY;
@property (nonatomic, strong, readonly) MASViewAttribute  *mas_baseline;
和NSLayoutAttrubute对比
常用的3个方法
1.mas_makeConstraints 只负责添加新增约束,Autolayout中不能同时存在两条针对于同一对象的约束,否则会报错
- (NSArray *)mas_makeConstraints:(void(^)(MASConstraintMaker *make))block;
- mas_updateConstraints 针对上面的情况,会更新在block中出现的约束,确保不会出现两个相同的约束
- (NSArray *)mas_updateConstraints:(void(^)(MASConstraintMaker *make))block;
3.mas_remakeConstraints 会清除之前的所有约束,仅保留最新的约束
- (NSArray *)mas_remakeConstraints:(void(^)(MASConstraintMaker *make))block;
使用方法示例
1、 居中显示一个View
// 居中显示一个view
UIView *view1 = [[UIView alloc] init];
view1.translatesAutoresizingMaskIntoConstraints = NO;
view1.backgroundColor = [UIColor greenColor];
//在使用autolayout之前一定要先将试图添加到superview上 否则会报错
[self.view addSubview:view1];
// 用masonry约束布局
[view1 mas_makeConstraints:^(MASConstraintMaker *make) {
    // 设置view1居中
    make.center.equalTo(self.view);
    // 设置view的宽 高
    make.size.mas_equalTo(CGSizeMake(200, 200));
}];
2.让一个View小于其superView(边界10)
方法一:官方文档提供方式
UIView *view2 = [[UIView alloc]init];
view2.backgroundColor = [UIColor cyanColor];
[self.view addSubview:view2];
UIEdgeInsets padding = UIEdgeInsetsMake(10, 10, 10, 10);
[view2 mas_makeConstraints:^(MASConstraintMaker *make) {
    make.top.equalTo(self.view.mas_top).with.offset(padding.top);
    make.left.equalTo(self.view.mas_left).with.offset(padding.left);
    make.bottom.equalTo(self.view.mas_bottom).with.offset(-padding.bottom);
    make.right.equalTo(self.view.mas_right).with.offset(-padding.right);
}];
方法二:官方文档方式:
//让一个View小于其superView(边界15)
 UIView *view2 = [[UIView alloc]init];
 view2.backgroundColor = [UIColor cyanColor];
[self.view addSubview:view2];
UIEdgeInsets padding = UIEdgeInsetsMake(10, 10, 10, 10);
[view2 mas_makeConstraints:^(MASConstraintMaker *make) {
    make.edges.equalTo(self.view).insets(padding);
}];
方法三:
//让一个View小于其superView(边界15)
UIView *view2 = [[UIView alloc]init];
view2.backgroundColor = [UIColor cyanColor];
[self.view addSubview:view2];
UIEdgeInsets padding = UIEdgeInsetsMake(10, 10, 10, 10);
[view2 mas_makeConstraints:^(MASConstraintMaker *make) {
    make.top.equalTo(self.view).with.offset(padding.top);
    make.left.equalTo(self.view).with.offset(padding.left);
    make.bottom.equalTo(self.view).with.offset(-padding.bottom);
    make.right.equalTo(self.view).with.offset(-padding.right);
}];
方法四:
//让一个View小于其superView(边界15)
UIView *view2 = [[UIView alloc]init];
view2.backgroundColor = [UIColor cyanColor];
[self.view addSubview:view2];
UIEdgeInsets padding = UIEdgeInsetsMake(10, 10, 10, 10);
[view2 mas_makeConstraints:^(MASConstraintMaker *make) {
   make.top.left.bottom.and.right.equalTo(self.view).width.insets(padding);

}];
以上四中方法的实现效果是一样的其中要注意上面那个是with不是width如果输入错误会出现
如下错误
Attributes should be chained before defining the constraint relation
with没有什么语法意义只是让语法好看,width是表示宽度的意思
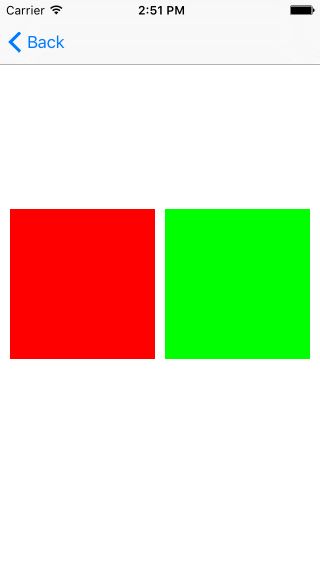
3.实现两个视图2等分平均分配居中
// 让2个view平分
UIView *view3 = [[UIView alloc]init];
view3.backgroundColor = [UIColor redColor];
[self.view addSubview:view3];

UIView *view4 = [[UIView alloc]init];
view4.backgroundColor  = [UIColor greenColor];
[self.view addSubview:view4];

[view3  mas_makeConstraints:^(MASConstraintMaker *make) {

    make.centerY.mas_equalTo(self.view.mas_centerY);
    make.left.equalTo(self.view.mas_left).with.offset(10);
    make.right.equalTo(view4.mas_left).with.offset(-10);
    make.height.mas_equalTo(@150);
    make.width.equalTo(view4);

} ];

[view4 mas_makeConstraints:^(MASConstraintMaker *make) {
    make.centerY.mas_equalTo(self.view.mas_centerY);
    make.left.equalTo(view3.mas_right).with.offset(10);
    make.right.equalTo(self.view.mas_right).with.offset(-10);
    make.height.equalTo(view3);
    make.width.equalTo(view3);
}];
页面效果:
参考文档:
1.https://github.com/SnapKit/Masonry
2.http://www.cocoachina.com/ios/20141219/10702.html
欢迎关注我们的微信公众号,大家一起学习交流。


