大家知道,我们在新建一个项目的时候,xcode就提供了一些模版框架给我们选择,其中比较常用的便是Tabbed Application,一旦选用这个模版创建好项目之后呢,会在StoryBoard中自动生成一系列的ViewController,非常方便(如下图),但仅仅只对个人开发者而言,团队开发的话如果把所有Controller都写到一个StoryBoard中,很有可能因为都修改过这个文件而提交时有冲突,现在我们就学习一下如何避免这种情况。

这里给大家推荐一个优秀的第三方TabBarController:CYLTabBarController,有点不足的是它是用Objective-C写的,不过正好我们可以再温习一下如何在Swift工程下引用Objective-C的开源工具。
继续上一节我们的工程,上一节我们是为项目添加了百度地图的支持,不过我们暂时先不用它,现在我们在finder中新建一个目录,放一些我们后面可能会使用到的第三方或者是我们自己编写的一些公共通用工具类,这也是我们后面的目的,打造一个Swift快速开发框架。
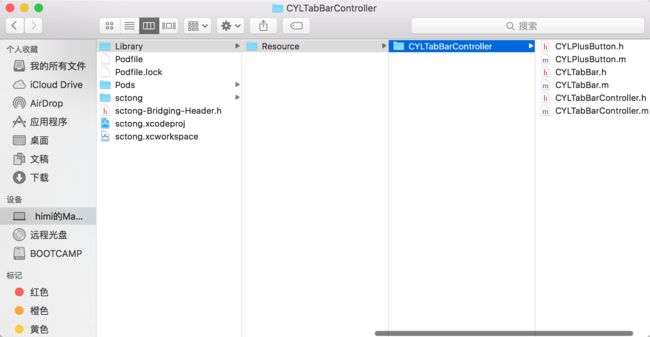
现在我们来开始动手吧,在当前目录中新建目录 Library(以后我们的框架库) -> Resource(所有引用到的第三方开源工具) ,并在Resource中放入上面提到的CYLTabBarController。现在你的目录结构应该跟下面是一样的。
修改sctong-Bridging-Header.h,添加对CYLTabBar的引用
//百度地图
#import //引入base相关所有的头文件
#import //引入地图功能所有的头文件
#import //引入检索功能所有的头文件
#import //引入云检索功能所有的头文件
#import //引入定位功能所有的头文件
#import //引入计算工具所有的头文件
#import //引入周边雷达功能所有的头文件
#import //只引入所需的单个头文件

//新增CYLTabBar
#import "CYLTabBarController.h"
#import "CYLTabBar.h"
#import "CYLPlusButton.h"
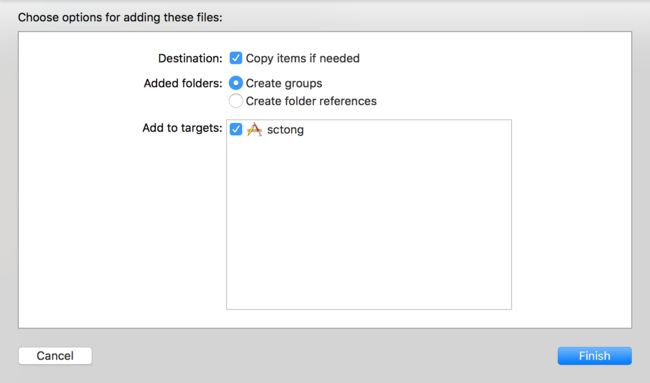
现在我们在项目根目录下也新建一些目录,初学者不要嫌这样很麻烦,你当然可以直接在Xcode中直接新建group,再到group下新建对应的文件就行,但这样在Xcode中看起来还正常,如果你到Finder下查看的话,会发现所有的文件全部并在根目录下的,那里你要找什么文件也不会很方便了,在Xcode支持创建Group时同时创建对应的文件夹之前,我们还是老老实实的在Finder中创建并拖拽进Xcode中吧。

我们将创建好的文件目录拖拽进Xcode,暂时只需要拖根目录,也就是Library及UI两个,现在你的结构应该跟图中的一样:

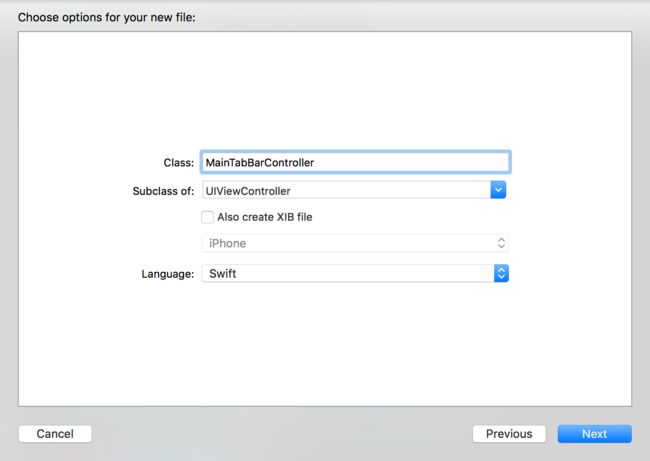
在Main下新建一个MainTabBarController,它就是以后程序的主界面了
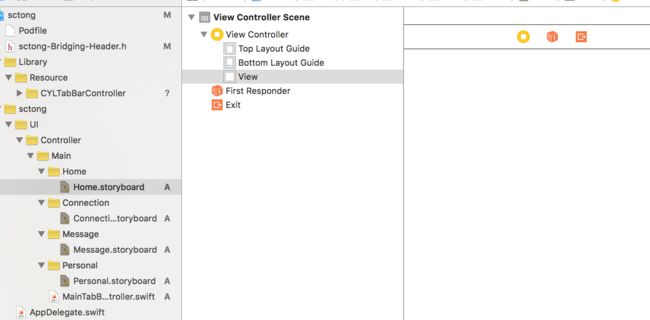
之前我们看过android版的app,可以看到底部分别是首页、人脉、消息、我的,现在我们继续在Finder中分别创建对应的4个目录,Home、Connection、Message和Personal,中间的按钮我们后面再实现。


拖进Xcode中Main下:

分别在4个目录下创建一个StoryBoard,并拖入一个简单的ViewControll,这样如果团队开发的话我们就可以各自维护自己的SB并且不会冲突了。

好的我们现在回到MainTabBarController,修改其继承自CYLTabBarController,如果你没有找到这个类的话,请查看一下sctong-Bridging-Header是否添加了import。
//新增CYLTabBar
#import "CYLTabBarController.h"
#import "CYLTabBar.h"
#import "CYLPlusButton.h"
下面我们修改MainTabBarController,
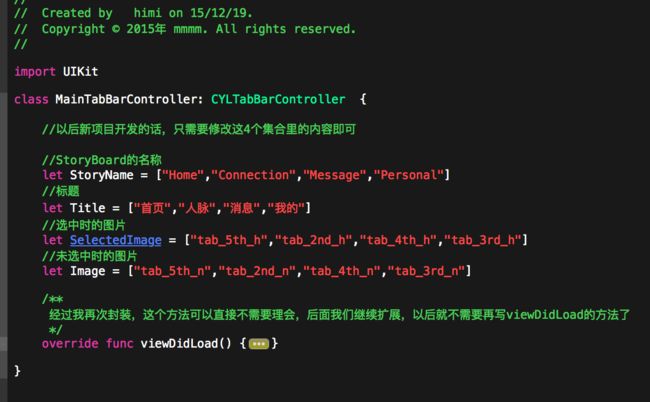
viewDidLoad中的实现
/**
经过我再次封装,这个方法可以直接不需要理会,后面我们继续扩展,以后就不需要再写viewDidLoad的方法了
*/
override func viewDidLoad() {
super.viewDidLoad()
var tabBarItemsAttributes: [AnyObject] = []
var viewControllers:[AnyObject] = []
for i in 0 ... Title.count - 1 {
let dict: [NSObject : AnyObject] = [
CYLTabBarItemTitle: Title[i],
CYLTabBarItemImage: Image[i],
CYLTabBarItemSelectedImage: SelectedImage[i]
]
let vc = UIStoryboard(name: StoryName[i], bundle: nil).instantiateInitialViewController()
tabBarItemsAttributes.append(dict)
viewControllers.append(vc!)
}
self.tabBarItemsAttributes = tabBarItemsAttributes
self.viewControllers = viewControllers
}
```
现在我们修改AppDelegate中的rootViewController为当前的MainTabBarController:
![[email protected]](http://upload-images.jianshu.io/upload_images/1190844-6ad274c3ae3ebbb5.png?imageMogr2/auto-orient/strip%7CimageView2/2/w/1240)
最后我们在模拟器上运行一下,选择6S\5S什么的随便了。
![[email protected]](http://upload-images.jianshu.io/upload_images/1190844-e5d77b26ace16241.png?imageMogr2/auto-orient/strip%7CimageView2/2/w/1240)
噢,这里出了异常,不要怀疑这段代码,是我们之前有一步忘记操作了。
**回到之前我们建立的4个SB文件,都把is initial view Controller勾上,再次运行。**
![[email protected]](http://upload-images.jianshu.io/upload_images/1190844-a9e40084886170b6.png?imageMogr2/auto-orient/strip%7CimageView2/2/w/1240)
这次我们看到,4个tab已经显示出来了,但因为没有设置导航,也没有放图片资源进去,所以图片和导航是看不到的。
![[email protected]](http://upload-images.jianshu.io/upload_images/1190844-9a30c4168f9be240.png?imageMogr2/auto-orient/strip%7CimageView2/2/w/1240)
现在我们设置一下导航:
![[email protected]](http://upload-images.jianshu.io/upload_images/1190844-eaca5cefe2543cc8.png?imageMogr2/auto-orient/strip%7CimageView2/2/w/1240)

记得把4个都设置一下。我们再放入资源文件
![[email protected]](http://upload-images.jianshu.io/upload_images/1190844-1e51185a34de779a.png?imageMogr2/auto-orient/strip%7CimageView2/2/w/1240)
再次运行,图片和导航都正常的显示出来了。
![[email protected]](http://upload-images.jianshu.io/upload_images/1190844-c8809aa38cd4dfaf.png?imageMogr2/auto-orient/strip%7CimageView2/2/w/1240)
我们把导航做得稍微漂亮一点,Info.plist中添加
UIStatusBarTintParameters

    UINavigationBar

        Style
        UIBarStyleDefault
        Translucent


UIViewControllerBasedStatusBarAppearance
didFinishLaunchingWithOptions中添加
    application.statusBarStyle = UIStatusBarStyle.LightContent
    UINavigationBar.appearance().barTintColor = UIColor.init(red: 33/255, green: 150/255, blue: 243/255, alpha: 1)
    UINavigationBar.appearance().tintColor = UIColor.whiteColor()
    UINavigationBar.appearance().titleTextAttributes = [NSForegroundColorAttributeName: UIColor.whiteColor()]
再次运行,一个完美的上档次的主流导航UI框架就出现了。
![[email protected]](http://upload-images.jianshu.io/upload_images/1190844-641a80cb1539f042.png?imageMogr2/auto-orient/strip%7CimageView2/2/w/1240)
最后我们来实现中间的按钮,在MainTabBarController中新建一个PlusButtonSubclass,
class PlusButtonSubclass : CYLPlusButton,CYLPlusButtonSubclassing{
class func plusButton() -> AnyObject! {
    let button:PlusButtonSubclass =  PlusButtonSubclass()

    //修改下按钮的大小
    button.frame.size.width = 50;
    button.frame.size.height = 50;

    button.setImage(UIImage(named: "icon_middle_add"), forState: UIControlState.Normal)
    button.titleLabel!.textAlignment = NSTextAlignment.Center;
    button.adjustsImageWhenHighlighted = false;
    button.addTarget(button, action: "buttonClicked:", forControlEvents: UIControlEvents.TouchUpInside)

    return  button
}

//点击事件
func buttonClicked(sender:CYLPlusButton)
{
    print("hello mm")
}

override func layoutSubviews() {
    super.layoutSubviews()
    // 控件大小,间距大小
    let imageViewEdge   = self.bounds.size.width * 0.6;
    let centerOfView    = self.bounds.size.width * 0.5;
    let labelLineHeight = self.titleLabel!.font.lineHeight;
    //        let verticalMarginT = self.bounds.size.height - labelLineHeight - imageViewEdge;
    //        let verticalMargin  = verticalMarginT / 2;

    // imageView 和 titleLabel 中心的 Y 值
    //        _  = verticalMargin + imageViewEdge * 0.5;
    let centerOfTitleLabel = imageViewEdge  + labelLineHeight + 2;

    //imageView position 位置
    self.imageView!.bounds = CGRectMake(0, 0, 36, 36);
    self.imageView!.center = CGPointMake(centerOfView, 0)//centerOfImageView * 2 );

    //title position 位置
    self.titleLabel!.bounds = CGRectMake(0, 0, self.bounds.size.width, labelLineHeight);
    self.titleLabel!.center = CGPointMake(centerOfView, centerOfTitleLabel);

}
}在didFinishLaunchingWithOptions中第一行加入PlusButtonSubclass.registerSubclass()```
有人遇到的这个buttonClicked 事件没响应,是因为你没有设置按钮的宽和高!自己打印下按钮的frame,就知道了!然后在func plusButton()这个方法里面设置宽和高就可以了!(如果在layoutSubviews中添加的话初始位置会不正确)
 //修改下按钮的大小
 button.frame.size.width = 100;
 button.frame.size.height = 100;
再次运行,中间的按钮已经出来了,同学们可以根据自己的需求在layoutSubviews中修改一下坐标,达到不同的效果。

OK本节到此结束。
Git地址: https://github.com/bxcx/sctong
本节分支: https://github.com/bxcx/sctong/tree/2nd_tabbed