上一篇文章:
Android自动化测试--Espresso使用
相比上一篇文章所讲的Espresso使用,本文所讲的自动化测试UI Automator最显著的特点就是,可以与多个app进行交互。
UI Automator 能够运行在 Android 4.3 (API 18) �及以上的版本。
使用
首先我们在Android Studio中新建一个项目,取名为UIAutomatorTests。同时删除自动生成的一些文件,最终目录结构如下:

接下来我们看看如何一步一步的使用Espresso,首先在�根目录的 build.gradle 文件中添加下面的引入。
ext {
    buildToolsVersion = "24.0.1"
    supportLibVersion = "24.2.0"
    uiautomatorVersion = "2.1.1"
    runnerVersion = "0.5"
    rulesVersion = "0.5"
}
在app目录中的build.gradle 文件中添加下面的引入,根据提示点击Sync Now。
dependencies {
    compile fileTree(dir: 'libs', include: ['*.jar'])
    // App dependencies
    compile 'com.android.support:appcompat-v7:' + rootProject.supportLibVersion;
    compile 'com.android.support:support-annotations:' + rootProject.supportLibVersion;
    androidTestCompile 'com.android.support:support-annotations:' + rootProject.supportLibVersion;
    androidTestCompile 'com.android.support.test:runner:' + rootProject.runnerVersion;
    // UiAutomator Testing
    androidTestCompile 'com.android.support.test.uiautomator:uiautomator-v18:' + rootProject.uiautomatorVersion;
    androidTestCompile 'org.hamcrest:hamcrest-integration:1.3'
}
接下来我们在AutomatorTest.class中编写测试代码,为了测试多个app,这里我们选择上篇文章中的EspressoTests和手机中的设置app。
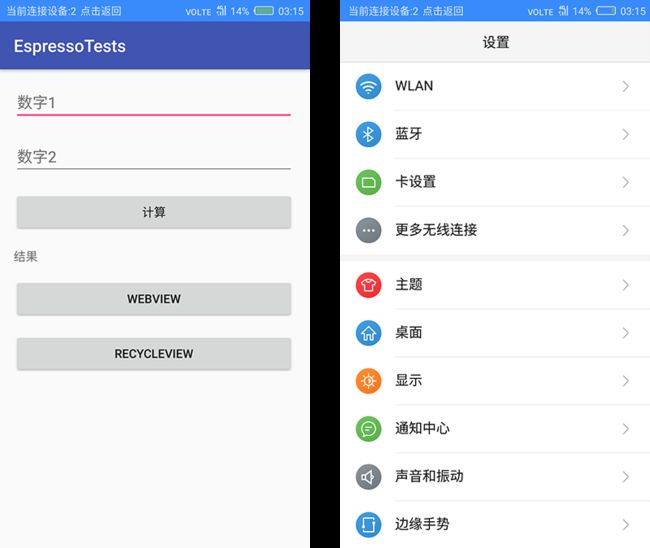
在EspressoTests中我们输入数据点击计算,然后通过设置app为手机更换一个一个铃声。详细的测试代码如下:
package me.shihao.uiautomatortests;

import android.content.Context;
import android.content.Intent;
import android.support.test.InstrumentationRegistry;
import android.support.test.filters.SdkSuppress;
import android.support.test.runner.AndroidJUnit4;
import android.support.test.uiautomator.By;
import android.support.test.uiautomator.UiDevice;
import android.support.test.uiautomator.UiObject;
import android.support.test.uiautomator.UiScrollable;
import android.support.test.uiautomator.UiSelector;
import android.support.test.uiautomator.Until;
import android.support.v7.widget.RecyclerView;
import android.widget.Button;
import android.widget.EditText;
import android.widget.ImageButton;
import android.widget.ListView;
import android.widget.ScrollView;
import android.widget.TextView;
import org.junit.Test;
import org.junit.runner.RunWith;
import static org.hamcrest.Matchers.notNullValue;
import static org.junit.Assert.*;

@RunWith(AndroidJUnit4.class)
@SdkSuppress(minSdkVersion = 18)
public class AutomatorTest {

    private static final String PACKAGE_ESPRESSOTESTS = "me.shihao.espressotests";
    private static final String PACKAGE_SETTING = "com.android.settings";

    @Test
    public void testEspressoTestsApp() throws Exception {
        //初始化一个UiDevice对象
        UiDevice mDevice = UiDevice.getInstance(InstrumentationRegistry.getInstrumentation());
        // 点击home键,回到home界面
        mDevice.pressHome();
        String launcherPackage = mDevice.getLauncherPackageName();
        assertThat(launcherPackage, notNullValue());
        mDevice.wait(Until.hasObject(By.pkg(launcherPackage).depth(0)), 3);

        // 启动espressotests App
        Context context = InstrumentationRegistry.getContext();
        Intent intent = context.getPackageManager().getLaunchIntentForPackage(PACKAGE_ESPRESSOTESTS);
        // 清除以前的实例
        intent.addFlags(Intent.FLAG_ACTIVITY_CLEAR_TASK);
        context.startActivity(intent);

        // 等待应用程序启动
        mDevice.wait(Until.hasObject(By.pkg(PACKAGE_ESPRESSOTESTS).depth(0)), 3);
        //通过id找到输入框一
        UiObject edt1 = mDevice.findObject(new UiSelector().resourceId("me.shihao.espressotests:id/editText")
            .className(EditText.class));
        //往里面输入字符2
        edt1.setText("2");
        //通过id找到输入框二
        UiObject edt2 = mDevice.findObject(new UiSelector().resourceId("me.shihao.espressotests:id/editText2")
            .className(EditText.class));
        //往里面输入5
        edt2.setText("5");
        //通过文本"计算"找到按钮
        UiObject btn = mDevice.findObject(new UiSelector().text("计算").className(Button.class));
        //执行点击事件,计算结果
        btn.click();
        //通过id找到显示结果的textview
        UiObject tvResult = mDevice.findObject(new UiSelector().resourceId("me.shihao.espressotests:id/textView")
            .className(TextView.class));
        //判断结果与预期是否匹配
        assertEquals(tvResult.getText(), "计算结果:7");
        //通过文本"RecycleView"找到按钮
        UiObject btnRecycleView = mDevice.findObject(new UiSelector().text("RecycleView").className(Button.class));
        //执行点击事件跳转到另一个界面
        btnRecycleView.click();
        //通过id找到recycleview
        UiScrollable recycleview = new UiScrollable(new UiSelector()
            .className(RecyclerView.class)
            .resourceId("me.shihao.espressotests:id/recycleview"));
        //滑动到底部
        recycleview.flingForward();
        //滑动到顶部
        recycleview.flingBackward();
        UiObject item5 = recycleview.getChild(new UiSelector().text("Item 5"));
        //点击Item 5,然后会弹出一个对话框
        item5.click();
        //通过文本"确定"找到对话框中的确定按钮
        UiObject btnConfirm = mDevice.findObject(new UiSelector().text("确定").className(Button.class));
        //点击确定关闭对话框
        btnConfirm.click();
        //另外一种方式找到Item 2
        UiObject item = mDevice.findObject(new UiSelector()
            .className(RecyclerView.class)
            .resourceId("me.shihao.espressotests:id/recycleview")
            .childSelector(new UiSelector().text("Item 2")));
        //点击弹出对话框
        item.click();
        //点击返回关闭对话框
        mDevice.pressBack();
    }


    @Test
    public void testSettingApp() throws Exception {
        //初始化一个UiDevice对象
        Context context = InstrumentationRegistry.getContext();
        UiDevice mDevice = UiDevice.getInstance(InstrumentationRegistry.getInstrumentation());
        //回到home界面
        mDevice.pressHome();
        // 启动设置
        Intent intent = context.getPackageManager().getLaunchIntentForPackage(PACKAGE_SETTING);
        // 清除以前的实例
        intent.addFlags(Intent.FLAG_ACTIVITY_CLEAR_TASK);
        context.startActivity(intent);
        //通过id找到scrollview
        UiScrollable scrollview = new UiScrollable(new UiSelector().className(ScrollView.class).resourceId("com" +
            ".android.settings:id/dashboard"));
        //滑动到底部
        scrollview.flingForward();
        //通过文本找到关于手机
        UiObject aboutPhone = scrollview.getChild(new UiSelector().text("关于手机"));
        //点击跳转到手机信息界面
        aboutPhone.click();
        //通过description找到向上返回的ImageButton
        UiObject ibtnBack = mDevice.findObject(new UiSelector().className(ImageButton.class).description("向上导航"));
        //点击返回
        ibtnBack.click();
        //滑动到包含"提示音和通知"的地方
        scrollview.scrollTextIntoView("提示音和通知");
        //通过显示的文本找到控件
        UiObject notify = scrollview.getChild(new UiSelector().text("提示音和通知"));
        //点击跳转到下一个界面
        notify.click();
        //通过显示的文本"手机铃声"找到控件
        UiObject sound = mDevice.findObject(new UiSelector().text("手机铃声"));
        //点击跳转到铃声对话框
        sound.click();
        //通过id找到铃声列表
        UiScrollable listview = new UiScrollable(new UiSelector().className(ListView.class).resourceId
            ("android:id/select_dialog_listview"));
        //活动到包含"Beat Plucker"处
       listview.scrollTextIntoView("Beat Plucker");
        //通过显示的文本找到该项
        UiObject beat = listview.getChild(new UiSelector().text("Beat Plucker"));
        //执行点击选中铃声
        beat.click();
        //通过文本"确定"找到对话框中的确定按钮
        UiObject btnConfirm = mDevice.findObject(new UiSelector().text("确定").className(Button.class));
        //点击确定关闭对话框
        btnConfirm.click();
        //通过id找到显示结果的TextView
        UiObject tvSound = mDevice.findObject(new UiSelector().resourceId("android:id/summary").className(TextView
            .class));
        //比较与预期结果是否一致
        assertEquals(tvSound.getText(), "Beat Plucker");
        //点击home键
        mDevice.pressHome();
        //点击最近应用键
        mDevice.pressRecentApps();
        //通过类名找到显示最近app的控件TaskStackView
        UiScrollable taskStackView = new UiScrollable(new UiSelector().className("com.android.systemui.recents.views" +
            ".TaskStackView"));
        //滑动到包含"EspressoTests"处
        taskStackView.scrollTextIntoView("EspressoTests");
        //通过显示的文本找到item
        UiObject espressoTestsApp = taskStackView.getChild(new UiSelector().text("EspressoTests"));
        //点击切换到前面的espressoTestsApp
        espressoTestsApp.click();
    }
}
运行效果如下:
UI Automator Viewer使用
从上面的测试代码可以看到,我们需要首先知道目标控件的一些属性值,然后再围绕我们的目标属性构建一个匹配规则。�而实际中我们并不知道app的实现,控件的属性并不是那么明显,或者并没有那么容易获取到,这时,我们可以使用Android提供的uiautomatorviewer工具帮助我们进行分析。
接下来我们就讲一下如何使用,Android Studio中点击Tools >> Android >> Android Device Monitor

下面显示的就是界面,最左边会显示连接的设备

点击会截图分析设备当前显示界面布局

然后右边会显示布局结构以及view详细的信息。

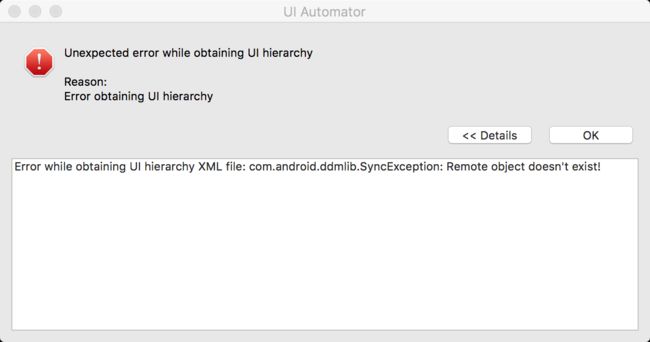
在实际使用中,我用了几个真机测试都会报这个错误
Error obtaining UI hierarchy Error while obtaining UI hierarchy XML file: com.android.ddmlib.SyncException: Remote object doesn't exist!,也一直没找到原因,到后面使用Genymotion并不会出现这个问题,有知道的小伙伴,可以告诉我,一定非常感谢。
接下来我们就看一看如何使用压力测试,欢迎查看下一篇文章: